- OpenVPN Configuration Guide for Linux Mint
- Настройка OpenVPN клиента в Linux Mint с помощью Network Manager.
- Network Manager ручная настройка
- Network Manager импорт из файла
- How can we help you?
- Mint OpenVPN Setup (Network Manager) Follow
- How to Set Up OpenVPN on Linux Mint via Network Manager
- Step 3
- Turn off IPv6
- Create a new VPN profile
- Step 3 alternatively (manual configuration)
OpenVPN Configuration Guide for Linux Mint


Linux Mint is arguably the most convenient and elegant GNU/Linux desktop distribution. It’s very easy to use, but the best part is that the software is regularly updated.
Things to Consider:
Before you begin, please make sure that:
- A working internet connection
- Linux Mint Supported Device.
- Own a premium PureVPN account (If you do not already own one, you can buy a subscription from here.
Just follow the below mentioned steps to configure OpenVPN on Linux Mint:
1 Open Terminal. Insert command:
sudo apt-get install network-manager-openvpn
and hit enter. Provide your Mint password and hit enter again.

2 Type “Y” and enter to continue

3 Insert command:
sudo apt-get install network-manager-openvpn-gnome

4 Insert command:
sudo restart network-manager

5 Download and extract OpenVPN files from here

6 Click on “Network Connection” and select “Network Settings”

7 Click on “+“

8 Click “Create”

9 Select “OpenVPN” and click “Create”

10 Insert the following info:
- Insert Connection name: PureVPN OpenVPN
- Insert desired Gateway:Open .ovpn file from OpenVPN folder to get the server address
- Select Type: Password from drop down menu
- Insert Username provided by PureVPN
- Insert Password provided by PureVPN
- Click on folder icon from CA Certificate

11 Go to OpenVPN downloaded folder, select ca.crt and click “Open”

12 Click “Advanced.”

13 From General tab select following options:
- Check Use custom gateway port: For UDP insert 53 and For TCP insert 80
- Check Use LZO data compression
Note: For TCP connectoin select “Use a TCP connection“

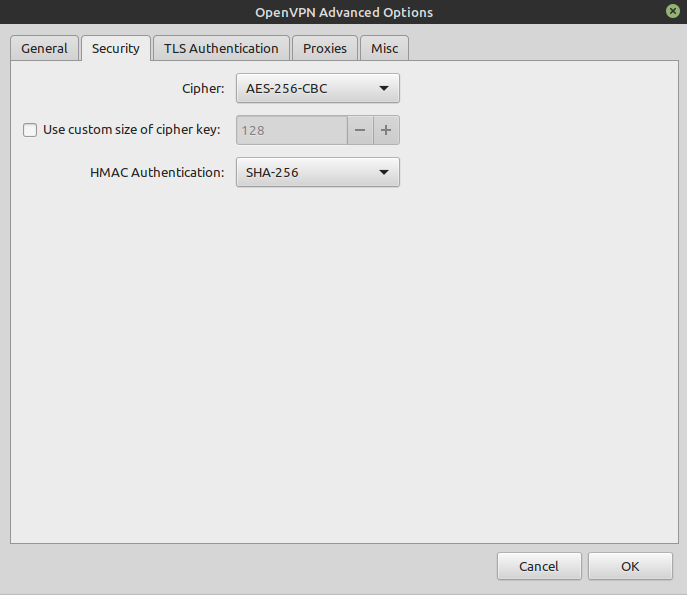
14 From Security tab select following options:
- From Cipher: Select AES-256-CBC or desired encryption
- From HMAC Authentication: Select SHA-1

15 Form TLS Authentication tab:
- Select Use additional TLS authentication
- Click on folder icon next to Key File

16 Go to OpenVPN downloaded folder, select Wdc.key and click “Open”

17 Select “1” from Key Direction and Click “OK”

18 Click “Save…”
19 Click on “PureVPN OpenVPN” Connection and Click on switch to “Turn ON” VPN

20 You are connected now. Enjoy the FREEDOM!

To Disconnect VPN:
- Click “Network Connection Icon…” and click the switch to “Turn OFF” VPN.
Caution: To prevent IPv6 leaks, you’re better off disabling your IPv6. Here’s how to go about Disabling IPv6 on Linux Mint.
Please use the comment box for your suggestions & feedback. For additional help, please submit support ticket with errors and screen shots (if possible) OR Contact our 24/7 live chat.
Источник
Настройка OpenVPN клиента в Linux Mint с помощью Network Manager.
Продолжаем знакомство с OpenVPN. В данной статье я расскажу как настроить подключение к OpenVPN на примере операционной системы Linux Mint 18.2 «Sonya».
В предыдущей статье, описывающей установку OpenVPN сервера, мы сгенерировали ключи и сертификаты для клиента.
- ca.crt — корневой CA-сертификат
- ta.key — HMAC ключ
- client.crt — сертификат клиента
- client.key — ключ клиента
Создайте каталог client-keys в /etc/openvpn и скопируйте в него указанные файлы.
Заодно создадим каталог для логов.
В Linux Mint 18.2 «Sonya» по умолчанию уже установлен openvpn версии 2.3.10, который выше не обновляется, по крайней мере из системных репозиториев. Поэтому я использую конфигурацию с обычным LZO-сжатием и алгоритмом шифрования AES-256-CBC.
Network Manager ручная настройка
Кликните по сетевому соединению, рядом с часами, выберите «Параметры сети».

В окне «Сеть» нажмите плюсик под списком соединений, выберите VPN подключение.

Выберите тип VPN подключения — OpenVPN (Совместим с сервером OpenVPN).

В окне «Add Network Connection» на вкладке «Идентификация» задаем имя соединения, шлюз (ХХ.ХХ.ХХ.ХХ — ip-адрес сервера) и порт через двоеточие. Выбираем тип аутентификации — Сертификаты (TLS), указываем расположение файлов ключей и сертификатов клиента.

Нажимаем кнопку «Дополнительно». На вкладке «Общие» отмечаем галочками опции эквивалентные клиентской конфигурации.
- comp-lzo — Использовать для данных сжатие LZO
- dev tun — Set virtual device type: TUN
- mssfix0 — Ограничить максимальный размер сегмента TCP(MSS) туннеля (не работает, можно не отмечать, MTU всегда будет равен 1345), привожу просто для справки. Поскольку Network Manager-ом не пользуюсь, то не стал разбираться что к чему.

Выбираем алгоритм шифрования и HMAC аутентификацию на вкладке «Безопасность».
- cipher AES — 256 —CBC — AES — 256 — CBC
- authSHA512 — SHA-512

На вкладке «Аутентификация TLS» отмечаем «Использовать дополнительную аутентификацию TLS» и указываем на файл ta.key. Так как это клиент, то в направлении ключа выбираем единицу.
Также отмечаем галочкой «Verify peer (server) certificate usage signature» в значении «Remote peer certificate TLS type» выбираем Server, это будет соответствовать опции — remote — cert — tls server .

На этом настройка завершена, нажимаем ОК, потом нажимаем Add. Новое соединение должно появиться в списке доступных соединений.
 Network Manager импорт из файла
 Network Manager импорт из файла
Все что было описано выше, можно сделать проще. Создайте файл client.ovpn в каталоге /etc/openvpn и добавьте в него нужные настройки (конфиг клиента).
Содержимое файла client.ovpn.
Кликните по сетевому соединению, рядом с часами, выберите «Параметры сети».
В окне «Сеть» нажмите плюсик под списком соединений, выберите VPN подключение.
Тип VPN подключения выбираем — Import from file.
Выберите созданный файл client.ovpn и нажмите Open.

Настройки будут импортированы и автоматически применены. Новое соединение будет носить имя файла из которого происходил импорт.
Кликните по сетевому соединению и активируйте подключение.

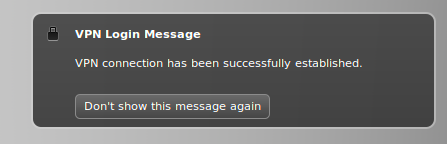
После активации появится сообщение что соединение установлено, можно начинать работу.
Источник
How can we help you?
Mint OpenVPN Setup (Network Manager) Follow
The WeVPN service can be used to ensure privacy and security whilst using a Linux machine.
Please Note: Some configurations may vary depending on the Linux distribution you are using.
To install and use the WeVPN service on Linux desktop using Terminal:
1. Open the Terminal window (Ctrl + Alt + T).
2. Install the OpenVPN package by entering the command:
sudo apt-get install network-manager-openvpn-gnome

If you are requested to enter your password, please enter your computer’s admin password.
3. Assign use of the Network Manager by entering the command:
sudo nano /etc/NetworkManager/NetworkManager.conf
4. Change the option [ifupdown] managed=false to [ifupdown] managed=true:

5. Restart the Network Manager by entering the command:
sudo service network-manager restart

6. Download and extract the WeVPN OpenVPN configuration files from:
7. Open the Network Manager and select the + to add a new connection. Select Import from file.

8. Enter your login credentials. These can be found in the Members Area and selecting the Show Credentials button on the Config Generator

9.Select Apply.
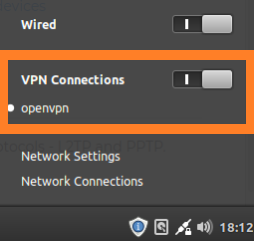
10. Enable the connection by selecting the toggle switch.
Источник
How to Set Up OpenVPN on Linux Mint via Network Manager
Please make sure the following requirements are met:
- Linux Mint 19.3 (instructions might also work for older/newer versions, but can differ in details )
- Updated software packages
- Installed OpenVPN software
- Installed network manager
- A CyberGhost account
Here’s how to create a CyberGhost account online
Here’s how to manage your CyberGhost account- A CyberGhost subscription
How to purchase or upgrade a subscription
Only prepaid subscribers: How to enter an activation key
 Disclaimer: Please keep in mind that, although the technical process is as thoroughly documented as possible, you need to have at least some technical understanding. There’s always a chance for an overseen mistake and/or things have changed and the article is not updated yet.
Step 1
Visit your CyberGhost VPN online account and login with your Premium Username and Password

Click on ‘ My Devices ‘ and in the ‘Add a new device‘ section > click ‘Others‘.
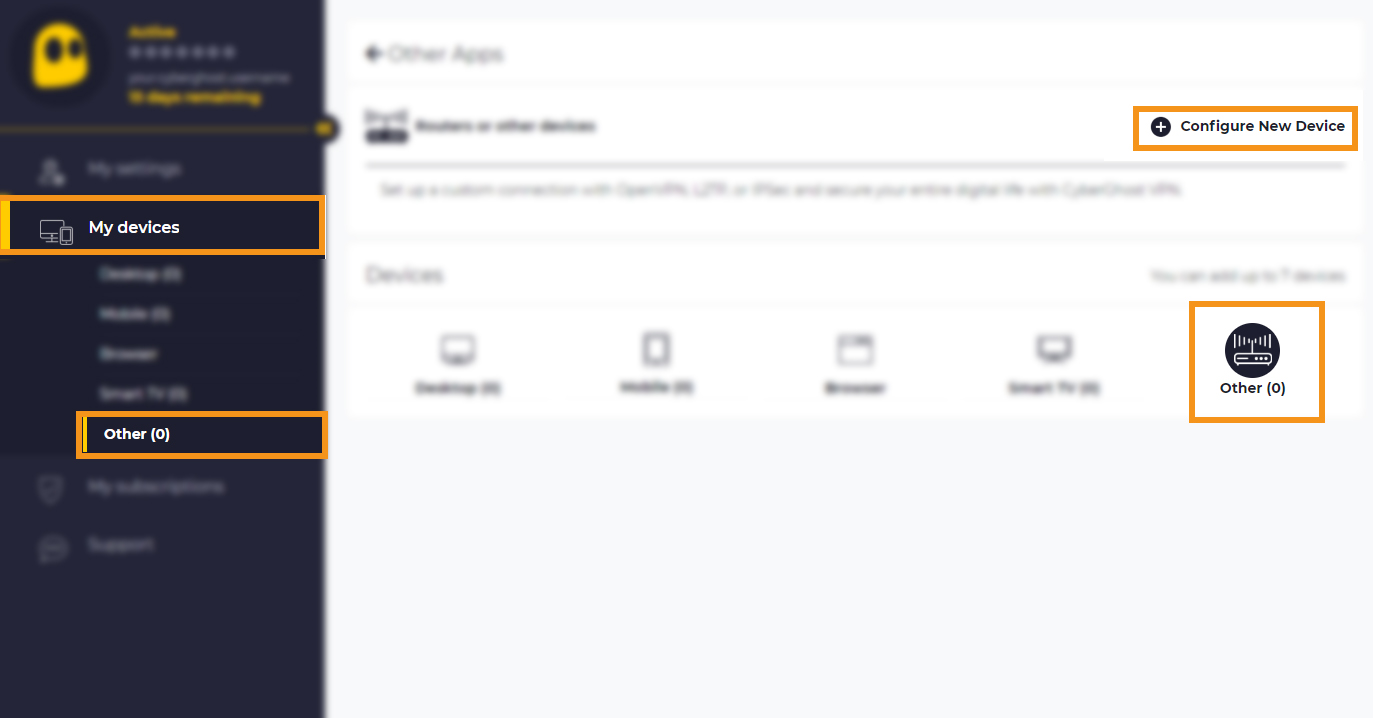
Click Configure new device and in the new window, choose your desired protocol, in our example: OpenVPN and your preferred country and server group , as described below:
- Protocol:OpenVPN
- Server group: Choose the server group and the OpenVPN protocol (UDP or TCP) you want to use
- Country: Since native protocol connections may only be used with exactly one server you now have to choose the country you want to surf from; the server to be used in this country will be chosen by CyberGhost automatically.
UDP allows higher speed than the TCP version but can result in broken downloads in some cases. This is the default setting.
TCP allows more stable connections than the UDP version but is a bit slower. Choose this version, if you have recurrent connection issues such as sudden disconnections.
Once the desired parameters are chosen, save them with Save Configuration

To view the OpenVPN credentials that are generated for you on the configuration dashboard, press ‘View Configuration’.

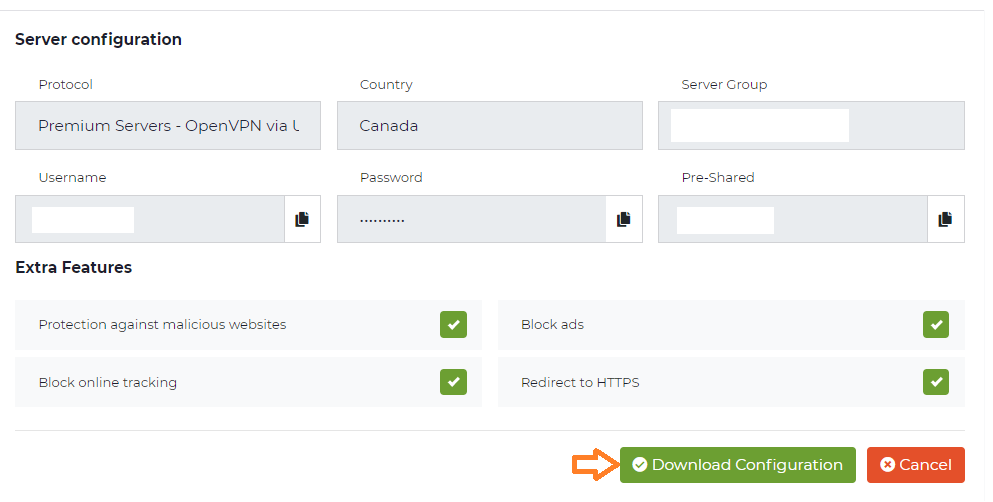
Once the new page is opened, your connection credentials are generated for you but make note of the following information:
- Server group: This is the address of the country (server) you want to be connected with, e.g. ‘12345-1-ca.cg-dialup.net’. Note This address changes with every country you have chosen in the step before. The actual single server to be used will be chosen automatically by CyberGhost.
- User name: A solely for this protocol generated user name. This is NOT your regular CyberGhost account user name, it’s used only to authenticate with our servers via Manual Configurations.
- Password (you need to check the «Show Password» option in order to see it): A solely for protocol usage generated password. This is NOT your regular CyberGhost account password, it’s used only to authenticate with our servers via Manual Configurations.
- Pre-Shared Key
Please download the configuration file. For that please click on ‘ Download Configuration ‘ and download the config file to your computer (it’s recommended that you create a special folder for the config, somewhere accessible like your Desktop and Extract/Copy the contents of the .zip file there).
Important: please keep your username and password obtained during the configuration process at hand, you will be asked to enter them later in the setup.
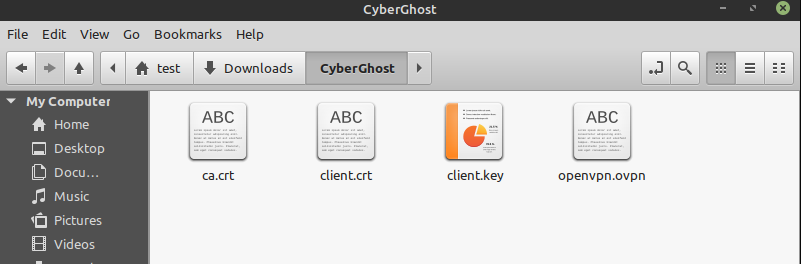
Now, the saved config is a ZIP file, which contains the following single files:
- ca.crt: This is the certificate of the certification authority
- client.crt: This is the user certification file
- client.key: This is your private key file
- openvpn.ovpn: This is your OpenVPN configuration file
If you need to change the country you connect to, you must re-configure the location to use in your account management and download the new zipped config file.
Step 2
For this tutorial, we’ll be using Linux Mint 19.03 (Tricia)
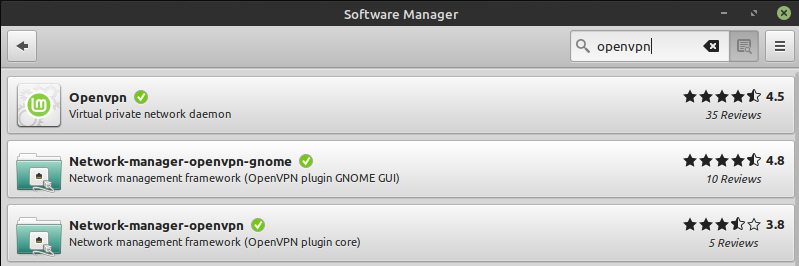
Install OpenVPN (if applicable) and the network manager on Linux Mint.
For that click on Menu > All Applications > Software Manager ‘ and type in the search field (in the upper right corner) ‘OpenVPN’. Install the following programs with a double click:
Alternatively or to make sure that already installed components are up to date, open a terminal and enter the following commands:
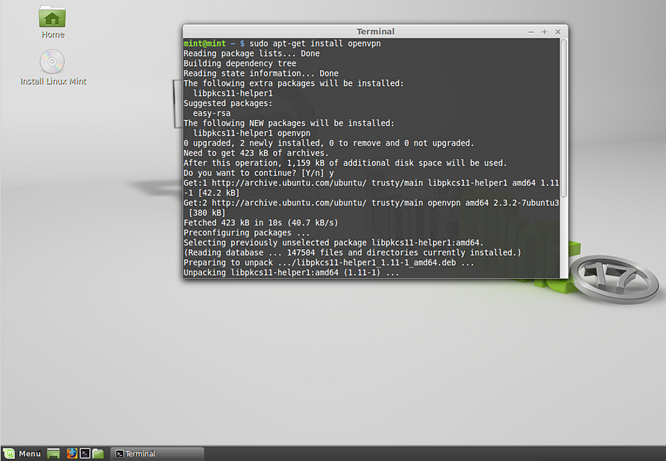
Note: Depending on your distribution it might happen that the network manager lacks the option to go for an OpenVPN connection. If that’s the case please open a terminal and enter the following commands:
Log out and in again or restart your computer or open a terminal and type in the following command :
Step 3
Open your personal folder in your file manager and create a new folder called ‘ CyberGhost ‘. Extract the content of the downloaded configuration ZIP file and copy all single files into the new folder.
If you want to surf from different countries, rename the unzipped OpenVPN configuration file from ‘openvpn.ovpn’ to e.g. ‘CG_RO_NoSpy.ovpn’ (or respective location/server group combination you have chosen while setting up the configuration file in your account management). Choose then a different location and a different server group (if available) and download the next zipped configuration file. Unzip it, rename the containing ‘OpenVPN.ovpn’ as well und copy it also inside the new folder. The also downloaded remaining certificate and key files in the ZIP do not need to be copied again, for you already have them from the first download.
For two different countries, you need for example do the following steps:
- Specify device, protocol and operating system
- Choose a country, e.g. USA
- Download the zipped configuration file with certificates, key and OpenVPN configuration file
- Unzip the downloaded file and copy all files into the new ‘CyberGhost’ folder
- Rename the OpenVPN configuration file from ‘openvpn.ovpn’ to ‘CG_USA.ovpn’. (If you need to address a single server instead of a country in general, you are to edit the OVPN file and exchange the pre-configured server address line.
- Choose the next country, e.g. Romania
- Download the next zipped configuration file
- Unzip the downloaded file and copy just the file ‘openvpn.ovpn’ into the ‘CyberGhost’ folder
- Rename it to ‘CG_RO.ovpn’.
- etc. .
The sub-folder ‘config’ now consists of the following files (regarding the example above):
- ca.crt
- client.crt
- client.key
- CG_USA.ovpn
- CG_RO.ovpn
- xxx.ovpn
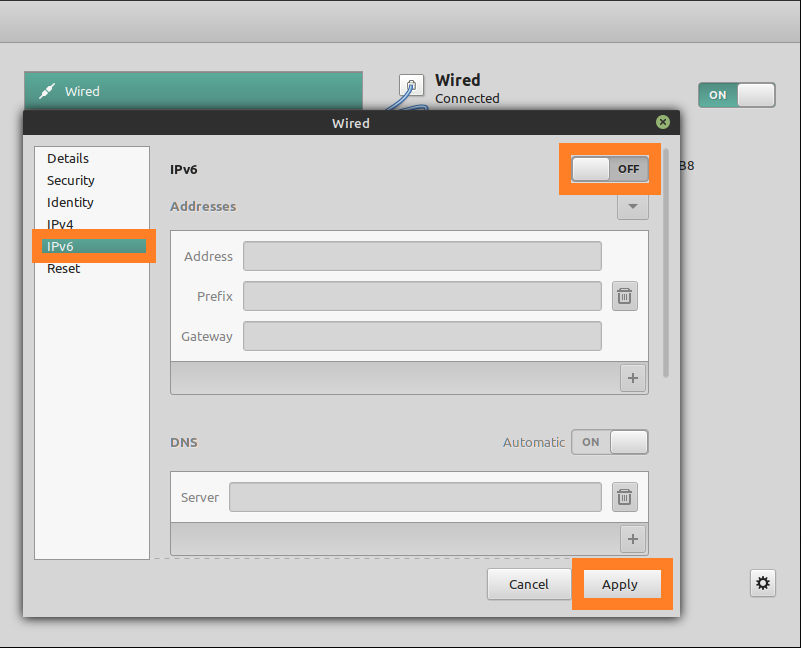
Turn off IPv6
Before enabling the VPN profile on your Linux Mint, CyberGhost VPN strongly recommends you to disable IPv6 to prevent IPv6 traffic from leaking out of the VPN tunnel :
To turn off IPv6, go to Network Settings > Wired / Wireless Interface Settings > IPv6 > Switch to OFF > Click Apply
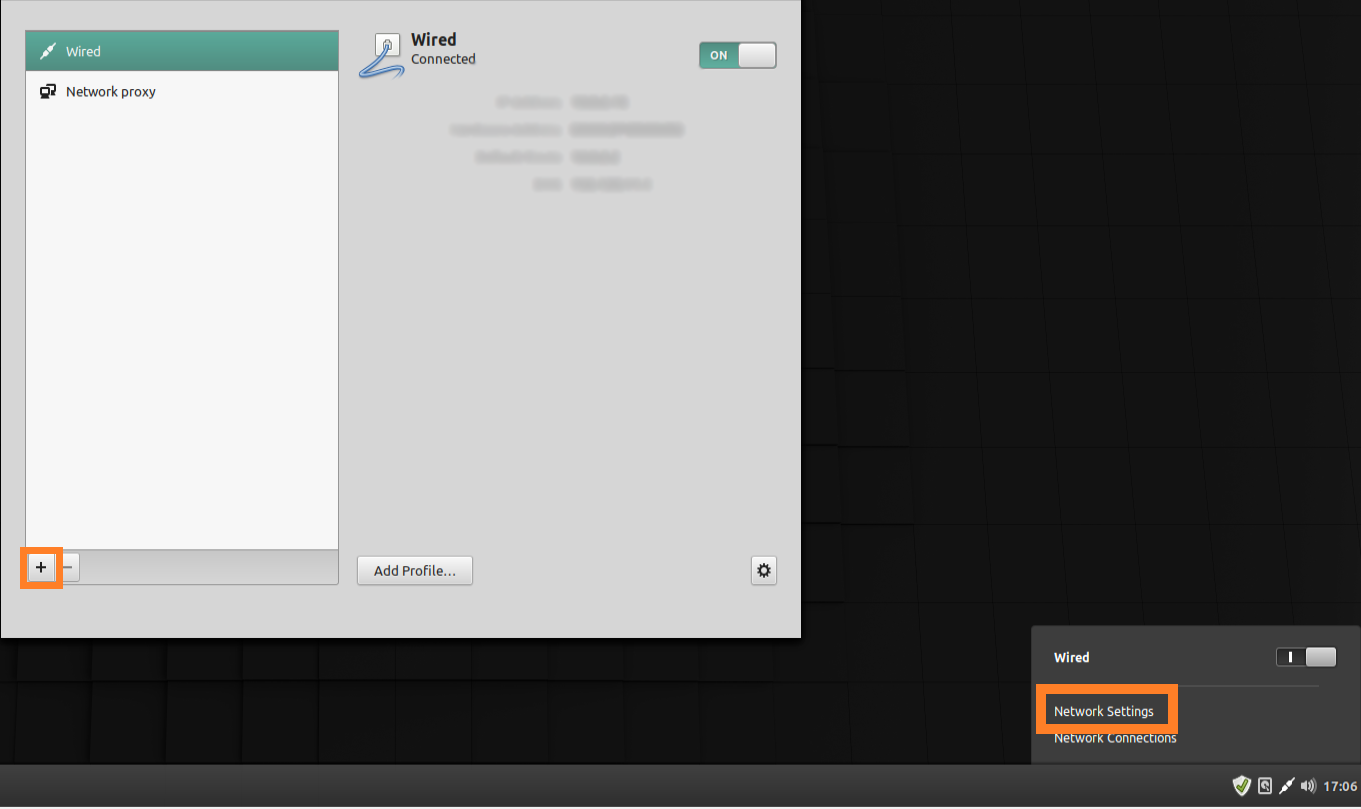
Create a new VPN profile
To add a new VPN profile, click in the lower right corner on the network icon and start the network manager via ‘ Network Settings ‘. Click on ‘ + ‘ symbol (Add VPN).
Choose ‘ Import from a file. ‘
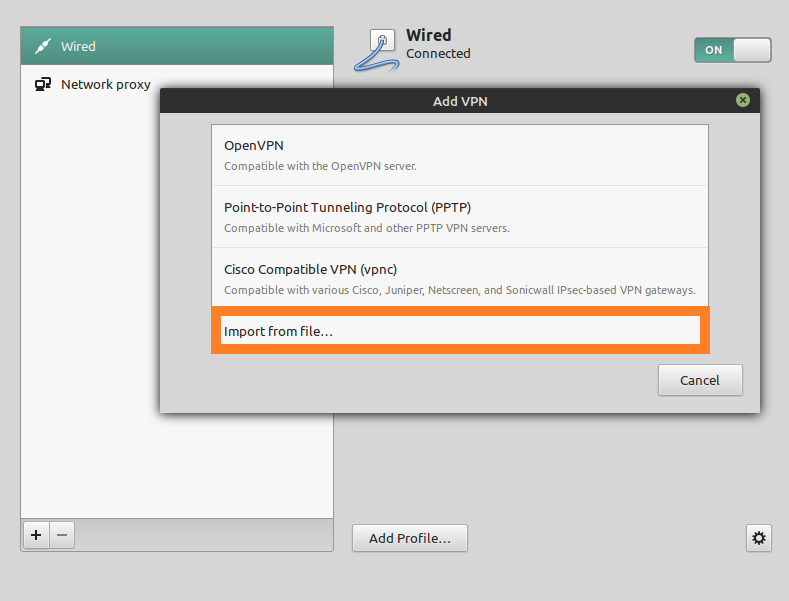
Open your ‘CyberGhost‘ folder, and choose to import the .ovpn configuration file (see step 3)
and click on ‘ Open ‘.
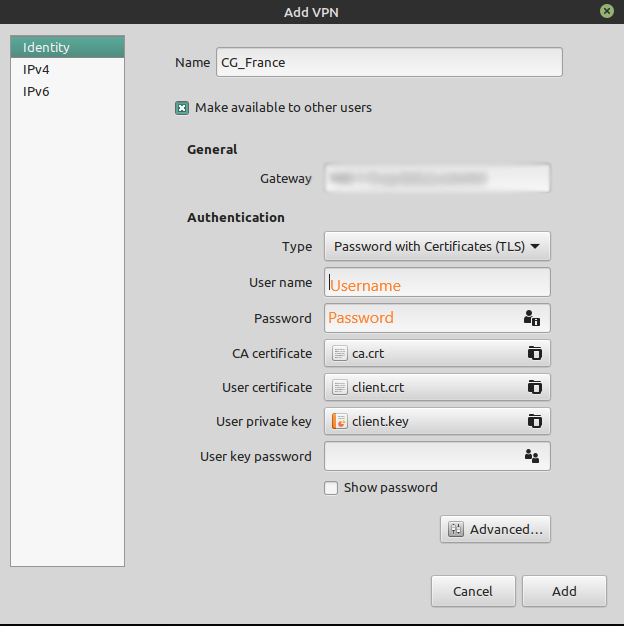
Focus on the tab ‘ Add VPN ‘ and take care of the following options:
- Connection name: Type in a name for this connection, ideally composed out of the country to surf from and maybe the server group to be used, e. g. ‘CG_France’
- Gateway: The server address is already filled in by the loaded configuration file
- Type: Choose ‘Password with certificates (TLS)’ — already filled in by the loaded configuration file
- User name: The user name created in step 1. DO NOT use your CyberGhost username!
- Password: The password created in step 1. DO NOT use your CyberGhost password!
- User certificate: Enter here the path to the user certification file (‘client.crt’) — usually already filled in by the loaded configuration file
- CA certificate: Enter here the path to the CA certification file (‘ca.crt’) — usually already filled in by the loaded configuration file
- Private Key: Enter here the path to the key file (‘client.key’) — usually already filled in by the loaded configuration file
Click on ‘ Add ‘ and enter the password of your keyring (only necessary, if it hasn’t been unlocked when logging in).
The VPN profile is now available in the network-manager. Click to activate it and if you receive the message «The VPN connection has been successfully established«, your VPN tunnel is up.
Step 3 alternatively (manual configuration)
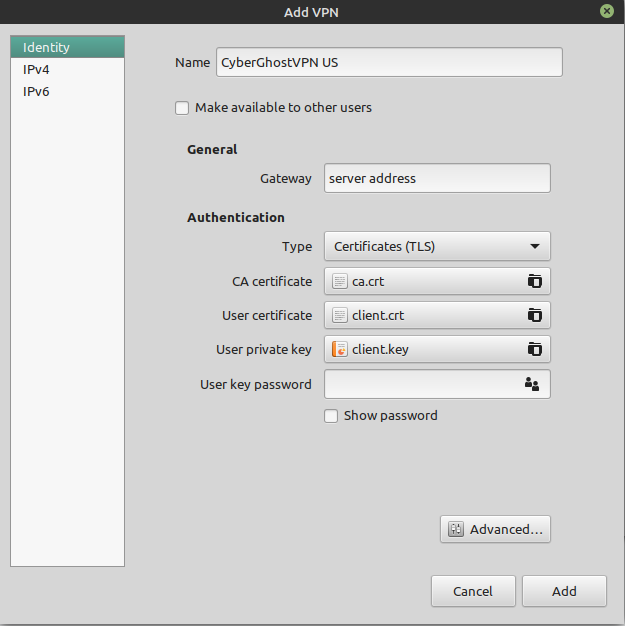
Click on ‘ + ‘ symbol (Add VPN), but this time don’t import a configuration file. Instead, click on ‘ OpenVPN ‘
- Connection name: Type in a name for this connection, ideally composed out of the country to surf from and maybe the server group to be used, e. g. ‘CyberGhost VPN US’
- Gateway: The server address you noted from your account management, e. g. ‘12345-5-us.cg-dialup.net’
- Type: Choose ‘Password with certificates (TLS)’
- User name: The user name created in step 1. DO NOT use your regular CyberGhost user name!
- Password: The password created in step 1. DO NOT use your regular CyberGhost password!
- User certificate: Enter here the path to the user certification file (‘client.crt’). For that click on the symbol right-handed and search for the respective file in your CyberGhost folder.
- CA certificate: Enter here the path to the CA certification file (‘ca.crt’). For that click on the symbol right-handed and search for the respective file in your CyberGhost folder.
- Private Key: Enter here the path to the key file (‘client.key’). For that click on the symbol right-handed and search for the respective file in your CyberGhost folder.
Now click on ‘ Advanced ‘ on the right bottom of the window and check all of these options (and deactivate the rest), then click OK
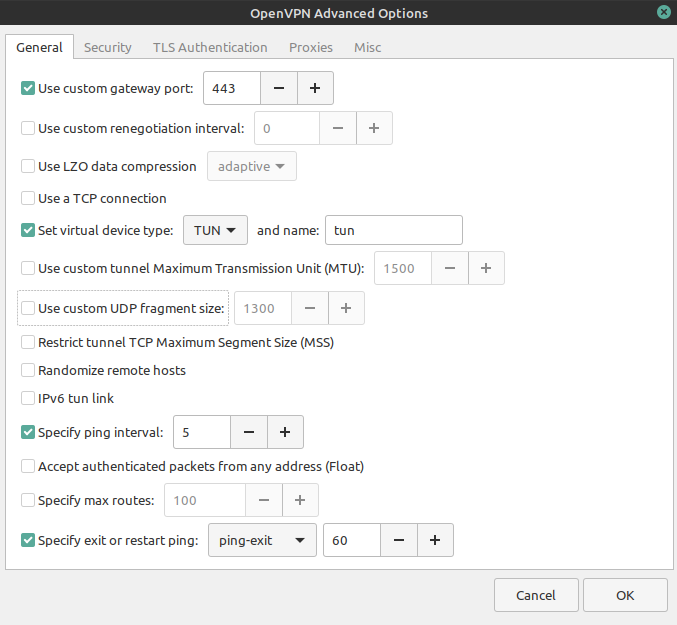
- Tab ‘General’:
- Use custom gateway port: 443
- Use a TCP connection: Only activated, if you have chosen an OpenVPN TCP connection while configuring your native VPN in your account management.
- Set ‘Set virtual device type : ‘TUN’ and name ‘tun’
- Specify ping interval : 5
- Specify exit or restart ping : ‘ping-exit’ > 60
- Tab ‘Security’
- Cipher: AES-256-CBC (also for TCP)
- HMAC Authentification: SHA256
Click on ‘ OK ‘ and ‘ Save ‘ and enter the password of your keyring (only necessary, if it hasn’t been unlocked when logging in).
Step 4
Back in the network manager you now should have an entry with your new OpenVPN connection.
Choose the entry via your menu, wait a moment . and you’re in:
Note: As we all know there are seldom two Linux distribution built the same way; therefore the Linux Mint 19.3 instructions might be of no help for you. If that’s the case, please consult the help documentation of your distribution. Furthermore, the following links might also help you out:
Источник


