- compizomania
- Страницы
- 24 октября 2019
- Как создать live-usb persistent в Ubuntu и производные
- Create A Persistent Storage Live USB With Ubuntu, Linux Mint Or Debian (UEFI, >4GB Persistence Support)
- How to install and use mkusb to create a persistent storage live USB with Ubuntu, Linux Mint or Debian
- Linux Mint Forums
- [Tutorial] Live usb with persistence over 4GB
- [Tutorial] Live usb with persistence over 4GB
- Re: [Tutorial] Live usb with persistence over 4GB
- Re: [Tutorial] Live usb with persistence over 4GB
compizomania
Азбука в Linux для начинающих и не только. Я знаю только то, что ничего не знаю, но другие не знают и этого. Сократ
Страницы
24 октября 2019
Как создать live-usb persistent в Ubuntu и производные

Давайте сразу разберёмся что такое live-usb и live-usb persistent.
1. Live USB — подключаемый к порту USB носитель данных, содержащий операционную систему с возможностью загрузки. Обычно в качестве Live USB используется флеш-накопители.
Применяется в основном для:
— оценки новых версий операционных систем пользователем без установки их на жёсткий диск компьютера;
— восстановления данных и/или работоспособности операционной системы компьютера;
— установки операционной системы на жёсткий диск;
— возможность настройки системы и установки новых программ;
— сброса пароля администратора и других действий.
Примечание. Все изменения сделанные пользователем в live-режиме не сохраняются.
2. live-usb persistent — это загрузочный носитель с возможностью сохранять изменённое состояние. Само слово persistent в переводе с английского означает сохраняемость данных.
live-usb persistent имеет все характеристики обычного live-usb, плюс возможность сохранять изменённое состояние системы после изменения настроек и установки доп.программ.
Т.е. загрузиться а live-режиме с флешки live-usb persistent, сделать какие-то изменения в системе и после перезагрузки с этой же флешки вы получите работоспособную live-систему с предыдущими настройками. Все пользовательские файлы хранятся в образе раздела casper-rw.
После настроек в live-usb persistent вы можете использовать флешку на других компьютерах, как обычную систему.
Примечание. Чего нельзя в live-usb persistent, например, загрузиться с новым ядром или установку видеодрайвера!
Установка инструмента mkusb для создания образа live-usb persistent.
Откройте терминал (Ctrl+Alt+T), скопируйте и выполните следующие команды:
sudo add-apt-repository ppa:mkusb/ppa
sudo apt update
sudo apt install —install-recommends mkusb mkusb-nox usb-pack-efi
Создание live-usb persistent с дистрибутивом Ubuntu/Debian
Примечание. Прежде чем начинать создание образа live-usb persistent, у вас уже должен быть загружен из сети iso-образ с дистрибутивом.
1. Запустите из системного меню программу mkusb.

2. Откроется окно с вопросом: «Хотите ли вы запустить версию DUS?», где нужно нажать на кнопке Yes (Да), либо Enter для продолжения.

Вам будет предложено ввести пароль администратора. Введите его и нажмите Enter.
3. Создание загрузочного устройства.
Примечание. Перед созданием загрузочного устройства, у вас должна быть вставлена в компьютер флешка объёмом не менее 4 ГБ.
В следующем окне выберите опцию — Install (make a boot device) и Ок.

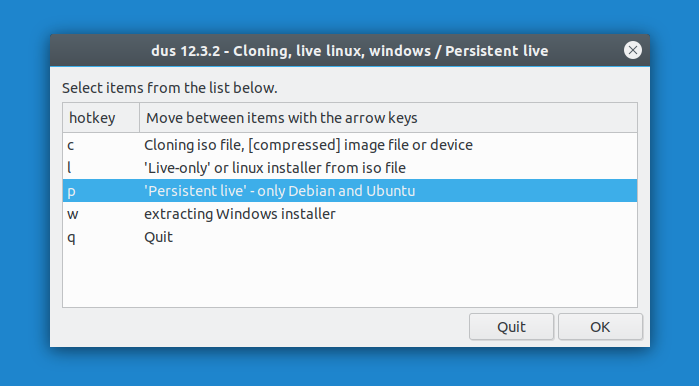
В следующем окне выберите опцию — “Persistent live” -only Debian and Ubuntu и Ok.

Далее выберите ISO-файл операционной системы, которую вы хотите сделать, как live-usb.

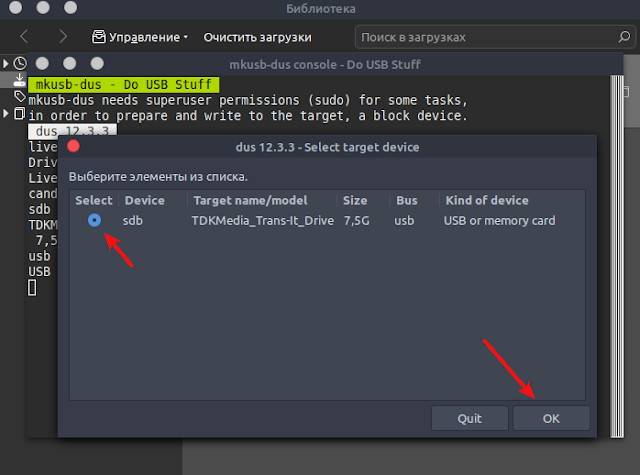
Теперь необходимо правильно выбрать вашу флешку в этом окне.
В следующем окне выберите опцию — “upefi”, которая поддерживает UEFI BIOS с безопасной загрузкой.

Оставьте процент хранения persistent данных на 50 по умолчанию. Это не имеет особого значения, если вы используете USB-накопитель объёмом 4 Гб и более.

Заключительное окно спросит вас, хотите ли вы продолжить создание persistent диска. Выберите Go и нажмите на кнопке Go.

Теперь mkusb начнёт создание live-usb persistent на основе выбранного вами ISO-образа.

Весь процесс займет несколько минут, в зависимости от вашей флешки и размера ISO-образа.
По окончании создания live-usb persistent, окно mkusb сообщит вам об этом.

4. Теперь вы можете загрузится с созданной флешки в liv-режиме и производить необходимые изменения системы, которые теперь будут сохранены при последующих входах. А также использовать эту флешку на других компьютерах как обычную систему без установки на ж/диск..
Примечание. Iso-образ с созданной live-usb persistent, имеет свой загрузчик GRUB, т.к. флешка разбита на разделы. Не путайте его с системным GRUB.
Источник
Create A Persistent Storage Live USB With Ubuntu, Linux Mint Or Debian (UEFI, >4GB Persistence Support)
When you create a regular Linux live USB, you can install software, download files, make changes to the system, and so on, but all of these changes are lost after a reboot. A persistent live USB allows saving any changes you make to the live system, so the they are still present the next time you boot to it.
This article explains creating a persistent live USB with Ubuntu (and flavors like Kubuntu, Xubuntu, Ubuntu MATE, etc.), Linux Mint, Debian or elementary OS (it should work with any Debian or Ubuntu based Linux distribution), using mkusb. You’ll need to be running Ubuntu, Linux Mint or Debian to install mkusb (it seems you may be able to install mkusb on other Linux distributions, but there’s no list of dependencies to install manually, and it may or may not work).
mkusb can create persistent live drives that work in both UEFI and BIOS mode. The persistence storage partition created by mkusb uses casper-rw, so it can have a size of more than 4 GB, unlike some other similar tools.
This tool can not only create persistent storage live USB drives, but also regular bootable live USBs of Linux distributions, wipe a device, and more. The only downside of mkusb is its user interface, which uses Zenity and can be a bit confusing, but other than that the application works great.
A few related articles from Linux Uprising that might interest you:
How to install and use mkusb to create a persistent storage live USB with Ubuntu, Linux Mint or Debian
1. Install mkusb on Ubuntu, Linux Mint or Debian
In Ubuntu, Linux Mint, elementary OS and other Ubuntu-based Linux distributions or flavors, mkusb can be installed by using its official PPA:
For Debian, the mkusb developer recommends using the same Ubuntu PPA. That’s because mkusb is only a series of scripts which don’t depend on specific Ubuntu package versions, so it works on Debian (unlike most PPA repositories). Manually add the mkusb PPA and install this tool in Debian:
You may also install mkusb on other Linux distributions, but the installation may require installing some packages manually, etc. See the mkusb wiki page for how to do this.
2. Launch mkusb from the applications menu. When it starts, the application asks you if it should run the dus version of mkusb (a revamped interface of mkusb), or another version:
In this dialog press YES to continue with the «dus» version.
3. Next, you’ll see a mkusb window that asks to enter your password on top of a terminal window:
Enter your password and press OK to continue. Make sure you don’t close the terminal window, as that’s where mkusb runs the commands required to create a persistent storage, bootable live USB!
4. mkusb will now present a list of options:
Select the first one — Install (make a boot device) -, and press OK to continue.
5. Next, another list of options is presented:
To create a persistent storage live USB, click on the third option — ‘Persistent live’ — only Debian and Ubuntu -, and click OK .
6. mkusb will now ask you to select an ISO or IMG file:
Select the Ubuntu (including Kubuntu, Xubuntu, Ubuntu MATE, Lubuntu, Ubuntu Budgie, etc.), Debian or Linux Mint (Cinnamon, MATE or Xfce) image from your filesystem, and click OK to continue.
7. For the next step, mkusb will present a list of storage devices. Make sure to select an USB or some other removable drive in this step, and not your HDD/SSD:
Double check that you’ve selected the correct target device (all data on the selected storage device will be lost!), and click OK to continue.
8. mkusb will now present some persistent live drive settings:
In this dialog you can enable upefi (comes from the package named usb-pack-efi , used by mkusb), in which Grub works in UEFI and BIOS mode. You can also enable the msdos option, which can help with some HP computers that can’t boot with Grub and GPT. Click OK when you’re done.
9. It’s now time to select the percentage of available space for persistence:
This is the space that will be available for the Linux distribution you’re going to install on the USB stick. Drag the slider to the desired persistence percentage and press the OK button. Don’t worry about the size of the persistence partition, mkusb doesn’t have the maximum 4 GB persistent storage limit present in some other bootable USB creators.
The remaining storage space on the USB drive will be used for a new usbdata partition that’s formatted as NTFS, which can be accessed from Linux, Windows and macOS — use this partition to store data on the USB drive that you want to access from other operating systems.
10. In this final step you’ll be presented with a confirmation screen:
If you’re sure you’ve selected the correct storage device and ISO file, you can now proceed to start creating the persistent live USB.
Select the line that says Go (Yes, I want to go ahead) and press the Go button at the bottom of the window. After this, mkusb will start creating the persistent storage Ubuntu, Linux Mint or Debian live USB.
Now boot the new live USB and select one of the Grub menu entries that says «persistence» (there will also be some non-persistence Grub menu items).
Источник
Linux Mint Forums
Welcome to the Linux Mint forums!
[Tutorial] Live usb with persistence over 4GB
[Tutorial] Live usb with persistence over 4GB
Post by Laurent85 » Sat Sep 03, 2016 6:00 pm
Thanks to phd21 who suggested Multisystem as a working alternative.
Follow this tutorial to create a Live usb flash drive with persistence on a separate partition, allowing persistence over the 4GB FAT32 file size limit.
Benefits of persistence and separate partition over full installation:
- persistence not limited to 4GB (on par with full installation)
- compressed Live image, the gain is around 2,6GB disk space, allowing the use of a 8GiB usb flash drive
- non persistent Live session still available, can be handy in some situations
- read only base image, persistence can be reset without reinstalling, boot a Live session to backup your /home data and personal settings, then reformat casper-rw.
Install Multisystem:
Note that for an unknown reason when returning to boot options persistent does not appear but was properly saved.
You can check if necessary:
select Menus tab > GRUB settings > grub.cfg > search for word persistent
Should appear line starting with linux (loop)/casper/vmlinuz persistent .
Done.
Tips:
To launch a Live session from flash drive, on startup from Multisystem screen edit Linux Mint entry and remove persistent parameter.
Nemo automatically mounts casper-rw partition. When persistence in use, casper-rw should not be considered as a removeable media, hence not mounted as is. You can change this behavior in Nemo Preferences > Behavior > unselect Automatically mount removable media.
Use Multisystem to create multi boot usb flash drives.
Multisystem also offers to enable persistence by creating a casper-rw file container up to 4GB on the FAT32 partition.

Re: [Tutorial] Live usb with persistence over 4GB
Post by Spearmint2 » Sun Nov 27, 2016 5:49 am
![]()
Re: [Tutorial] Live usb with persistence over 4GB
Post by phd21 » Mon Jul 24, 2017 7:22 pm
Hi Everyone, «Laurent85», and «Spearmint2»,
Nice tutorial «Laurent85».
I have been making «Persistent» USB flash drive sticks that work well for years in Linux Mint 17.3 and now in Linux Mint 18.1. In fact just a little while ago I created a bootable USB flash drive stick with Linux Mint Cinnamon 18.2 (64-bit) using MultiSystem in Linux Mint 18.1 KDE on a 16gb USB flash drive stick, see screenshot below. In fact, I am running on that right now while writing this reply. Even after installing all the Linux Mint updates, and installing a whole bunch of stuff, I still have 10gb of space left.
FYI: Make sure you have a good USB flash drive stick, check it for errors. I had a lot of trouble recently testing USB sticks because my 8gb USB flash drive stick that I use for testing was wearing out, actually wore out after 3-4 years, and I did not realize it until today.
I have been using «MultiSystem» for most of them, but «Unetbootin» is easy to use and works well for creating «Persistent» USB flash drive sticks with up to 4gb (4000mb) of persistent space. Obviously, I have also been using MultiSystem for creating USB flash drive sticks with over 4gb of «persistent» space.
Источник


