- Использование HTTP proxy и SOCKS в Linux
- curl: передача данных через proxy
- wget: закачка файлов через proxy
- ssh: доступ к серверам
- Соксификатор dante
- DNS запросы через proxy
- HOWTO Прокси в Linux Mint (Debian/Ubuntu)
- HOWTO Прокси в Linux Mint (Debian/Ubuntu)
- Как настроить прокси в Linux
- Как настроить прокси в Linux
- В статье показано как настроить прокси в любой версии ОС Linux.
- Рассмотрим настройку переменных для использования прокси
- Тестирование работы
- How To Install And Use Tor (Client) As A Proxy In Ubuntu, Pop!_OS Or Linux Mint
- Installing Tor and optionally Privoxy in Ubuntu / Pop!_OS or Linux Mint
- Using Tor and Privoxy in Ubuntu / Pop!_OS or Linux Mint
Использование HTTP proxy и SOCKS в Linux
В Linux существует много полезных консольных команд, которые при необходимости хотелось бы запустить через proxy. Некоторые приложения имеют встроенную поддержку proxy, а некоторые нет. Далее описано как пользоваться востребованными утилитами через proxy, даже теми, которые этой поддержки не имеют.
curl: передача данных через proxy
curl имеет полноценную поддержку как HTTP proxy так и SOCKS.
Для тестирования возможно использовать proxy сервера из бесплатных списков (socks — sockslist.net, и HTTP proxy — proxyhttp.net). Проверка IP адреса будет производиться с помощью ресурса check-host.net
Часть параметров curl можно записать в файл
С помощью time и curl также можно замерить время отклика сервера:
Результат будет выглядеть так:
wget: закачка файлов через proxy
wget имеет встроенную поддержку proxy. Недостаток лишь в том, что только поддержку HTTP proxy. Для использования совместно с SOCKS рекомендуется использовать соксификатор dante.
Чтобы все время не указывать —proxy-user и —proxy-password можно их прописать в файл
ssh: доступ к серверам
Для доступа к серверам через ssh и proxy также лучше использовать соксификатор dante.
Соксификатор dante
С помощью socksify можно направить через proxy почти любое приложение, не только консольное.
Чтобы все время не вводить данные о proxy можно создать файл /etc/socks.conf
Пример для SOCKS:
Пример для HTTP proxy с авторизацией:
А также экспортировать переменные SOCKS_USERNAME и SOCKS_PASSWORD, если для SOCKS или HTTP proxy требуется авторизация:
DNS запросы через proxy
Часто требуется чтобы и преобразование имен происходило через proxy. Если использовать dante, то запрос на преобразование имен идет и через proxy, и через именной сервер указанный в /etc/resolv.conf . Понять почему же идет два одинаковых запроса вместо одного не удалось. Поэтому можно предложить два варианта:
1) Закомментировать именные сервера в файле /etc/resolv.conf, чтобы преобразование имен шло только через proxy. Это отразится на всей системе.
2) Изменить /etc/resolv.conf и выставить именные сервера необходимой страны, или просто отличные от серверов провайдера. Например установить сервера Google:
Чтобы данные не были перезаписаны именными серверами провайдера (при переподключении), можно запретить обновление списка именных серверов сетевому менеджеру (NetworkManager/wicd) или DHCP-клиенту (спасибо ergil за корректировку).
Или воспользоваться «грубым» методом — запрещением изменения файла /etc/resolv.conf:
Если есть какие-то дополнения, пожалуйста, напишите, это будет полезно узнать и применить.
Источник
HOWTO Прокси в Linux Mint (Debian/Ubuntu)
У меня на работе все выходы во внешний мир идут через прокси-сервр. Его настройкой занимаются админы, тем не менее, и простые юзеры вынуждены регулярно вносить коррективы в настройки таких программ как браузеры, интернет-болталки и т.д. Поэтому тема настройки прокси-сервера весьма интересна и актуальна. На сайте Nix Daily прочитал прекрасно руководство по настройке прокси-сервера в домашних условиях путем правки конфигов. речь идет о Linux Mint, а значит решение актуально для Ubuntu, да и других дистрибутивов на базе Debian. Считаю, что это готовое HOWTO, поэтому решил разместить его в своей базе знаний. Отдельное спасибо автору статьи.
Встала задача настроить систему на использование прокси-сервера для выхода в интернет, но стандартная гномовская утилита насторойки прокси сервера лишь прописала настройку в инвайромент. В итоге немного порывшись в конфигах был достигнут желаемый результат.
1. Настройка apt
прописываем соответственно:
Acquire::http::Proxy «http://domain\domainuser:[email protected]:8080″;
Acquire::ftp::Proxy «http://domain\domainuser:[email protected]:8080″;
Acquire. Proxy «true»;
2. Настройка wget
раскоментируем строчки и прописываем нужное:
https_proxy = http://192.168.1.150:8080/
http_proxy = http://192.168.1.150:8080/
ftp_proxy = http://192.168.1.150:8080/
3. Настройка enviroment
прописываем нужное :
http_proxy=»http:/192.168.1.150:8080″
ftp_proxy=»http://192.168.1.150:8080″
4. Настройка mintUpdate и Synaptic
1) В самом синаптике через gui настройте использование прокси сервера
(Настройки>Параметры>Сеть)
2) В mintUpdate (Правка>Параметры>Прокси) настройте прокси следующим образом:
прокси http://192.168.1.150 порт 8080
Конечно, ремонт лифтов это более сложная задача и от квалификации ремонтников зависит жизнь и здоровье обитателей дома или офиса. Поэтому такие работы стоит заказывать только опытным сотрудникам компании, имеющей безупречную репутацию.
Источник
HOWTO Прокси в Linux Mint (Debian/Ubuntu)

У меня на работе все выходы во внешний мир идут через прокси-сервр. Его настройкой занимаются админы, тем не менее, и простые юзеры вынуждены регулярно вносить коррективы в настройки таких программ как браузеры, интернет-болталки и т.д. Поэтому тема настройки прокси-сервера весьма интересна и актуальна. На сайте Nix Daily прочитал прекрасно руководство по настройке прокси-сервера в домашних условиях путем правки конфигов. речь идет о Linux Mint, а значит решение актуально для Ubuntu, да и других дистрибутивов на базе Debian. Считаю, что это готовое HOWTO, поэтому решил разместить его в своей базе знаний. Отдельное спасибо автору статьи.
Встала задача настроить систему на использование прокси-сервера для выхода в интернет, но стандартная гномовская утилита насторойки прокси сервера лишь прописала настройку в инвайромент. В итоге немного порывшись в конфигах был достигнут желаемый результат.
1. Настройка apt
прописываем соответственно:
Acquire::http::Proxy «http://domain\domainuser:[email protected]:8080″;
Acquire::ftp::Proxy «http://domain\domainuser:[email protected]:8080″;
Acquire. Proxy «true»;
2. Настройка wget
раскоментируем строчки и прописываем нужное:
https_proxy = http://192.168.1.150:8080/
http_proxy = http://192.168.1.150:8080/
ftp_proxy = http://192.168.1.150:8080/
3. Настройка enviroment
прописываем нужное :
http_proxy=»http:/192.168.1.150:8080″
ftp_proxy=»http://192.168.1.150:8080″
4. Настройка mintUpdate и Synaptic
1) В самом синаптике через gui настройте использование прокси сервера
(Настройки>Параметры>Сеть)
2) В mintUpdate (Правка>Параметры>Прокси) настройте прокси следующим образом:
прокси http://192.168.1.150 порт 8080
Конечно, ремонт лифтов это более сложная задача и от квалификации ремонтников зависит жизнь и здоровье обитателей дома или офиса. Поэтому такие работы стоит заказывать только опытным сотрудникам компании, имеющей безупречную репутацию.
Источник
Как настроить прокси в Linux

Как настроить прокси в Linux
В статье показано как настроить прокси в любой версии ОС Linux.
Прокси-сервер или proxy — в переводе с англ. «представитель» — сервер как комплекс программ в компьютерных сетях, позволяющий клиентам выполнять косвенные запросы к другим сетевым службам. В рамках данного материала прокси понимается сервер выполняющий доступ к глобальной сети интернет.
Проще всего для использования прокси в командной строке, но в зависимости от типа трафика, Вы можете определить переменные окружения http_proxy, https_proxy или ftp_proxy.
Практически все утилиты командой строки, такие как curl, wget, ssh, apt-get, ftp, wget, yum и прочие, используют данные переменные.
Рассмотрим настройку переменных для использования прокси
Используйте следующий синтаксис для настройки таких типов трафика как http, https и ftp из командной строки:
$ export ftp_proxy=»http://proxy-server:port»
$ export http_proxy=»http://proxy-server:port»
$ export https_proxy=»https://proxy-server:port»
Используйте следующий синтаксис, если прокси-сервер требует аутентификацию:
$ export http_proxy=»http://user:pass@proxy-server:port»
$ export https_proxy=»https://user:pass@proxy-server:port»
$ export ftp_proxy=»http://user:pass@proxy-server:port»
Если Ваш пароль содержит спец. символы, Вы должны заменить их на ASCII коды.
Например символ собаки «@», должен быть заменен на «%40» (т. е. p@ss = p%40ss).
Тестирование работы
Используйте следующую команду для проверки текущих переменных прокси:
$ env | grep -i proxy
Можно проверить работу прокси, узнав ваш внешний IP адрес из командной строки:
Источник
How To Install And Use Tor (Client) As A Proxy In Ubuntu, Pop!_OS Or Linux Mint

Tor (The Onion Router) directs Internet traffic through a volunteer overlay network, with the purpose of protecting the user’s privacy and freedom.
This article explains how to install the latest Tor Client in Ubuntu 20.10, 20.04, 19.10, 18.04 or 16.04 / Linux Mint 20, 19.x and 18.x, and using it as a proxy with various applications.
The instructions below include steps for setting up Privoxy, in case you want to use Tor with an application that doesn’t support SOCKS5 proxies, manually setting up the proxy in case torsocks fails to launch an application, as well as configuring Tor to use country-specific exit nodes (so you can specify from which country your new IP should be), useful if you want to bypass country restrictions / censorship and you don’t afford a VPN (but if you can, go for the VPN option!).
This should work in Ubuntu 16.04 / Linux Mint 18.x, Ubuntu 18.04 / Linux Mint 19.x, 19.10 and 20.04 / Linux Mint 20, Ubuntu 20.10 and newer, as well as Linux distributions based on Ubuntu, like Pop!_OS, elementary OS, and Ubuntu or Linux Mint flavors, like Linux Mint MATE or Kubuntu, Xubuntu, Ubuntu MATE, and so on.
Ubuntu versions older than 16.04 / Linux Mint older than 18.x don’t use systemd, so some things in this article won’t work for such old versions.
Tor does not prevent online services from determining that you’re using Tor so keep this in mind! This should be used for privacy, and not anonymity. If all you need a web browser using Tor, use Tor Browser which uses Firefox ESR as its base, is very easy to use, and it includes everything you need. This article is for using the Tor client with other applications. Do not confuse Tor (client) with Tor Browser, they are two different things (in what they do)!
Installing Tor and optionally Privoxy in Ubuntu / Pop!_OS or Linux Mint
I. Install Tor in Ubuntu / Pop!_OS or Linux Mint
The Tor package from the Ubuntu repositories is usually not updated frequently, so it’s recommended you use the official Tor repository instead.
Start by installing apt-transport-https , needed in order to use https repositories, and curl, to download the repository key:
And then add the Tor repository (and its key) in Ubuntu / Pop!_OS using these commands:
For Linux Mint, use the same commands as above, but replace $(lsb_release -cs) in the first command with the Ubuntu version codename your Linux Mint version is based on. For Linux Mint 20 use focal , for Linux Mint 19 (and 19.x) use bionic , while for Linux Mint 18.x use xenial .
Now you can install Tor, tor-geoipdb (to be able to use country specific exit nodes), torsocks (a library to easily torify applications) and deb.torproject.org-keyring (a package that makes sure you have the latest repository signing key):
II. Optionally install Privoxy and configure it for use with Tor
Privoxy is a non-caching web proxy. You can use it with Tor if you plan on using Tor with applications that only support HTTP proxies (don’t support SOCKS5 proxies).
To install Privoxy in Ubuntu / Pop!_OS or Linux Mint, use:
To use Privoxy with Tor you’ll need to edit its /etc/privoxy/config configuration file with a text editor, like Nano (as root):
In this configuration file, paste the following line at the end of the file (you can get to the end of the file with Nano command line text editor by pressing Ctrl + W followed by Ctrl + V , without changing anything else:
There’s a space and then a dot at the end of the line, that is not a typo.
Then save the file and exit (to save the file using Nano command line text editor, press Ctrl + O , then Enter ; exit using Ctrl + X ).
Now you’ll need to restart Privoxy:
Using Tor and Privoxy in Ubuntu / Pop!_OS or Linux Mint
I. Using Tor via torsocks
To easily launch an application and make it use Tor, you can use torsocks , which works with both GUI and command line programs. This library ensures that DNS requests are handled safely and explicitly rejects any traffic other than TCP from the application you’re using.
For example, to launch Spotify with torsocks, use:
To test it, run this command to get your real IP address:
(In case curl is not installed, you can install it using: sudo apt install curl )
And then run the same command but using torsocks:
The torsocks command should return a different IP because it was ran through the Tor proxy.
If you get an error, the Tor service may not be running. It should be automatically started when it’s installed, but in case it’s not, you can start it using this command:
There is a problem with torsocks though — it fails to launch some applications. For example, running torsocks firefox or torsocks google-chrome does nothing. For such cases, you’ll need to enter the Tor SOCKS5 proxy manually in the application you want to use — see below.
II. Enter the proxy address manually
Once you install Tor and Privoxy, you can use the following proxy information (you only need to set up one of these two) in the application network / proxy settings:
- SOCKS5 proxy: use localhost as the proxy host / IP, and 9050 as the port
- HTTP proxy (requires Privoxy installed and configured as explained): use localhost as the proxy address and 8118 as the port
Use a SOCKS5 proxy where possible or, if the application doesn’t support it, use a regular HTTP proxy instead.
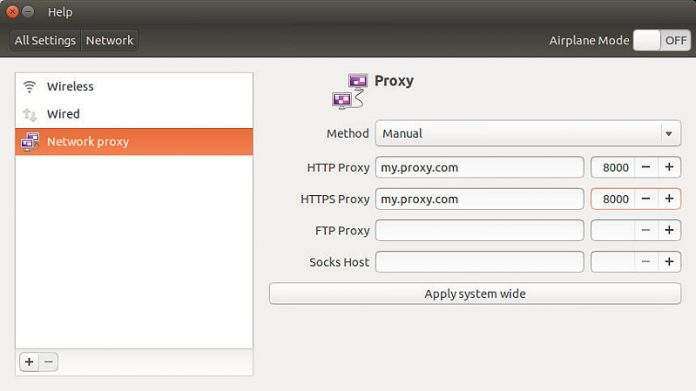
You can also use Tor as a system-wide proxy. For example in Gnome go to System Settings > Network , click on Network Proxy , set the proxy to Manual , then use localhost as the Socks Host and 9050 as the port:
Note that Chromium-based web browsers (Google Chrome, Opera, Vivaldi, etc.) don’t allow setting a proxy in their settings and instead use the system-wide proxy.
III. How to change the IP address given by Tor
In case you need to change the IP address given by Tor, the easiest way is to reload the Tor service, like this:
This command will reload the Tor configuration and get Tor to set up a new circuit, giving you a new IP address.
Check the IP address using the torsocks curl ipv4.icanhazip.com command.
IV. How to configure Tor to use country specific exit nodes (choose from which country your new IP should be)
To be able to specify country specific exit nodes in Tor, the tor-geoipdb package needs to be installed. This package is mentioned in the instructions above, so it should already be installed, but I thought I’d mention this in case you already had Tor installed and skipped the installation instructions from this article.
To use Tor to change your IP to a specific country IP, you’ll need to edit the Tor /etc/tor/torrc configuration file as root:
Add the following two lines to the file, without changing anything else:
Replace COUNTRY_CODE with the 2 letter ISO3166 country code, for example use us for the United States, de for Germany, and so on. You can find a list of country codes here. You can also specify multiple countries by separating them with a comma, like this:
When you’re done, save the file and exit (to save the file using Nano command line text editor, press Ctrl + O , then Enter ; exit using Ctrl + X ), and reload the Tor configuration using this command:
Источник


