- Linux: загрузка в однопользовательском режиме (single mode)
- Однопользовательский режим при использовании GRUB
- Однопользовательский режим при использовании LILO
- Как мне загрузиться в однопользовательском режиме от GRUB?
- How to Boot Linux Mint 20 in Rescue / Emergency Mode
- Booting Linux Mint 20 into Rescue / Single User Mode
- Booting Linux Mint 20 Into an Emergency Mode
- How to boot into single user mode in Linux Mint 18
- 2 Answers 2
- Recover your system with Single user mode in Linux Mint / Linux Mint 12
Linux: загрузка в однопользовательском режиме (single mode)

Сегодня в статье поговорим о однопользовательском режиме (single mode). Single mode прекрасно подходит для изменения конфигурации системы или выполнения задач по ее обслуживанию. Кроме того, этот режим может быть единственно доступным при работе в поврежденной системе.
Чаще всего переход в однопользовательский режим выполняют путем передачи аргументов программе начальной загрузки. Однако обычно переход в однопользовательский режим с другого уровня выполнения можно выполнить с помощью команды telinit 1 . При этом перезагрузку можно и не выполнять. Если только не требуется устранять какую- либо проблему начальной загрузки.
В качестве меры безопасности корневой каталог системы монтируется в режиме только для чтения. Это вызывает ряд неудобств, если вам надо исправить что либо в системе. Чтобы выйти из положения, начните однопользовательский сеанс с повторного монтирования корневой директории в режиме чтения/записи. Нужное действие выполняет команда:
Конкретные процедуры перехода в однопользовательский режим при использовании загрузчиков GRUB и LILO различаются между собой.
Однопользовательский режим при использовании GRUB
Чтобы выполнить загрузку в однопользовательском режиме при использовании загрузчика GRUB, не нужно применять опции командной строки. Авторы этого загрузчика пришли к выводу, что параметры начальной загрузки должны легко поддаваться изменению, и что клавиша ‘ a ‘ — вполне подходящее средство для решения этой задачи. Когда откроется экран начальной загрузки GRUB, выделите нужное ядро и нажмите клавишу ‘ a ‘, чтобы дополнить опции начальной загрузки. Чтобы обеспечить загрузку в однопользовательском режиме, добавьте флаг single в конец существующих опций ядра. Пример типичной конфигурации мог бы выглядеть следующим образом:
Однопользовательский режим при использовании LILO
Различные дистрибутивы предлагают различные средства открытия командного приглашения LILO. Пользователи Debian и Ubuntu должны нажать и удерживать нажатой клавишу shift сразу после того, как BIOS завершит проверку памяти и другие тесты самопроверки.
В строке приглашения LILO введите метку ядра (она задана в файле lilo.conf ), которое требуется загрузить, а затем — опцию -s или single . Например, стандартное ядро дистрибутива Debian имеет метку “ linux ”, поэтому, чтобы загрузиться в однопользовательском режиме, необходимо ввести следующее:
Если есть вопросы, то пишем в комментариях.
Также можете вступить в Телеграм канал, ВК или подписаться на Twitter. Ссылки в шапки страницы.
Заранее всем спасибо.
Источник
Как мне загрузиться в однопользовательском режиме от GRUB?
После изменения нескольких строк в xorg.conf я больше не могу загружать Ubuntu (я полагаю, он ломается при попытке загрузить X), поэтому мне нужен способ загрузки в однопользовательском режиме. Тем не менее, в Интернете, похоже, нет нулевых руководств, потому что все они предполагают, что я действительно могу редактировать файлы на своем компьютере, а я, очевидно, не могу.
Так как мне загрузить Ubuntu в однопользовательском режиме?
Когда я отключил заставку, я понял проблему: всякий раз, когда Ubuntu не может загрузить X-сервер из-за какой-либо ошибки, он переключается на tty1 и ждет приглашения, но не выключает заставку.
Для загрузки в single user режиме вы редактируете инструкции по загрузке для пункта меню GRUB, который вы хотите загрузить, и добавляете параметр / опцию ядра single . Краткие инструкции о том, как это сделать, приведены ниже.
- Во Shift время перезагрузки удерживайте нажатой левую клавишу, чтобы вызвать меню GRUB.
- Выберите (выделите) пункт меню загрузки GRUB, который вы хотите использовать.
- Нажмите e для редактирования команд загрузки GRUB для выбранного пункта меню загрузки.
Посмотрите внизу списка команд для строк, похожих на
Измените среднюю строку в (4), добавив параметр загрузки ядра single в конец строки (т.е. после ro quiet splash ).
Для этого примера вы бы изменили:
Нажмите Ctrl + X или F10 для загрузки с использованием этих параметров ядра.
Примечание. Эти изменения не являются постоянными. Любое изменение параметров загрузки ядра, сделанное таким образом, повлияет только на следующую загрузку и только в том случае, если вы начнете эту загрузку нажатием Ctrl + X или, F10 находясь в режиме редактирования GRUB.
Источник
How to Boot Linux Mint 20 in Rescue / Emergency Mode
There are some situations like user forget his / her password, file system is 100 % utilized, file system got corrupted and invalid entries in fstab file. So, to recover Linux system in these situations, we have to boot Linux system into rescue mode or single user mode.
In this article, we will learn how to boot Linux Mint 20 in rescue and emergency mode.
Booting Linux Mint 20 into Rescue / Single User Mode
Rescue mode is also known as single user mode, in order to boot Linux Mint 20 in rescue mode,
Step 1) Go to grub screen by pressing “ SHIFT ” key and then press “ ESC ” key. We will get the following Grub boot loader screen,

Choose first option and then press ‘ e ‘ to edit
Step 2) Append “ systemd.unit=rescue.target ” to end of line which begins with linux word
In the boot loader screen, look for the line which begins with “linux” word and append “ systemd.unit=rescue.target “, example is shown below
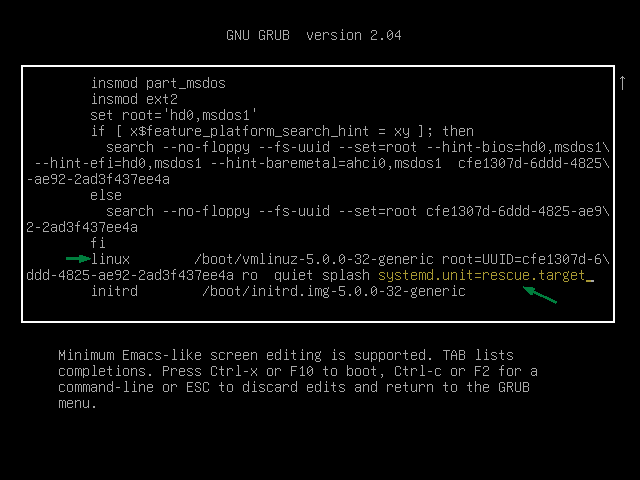
Now, Press F10 or CTRL-X to boot the system in rescue mode,
Step 3) Perform troubleshooting steps and recover the system
We will get the following rescue mode screen; press enter and then do the troubleshooting steps. I am assuming “ James ” user has forget his password, so we will be resetting his password from rescue mode.
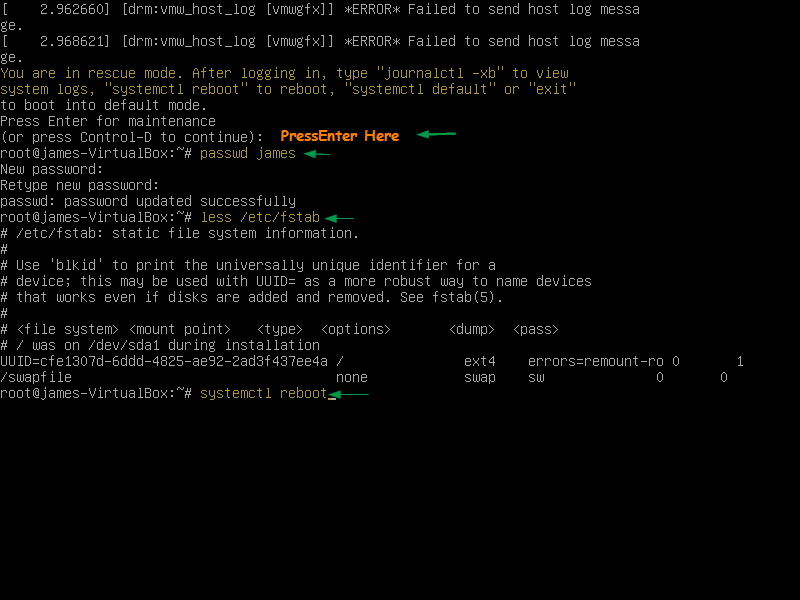
Once you are done with troubleshooting steps then run “ systemctl reboot ” command to restart the system.
Booting Linux Mint 20 Into an Emergency Mode
Emergency mode is used where we can not boot Linux system into single user mode, In this mode, file system is mounted in read only mode. To make any changes in the system we must first mount filesystem in read-write mode.
In order to boot Linux Mint 20 in emergency mode, go to Grub boot loader screen and choose the first option and then press “ e ” to enter into boot loader edit mode.
Look for the line which starts with ‘ linux ’ word and append “ systemd.unit=emergency.target ” at the end of line,

Now, press ctrl-x or F10 to boot. Once the system is booted into emergency mode, we will get the following screen,
To mount / file system in read-write mode, use following command:
# mount -o remount,rw /
Perform all the troubleshooting steps to recover system,
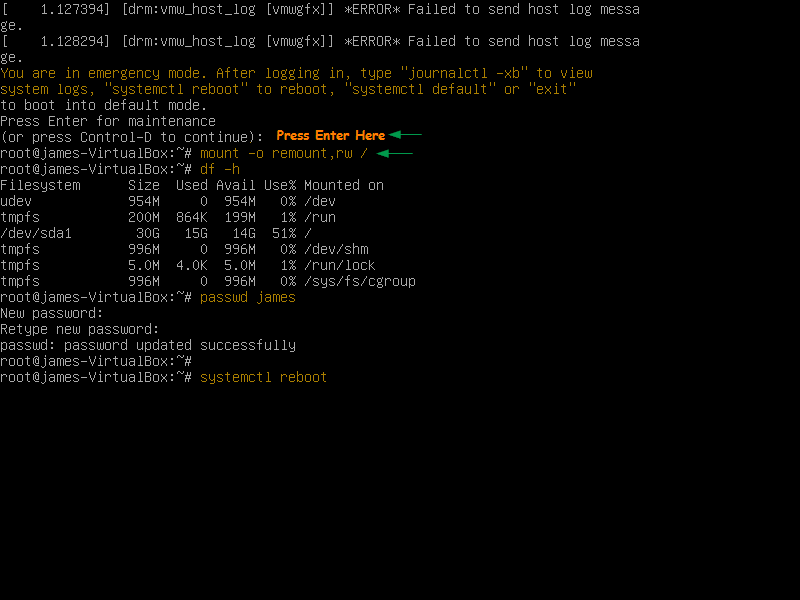
Once you are satisfied with all the troubleshooting steps and then reboot the system with “ systemctl reboot ” command.
That’s all from this article. I hope you got the clear idea on how we boot our Linux Mint 20 into rescue and emergency mode. Please don’t hesitate to share your feedback and comments in the comments section below.
Источник
How to boot into single user mode in Linux Mint 18
I am using Linux Mint on my office laptop and there are two user accounts on it. one is the director’s account and the other is mine. Although I did sudo command on the terminal before now I cant.It shows below error
To fix the permissions of sudo one told to Boot into single-user mode and do chmod u+s /usr/bin/sudo . I am new to these things. How to do that. Below I have mentioned OS released details
- NAME=»Linux Mint»
- VERSION=»18 (Sarah)»
- ID=linuxmint
- ID_LIKE=ubuntu
- PRETTY_NAME=»Linux Mint 18″
- VERSION_ID=»18″
- HOME_URL=»http://www.linuxmint.com/»
- SUPPORT_URL=»http://forums.linuxmint.com/»
- BUG_REPORT_URL=»http://bugs.launchpad.net/linuxmint/»
- UBUNTU_CODENAME=xenial

2 Answers 2
It has not been single-user mode since 1995. You have emergency mode and rescue mode. Either will do for your purposes, as presumably chmod and sudo are on the root filesystem. (In the unlikely event that /usr is on a separate filesystem, pick rescue mode. Also pick rescue mode if in emergency mode you find that your / filesystem is mounted read-only.)
When the GRUB menu shows, select a «rescue mode» option if you have one. If you do not have one, use e to edit your normal bootstrap selection and add in a -s or a -b to the kernel command line, for rescue mode and emergency mode respectively. ⎈ Control + X boots with the edited command line, of course.
- Do not use systemctl set-default as that makes a permanent change to how your operating system starts. You want a one-time modification, so that you can go back to bootstrapping normally thereafter with no further effort.
- Forget about run-levels. Do not start learning about them. systemd does not have them in reality. Learn the paradigms that your operating system actually has.
- You can use other kernel command line options such as emergency , 1 , systemd.unit=emergency , single , S , and so forth. -s and -b are the most widely accepted across many system management toolsets, not just systemd, and are the original options from 1995.
- Be aware that whatever you did to mess up sudo has probably caused further problems on your system.
Mint might provide you with a «recovery mode» GRUB menu choice. You can use this, too. It isn’t any of systemd’s bootstrap targets, though. (It runs a program named /lib/recovery-mode/recovery-menu via an additional systemd target set up by the friendly-recovery package.) «recovery mode» in Ubuntu and derivatives is not rescue mode.
Источник
Recover your system with Single user mode in Linux Mint / Linux Mint 12
Single user mode is one of run level in Linux; this is also called as Init 1, in this mode all the filesytems will be mounted in read-write mode and can be modified by anybody; this is very insecure because it won’t ask password for login unless you have configured grub password. In this mode networking services (NFS, NIS, DNS and many more) won’t start (Linux Mint has option to start networking support), it is mainly used for troubleshooting system and administrative tasks by the super user. In Linux Mint, it is very easy to enter into single user mode because it has own recovery kernel option in the grub menu.
Here is the small tutorial about the single user mode in Linux Mint 12.
Step 1: Power on or Reboot (if it is already running) your machine.
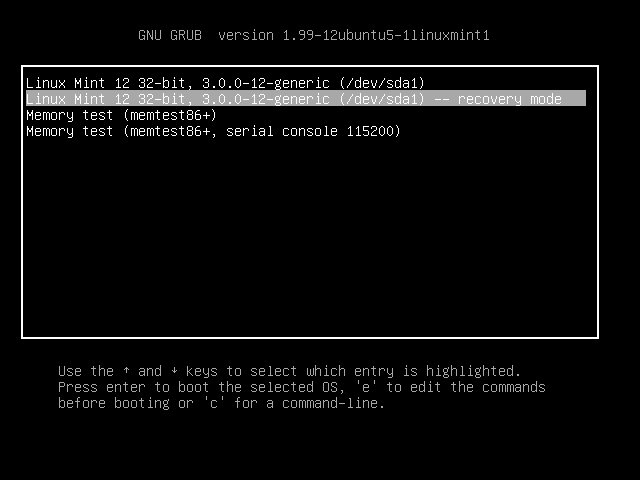
Step 2: While booting press and hold “ Shift ” key, you might see the splash screen like below with the list of kernel installed. Select the recovery kernel and press Enter.
Step 3: Once the recovery kernel booted, you should see the following graphical command menu; in Linux Mint 12 there are two recovery menus available to recover your system, in this menu you can select any one out of four option;
Recovery Menu (limited read-only menu):
* resume Resume normal boot
* fsck Check all file systems (will exit read-only mode)
* remount Remount / read/write and mount all other file systems
* root Drop to root shell prompt
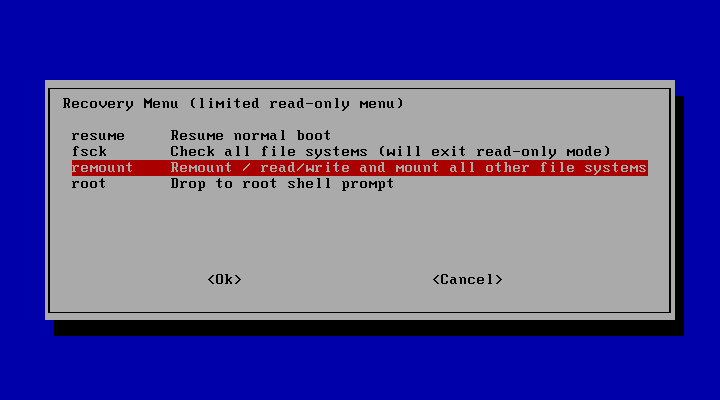
If you want recover your system, you have to enter into normal recovery menu; for that you should select either “ remount ” or “ fsck ” because other option such as “ root ” will mount your file system in read only mode ( No use ) and “ resume “ – will resume normal boot .
Step 4: Once you have selected either “ remount ” or “ fsck ”; you have to press “ Ente r” to get normal recovery menu. Here you can select the option according to your requirement, this time file systems will be mounted read- write mode if you have selected Drop to root shell prompt or other options.
Recovery Menu:
* resume Resume normal boot
* clean Try to make free space
* dpkg Repair broken packages
* grub Update grub bootloader
* netroot Drop to root shell prompt with networking
* root Drop to root shell prompt
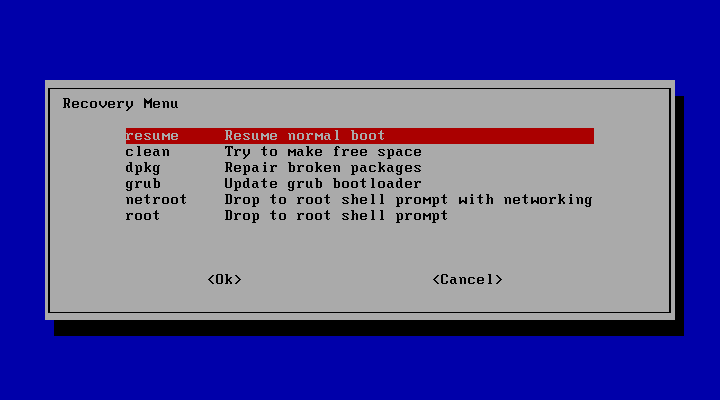
That’s all. Now you can start do the administrative tasks.
Источник


