- How to Install VirtualBox Guest Additions in Ubuntu
- How to Install VirtualBox Guest Additions in Ubuntu
- If You Appreciate What We Do Here On TecMint, You Should Consider:
- VirtualBox Guest Additions Installation In Ubuntu, Linux Mint, Debian, Fedora And openSUSE [How-To]
- Installing VirtualBox Guest Additions ISO manually in Ubuntu, Linux Mint, Debian, openSUSE and Fedora
- Install VirtualBox Guest Additions in Linux Mint Step by Step
- What is VirtualBox Guest Additions?
- How to Install Virtualbox Guest Additions in Linux Mint
- If VirtualBox Can’t Find the Guest Additions CD Image
- Enable Copy and Paste Clipboard Between Host and Guest
- Enable Shared Folder
- Wrapping Up
How to Install VirtualBox Guest Additions in Ubuntu
VirtualBox Guest Additions are a collection of device drivers and system applications designed to achieve closer integration between the host and guest operating systems. They help to enhance the overall interactive performance and usability of guest systems.
The VirtualBox Guest Additions offer the following features:’
- Easy mouse pointer integration.
- Easy way to share folders between the host and the guest.
- Drag and drop feature allows copying or opening files, copy clipboard formats from the host to the guest or from the guest to the host.
- Share clipboard (for copy and paste) of the guest operating system with your host operating system.
- Better video support provides accelerated video performance.
- Better Time synchronization between guest and host.
- Standard host/guest communication channels.
- Seamless Windows features allows you to run windows of your guest operating system seamlessly next to the windows of your host.
The VirtualBox Guest Additions should be installed inside a virtual machine after the guest operating system has been installed.
In this article, we will explain how to install VirtualBox Guest Additions on Ubuntu and Debian based distributions such Linux Mint.
How to Install VirtualBox Guest Additions in Ubuntu
1. First start by updating your Ubuntu guest operating system software packages using following command.
2. Once upgrade completes, reboot your Ubuntu guest operating system to effect the recent upgrades and install required packages as follows.
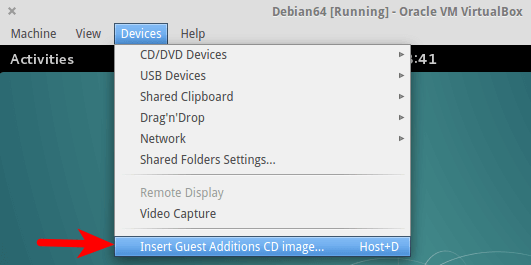
3. Next, from the Virtual Machine menu bar, go to Devices => click on Insert Guest Additions CD image as shown in the screenshot. This helps to mount the Guest Additions ISO file inside your virtual machine.
![]() Install Virtualbox Guest Additions
Install Virtualbox Guest Additions
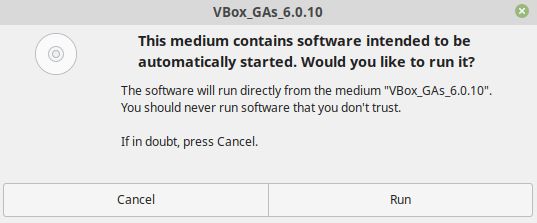
4. Next, you will get a dialog window, prompting you to Run the installer to launch it.
![]() Run VirtualBox Guest Additions
Run VirtualBox Guest Additions
5. A terminal window will be opened from which the actual installation of VirtualBox Guest Additions will be performed. Once the installation is complete, press [Enter] to close the installer terminal window. Then power off your Ubuntu guest OS to change some settings from VirtualBox manager as explained in the next step.
![]() Install VirtualBox Guest Additions
Install VirtualBox Guest Additions
6. Now to enable Shared Clipboard and Drag’n’Drop functionality between Guest and Host Machine. Go to General => Advanced and enable the two options (Shared Clipboard and Drag’n’Drop) as you wish, from the drop down options. Then click OK to save the settings and boot your system, login and test if everything is working fine.
![]() Enable Shared Clipboard in Virtualbox
Enable Shared Clipboard in Virtualbox
Congratulations! You have successfully installed VirtualBox Guest Additions on Ubuntu and Debian based distributions such Linux Mint.
If you face any problems during installation, use the feedback form below to ask any questions or share your thoughts about this article.
If You Appreciate What We Do Here On TecMint, You Should Consider:
TecMint is the fastest growing and most trusted community site for any kind of Linux Articles, Guides and Books on the web. Millions of people visit TecMint! to search or browse the thousands of published articles available FREELY to all.
If you like what you are reading, please consider buying us a coffee ( or 2 ) as a token of appreciation.

We are thankful for your never ending support.
Источник
VirtualBox Guest Additions Installation In Ubuntu, Linux Mint, Debian, Fedora And openSUSE [How-To]
The VirtualBox Guest Additions are designed to be installed inside a virtual machine, after the guest operating system has been installed, and they include drivers and optimizations for better system performance and usability.
By installing the VirtualBox Guest Additions, the virtual machine should have better video support (including hardware-accelerated graphics), shared clipboard, drag and drop support between the guest and host machines, and shared folders, among others.
Debian (in the contrib repository), Ubuntu and Debian/Ubuntu based Linux distribution users can install the VirtualBox Guest Additions from the repositories (installing the virtualbox-guest-x11 , virtualbox-guest-utils and virtualbox-guest-dkms packages ), while Fedora 28 and newer ships with a Guest Additions package installed by default. This way of installing the VirtualBox Guest Additions is easier than installing the Guest Additions shipped with VirtualBox, but it may lack some features, like the ability to use the new file manager added in VirtualBox 6.0.
For example, in Fedora 29 which comes with the VirtualBox Guest Additions package installed by default, using VirtualBox 6.0 you can resize the machine window, and enable shared clipboard between the guest and host machines, but no shared files related actions work (can’t add shared folders, the new VirtualBox 6.0 file manager doesn’t work — it completely freezes the virtual machine, and dragging and dropping files between the guest and host doesn’t work).
Another example. In Ubuntu 18.04, by installing the VirtualBox Guest Additions repository packages, you will get the ability to synchronize the clipboard between guest and host, and you’ll be able to add a shared folder, but you won’t be able to use the new VirtualBox 6.0 file manager, or use drag and drop to share folders between the host and guest machines.
It should be noted that using Ubuntu 19.04 in a virtual machine, and installing the repository-provided guest additions enables sharing folders between the guest and host machines as well using the new VirtualBox 6.0 file manager, so there’s no need to install the built-in VirtualBox Guest Additions installer. All you have to do is install those packages and reboot ( sudo apt install virtualbox-guest-x11 virtualbox-guest-utils virtualbox-guest-dkms ).
This article explains installing the VirtualBox Guest Additions ISO using the built-in VirtualBox installer, for Ubuntu, Linux Mint, Debian, openSUSE, or Fedora guest virtual machines, which enables all the available guest additions features.
Installing VirtualBox Guest Additions ISO manually in Ubuntu, Linux Mint, Debian, openSUSE and Fedora
| Using the VirtualBox 6.0 file manager with Fedora guest |
Terminology:
- «Host» or host operating system: the physical computer on which Oracle VM VirtualBox was installed.
- «Guest» or guest operating system: the operating system running inside the virtual machine.
1. Download and install the Oracle VM VirtualBox Extension Pack on the host.
On your computer (not on a VirtualBox guest), go to the VirtualBox downloads page and download the «VirtualBox N.N.N Oracle VM VirtualBox Extension Pack» — it’s a single file for all supported platforms.
Double click the downloaded .vbox-extpack file and it should open with VirtualBox, allowing you to install it.
2. Install packages required to build the VirtualBox Guest Additions on the guest machine.
Without this, if you just installed Fedora in a virtual machine and you didn’t install the available updates, you may run into issues (mismatch between kernel-devel and the current running kernel).
Now you can install the packages required to build the VirtualBox Guest Additions on the Fedora guest:
Ubuntu / Linux Mint / Debian:
3. Insert the VirtualBox Guest Additions ISO (VBoxGuestAdditions.iso).
From the VirtualBox machine menu select Devices > Insert Guest Additions CD image .
4. Install the VirtualBox Guest Additions ISO on the guest operating system (Ubuntu, Linux Mint, Debian, openSUSE or Fedora).
Fedora or openSUSE:
Ubuntu / Linux Mint:
In all three cases: type yes when prompted.
5. Optional if you plan on using shared folders: add your username to the vboxsf group on the guest OS.
For shared folders to work, add your guest machine username to the vboxsf group (on the guest machine):
Without this you won’t be able to access the shared folder contents on the guest machine.
This is not required to use the new VirtualBox file manager, but only for the already existing VirtualBox shared folders feature.
6. Reboot the virtual machine.
| Using the VirtualBox 6.0 file manager with Ubuntu 18.04 guest |
Now you should be able to use all the available VirtualBox Guest Additions features:
- enable the shared clipboard feature from the machine Devices menu -> Shared Clipboard
- enable shared folders from the machine Devices menu -> Shared Folders
- enable drag and drop of file from the machine Devices menu -> Drag and Drop
- start the new VirtualBox 6.0 file manager that allows browsing and copying files between guest and host from the Machine menu -> File manager , then click on the Session button, enter your username and password, and click Create Session
The drag and drop feature does not work with Wayland (which is default in Fedora). If you want to use this in Fedora, logout and select GNOME on Xorg from the login screen.
Источник
Install VirtualBox Guest Additions in Linux Mint Step by Step
In this tutorial I will show you how to install VirtualBox guest additions in Linux Mint virtual machine. To follow this tutorial, you need to have Linux Mint installed inside VirtualBox as a guest OS. I’m using Debian 10 Buster as the host OS, but the following method works for any host OS (including MacOS and Windows).
What is VirtualBox Guest Additions?
VirtualBox guest additions provide the following capabilities:
- Enable users to seamlessly move mouse pointer between host and guest OS.
- Allow guest OS to have read and write access to hard drives on the host OS, so you can transfer files between them.
- Power up the graphics/video ability of the guest OS. The screen resolution of guest OS can be automatically adjusted and 3D graphics can be accelerated.
- Enable bidirectional shared clipboard between host and guest OS, so you can copy and paste stuff between them.
How to Install Virtualbox Guest Additions in Linux Mint
Log into Linux Mint (guest OS) and run the following command in a terminal window to update software packages.
Please note that if a new Linux kernel is installed in the upgrade process, then you need to reboot Linux Mint virtual machine. After that, run the following command to install required packages for building kernel modules.
Next, prepare Linux Mint for building kernel module with the following command.
Then in the VirtualBox window menu bar, select Devices > Insert Guest Additions CD image.
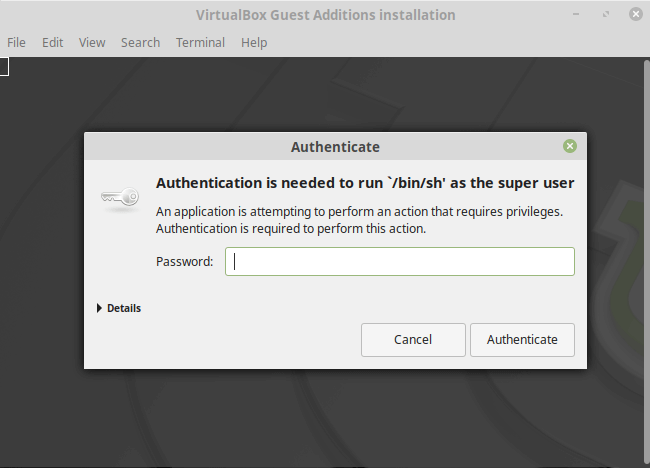
If your host OS already has the CD image, then you will be asked if you want to run the software. Select Run.
Then you will need to enter your password in order to install the guest additions.
Output in terminal window.
Once the guest additions is installed, press Enter to close the terminal window and restart your Linux Mint virtual machine. Now the resizeable display should be working. The screen resolution of Linux Mint VM will adjust with the size of VirtualBox window. You can press right Ctrl and F keyboard shortcut to enter full-screen mode. You can now also configure shared folder and bidirectional shared clipboard.
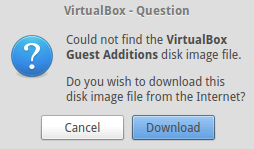
If VirtualBox Can’t Find the Guest Additions CD Image
If your host OS doesn’t have the guest additions CD image, then it will ask you to click a button to download the CD image onto the host OS. Click Download.
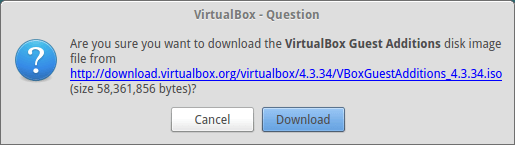
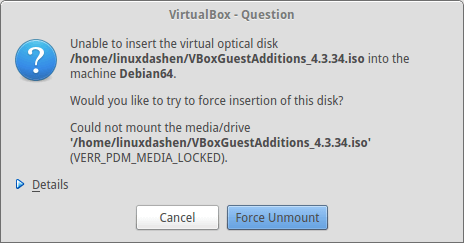
If you can’t download it from the above window, then go to http://download.virtualbox.org/virtualbox/. Select a version and download VBoxGuestAdditions ISO to your home directory. Once downloaded, insert the ISO image. If you see the following error, click Force Umount.
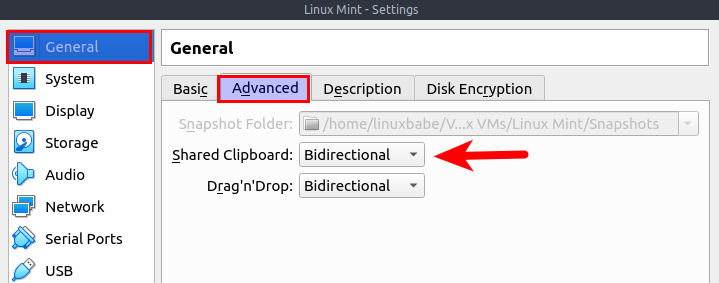
Enable Copy and Paste Clipboard Between Host and Guest
After installing guest additions, you can go to the virtual machine settings -> General -> Advanced and enable bidirectional clipboard.
Enable Shared Folder
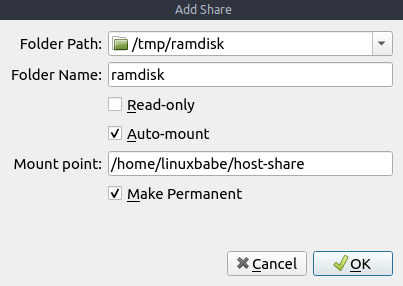
Now you can also share files between host and guest OS via the shared folder feature. Go to the virtual machine settings. In the left pane, select Shared Folders . Then click on the add button to add a shared folder.
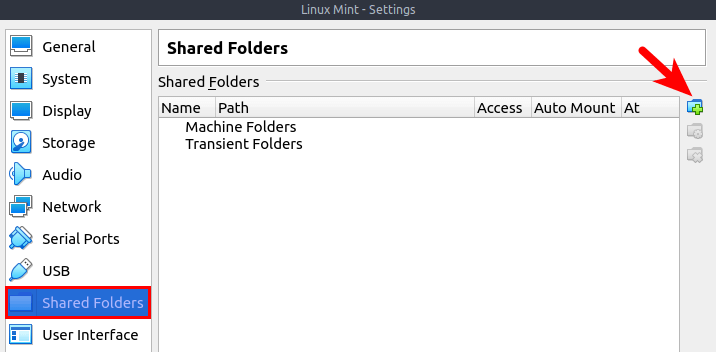
- In the Folder Path field, select a folder on your host OS.
- Tick on the Auto-mount checkbox so that the shared folder will be automatically mounted to the guest OS when virtual machine boots up.
- In the Mount-point field, enter a path on the guest OS, such as a sub-directory in your user’s home directory.
- Tick on the Make Permanent checkbox.
After saving the settings, you will find the shared folder appears in your home directory in the Linux Mint virtual machine, but only the root user and members of the vboxsf group have read and write access to this shared folder. So what we need to now is add your user to vboxsf group. Open up a terminal in Linux Mint and run the following command. Replace username with your real username.
Log out of the current session and log back in. Now you should be able to access the shared folder.
Wrapping Up
I hope this tutorial helped you install VirtualBox guest additions in Linux Mint. You may also want to read:
As always, if you found this post useful, then subscribe to our free newsletter to get more tips and tricks. Take care 🙂
Источник


