- Как установить VNC Server на Linux Mint 20
- Как установить VNC Server на Linux Mint 20
- Установить VNC Server на Linux Mint 20 Ulyana
- Шаг 1. Перед запуском приведенного ниже руководства важно убедиться, что ваша система обновлена, выполнив следующие apt команды в терминале:
- Шаг 2. Установка окружения рабочего стола.
- Шаг 3. Установка VNC-сервера на Linux Mint 20.
- Шаг 4. Настройте VNC.
- Шаг 5. Создайте сценарий запуска системы VNC-сервера.
- Шаг 6. Подключение к VNC-серверу.
- Как установить сервер VNC на Linux
- Enabling remote desktop sharing (VNC) on Linux Mint 19
- There is an updated version of this tutorial here!
- Share this:
- 46 Comments
Как установить VNC Server на Linux Mint 20

Как установить VNC Server на Linux Mint 20
В этом руководстве мы покажем вам, как установить VNC Server на Linux Mint 20. Для тех из вас, кто не знал, Node.js — это платформа Javascript для программирования, которая позволяет пользователям очень быстро создавать сетевые приложения. Если вы используете Javascript как во внешнем, так и в серверном интерфейсе, это означает, что ваша разработка может быть более последовательной и разрабатываться в рамках одной и той же системы.
В этой статье предполагается, что у вас есть хотя бы базовые знания Linux, вы знаете, как использовать оболочку, и, что наиболее важно, вы размещаете свой сайт на собственном VPS. Установка довольно проста и предполагает, что вы работаете с учетной записью root, в противном случае вам может потребоваться добавить ‘ sudo ‘ к командам для получения привилегий root. Я покажу вам пошаговую установку VNC Server на Linux Mint 20 (Ульяна).
Установить VNC Server на Linux Mint 20 Ulyana
Шаг 1. Перед запуском приведенного ниже руководства важно убедиться, что ваша система обновлена, выполнив следующие apt команды в терминале:
Шаг 2. Установка окружения рабочего стола.
Выполните следующую команду, чтобы установить рабочий стол XFCE:
Шаг 3. Установка VNC-сервера на Linux Mint 20.
Установите сервер TightVNC, используя следующую команду:
После завершения установки введите следующую команду:
Вам будет предложено установить пароль для VNC-сервера. Введите пароль, а затем подтвердите его повторным вводом.
Шаг 4. Настройте VNC.
Сначала остановите сеанс VNC с помощью следующей команды:
Затем создайте резервную копию файла сценария запуска по умолчанию:
Теперь отредактируйте xstartup файл:
Вставьте в этот файл следующие строки:
Сделайте xstartup файл исполняемым:
И, наконец, начнем vncserver снова:
Шаг 5. Создайте сценарий запуска системы VNC-сервера.
Еще раз остановим VNC-сервер, чтобы мы могли изменить файлы конфигурации:
Теперь создайте новый файл модуля для VNC. Юнит-файл кодирует информацию о сервисе:
Вставьте следующее, заменив idroot его своим именем пользователя. Вы также 1280×800 можете выбрать желаемое разрешение:
Теперь перезагрузите systemd процессы, используя следующую команду, чтобы изменения вступили в силу:
Шаг 6. Подключение к VNC-серверу.
Чтобы получить доступ к удаленному рабочему столу на сервере VNC из системы Windows, в вашей системе должна быть установлена программа просмотра VNC. Доступны различные программы просмотра VNC. Загрузите любой и установите его в своей системе, например:

Поздравляю! Вы успешно установили VNC . Благодарим за использование этого руководства для установки последней версии VNC Server в системе Linux Mint. Для получения дополнительной помощи или полезной информации мы рекомендуем вам посетить официальный сайт VNC .
Источник
Как установить сервер VNC на Linux
Virtual Network Computing (VNC) позволяет создавать совместный доступ другим удалённым пользователям к окружению рабочего стола локального хоста по сети. Для предоставления доступа к рабочему столу, на локальном хосте должен быть запущен VNC сервер, а удалённые пользователи подключаются к серверу VNC, используя какой-либо клиент просмотрщика VNC.
В этой инструкции я объясню как настроить VNC сервер на Linux. Для этого я буду использовать vino, программное обеспечение VNC сервера для окружения рабочего стола GNOME.
Для установки VNC сервера vino на машину с Debian, Ubuntu или Linux Mint:
Для установки VNC сервера vino на машину с Fedora, CentOS или RHEL:
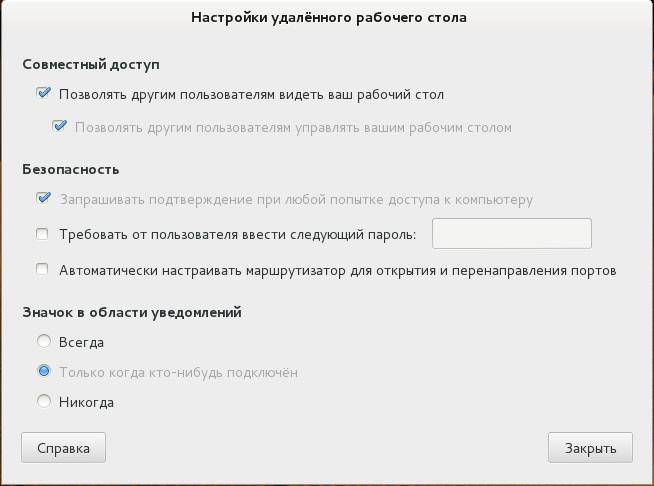
После установки, вы можете запустить vino и включить сервер VNC введя команду vino-preferences.
Вышеприведённая команда откроет окно настроек vino для доступа к рабочему столу как показано ниже. В окне там где «Совместный доступ» поставьте галочку, чтобы позволять другим пользователям видеть ваш рабочий стол. Также можете установить VNC пароль. Когда настройка сделана, это окно можно закрыть.
По идее, утилита vino-preferences сама должна запустить сервер VNC. Если VNC сервер не запущен по каким-то причинам, вы можете запустить VNC сервер вручную следующим образом.
На последних Linux Mint с рабочим столом Cinnamon, как известно, vino-preferences отсутствуют. Для включения настройки VNC сервера в Mint на рабочем столе Cinnamon, используйте вместо этого dconf-editor, как это описано здесь.
Вы можете проверить, запущен ли vino набрав следующую команду.
Как видно выше, vino-server запущен на TCP порте с номерами 5800 и 5900. Вы можете использовать любое программное обеспечение с функцией VNC клиента для подключения к VNC серверу.
Если VNC сервер настроен так, что вы должны подтверждать каждый VNC доступ к вашему рабочему столу, то вы увидите следующее всплывающее сообщение каждый раз, когда получен запрос VNC соединения. Только после того, как вы разрешите VNC, клиент VNC будет способен получить доступ на ваш рабочий стол.
Источник
Enabling remote desktop sharing (VNC) on Linux Mint 19
There is an updated version of this tutorial here!
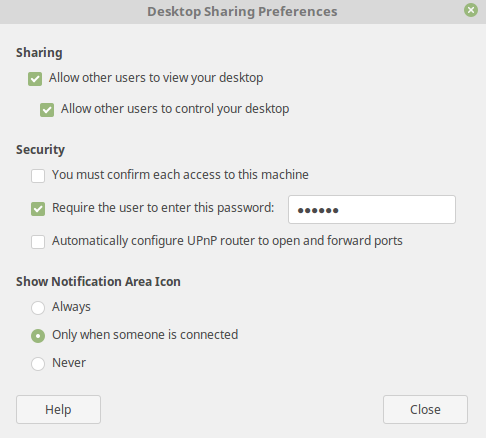
As of Linux Mint 19 there is no longer a menu option for the old vino-preference screen which allowed you to enable remote desktop at the push of a button.
 I will miss you simple setting screen…
Instead there is a new way to make this work :). Assuming you are starting from a fresh install we first need to install vino:
Once that’s done we can start the server using the command:
Don’t forget to set this up to run automatically if you want it to happen every time you boot up!
There are a few additional tweaks that I like to apply as well. The first is to disable requiring VNC encryption as I’ll only ever be connecting to this server via ssh anyway and VNC encryption isn’t universally supported.
gsettings set org.gnome.Vino require-encryption false
Next up I want to disable requiring someone on the remote machine to accept the fact that I’m connecting. To me it kind of defeats the whole purpose of remote desktop sharing if I have to be local to allow the remote connection access.
gsettings set org.gnome.Vino prompt-enabled false
Hopefully this post saves you some headache!
Share this:
46 Comments
You don’t have to do that, just remove latest vino then install deb from mint 18.3 or ubuntu 17.10
$sudo apt-get remove vino
then download deb at:https://ubuntu.pkgs.org/17.10/ubuntu-main-amd64/vino_3.8.1-0ubuntu12_amd64.deb.html, double click to install, then it works
this doesn’t work. it just says “Unable to init server: Could not connect: Connection refused
Cannot open display:
Run ‘vino-server –help’ to see a full list of available command line options”
when I run “/usr/lib/vino/vino-server”. And how would I even use this if it did work? you don’t show where the settings are or anything. This is kind of a crappy, vague tutorial.
I’m sorry you didn’t find this free tutorial on the internet helpful. Perhaps you’ve already solved the issue but allow me to try and help you if not. Did you perhaps run the command while still as root? If so try running it under your user account instead.
If by “you didn’t show where the settings are or anything” you mean physically on the disk then I think you may not understand how this works. You’re basically editing the GNOME equivalent of the Windows registry. If you simply use the command from a terminal it will set it for you.
I hope you got it working!
Thank you AD, this worked beautifully!
Tried all that. No charm.
“Don’t forget to set this up to run automatically if you want it to happen every time you boot up!”
Can you specify how to do this, and perhaps update the article with this info? Many thanks!
If you search in the menu for Startup Applications you can create a new entry in there and paste the command to run on startup.
I try it according to A.D instructions , but there are many options .. I try some , and it just works with .. vino_3.8.1-0ubuntu9.2_amd64.deb … I am using LM19 cinamon ..
Finally something that works. I hate linux to be honest, the simplest of things is so crazy hard. Spent 2 days minimum to get this to work.
This works great.
To people having problem maybe you dont have a monitor cable connected to your pc? that sucks but i know usually this will cause problem with remote desktop in linux. I had to buy a fake monitor dongle so that my linux pc thinks its connected to a monitor.
The sad part of all this is why did the good folks at Team Mint remove functionality that many liked in Mint 18? It’s always frustrating when distros take one step forward and two steps back. VNC used to be a simple native thing in most popular distros and, supposedly, the whole point of newer versions of Mint is to be more newbie friendly and less need for the terminal command line. But, in this case, they went the opposite direction.
As this thread shows, it’s also not as simple as just Googling the issue and finding an obvious solution. Instead you’ll find many different recommendations and lots of “this is how I do it but might not work for you” advice. Experienced Linux users tend to often do things differently, each having their favorite tools, desktops, distros, utilities, applications, etc. A newbie following their advice often will waste even more time and become even more frustrated.
I’m not sure it was the Mint team that removed the functionality. They don’t directly program every piece of software in the distribution and (as an example) other distros using the same version of remmina like Ubuntu (which Mint is based on) are also “missing” this functionality.
I suppose I should file a feature request against remmina when I get a moment…
Doing a bit of digging it seems (from memory and paraphrasing) the Mint team said it was a Mate issue. And the Mate team said it was a Vine issue. And the Vine folks were depending on a central gnome-based GUI configuration tool that apparently several distros, including Mint, eliminated/replaced. So the easy “fix” was to make newer versions of Vine only configurable from the command line.
My greater point is the net effect for Mint 19 users was a step backward from Mint 18. They could have included the old version of Vine or an entirely different remote desktop solution. Especially for Linux distros aimed at Windows users, like Mint, one goal should be providing as much similar native functionality as Windows has via the GUI desktop.
Sadly the “beauty” of even the latest Linux distros and desktops is often only skin deep. You don’t have to scratch very far below the swanky surface to find issues like this one. If even half the development effort that’s going into all the various desktop flavors, visual UI design, effects, themes, and other stuff that adds zero functionality, went into making the stuff that matters actually work right we’d have some great distros. There’s a big difference between UX and UI. IMHO, distros like Mint are far too focused on the superficial UI and not the total user experience. It’s form over function.
@DevGuy
Well said.
I completely agree with DevGuy.
Far too many people are focused on the glitz and glamour instead of the shovel and the unfinished ditch.
Thanks @Oryx and Jim. I like the premise of this website but I fear it won’t make much of a difference in making future distros a better replacement for Windows or MacOS. The collective “Borg” behind distros is beyond dysfunctional and already overloaded with too many requests. What’s more, most of the people actually doing the development work are hardcore Linux geeks that generally have little interest in catering to Windows or Mac users. It’s been that way forever and movement in the right direction is glacially slow. For the most part the contributors are not being paid for their efforts so, unless it’s something they personally want, they have little incentive to make things easy for Linux newbies.
On a brighter note I can report installing Remmina from the Cinnamon Software Manager works reasonably well as a client but you still need a VNC server at the other end. You have to also install the VNC plug-in which is listed right below it. I also tried RDP to a Windows machine and that also mostly works if you get all the boxes correct when you define the connection.
If you’re OK with a closed source free-for-home-use solution you might look at NoMachine: https://www.nomachine.com/ It performs much better than VNC, is multi-platform, can be configured as a client or server, and even supports remote audio which Remmina and other Linux VNC clients do not AFAIK.
I ran into this problem installing Linux Mint 19.1 and the easiest solution was installing Dconf-editor (from the Mint Software Manager). Then run dconf-editor and go to /org/gnome/desktop/remote-access/ and you can see the settings listed there. I changed:
authentication-method to [‘vnc’]
vnc-password to my vnc password (base64 encoded*)
prompt-enabled to false
notify-on-connect to false
require-encryption to false (you can leave it true for Vinagre clients, but many non-Linux vnc clients do not support encryption)
Also I had to go to System Settings / Startup Applications and add vino (command:
/usr/lib/vino/vino-server).
* – you can do that on the command line: echo “your-password” | base64
Since everyone’s Linux Mint environment is going to be just a little bit different than everyone else’s, you’ll have to play with the solutions a bit here to get them to work for you. However, they will work for you eventually.
As suggested above, use the Software Manager to install Vino and Dconf-editor and also any plug-ins/extensions for both of them that come up in the Software Manager’s screen.
Then, it’s just a matter of diddling with the vino settings with Dconf-editor until you get vino set to paramaters that your particular vnc client likes.
Authentication, for example, is tricky. You might want to just set it, and all the other optional stuff ‘Off’, until you get it to actually work for the first time and then experiment with the possible ways you can customize it for your environment.
Hey Jeff, thanks for the input i have been trying this fix however where it says to go to /org/gnome/desktop/remote-access/ with dconf editor I do not see the remote-access folder? – is there a permissions thing i am missing you think?
Navigate to “remote-access” using the dconf editor window. Just click on the 2nd search symbol in the upper left corner of the dconf window and navigate to “remote-access” by double clicking on the “org” and then the “gnome”, etc., etc. until you get to “remote-access”.
Hey Len thanks, however What i said was I did navigate to the /org/gnome/desktop folder but the remote access folder is not there…
Oh, sorry. I misunderstood.
I don’t know why it would not be there for you.
Did you Apt-get install Vino ok? Maybe remove Vino and reinstall it. I don’t remember if I installed it from a command line in terminal or used the Software Manager from the menu. Probably the Software Manager, I think.
I installed and removed Vino a few times with a good bit of cursing in between. I think the cursing is optional but who knows…
Anyway, good luck with it.
Yea Thanx Len i guess that will be my next move to remove vino, I did it from terminal will try software manager next time
we are about to get a new Mint 19.1 mini pc, looking on the instructions, two thing are unclear:
1. in what stage i will be promoted to set up the VNC server password?
2. How do i set it to run automaticlly upon startup?
Dori, I’ll try and help.
First, please read and understand all the article’s text above as well as each of the comments, too. Some of that is critical and without it, you will not succeed.
Second, install Vino and Dconf-editor as explained above.
Third, use Dconf editor and navigate to the Vino remote access settings and therein you will find the password setting amongst all the other settings for Vino.
Please understand that the Dconf-editor is NOT a file editor. It edits the Linux equivalent of the Windows registry. Nothing to do with directories or files.
Be patient and careful and try to examine and explore your surroundings as you go through the procedure. Examine the various options and, if you don’t understand one or another of them, Google the item and get an explanation.
Hope that helps. Good luck with it.
I almost forgot… To set a program to run automatically on startup go to your menu and then “Preferences” and “Startup Applications”. At least, that’s the way it works on my Mint Mate 19.1 system. If you have Cinnamon, it may be a bit different.
And I know I already said it above, but I strongly suggest taking some time to explore and poke around in things like, say… “Menus”. You’ll find it very rewarding in a very practical way.
Источник


