- How to mount usb drive in a linux system
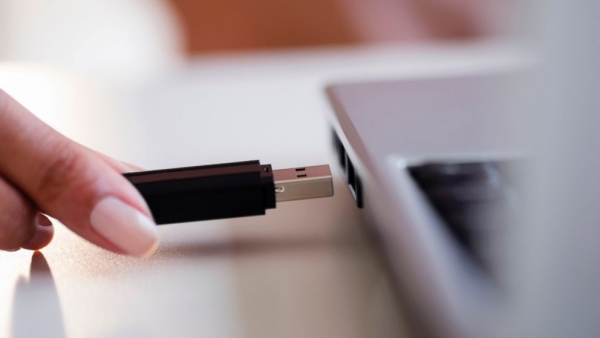
- Step 1: Plug-in USB drive to your PC
- Step 2 – Detecting USB Drive
- Step 3 – Creating Mount Point
- Step 4 – Delete a Directory in USB
- Step 5 – Formatting the USB
- Format vs Fat FileSystem
- Format NTFS FileSystem
- Format EXT4 FileSystem
- USB storage devices (Русский)
- Contents
- Монтирование USB устройств
- Автоматическое монтирование с помощью udev
- How to Mount USB/External Disks/CD Drive in Linux
- Syntax
- Mount and change permissions on external drives
- Mounting CD Drive
- Mounting a USB Device
- Mounting an ISO Image
- Mounting Hard Disk partitions
- How to Unmount Devices in Linux
- To un-mount a floppy drive
- To un-mount a CD ROM drive
- To un-mount a USB drive
- How to Mount USB Drive on Linux
- About the author
- Zeeman Memon
- Как примонтировать флешку в Linux
- Монтирование флешки в Linux
- Автоматическое монтирование флешки в Linux
- Выводы
How to mount usb drive in a linux system
Do you know “how to use USB memory sticks with Linux”, If you are not sure then this article describes “how to mount USB drive on a Linux system with command line interface”
Universal serial bus, or USB (also known as Flash drive), is an electronic communications protocol that is commonly used in computer accessories and other small devices. If you have an up-to-date Linux system and a modern Desktop environment, your device should show up on your desktop, with no need to open a console. There are few important factors which are involved in learning how to mount USB drive with Linux machine.
Following are the step by step instructions to understand further –
Step 1: Plug-in USB drive to your PC
Step 2 – Detecting USB Drive
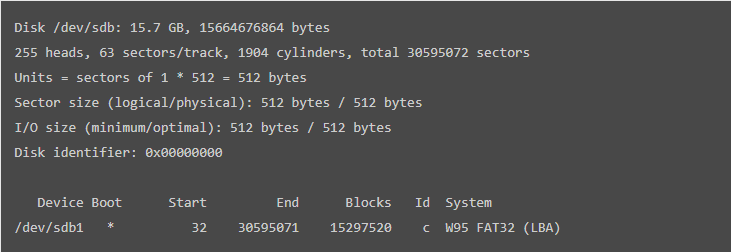
After you plug in your USB device to your Linux system USB port, It will add new block device into /dev/ directory. To verify it, use the following command –
The sample output should be like this –
We can observe from the above result that, device boot, blocks, id and system format are displayed.
Step 3 – Creating Mount Point
To mount the USB, use the following command –
To create a directory in the mounted device, use the following commands –
The above command creates a directory called john in USB device.
Step 4 – Delete a Directory in USB
To delete a directory in USB, use the following command –
Step 5 – Formatting the USB
You should unmount the device first to format the USB device, then use the following command to unmount the device –
Now use either of the commands as per file system based on your requirement. To format a USB drive, users generally prefer VFAT or NTFS file systems because they can be easily mounted on Windows operating systems and Linux systems.
Format vs Fat FileSystem
To format USB with vFat File System, use the following command –
Format NTFS FileSystem
To format a USB Flash Drive with NTFS file system, use the following command –
Format EXT4 FileSystem
To format a USB with EXT4 file system, use the following command –
Congratulations! Now, you know “How to Mount USB Drive in a Linux System?”. We’ll learn more about these types of commands in our next Linux post. Keep reading!
Источник
USB storage devices (Русский)
В этом документе описываются способы использования различных USB накопителей в Linux. Это также касается и других устройств, таких как цифровые камеры или телефоны, которые распознаются как обычные USB накопители.
Contents
Монтирование USB устройств
Если у вас свежая система со стандартным ядром Arch и современная среда рабочего стола, USB устройство должно автоматически появляться на рабочем столе при подключении, и лезть в консоль не потребуется.
Если этого не произошло см. далее.
Автоматическое монтирование с помощью udev
См. Udev:Монтирование съёмных устройств. Простой способ настройки автомонтирования жестких дисков для однопользовательских систем с использованием udev заключается в следующем: создается файл /etc/udev/rules.d/automount.rules со следующим содержимым:
и исполняемый от root файл /usr/lib/udev/domount со следующим содержимым (необходимо вставить корректные для Вашей системы значения):
При подключении USB-диска происходит автомонтирование и открывается окно терминала. Чтобы размонтировать устройства, просто нажмите Ctrl + D в окне терминала. Место монтирования определяется в /etc/fstab или, при его отсутствии, создается на основе UUID раздела.
Чтобы ваш пароль не запрашивался при команде размонтирования, добавьте (заменить на ваше имя пользователя) имя_пользователя в /etc/sudoers с помощью команды visudo. См. Sudo (Русский)
Если терминал не появляется проверьте команду его запуска. Например, в xfce4, используется команда «Terminal -T -e
Источник
How to Mount USB/External Disks/CD Drive in Linux
In Linux mounting of devices (external disks,usb,cd drive) is done with a command known as mount . While mounting any device you should pass the argument to the command that what is the name of the partition and where do you want to mount the same. The mount point should be any directory present on your system.
Syntax
For Instance, if you want to mount a Floppy drive then,
So, here the /dev/fd0 is the alias for floppy drive in Linux system and /mnt/floppy is the mount point. It is the folder where we are mounting the floppy drive. So, if you want to view the files under floppy disk then you should directly access /mnt/floppy folder.
Note: In some Linux distribution, alias for the floppy drive may be different so, you should check the same before executing the command.
Mount and change permissions on external drives
By default, it’s only the user of the pen drive that has read and write permissions as shown below. The group and other users are restricted from having both read and write permissions as shown below. The pen drive, in this case, is labeled KIARIE found in /run/media/tarantula/ file path.
Output
This can also be seen in the file manager properties of the flash drive below

To grant other people access to the drive including all files and folders in the drive, run the following commands:
First, create a mount point in the /media/ directory. Let’s call it /data
Run fdisk -l to find out the partition information of the flash drive. If it’s the only removable drive, you’ll find that it’s indicated as /dev/sdb1 Implying that it’s the first partition of the second hard drive with a filesystem of FAT32.
The second step is to mount it to /mnt/data with read and write options.
This procedure will only work for an external drive formatted in ext4 format. If you are using a drive in Vfat or FAT 32 filesystem, you’ll need to convert it to ext4 using Gparted utility tool. Ensure to back up any data before conversion as this leads to formatting of the drive from one filesystem to another.
Another way you can mount and change permissions on external drives is by using pysdm package. However, this package has been obsoleted and is no longer in use for Ubuntu versions 12.10 and later.
When changing files permissions on the last step, you can also use the octal system i.e chmod +R 766 /mnt/data to give the group and other users read and write permissions. Thank you.
Mounting CD Drive
Here, the alias for the CD ROM is /dev/cdrom and the mount point is /mnt/CD.
Mounting a USB Device
Once we plug the USB device in the port, Linux will detect it as a new device and create its alias in /dev directory. To check that alias you can execute the following command.
Once you identify your USB device from the above output then you can mount the same with the following command:
Here, the mount point that should be creating in the system is /mnt/test.
Mounting an ISO Image
ISO Image is actually an image of any optical disk having extension .iso.
Here, -o loop option is used to support a file system that is in ISO format. It helps us to access such file system.
Mounting Hard Disk partitions
Once you have created a partition of your Hard Disk in Linux box then you should also mount those partitions to access them. Here, you can use the same command to find out the total partitions of the hard disk.
Once you identify the partition which you want to mount then use the following command to mount the same.
Here, the mount point that should be created in the system is /mnt/part1.
How to Unmount Devices in Linux
Un-mount means detaching any device from the Linux system and it is generally done with umount command. So, while un-mounting any device you should tell Linux what device to un-mount. For example,
To un-mount a floppy drive
To un-mount a CD ROM drive
To un-mount a USB drive
Assuming /dev/sda1 is the usb mount partition
This will detach the device from your Linux box. You can then remove that device from the system.
Источник
How to Mount USB Drive on Linux
Although, it is a time-consuming task, but once you know how to mount USB drive in LINUX, you will feel lightened and it would be easier for you to perform it the next time when needed. If you are having an updated LINUX System, and a modern computer environment, then your device shall show up on the desktop of your PC itself, but to make it happen at even an older computer, you need to read this article.
Here, in this article, we will discuss about how to mount USB drive in LINUX along with instructions on how to create, delete & format a USB Drive straight from your LINUX system. This should be an easy task once you get the hang of it, just make sure you follow all the steps carefully and you won’t have problems the next time you decide to mount your USB drive in Linux.
1) Plug-in your USB drive to your PC
First, you need to plug in your USB drive to your LINUX-based personal computer (PC) in which you want to access the USB drive.
2) Detecting the USB Drive on PC
The second step is the most important and easy step to accomplish. After plugging-in your USB device to your LINUX system’s USB port, the system will add a new block device into the /dev/ directory. To check that, use the following command – Firstly, open your command line and write the following command in CLI:
The resulting screen should be seen with the text like this:
The result above shows that device boot, blocks, id and system format are displayed.
After this step, you will need to create a mount point. In order to do so,
3) Create a Mount Point
In this step, we will guide you to create the mount point. Just type the following command to move forward:
In above given command, ‘sbd1’ refers to the name of your USB Device.
4) Creating a Directory in the USB Drive
Next, you will be required to create a directory in the mounted device. For that, use the following command:
Above commands will create a directory named ‘John’ in the USB Drive. You can create the directory of your desired name by replacing it with John. e.g.
This command will create a directory in the USB Drive with the name ‘Google’.
This step will complete your query of how to mount USB Drive in LINUX. After this step, a new directory will be created
5) Delete a Directory in USB Drive
After telling you about creating a Directory on your USB, its time to learn about how you can delete a directory on your USB Drive. To delete a directory, write the following command:
The above given command will delete the drive named as ‘John’. But if you want to delete a directory with your desired name, just replace it with ‘John’. e.g.
The above code deletes the directory named ‘Google’. Similarly, you can write any of your desired name to delete a directory on your USB Drive on a LINUX operated computer.
6) Formatting the Mounted USB in LINUX
In order to format a USB Flash Drive, you need to unmount the drive first. Use following command to un-mount the USB:
In above-given command, ‘sbd1’ refers to the name of your USB Device. Next, you have to choose either of the following codes as per your USB Drive file systems:
- For VFAT (FAT32) File System
To format VFAT (FAT32) file system, use:
In above given command, ‘sbd1’ refers to the name of your USB Device.
- For NTFS File System
To format NTFS file system USB Drive, use:
In above given command, ‘sbd1’ refers to the name of your USB Device.
- For EXT4 File System
For formatting EXT4 file system USB Drive, use:
In above given command, ‘sbd1’ refers to the name of your USB Device.
With that I have showed you the basics of mounting UBS drives on linux.
About the author
![]()
Zeeman Memon
Hi there! I’m a Software Engineer by degree, Blogger by skills who loves to write about tech, develop websites & do SEO. You can reach out to me on LinkedIn.
Источник
Как примонтировать флешку в Linux
В наши дни очень большую популярность у пользователей набрали USB флешки. Они используются для обмена файлами, различными фильмами и документами, установки операционных систем, а также восстановления системы после сбоя. Чтобы работать с флешкой в Linux ее нужно примонтировать в корневую файловую систему.
Дело в том, что организация файловой системы Linux немного отличается от того, что мы привыкли видеть в Winodws. Здесь нет никаких дисков C,D,E и так далее, есть только корень, самая верхняя точка файловой системы, в подкаталоги которой подключаются все жесткие диски и внешние носители.
Если в системе используется окружение рабочего стола, то оно, как правило, берет на себя всю низкоуровневую работу чтобы выполнить монтирование флешки в linux. Система обнаруживает подключенную флешку и в системном лотке всплывает уведомление о подключенном устройстве. Дальше остается кликнуть по значку флешки, чтобы система выполнила все нужные для ее монитрования действия. Но если окружение рабочего стола не запущенно или вам нужно работать в консоли можно выполнить все действия по монтированию флешки вручную.
В этой инструкции мы рассмотрим монтирование usb флешки в linux через терминал, а также настройку автоматического монтирования для оконных менеджеров, которые не поддерживают такую возможность.
Монтирование флешки в Linux
Самое первое, что нужно сделать после того, как вы подключили флешку — узнать имя ее файла в системе. В Unix все устройства имеют свои файлы и именно через эти файлы система и программное обеспечение взаимодействуют с ними.
Файлы флешек и других устройств хранения данных находятся в каталоге /dev. Устройства нумеруются по алфавиту sda, sdb, sdc, sdd и т д. Так как флешка подключается последней у нее будет старшая буква. Например, sdb или sdc. Имя sda принадлежит жесткому диску. Можно, конечно, просто посмотреть содержимое каталога /dev/, но такой способ ненадежный. Мы воспользуемся утилитой fdisk.
Подключите флешку и выполните:

Как видите, здесь мы можем посмотреть детальную информацию об устройстве. Имя файла, список разделов, формат таблицы разделов, список разделов. А главное для нас, размер раздела и его файловую систему. Теперь не сложно понять какая из них флешка. В этом примере это /dev/sdc1
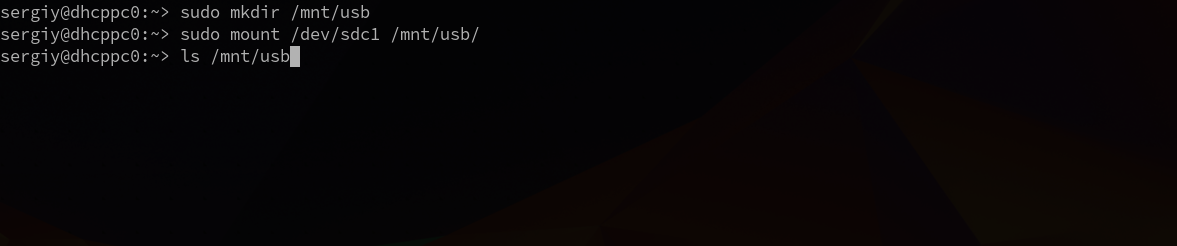
Создаем папку для монтирования:
sudo mkdir /mnt/usb
Теперь монтируем флешку с помощью команды mount:
sudo mount /dev/sdc1 /mnt/usb
Если знаете файловую систему флешки, то лучше ее указать с помощью опции -t. Чаще всего используется FAT, так как ее легко открывают как Windows так и Linux системы:
sudo mount -t vfat /dev/sdc1 /mnt/usb
Монтирование осуществляется от суперпользователя, но если нужно чтобы отмонитровать флешку мог любой нужно указать опцию users:
sudo mount -t vfat -o users /dev/sdc1 /mnt/usb
По умолчанию владельцем файлов на флешке при монтировании устанавливается root, поэтому если вы захотите работать с флешкой через файловый менеджер, то нужно будет его запускать с правами суперпользователя или же сразу примонтировать флешку в linux таким образом, чтобы владельцем был ваш пользователь. Для этого укажите группу и id своего пользователя в опциях uid и gid:
sudo mount -o users,uid=1000,gid=1000 /dev/sdc1 /mnt/usb
Удостовериться что флешка подключена можно посмотрев содержимое каталога, в который мы ее монтировали:
Или выполнив команду mount:

После завершения работы с флешкой не забудьте ее отмонтировать. Потому что иначе данные могут быть не сохранны или вообще повреждена файловая система флешки:
sudo umount /dev/sdc1
Автоматическое монтирование флешки в Linux
Популярные окружения рабочего стола выполняют монтирование флешки linux автоматически, как только она подключена к системе или по клику на ярлыке. Мы можем это реализовать с помощью службы udisks2.
Udisks — это служба dbus, позволяющая другим программам и пользователю взаимодействовать с udev. Мы можем получать сообщения о только что подключенных устройствах, выполнять их монтирование и отключение. Окружения рабочего стола используют именно этот сервис для монтирования устройств.
Мы тоже можем использовать его для ручного монтирования. Здесь даже есть несколько плюсов. Во-первых, мы можем монтировать без прав суперпользователя, во-вторых, не нужно создавать папку.
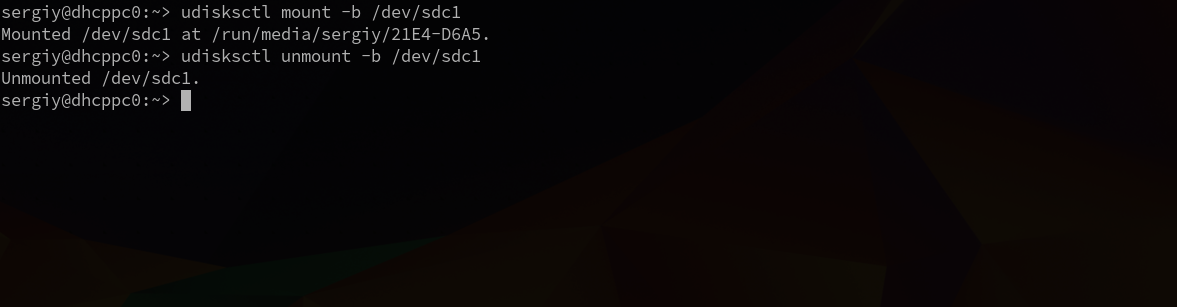
Для монтирования используется такая команда:
udisksctl mount -b /dev/sdc1

Здесь /dev/sdc1 — файл нашей флешки, а опция -b указывает, что нужно монтировать блочное устройство. Так же как и в mount здесь можно задать опции монтирования -o и файловую систему -t. Флешка будет примонтирована в папку /run/имя_пользователя/uuid-флешки/
Для размонтирования используется аналогичная команда:
udisksctl unmount -b /dev/sdc1
Автоматическое монтирование usb флешки в linux можно настроить с помощью утилиты udiskie. Все новые подключенные флешки будут автоматически подключаться, после подключения устройства будет всплывать окно с предложением открыть файловый менеджер, а также значок, с помощью которого можно получить доступ к каждому из устройств.
Устанавливается утилита в Ubuntu командой:
sudo apt install udiskie
Дальше остается запустить программу:
Теперь все подключаемые устройства будут автоматически монтироваться с помощью udisks. Рассмотрим что значат опции:
- -a — выполнять автоматическое монтирование
- -n — показывать всплывающее уведомление
- -t — показывать значок в трее.
Выводы
Теперь монтирование флешки linux не вызовет у вас проблем. Даже если у вас не будет работать окружение рабочего стола и придется делать все вручную. Если остались еще вопросы, спрашивайте в комментариях.
Источник


