- DKIM для Sendmail на CentOS 6, 7
- Configure sendmail on CentOS to allow sending of email from localhost
- How to Install Sendmail Server on CentOS/RHEL 7/6
- 1. Install Sendmail
- 2. Configure Sendmail Server
- 3. Recompile Sendmail Configuration
- 4. Configure Domain-based E-mail Routing
- [Complete Guide] How to Install Sendmail Server on Centos 7?
- Introduction
- Prerequisites Before you Install Sendmail Server on Centos 7
- Step 1
- Step 2
- Step 3: Configure Sendmail Server
- Step 4: Make Auth Directory
- Step 5: Recompiling Sendmail Configuration
- Step 6: Send Your First Email
- Common Errors and Exceptions
- #Error 1:
- #Error 2: Sendmail Error 550 5.1.1 “User Unknown”
- Integrate Sendmail with Pepipost SMTP
- Linux настройка sendmail centos
- Начальные требования
- У нас часто спрашивают, сколько нужно заплатить
- Баллы опыта
- Тесты и сертификат
- Комментарии к урокам
- Для преподавания оффлайн
- Если нет интернета
- Как проходить учебный курс?
DKIM для Sendmail на CentOS 6, 7
Дата 29.12.2016 Автор Alex Рубрика Интернет, Сервер
Если попытаться отправить мэйл с только что созданного сервера, то скорее всего он не дойдёт до адресата. Потому что письмо не будет иметь необходимых подписей, которые бы говорили, что оно не является спамом. К числу таких подписей относится DKIM. В статье описывается процесс настройки DKIM подписи.
Всё описание будет верным для CentOS и установленным на неё SendMail.
Буду приводить пример только для настройки подписи исходящей почты. Без проверки входящей. Потому что лучше всего принимать почту в «Яндекс.Почта для доменов» — это безопасно и бесплатно.
В примерах будет указан домен alexgur.ru. Меняйте его на домен, который хотите подписать. Конечно же, сайт должен находится на том сервере, куда ссылается домен.
Установка DKIM
DKIM подпись — это самый сложный по настройке способ придания веса мэйлам. Для сравнения, чтобы настроить SPF надо прописать одну TXT запись к DNS. А для DKIM нужен примерно час возни с сервером. И то при условии, что делаешь такую процедуру каждый день и помнишь всю последовательность действий.
Эта команда загрузит и установит OpenDKIM, который будет подписывать исходящие письма.
Теперь надо сгенерировать private и public ключи для всех доменов, которым необходимо сделать подпись почты. Ключ private хранится на сервере и не доступен для просмотра из вне. Ключ public находится в DNS записи домена и виден всем. Так что принимающий от нас почту сервер всегда может посмотреть эту запись и подтвердить достоверность DKIM подписи на письме.
Создаём папку для ключей, создаём ключи и настраиваем права доступа:
mkdir -p /etc/opendkim/keys/alexgur.ru
/usr/sbin/opendkim-genkey -D /etc/opendkim/keys/alexgur.ru/ -d alexgur.ru -s default
chown -R opendkim:opendkim /etc/opendkim/keys
chown -R opendkim:opendkim /etc/opendkim/keys/alexgur.ru
chmod 640 /etc/opendkim/keys/alexgur.ru/default.private
chmod 644 /etc/opendkim/keys/alexgur.ru/default.txt
Отлично! Ключи созданы. Теперь надо настроить OpenDKIM, чтобы тот подписывал письма. Обратим внимание на четыре файла:
- /etc/opendkim.conf – главный файл конфигурации OpenDKIM
- /etc/opendkim/KeyTable – список ключей, которыми можно подписывать
- /etc/opendkim/SigningTable – список доменов, почта с которых должна быть подписана
- /etc/opendkim/TrustedHosts – список серверов, которым надо доверять при подписывании или верифицировании
Придётся покопаться в каждом файле. Пойдём по порядку.
Источник
Configure sendmail on CentOS to allow sending of email from localhost
For some of my Drupal sites and PHP scripts (and shell scripts) that I run on a VPS I manage, I need to simply be able to send outgoing emails from arbitrary email addresses. I could go into all the details of DNS SPF records and MX records here, but that’s something you’ll need to research on your own. This post simply shows how to install and configure sendmail on a CentOS box to just allow outgoing mail from php’s mail() function, the mail command line utility, etc., and only from localhost (127.0.0.1):
First, install sendmail with $ sudo yum install sendmail sendmail-cf .
Then, configure sendmail by editing the file /etc/mail/sendmail.mc (don’t edit the sendmail.cf file — we’ll auto-generate that after setting things correctly in sendmail.mc).
- Configure DAEMON_OPTIONS to only allow sending from localhost/smtp: DAEMON_OPTIONS(`Port=smtp,Addr=127.0.0.1, Name=MTA’)dnl
- Set the LOCAL_DOMAIN option to your hostname: LOCAL_DOMAIN(`example.com’)dnl
Now, to update sendmail’s configuration, enter $ sudo make -C /etc/mail , and then restart sendmail with $ sudo service sendmail restart .
You’ll also want to make sure your hostname is set correctly (this will be the default from address domain); check it by entering $ hostname . if it’s incorrect, you can set it explicitly in /etc/sysconfig/network as the HOSTNAME variable. You might also want to add your hostname to /etc/hosts as the first result for 127.0.0.1.
(This guide assumes you’re using RHEL or CentOS/Fedora. ).
Источник
How to Install Sendmail Server on CentOS/RHEL 7/6
Sendmail is a MTA (Mail Transfer Agent) server used for transferring email from between different hosts. Sendmail uses SMTP (Simple Mail Transfer Protocol) protocol. Most of the system administrators preferred to use Sendmail server as MTA than other MTAs.
RHEL 5 or its earlier versions were using Sendmail as a default mail server, But newer version’s of RHEL based systems adapted postfix as a default mail server. Most of the users are familiar with Sendmail and want to use it with version 6 also. This article will help users for installing Sendmail server on RHEL 7/6/5 or with minimal configuration.
1. Install Sendmail
If you don’t have installed Sendmail using the following command to install Sendmail with other required packages using yum package manager.
2. Configure Sendmail Server
Before starting configuration we must know about various Sendmail configuration files exists in /etc/mail directory.
2.1 Comment out below line in /etc/mail/sendmail.mc to allow receiving email from anywhere. To comment a line in sendmail.mc, just put dnl at start of line.
2.2 Add this line also in sendmail.mc above ‘MAILER’ option
2.3 Add your PC’s full hostname in this file.
3. Recompile Sendmail Configuration
m4 ia a macro processor to compile the Sendmail configuration files. m4 is stream-based, that is, it doesn’t understand about lines.
Restart Sendmail service
4. Configure Domain-based E-mail Routing
As we read above that virtusertable file used for aliasing, allowing multiple virtual domains to be hosted on one machine.
1. All emails addressed to @example.com domain delivered to [email protected]
2. All emails addressed to [email protected] will forward to local user jack.
3. All emails addressed to @mydomain.com will forward to domain @otherdomain.com with corresponding usernames.
4. All emails addressed to @otherdomain.com will be rejected my mail server with acknowledging sender with the message
After making all changes in virtusertable execute following command to create updated virtusertable.db file containing the new configuration.
Now restart Sendmail service
Thanks for reading this article. I hope this article will help you to configure Sendmail on CentOS and Red Hat systems.
Источник
[Complete Guide] How to Install Sendmail Server on Centos 7?

The author voluntarily contributed this tutorial as a part of Pepipost Write to Contribute program.
Introduction
Sendmail is a feature-rich MTA (Mail Transfer Agent) uses SMTP protocol for sending mail. Though Sendmail has been replaced by postfix in modern RHEL versions it is widely used in RHEL 5 or its earlier version. Sendmail is recommended by most of the system administrator as an MTA(Mail transfer agent) server over other MTAs.
Prerequisites Before you Install Sendmail Server on Centos 7
Highly recommended to have root privileges in order to perform the below steps:
Step 1
Add the centos 7 EPEL repositories, open terminal and paste the below command:
Step 2
Install Sendmail with dependency from yum package manager
(Note: m4 is a macro processor you need to use to compile Sendmail configuration file. )
Once the installation is done, you will be getting output like this:
Step 3: Configure Sendmail Server
Before directly edit /etc/mail/sendmail.mc for configuration we need to understand important file existence in /etc/mail directory.
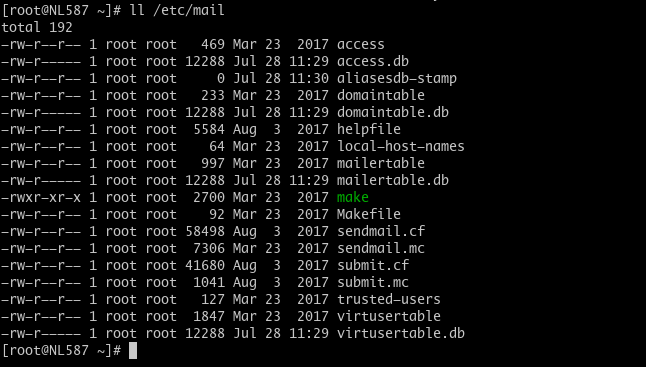
- access: allowing or denying other systems to use Sendmail for outbound emails.
- domaintable: used for domain name mapping for Sendmail.
- local-host-names: used to define an alias for a host.
- mailertable: used to override routing for particular domains.
- virtusertable: allowing multiple virtual domains to be hosted on one machine.
Make the following changes in sendmail.mc file below is the command:
Note: Set your SMTP hostname above
#Add the below two lines in your sendmail.mc file to listen on port 465 and 587:
#Uncomment the below lines:
#Add the below lines:
#Uncomment for Sendmail to listen on port 587
#Uncomment for Sendmail to listen on port 587
#Mention your domain and uncomment
Save and exit the file.
Step 4: Make Auth Directory
By assigning proper permission to make auth directory inside /etc/mail
Create a new file client-info and below auth in the file.
Add your relay IP
Connect: [your-ip ] RELAY
Step 5: Recompiling Sendmail Configuration
Update Sendmail configuration by compiling the /etc/mail/sendmail.mc file using m4 macro processor.
Once you have recompiled restart the service using below command.
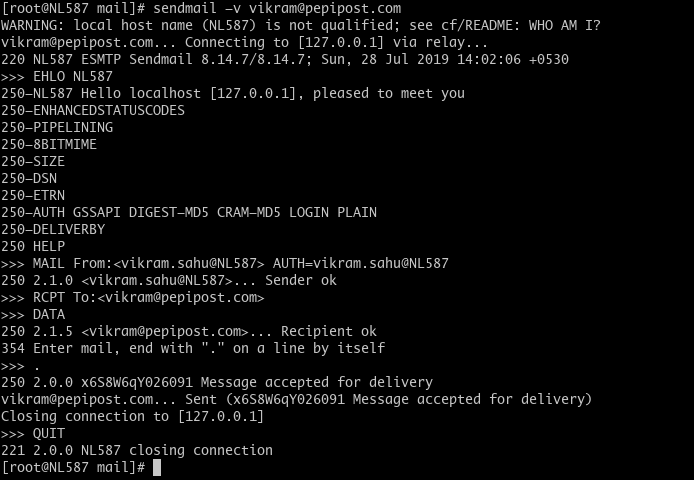
Step 6: Send Your First Email
Common Errors and Exceptions
#Error 1:
This issue occurs when your hostname/domain name is not mapped with your server. It’s a warning, that your hostname won’t work outside your local network.
You can simply set your hostname to a registered domain by using below command:
#Error 2: Sendmail Error 550 5.1.1 “User Unknown”
‘550 5.1.1 User unknown’ is the most common issue which occurs while sending mails to Exchange/Recipient servers. 550 error means there is a problem with the recipient server due to which such emails are not delivered. Such issues arise not only with the Sendmail server but with postfix, Exim, etc.
Possible reasons for the occurrence of this issue:
1. Wrong Recipient address
- The sender would get a bounce message «550 5.1.1 User unknown» if the recipient mailbox is not available.
- This occurs due to human error while subscribing to the mailing list or if you have purchased an email list (this is a bad practice that can result in a downgrade of your IP reputation).
- Recipient mailbox is moved or deleted from the recipient mail server.
- A misconfiguration or bug on the recipient mail server can cause the unavailability of recipient mail account
How to avoid it?
Always validate email id by sending an email confirmation before sending your regular updates.
2. DNS setting is incorrect for domain
- 550 error can also occur if MX entry is not resolving correctly or DNS settings are incorrect e.g. MX for a domain, xyz.com is resolving some other domains MX.
- In the above case, the recipient account will be unavailable due. so if you are sending an email to [email protected] and it is resolving wrong MX then it will try sending mail to [email protected]
How to avoid it?
Check your MX record by using dig from the command line:
Note: If dig is not installed try using;
3. Email filters set for the domain
- These filters are mostly applied to cooperate mailboxes. Also, if the recipient email account has a forwarder set and that is incorrectly set to a nonexisting account it will result in 550 error.
- Filtering for incoming mails using email filters or anti-spam firewalls can end up bouncing emails from certain sender servers.
How to avoid?
Check your outgoing firewalls and rules, if any. If all good, contact recipient server support and get the email filters verified for any erroneous filters or rules that can be blocking mails.
Hope you liked this article, where the A-Z of Sendmail is explained in simple language. Using these simple steps you can install Sendmail Server on Centos.
In case you are facing some issues which are not listed above in the tutorial, or you have some suggestions, then please feel free to contribute below in comments.
Integrate Sendmail with Pepipost SMTP
No SMTP connection issues. Send your first 30,000 emails for free.
Источник
Linux настройка sendmail centos
Курс предназначен пользователям, администрирующим сайты на платформе «1С-Битрикс: Управление сайтом». Курс Администратор. Модули позволяет освоить методы выполнения расширенных задач по администрированию модулей не относящихся к коммерческой деятельности Для модулей, связанных с торговлей в Интернете создан отдельный курс Администратор. Бизнес. .
- методы работы с модулями системы некоммерческого плана;
- работа со специальными инструментами: Push&Pull, Служба сообщений и другие ;
- работа с модулями, обеспечивающим общение пользователей: форум, блоги и другие;
- организация документооборота и бизнес-процессов;
- настройка инструментов Веб-аналитики;
- и другие.
Начальные требования
Необходимый минимум знаний для изучения курса:
- базовые навыки компьютерной грамотности и навыков работы с ОС Windows;
- базовые знания о WWW и организации доступа к веб-серверу;
- базовые навыки установки и администрирования *nix-систем;
- знание системы в рамках курса Контент-менеджер Мы считаем, что вы этот курс уже прошли и знаете многое о Битриксе. Поэтому подсказок во всплывающих окнах будет намного меньше, чем в курсе Контент-менеджер.
Подробнее. , чтобы банально не путаться в интерфейсе. - знание системы в рамках курса Администратор. Базовый Мы считаем, что вы этот курс уже прошли и знаете многое об администрировании «1С-Битрикса». Поэтому подсказок во всплывающих окнах будет намного меньше, как и объяснений о том где и как выполнять общие задачи администрирования.
У нас часто спрашивают, сколько нужно заплатить
Курс полностью бесплатен. Изучение курса, прохождение итоговых тестов и получение сертификатов — ничего из этого оплачивать не нужно.
Но у нас есть Академия 1С-Битрикс, где можно обучиться на платной основе на курсах нашей компании либо наших партнёров.
Баллы опыта
В конце каждого урока есть кнопка . При клике на неё в Вашу итоговую таблицу опыта добавляется то количество баллов, которое указано в прочитанном После нажатия кнопки Прочитано! появится
окно подтверждения:
 уроке.
Периодически мы заново оцениваем сложность уроков, увеличивая/уменьшая число баллов, поэтому итоговое количество набранных Вами баллов может отличаться от максимально возможного. Не переживайте! Отличный результат — это если общее число набранных Вами баллов отличается от максимального на 1-2%.
Тесты и сертификат
После изучения курса вам будет предложено пройти тесты на сертификацию. При успешной сдаче последовательности тестов на странице Моё обучение можно просмотреть результат обучения и загрузить сертификат в формате PDF.
Комментарии к урокам
| На каждой странице курса авторизованный на сайте посетитель может дать комментарий к содержимому страницы. Комментарий — не форум, там не ведётся обсуждений или разъяснений. Это инструмент для сообщений нам об ошибках, неточностях. Для отправки комментария воспользуйтесь расположенной в правом нижнем углу окна браузера кнопкой: |  |
Для преподавания оффлайн
Если данный курс берётся в качестве основы для оффлайного преподавания, то рекомендуемая продолжительность: 4 дня (32 академических часа).
Если нет интернета
 Скачать материалы курса в формате EPUB. Файлы формата EPUB Чем открыть файл на
Android:
EPUB Reader
CoolReader
FBReader
Moon+ Reader
eBoox
iPhone:
FBReader
CoolReader
iBook
Bookmate
Windows:
Calibre
FBReader
Icecream Ebook Reader
Плагины для браузеров:
EpuBReader – для Firefox
Readium – для Google Chrome
iOS
Marvin for iOS
ShortBook
обновляются периодически, поэтому возможно некоторое отставание их от онлайновой версии курса. Версия файла — от 03.08.2021.
Как проходить учебный курс?
Источник


