- Linux-Blog – Dr. Mönchmeyer / anracon – Augsburg
- Linux, LAMP, Python – praxisnaher Einsatz im Alltag – Ein Blog für Linux-Anwender
- Fun with veth-devices, Linux bridges and VLANs in unnamed Linux network namespaces – III
- Using network namespaces and a virtual switch to isolate servers
- Yet another blog post on how to create a virtual network that connects network namespaces using a brdige, veth pairs and iptables.
- Setting up
- Closing thoughts
- Stay in touch!
Linux-Blog – Dr. Mönchmeyer / anracon – Augsburg
Linux, LAMP, Python – praxisnaher Einsatz im Alltag – Ein Blog für Linux-Anwender

Fun with veth-devices, Linux bridges and VLANs in unnamed Linux network namespaces – III
In the first blog post
Fun with veth-devices, Linux bridges and VLANs in unnamed Linux network namespaces – I
of this series about virtual networking between network namespaces I had discussed some basic CLI Linux commands to set up and enter network namespaces on a Linux system. In a second post
Fun with veth-devices, Linux bridges and VLANs in unnamed Linux network namespaces – II
I suggested and described several networking experiments which can quickly be set up by these tools. As containers are based on namespaces we can study virtual networking between containers on a host in principle just by connecting network namespaces. Makes e.g. the planning of firewall rules and VLANs a bit easier .
The virtual environment we want to build up and explore step by step is displayed in the following graphics:
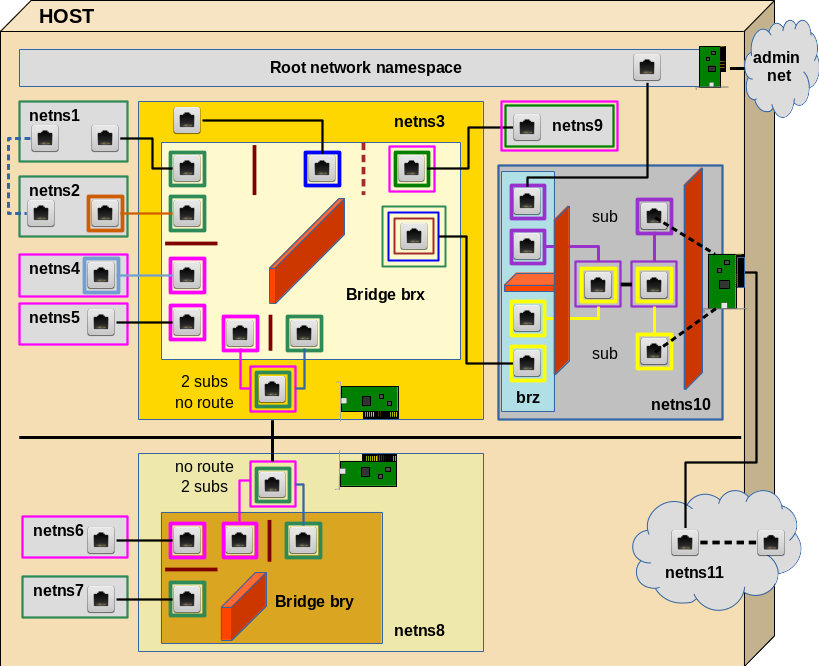
In this article we shall cover experiment 1 and experiment 2 discussed in the last article — i.e. we start with the upper left corner of the drawing.
Experiment 1: Connect two network namespaces directly
This experiments creates the dotted line between netns1 and netns2. Though simple this experiments lays the foundation for all other experiments.
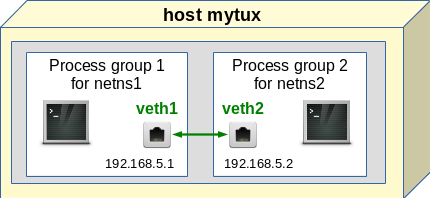
We place the two different Ethernet interfaces of a veth device in the two (unnamed) network namespaces (with hostnames) netns1 and netns2. We assign IP addresses (of the same network class) to the interfaces and check a basic communication between the network namespaces. The situation corresponds to the following simple picture:
What shell commands can be used for achieving this? You may put the following lines in a file for keeping them for further experiments or to create a shell script:
If you now copy these lines to the prompt of a root shell of some host «mytux» you will get something like the following:
Of course, you recognize some of the commands from my first blog post. Still, some details are worth a comment:
Unshare, background shells and shell variables:
We create a separate network (and uts) namespace with the «unshare» command and background processes.
unshare —net —uts /bin/bash &
Note the options! We export shell variables with the PIDs of the started background processes [$!] to have these PIDs available in subshells later on. Note: From our original terminal window (in my case a KDE «konsole» window) we can always open a subshell window with:
You may use another terminal window command on your system. The output redirection is done only to avoid KDE message clattering. In the subshell you may enter a previously created network namespace netnsX by
nsenter -t $pid_netnsX -u -n /bin/bash
Hostnames to distinguish namespaces at the shell prompt:
Assignment of hostnames to the background processes via commands like
nsenter -t $pid_netns1 -u hostname netns1
This works through the a separation of the uts namespace. See the first post for an explanation.
Create veth devices with the «ip» command:
The key command to create a veth device and to assign its two interfaces to 2 different network namespaces is:
ip link add veth11 netns $pid_netns1 type veth peer name veth22 netns $pid_netns2
Note, that we can use PIDs to identify the target network namespaces! Explicit names of the network namespaces are not required!
The importance of a running lo-device in each network namespace:
We intentionally did not set the loopback device «lo» up in netns2. This leads to an interesting observation, which many admins are not aware of:
The lo device is required (in UP status) to be able to ping network interfaces (here e.g. veth11) in the local namespace!
This is standard: If you do not specify the interface to ping from via an option «-I» the ping command will use device lo as a default! The ping traffic runs through it! Normally, we just do not realize this point, because lo almost always is UP on a standard system (in its root namespace).
For testing the role of «lo» we now open a separate terminal window:
And: Within the same namespace and «lo» down you cannot even ping the second Ethernet interface of a veth device from the first interface — even if they belong to the same network class:
Open anew sub shell and enter e.g. netns1 there:
Connection test:
Now back to our experiment. Let us now try to ping netns1 from netns2:
OK! And vice versa:
Our direct communication via veth works as expected! Network packets are not stopped by network namespace borders — this would not make much sense.
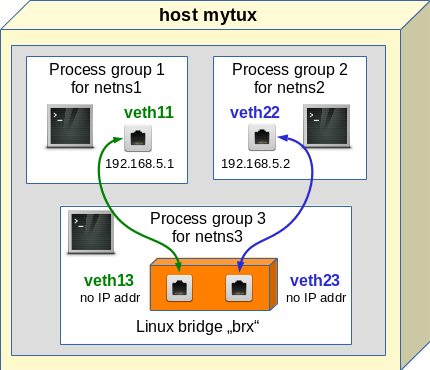
Experiment 2: Connect two namespaces via a bridge in a third namespace
We now try a connection of netns1 and netns2 via a Linux bridge «brx«, which we place in a third namespace netns3:
This is a standard way to connect containers on a host!
LXC tools as well as libvirt/virt-manager would help you to establish such a bridge! However, the bridge would normally be place inside the host’s root namespace. In my opinion this is not a good idea:
A separate 3rd namespace gets the the bridge and related firewall and VLAN rules outside the control of the containers. But a separate namespace also helps to isolate the host against any communication (and possible attacks) coming from the containers!
So, let us close our sub terminals from the first experiment and kill the background shells:
We adapt our setup commands now to create netns3 and bridge «brx» there by using «brctl bradd«. Futhermore we add two different veth devices; each with one interface in netns3. We attach the interface to the bridge via «brctl addif»:
It is not necessary to show the reaction of the shell to these commands. But note the following:
- The bridge has to be set into an UP status.
- The veth interfaces located in netns3 do not get an IP address. Actually, a veth interface plays a different role on a bridge than in normal surroundings.
- The bridge itself does not get an IP address.
Bridge ports
By attaching the veth interfaces to the bridge we create a «port» on the bridge, which corresponds to some complicated structures (handled by the kernel) for dealing with Ethernet packets crossing the port. You can imagine the situation as if e.g. the veth interface veth13 corresponds to the RJ45 end of a cable which is plugged into the port. Ethernet packets are taken at the plug, get modified sometimes and then are transferred across the port to the inside of the bridge.
However, when we assign an Ethernet address to the other interface, e.g. veth11 in netns1, then the veth «cable» ends in a full Ethernet device, which accepts network commands as «ping» or «nc».
No IP address for the bridge itself!
We do NOT assign an IP address to the bridge itself; this is a bit in contrast to what e.g. happens when you set up a bridge for networking with the tools of virt-manager. Or what e.g. Opensuse does, when you setup a KVM virtualization host with YaST. In all these cases something like
happens in the background. However, I do not like this kind of implicit politics, because it opens ways into the namespace surrounding the bridge! And it is easy to forget this bridge interface both in VLAN and firewall rules.
Almost always, there is no necessity to provide an IP address to the bridge itself. If we need an interface of a namespace, a container or the host to a Linux bridge we can always use a veth device. This leads to a much is much clearer situation; you see the Ethernet interface and the port to the bridge explicitly — thus you have much better control, especially with respect to firewall rules.
Enter network namespace netns3:
Now we open a terminal as a sub shell (as we did in the previous example) and enter netns3 to have a look at the interfaces and the bridge.
Let us briefly discuss some useful commands:
Incomplete information of «brctl show»:
Unfortunately, the standard command
does not work properly inside network namespaces; it does not produce a complete output. E.g., the attached interfaces are not shown. However, the command
shows all interfaces and their respective «master«. The same is true for the very useful «bridge» command :
If you want to see even more details on interfaces use
and grep the line for a specific interface.
Just for completeness: To create a bridge and add a veth devices to the bridge, we could also have used:
Connectivity test with ping
Now, let us turn to netns1 and test connectivity:
Note that — as expected — we do not see anything of the bridge and its interfaces in netns1! Note that the bridge basically is a device on the data link layer, i.e. OSI layer 2. In the current configuration we did nothing to stop the propagation of Ethernet packets on this layer — this will change in further experiments.
Connectivity test with netcat
At the end of our test we used the netcat command «nc» to listen on a TCP port 41234. At another (sub) terminal we can now start a TCP communication from netns2 to the TCP port 41234 in netns1:
This leads to an output after the last command in netns1:
So, we have full connectivity — not only for ICMP packets, but also for TCP packets. In yet another terminal:
It is pretty easy to connect network namespaces with veth devices. The interfaces can be assigned to different network namespaces by using a variant of the «ip» command. The target network namespaces can be identified by PIDs of their basic processes. We can link to namespaces directly via the interfaces of one veth device.
An alternative is to use a Linux bridge (for Layer 2 transport) in yet another namespace. The third namespace provides better isolation; the bridge is out of the view and control of the other namespaces.
We have seen that the commands «ip a s» and «bridge link» are useful to get information about the association of bridges and their assigned interfaces/ports in network namespaces.
In the coming article
Fun with veth-devices, Linux bridges and VLANs in unnamed Linux network namespaces – IV
we extend our efforts to creating VLANs with the help of our Linux bridge. Stay tuned .
twentyeleven theme modified by anracom.com
Dieser Blog verwendet nur technisch notwendige (Session-) Cookies. Bei weiterer Nutzung gehen wir von Ihrem Einverständnis aus. Optionen / Informationen Verstanden
Die Cookie-Einstellungen auf dieser Website sind auf «Cookies zulassen» eingestellt, um das beste Surferlebnis zu ermöglichen. Wenn du diese Website ohne Änderung der Cookie-Einstellungen verwendest oder auf «Akzeptieren» klickst, erklärst du sich damit einverstanden.
Источник
Using network namespaces and a virtual switch to isolate servers
Yet another blog post on how to create a virtual network that connects network namespaces using a brdige, veth pairs and iptables.
by Ciro S. Costa — Jun 12, 2018
I’ve been working on an tc + ebpf -based load-balancer that I’ll soon talk about here in this blog, and one of the things I wanted to do was test such load-balancing feature.
In my line of thought, I wondered: if I’m going to redirect the traffic by changing the destination address of the packets, that means that I’ll need somehow to have a different internet set up in the machine where I could put processes listening on those addresses.

Having worked with Docker and implemented a tiny container runtime myself, it seemed clear that going with network namespaces, virtual interfaces and bridging would get the job done.
How these two relate to each other become clearer after looking at what jobs they do:
- network namespaces, according to man 7 network_namespaces :
Network namespaces provide isolation of the system resources associated with networking: network devices, IPv4 and IPv6 protocol stacks, IP routing tables, firewall rules, the /proc/net directory, the /sys/class/net directory, various files under /proc/sys/net, port numbers (sockets), and so on.
virtual interfaces provide us with virtualized representations of physical network interfaces; and
the bridge gives us the virtual equivalent of a switch.
That said, we can combine these three virtual components and create a virtual network inside the host without the need of VMs. Very lightweight (and with a single dependency — iproute2 ).
Setting up
Assuming we want to simulate load-balancing across two different servers, that would mean that we’d set up the machine to have:
- two network namespace (in this case, we can think of each network namespace as a different computer);
- two veth pairs (we can think of each pair as two ethernet cards with a cable between them); and
- a bridge device that provides the routing to these two namespaces (we can think of this device as a switch).

First, let’s start with the namespaces:
Once the namespaces have been set up, we can confirm the isolation by taking advantage of ip netns exec and executing some commands there:
At this point, we can start creating the veth pairs and associating one of their sides to their respective namespaces.
These pairs act as tunnels between the namespaces (for instance, namespace1 and the default namespace).
Now that the namespaces have an additional interface, check out that they’re actually there:
As we can see, the veth interface has no IPV4 address associated with it.
We can do so by making use of ip addr add from within the corresponding network namespaces:
Although we have both IPs and interfaces set, we can’t establish communication with them.
That’s because there’s no interface in the default namespace that can send the traffic to those namespaces — we didn’t either configure addresses to the other side of the veth pairs or configured a bridge device.
With the creation of the bridge device, we’re then able to provide the necessary routing, properly forming the network:
With the bridge created, now it’s time to connect the bridge-side of the veth pair to the bridge device:
Now, it’s a matter of giving this bridge device an address so that we can target such IP in our machine’s routing table making it a target for connections to those interfaces that we added to it:
Checking our routing table (from the default namespace), we can see that any requests with a destination to our namespaces ( 192.168.1.0/24 ) go through our bridge device:
We can verify that we indeed have connectivity:
Given that the routing table from namespace1 doesn’t have a default gateway, it can’t reach any other machine from outside the 192.168.1.0/24 range.
To fix that, the first step is giving the namespaces a default gateway route:
Show we be able to reach the internet now? Not yet.
Although the network is now reachable, there’s no way that we can have responses back — packets from external networks can’t be sent directly to our 192.168.1.0/24 network.
To get around that, we can make use of NAT (network address translation) by placing an iptables rule in the POSTROUTING chain of the nat table:
Although NAT is set to work for the packets originating from 192.168.1.0/24 , there’s still (yet another) one more configuration to do: enable packet forwarding (maybe this is already active in your case):
Now (finally), we’re good! We have connectivity all the way:
- the host can direct traffic to an application inside a namespace;
- an application inside a namespace can direct traffic to an application in the host;
- an application inside a namespace can direct traffic to another application in another namespace; and
- an application inside a namespace can access the internet.
Closing thoughts
Did we need bridge at all? That depends.
If the intention was to have the communication going through the host to a namespace (or vice-versa) directly, just setting the pairs would be enough.
Just in case you spot any mistake, please let me know! I’m cirowrc on Twitter.
Have a good one!
Stay in touch!
From time to time I’ll deliver some content to you.
The emails are not automatic — it’s all about things I thought were worth sharing that I’d personally like to receive.
If you’re into Twitter, reach me at @cirowrc.
Источник


