- Сканирование сетевых портов в Linux – команда nmap
- Зачем нужна команда nmap?
- Синтаксис команды nmap и особенности её работы
- Использование nmap
- Заключение
- How To Use Nmap to Scan for Open Ports
- Introduction
- Understanding Ports
- Identifying Common Ports
- Checking Open Ports
- Using Nmap
- Scanning Ports with nmap
- Conclusion
Сканирование сетевых портов в Linux – команда nmap
Системы Linux и UNIX являются сетевыми операционными системами (ОС). Поэтому их эксплуатация неразрывно связана с администрированием и обслуживанием сетей. Независимо от сложности и масштабов сети необходимо проводить постоянный мониторинг окружения сети на предмет качества связи и соединений. А также для определения признаков или даже фактов вредительства в ней или несанкционированных атак. Одним из эффективных инструментов для выполнения подобных задач является команда nmap.
Зачем нужна команда nmap?
Основная задача команды nmap – сканирование сетевых портов указанных компьютеров для определения, какие из них используются (прослушиваются) программами-серверами. Для подавляющего числа сетевых демонов (служб) определены их стандартные порты по-умолчаню, которые они используют для своей работы. По этому признаку можно делать выводы, о том какие серверные программы запущены на том или ином компьютере в сети.
Также команда nmap – это самый доступный инструмент в руках злоумышленников для организации подготовки хакерской атаки на сеть. Ведь с помощью этой команды очень легко получить информацию, на основе которой можно судить о слабых и уязвимых местах в атакуемой системе.
Синтаксис команды nmap и особенности её работы
Команда nmap довольно проста в использовании и каким-то сложным синтаксисом не отличается:
Чего нельзя сказать о количестве, функциональности её ключей и неисчерпаемых возможностях их применения. Официальная документация, доступная на страницах man-руководства (команда man nmap), кроме того, что очень подробная (трудно встретить ещё подробнее), так ещё и имеет качественный перевод (локализации, в том числе и на русском языке) в большинстве Linux-дистрибутивов.
Не всегда утилита nmap предустановлена в системе, поэтому для её использования требуется установка соответствующего пакета, который обычно имеет имя nmap:
Или в Centos/Redhat
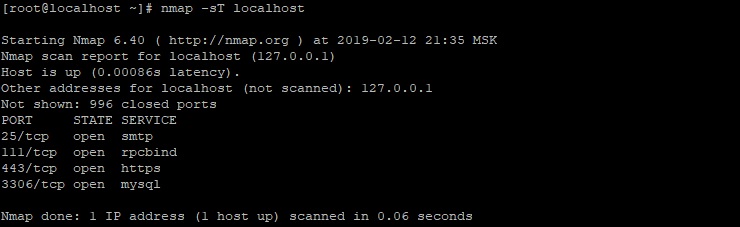
Столбец STATE показывает состояние порта: он может быть открыт (open), когда связан с использующими его службами (соединениями), закрыт (closed), когда порт не используется ни одним сервером. Также доступны состояния: unfiltered, когда nmap не смогла определить состояние порта. А также filtered – когда порт защищён (или заблокирован) брандмауэром.
Для задания хоста можно также использовать цифровую запись в виде IP-адреса. Отчёт из данного примера сформирован для самого обычного компьютера, для которого не была сконфигурирована какая-то защита. Как можно видеть, для прослушивания 80 и 443 портов для работы протоколов HTTP и HTTPS соответственно, запущен веб-сервер. Сервер баз данных (БД) MySQL также работает по стандартному порту.
Использование nmap
Если посмотреть на отчёт команды nmap для более защищённого узла, то он будет выглядеть примерно так:
Как можно видеть, на сканируемом узле (компьютере) скорее всего работает брандмауэр. Который блокирует все порты кроме тех, что отведены для работы почтового и веб- серверов. Таким образом, можно сделать вывод о том, что компьютер по указанному адресу настроен специально для работы с электронной почтой и обработкой HTTP-запросов.
Однако, одна из особенностей nmap заключается в том, что эту команду можно использовать в «хакерском» режиме. Другими словами она позволяет сканировать порты без установки реальных соединений. Это достигается путём использования неквитирующих пакетов, т. е. тех, которые похожи на имеющиеся в существующих соединениях. Но в ответ на такие пакеты можно получать пакеты диагностические. Т. е. получать информацию о соединении, при этом не быть «замеченным» брандмауэром или другим сетевым фильтром. Которые следят за «сканировщиками» портов.
Помимо всего прочего nmap умеет распознавать, какая ОС используется на проверяемом узле. Путём анализа некоторых особенностей, характерных для реализации стека TCP/IP для разных ОС. Для использования этой возможности существует ключ -O:
Как можно видеть, компьютер с IP-адресом 192.186.0.101 работает под управлением ОС Windows, предположительно Windows 7. Информация в отчёте довольно подробная, определён даже MAC-адрес сканируемого сетевого устройства.
Стоит рассмотреть некоторые примеры для команды nmap, которые могут пригодиться администраторам в их работе. Сканирование нескольких адресов:
Определение активных узлов в сети:
В этой команде используется формат записи, для обозначения подсети. В качестве параметров можно также указывать данные из файла:
Записи адресов в файле указываются также, как и в командной строке. И разделяться должны одним или несколькими пробелами или символами перевода строки. Для сканирования определённых портов:
или диапазона портов:
Сканирование всех портов:
Сканирование определённых типов портов (TCP или UDP):
Соответственно для указания UDP-портов следует указывать опцию -U. Для объединённого сканирования портов:
Для скрытого сканирования:
Сохранение результатов сканирования в файл:
Определить (с высокой степенью вероятности), работает ли на сканируемом узле брандмауэр или другой пакетный фильтр:
Определение только открытых портов:
Определение версии ОС, а также трассировки маршрутов:
Чтобы исключить из сканирования определённые адреса или подсети нужно использовать опцию —exclude:
Чтобы использовать для этой цели данные из файла, применяется опция —excludefile:
Заключение
Как можно видеть, nmap – это действительно мощный инструмент для мониторинга и анализа безопасности сетевого окружения. Следует также всегда помнить, что с помощью одной только команды nmap система или сеть могут быть досконально изучены «посторонними» или не совсем добросовестными людьми. Поэтому системные администраторы всегда должны учитывать этот фактор для обеспечения безопасности вверенных им систем.
Если вы нашли ошибку, пожалуйста, выделите фрагмент текста и нажмите Ctrl+Enter.
Источник
How To Use Nmap to Scan for Open Ports
Last Validated on September 2, 2020 Originally Published on September 24, 2013
Introduction
Networking is an expansive and overwhelming topic for many budding system administrators. There are various layers, protocols, and interfaces, and many tools and utilities that must be mastered to understand them.
In TCP/IP and UDP networking, ports are endpoints for logical communications. A single IP address may have many services running, such as a web server, an application server, and a file server. In order for each of these services to communicate, they each listen and communicate on a specific port. When you make a connection to a server, you connect to the the IP address and a port.
In many cases, the software you use specifies the port for you. For example, when you connect to https://digitalocean.com , you’re connecting to the digitalocean.com server on port 443 , the default port for secure web traffic. Since it’s the default, your browser adds the port for you.
In this tutorial you’ll explore ports in more detail. You’ll use the netstat program to identify open ports, and then use the nmap program to get information about the state of a machine’s ports on a network. When you’re done you’ll be able to identify common ports and scan your systems for open ports.
Note: This tutorial covers IPv4 security. In Linux, IPv6 security is maintained separately from IPv4. For example, “nmap” scans IPv4 addresses by default but can also scan IPv6 addresses if the proper option is specified (nmap -6).
If your VPS is configured for IPv6, please remember to secure both your IPv4 and IPv6 network interfaces with the appropriate tools. For more information about IPv6 tools, refer to this guide: How To Configure Tools to Use IPv6 on a Linux VPS
Understanding Ports
There are many layers in the OSI networking model. The transport layer is the layer primarily concerned with the communication between different services and applications.
This layer is the main layer that ports are associated with.
Some knowledge of terminology is needed to understand port configuration. Here are some terms that will help you understand the discussion that will follow:
Port: An addressable network location implemented inside of the operating system that helps distinguish traffic destined for different applications or services.
Internet Sockets: A file descriptor that specifies an IP address and an associated port number, as well as the transfer protocol that will be used to handle the data.
Binding: The process that takes place when an application or service uses an internet socket to handle the data it is inputting and outputting.
Listening: A service is said to be “listening” on a port when it is binding to a port/protocol/IP address combination in order to wait for requests from clients of the service.
Upon receiving a request, it then establishes a connection with the client (when appropriate) using the same port it has been listening on. Because the internet sockets used are associated with a specific client IP address, this does not prevent the server from listening for and serving requests to other clients simultaneously.
- Port Scanning: Port scanning is the process of attempting to connect to a number of sequential ports, for the purpose of acquiring information about which are open and what services and operating system are behind them.
Identifying Common Ports
Ports are specified by a number ranging from 1 to 65535 .
Many ports below 1024 are associated with services that Linux and Unix-like operating systems consider critical to essential network functions, so you must have root privileges to assign services to them.
Ports between 1024 and 49151 are considered “registered”. This means that they can be “reserved” (in a very loose sense of the word) for certain services by issuing a request to the IANA (Internet Assigned Numbers Authority). They are not strictly enforced, but they can give a clue as to the possible services running on a certain port.
Ports between 49152 and 65535 cannot be registered and are suggested for private use.
Because of the vast number of available ports, you won’t ever have to be concerned with the majority of the services that tend to bind to specific ports.
However, there are some ports that are worth knowing due to their ubiquity. The following is only a very incomplete list:
- 20: FTP data
- 21: FTP control port
- 22: SSH
- 23: Telnet (Insecure, not recommended for most uses)
- 25: SMTP
- 43: WHOIS protocol
- 53: DNS services
- 67: DHCP server port
- 68: DHCP client port
- 80: HTTP — Unencrypted Web traffic
- 110: POP3 mail port
- 113: Ident authentication services on IRC networks
- 143: IMAP mail port
- 161: SNMP
- 194: IRC
- 389: LDAP port
- 443: HTTPS — Secure web traffic
- 587: SMTP — message submission port
- 631: CUPS printing daemon port
- 666: DOOM — This legacy game actually has its own special port
These are just a few of the services commonly associated with ports. You should be able to find the appropriate ports for the applications you are trying to configure within their respective documentation.
Most services can be configured to use ports other than the default, but you must ensure that both the client and server are configured to use a non-standard port.
You can get a list of some common ports by looking at the /etc/services file:
It will give you a list of common ports and their associated services:
Depending on your system, this will display multiple pages. Press the SPACE key to see the next page of entries or press Q to return to your prompt.
This is not a complete list; you’ll be able to see that shortly.
Checking Open Ports
There are a number of tools you can use to scan for open ports. One that is installed by default on most Linux distributions is netstat .
You can quickly discover which services you are running by issuing the command with the following parameters:
You’ll see results like the following:
This shows the port and listening socket associated with the service and lists both UDP and TCP protocols.
The nmap tool is another method you can use to identify ports.
Using Nmap
Part of securing a network involves doing vulnerability testing. This means trying to infiltrate your network and discover weaknesses in the same way that an attacker might.
Out of all of the available tools for this, nmap is perhaps the most common and powerful.
You can install nmap on an Ubuntu or Debian machine by entering:
One of the side benefits of installing this software is an improved port mapping file. You can see a much more extensive association between ports and services by looking in this file:
You’ll see output like this:
Besides having almost 20 thousand lines, this file also has additional fields, such as the third column, which lists the open frequency of that port as discovered during research scans on the internet.
Scanning Ports with nmap
Nmap can reveal a lot of information about a host. It can also make system administrators of the target system think that someone has malicious intent. For this reason, only test it on servers that you own or in situations where you’ve notified the owners.
The nmap creators provide a test server located at scanme.nmap.org .
This, or your own servers are good targets for practicing nmap.
Here are some common operations that can be performed with nmap. We will run them all with sudo privileges to avoid returning partial results for some queries. Some commands may take a long while to complete:
Scan for the host operating system:
Skip network discovery portion and assume the host is online. This is useful if you get a reply that says “Note: Host seems down” in your other tests. Add this to the other options:
Scan without preforming a reverse DNS lookup on the IP address specified. This should speed up your results in most cases:
Scan a specific port instead of all common ports:
To scan for TCP connections, nmap can perform a 3-way handshake (explained below), with the targeted port. Execute it like this:
To scan for UDP connections, type:
Scan for every TCP and UDP open port:
A TCP “SYN” scan exploits the way that TCP establishes a connection.
To start a TCP connection, the requesting end sends a “synchronize request” packet to the server. The server then sends a “synchronize acknowledgment” packet back. The original sender then sends back an “acknowledgment” packet back to the server, and a connection is established.
A “SYN” scan, however, drops the connection when the first packet is returned from the server. This is called a “half-open” scan and used to be promoted as a way to surreptitiously scan for ports, since the application associated with that port would not receive the traffic, because the connection is never completed.
This is no longer considered stealthy with the adoption of more advanced firewalls and the flagging of incomplete SYN request in many configurations.
To perform a SYN scan, execute:
A more stealthy approach is sending invalid TCP headers, which, if the host conforms to the TCP specifications, should send a packet back if that port is closed. This will work on non-Windows based servers.
You can use the “-sF”, “-sX”, or “-sN” flags. They all will produce the response we are looking for:
To see what version of a service is running on the host, you can try this command. It tries to determine the service and version by testing different responses from the server:
Finally, you can use nmap to scan multiple machines.
To specify a range of IP addresses with “-” or “/24” to scan a number of hosts at once, use a command like the following:
Or scan a network range for available services with a command like this:
There are many other command combinations that you can use, but this should get you started on exploring your networking vulnerabilities.
Conclusion
Understanding port configuration and how to discover what the attack vectors are on your server is only one step to securing your information and your VPS. It is an essentail skill, however.
Discovering which ports are open and what information can be obtained from the services accepting connections on those ports gives you the information that you need to lock down your server. Any extraneous information leaked out of your machine can be used by a malicious user to try to exploit known vulnerabilities or develop new ones. The less they can figure out, the better.
Источник


