- NTP сервер на Linux Ubuntu
- Установка сервера
- Настройка NTP
- Дополнительные настройки
- Тестирование
- Настройка клиента Linux
- ntpdate
- Настройка клиента Windows
- Некоторые ошибки
- 1. the NTP socket is in use, exiting
- 2. Connection refused
- 3. no server suitable for synchronization found
- Записки IT специалиста
- Настройка NTP-сервера в Debian или Ubuntu
- Time Synchronization
- Synchronizing your systems time
- Configuring timedatectl and timesyncd
- Serve the Network Time Protocol
- chrony(d)
- Installation
- Chronyd Configuration
- Serving the NTP Protocol
- View status
- PPS Support
- Example configuration for GPSD to feed Chrony
- NTS Support
- NTS Server
- NTS Client
NTP сервер на Linux Ubuntu
Следить за актуальностью времени на всех узлах локальной сети удобнее с помощью сервера синхронизации времени NTP. В инструкции рассказано об установке и настройке такого сервера на Linux Ubuntu Server 16.04. Данное руководство можно использовать для настройки ntpd на любом другом Linux (например, Debian или CentOS).
Установка сервера
Устанавливаем ntp сервер следующей командой:
apt-get install ntp
Разрешаем автозапуск и стартуем сервис:
systemctl enable ntp || update-rc.d ntp defaults
systemctl start ntp || service ntp start
Настройка NTP
Открываем файл с настройками:
Настраиваем серверы, с которых наш NTP будет брать эталонное время. Например:
pool ru.pool.ntp.org iburst
server ntp2.vniiftri.ru iburst prefer
pool 0.ubuntu.pool.ntp.org iburst
pool 1.ubuntu.pool.ntp.org iburst
server 127.127.1.0
* iburst — отправлять несколько пакетов (повышает точность); ru.pool.ntp.org / 0.ubuntu.pool.ntp.org / 1.ubuntu.pool.ntp.org — адреса серверов, с которыми наш сервер будет сверять время; server — указывает на выполнение синхронизации с сервером, а не пулом серверов; prefer — указывает на предпочитаемый сервер. server 127.127.1.0 — позволит в случае отказа сети Интернет брать время из своих системных часов.
restrict default kod notrap nomodify nopeer noquery
restrict 192.168.0.0 mask 255.255.255.0 nomodify notrap
restrict 127.0.0.1
restrict ::1
- restrict default — задает значение по умолчанию для всех рестриктов.
- kod — узлам, которые часто отправляют запросы сначала отправить поцелуй смерти (kiss of death), затем отключить от сервера.
- notrap — не принимать управляющие команды.
- nomodify — запрещает команды, которые могут вносить изменения состояния.
- nopeer — не синхронизироваться с хостом.
- noquery — не принимать запросы.
- restrict 192.168.0.0 mask 255.255.255.0 — разрешить синхронизацию для узлов в сети 192.168.0.0/24.
- IP адреса127.0.0.1 и ::1 позволяют обмен данные серверу с самим собой.
Настройки по умолчанию могут быть разные для IPv4 и IPv6:
restrict -4 default kod notrap nomodify nopeer noquery
restrict -6 default kod notrap nomodify nopeer noquery
systemctl restart ntp || service restart ntp
Если используется брандмауэр, добавляем правило:
iptables -I INPUT 1 -p udp —dport 123 -j ACCEPT
или с помощью ufw:
ufw allow in on enp2s0 to any port 123 proto udp
* где enp2s0 — сетевой интерфейс, на котором слушает наш сервер.
Дополнительные настройки
Настройка файла хранения логов:
Тестирование
Проверить состояние получения эталонного времени можно командой:
Мы должны увидеть, примерно, следующее:
remote refid st t when poll reach delay offset jitter
==============================================================================
ru.pool.ntp.org .POOL. 16 p — 64 0 0.000 0.000 0.000
ntp.ubuntu.com .POOL. 16 p — 64 0 0.000 0.000 0.000
*91.189.94.4 17.253.34.253 2 u 58 64 377 55.802 3.790 0.412
-91.189.91.157 132.246.11.231 2 u 56 64 377 113.456 -1.746 0.334
+91.189.89.198 192.53.103.108 2 u 1 64 377 54.595 4.229 0.608
+91.189.89.199 17.253.34.253 2 u 61 64 377 54.061 2.637 0.557
- remote — адрес сервера времени, с которым синхронизируется наш сервер;
- refid — вышестоящий сервер (с которым сервер из графы выше получает время);
- st — уровень сервера (stratum);
- t — пир (unicast или multicast);
- when — когда последний раз сверялось время;
- poll — периодичность синхронизации с этим сервером;
- reach — состояние работоспособности. Если удалось произвести синхронизации восемь раз в подряд становится равным 377;
- delay — время задержки;
- offset — разница между нашим временем и временем на сервере; положительное — наши часы спешат, отрицательное — отстают;
- jitter — смещение времени на удаленном сервере;
- * — с этим сервером синхронизирует время наш ntpd;
- + — сервер можно использовать для сверки часов;
- — — не рекомендован для синхронизации;
- x — не доступен.
Проверить отдачу времени сервером можно введя команду на другом Linux:
Правильный ответ имеет следующий вид:
ntpdate[3576]: adjust time server 192.168.0.15 offset 0.017657 sec
* время было рассинхронизировано на 0.017657 секунд.
Отобразить текущее время можно командой:
Если после синхронизации время некорректно, настраиваем правильный часовой пояс:
cp /usr/share/zoneinfo/Europe/Moscow /etc/localtime
* московское время (GMT+3).
Настройка клиента Linux
Для клиентов можно выбрать 2 стратегии настройки — с помощью ntp или утилиты ntpdate.
apt-get install ntp
CentOS / Red Hat:
yum install ntp
В настройка /etc/ntp.conf в качестве сервера оставляем только наш локальный сервер, например:
Остальные pool и server удаляем или комментируем.
systemctl restart ntp || service restart ntp
ntpdate
Утилита командной строки выполняет разовую синхронизацию. Чтобы автоматизировать процесс, добавляем задание в cron:
0 0 * * * /usr/sbin/ntpdate 192.168.0.15
* в данном примере задание будет выполняться раз в день в 00:00. /usr/sbin/ntpdate — полный путь расположения утилиты, в разных системах может быть разным — проверить стоит командой which ntpdate.
Настройка клиента Windows
В командной строке выполняем:
w32tm /config /manualpeerlist:»192.168.0.15,0×8″ /syncfromflags:manual /update
Некоторые ошибки
1. the NTP socket is in use, exiting
Как правило, данная ошибка возникает при попытке синхронизировать время с помощью ntpdate, когда в системе работает демон ntp.
Причина: NTP сокет в системе уже занят, как правило, ntpd.
Решение: либо не использовать ntpdate, так как ntp умеет сверять время, либо отключить сервис ntpd командой service ntp stop.
2. Connection refused
Возникает при попытке выполнить команду ntpq -p.
Причина: нет разрешения на обращение к серверу.
Решение: проверьте, удастся ли выполнить запрос командой ntpq -pn 127.0.0.1 или ntpq -pn ::1. Также убедитесь, что настройка restrict позволяет серверу подключаться к самому себе по нужному протоколу.
3. no server suitable for synchronization found
Ошибка появляется при попытке синхронизировать время с другим сервером синхронизации.
Причина: сервер синхронизации не доступен по одной из причин: 1) не работает или выключен, 2) установлен restrict, 3) на сервере не запущен ntpd, 4) нет сетевой доступности из-за проблем на сети или брандмауэра.
Источник
Записки IT специалиста
Технический блог специалистов ООО»Интерфейс»
- Главная
- Настройка NTP-сервера в Debian или Ubuntu
Настройка NTP-сервера в Debian или Ubuntu
 Мы уже неоднократно поднимали вопрос важности синхронизации времени, особенно сейчас, когда даже в небольших сетях появляется все больше и больше служб критичных к точному времени. Это криптография, системы контроля доступа и видеонаблюдения, кассовые узлы. В этих условиях точности обычных аппаратных часов начинает не хватать и хотя во многих случаях допускается разбег времени не более пяти минут, лучше не ждать пока это случится (как всегда в самый неподходящий момент), а обеспечить свою инфраструктуру собственным сервером времени. В данной статье мы рассмотрим, как это сделать в системах основанных на Debian.
Перед установкой сервера времени убедитесь. что в вашей системе правильно настроен часовой пояс, проверить и изменить его можно командой:
Данную и все последующие команды следует выполнять с правами суперпользователя.
После установки часового пояса обновите список пакетов и установите пакет NTP-сервера:
Пакет работоспособен сразу после установки и конфигурация из коробки достаточно актуальна, но лучше внести в нее некоторые дополнительные штрихи. Для изменения настроек откроем файл /etc/ntp.conf.
Начнем с вышестоящих серверов для синхронизации времени, рекомендуется выбирать ближайшие к вам сервера, их адреса можно получить на сайте ntppool.org. Затем найдем в конфигурационном файле следующую секцию:
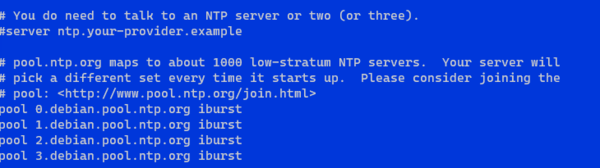 И заменим значения на следующие:
В нашем примере приведены настройки для использования российских серверов времени. Ниже зададим настройку для синхронизации с аппаратными часами на случай отсутствия синхронизации с серверами в интернет:
Первая строка задает адрес аппаратных часов — 127.127.1.0, вторая указывает приоритет — stratum — он выбран таким образом, чтобы при наличии интернета NTP-сервер не синхронизировался с аппаратными часами. У серверов входящих в пулы ntp.org значение stratum равно двум.
Затем перейдем к списку контроля доступа, который состоит из сетевых адресов отсортированных по возрастанию адресов и масок. Запись по умолчанию — default соответствует адресу 0.0.0.0 с маской 0.0.0.0, если в записи не указана маска, то автоматически подставляется значение 255.255.255.255, что соответствует конечному хосту.
Кроме адресов строки списка содержат флаги, флаги указывают на те или иные ограничения, если строка не содержит флагов — это означает полный доступ к серверу. По умолчанию список контроля доступа, следующий:
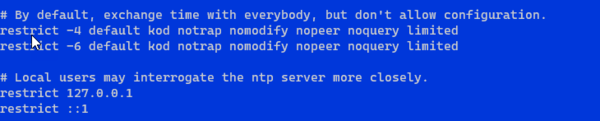 Разберем его подробнее. Первые две строки задают значения по умолчанию, т.е. для любых клиентов, в сетях IPv4 и IPv6:
Перечисленные флаги имеют значения:
- kod — отправка клиенту, посылающему нежелательные запросы, пакета KoD (Kiss O’Death), получатель такого пакета обязан выполнить предписанную ему проверку и изменить свое поведение, в противном случае такой клиент будет отключен от сервера.
- notrap — запрет приема управляющих сообщений
- nomodify — запрет приема сообщений, изменяющих состояние сервера
- nopeer — запрет установки одноранговых отношений с другими NTP-серверами
- noquery — запрет любых запросов для синхронизации времени поступающих с других серверов
- limited — запрет обслуживания, если интервал между пакетами от клиента превышает разрешенные значения
Под ними расположены строки, дающие полный доступ к серверу локальной системе:
Отсутствие маски указывает на то, что это конечный узел, а отсутствие флагов предоставляет полный доступ.
При необходимости мы можем добавить свои записи, скажем для клиентов собственной сети с меньшим числом ограничений:
Если нужно запретить доступ к серверу времени, то следует использовать флаг ignore. Допустим, мы хотим запретить доступ для всех клиентов доменной сети, кроме эмулятора PDC:
Расположение строк не имеет значения, так как при запуске сервера все адреса будут отсортированы по возрастанию адреса/маски.
После внесения изменений следует перезапустить службу:
Проверить ее статус можно командой:
Состояние синхронизации с вышестоящими серверами можно узнать командой:
Которая выдаст нам следующий вывод:
 На что следует обратить внимание? Прежде всего на символы слева от адреса сервера:
- * — сервер выбран для синхронизации
- + — сервер пригодный для синхронизации
- — — синхронизация с этим сервером не рекомендуется
- x — сервер недоступен
Затем на колонку refid — показывающее вышестоящий сервер синхронизации и колонку offset, которое показывает расхождение ваших часов с эталоном, при положительном значении наши часы спешат, при отрицательном отстают.
В колонке st указывается stratum — приоритет сервера, а delay содержит задержку ответа от сервера. Как видим, в нашем случае служба времени выбрала для синхронизации сервер с приоритетом 1, который синхронизируется от GPS-часов, несмотря на более высокий уровень задержки при работе с ним.
Ну и не забудьте разрешить доступ к вашему NTP-серверу в брандмауэре, добавив в правила iptables строку:
При необходимости можно ограничить доступ сетевым интерфейсом:
Как видим, настроить собственный сервер времени очень и очень просто, можно просто установить пакет и работать. Но гораздо лучше разобраться с настройками, хотя бы на базовом уровне, после чего для вас конфигурация NTP перестанет быть «китайской грамотой» и вы будете понимать, как именно работает ваш сервер.
Помогла статья? Поддержи автора и новые статьи будут выходить чаще:

Или подпишись на наш Телеграм-канал: 
Источник
Time Synchronization
NTP is a TCP/IP protocol for synchronizing time over a network. Basically a client requests the current time from a server, and uses it to set its own clock.
Behind this simple description, there is a lot of complexity — there are tiers of NTP servers, with the tier one NTP servers connected to atomic clocks, and tier two and three servers spreading the load of actually handling requests across the Internet. Also the client software is a lot more complex than you might think — it has to factor out communication delays, and adjust the time in a way that does not upset all the other processes that run on the server. But luckily all that complexity is hidden from you!
Ubuntu by default uses timedatectl / timesyncd to synchronize time and users can optionally use chrony to serve the Network Time Protocol.
Synchronizing your systems time
Since Ubuntu 16.04 timedatectl / timesyncd (which are part of systemd) replace most of ntpdate / ntp.
timesyncd is available by default and replaces not only ntpdate, but also the client portion of chrony (or formerly ntpd). So on top of the one-shot action that ntpdate provided on boot and network activation, now timesyncd by default regularly checks and keeps your local time in sync. It also stores time updates locally, so that after reboots monotonically advances if applicable.
If chrony is installed timedatectl steps back to let chrony do the time keeping. That shall ensure that no two time syncing services are fighting. While no more recommended to be used, this still also applies to ntpd being installed to retain any kind of old behavior/config that you had through an upgrade. But it also implies that on an upgrade from a former release ntp/ntpdate might still be installed and therefore renders the new systemd based services disabled.
ntpdate is considered deprecated in favor of timedatectl (or chrony) and thereby no more installed by default. timesyncd will generally do the right thing keeping your time in sync, and chrony will help with more complex cases. But if you had one of a few known special ntpdate use cases, consider the following:
If you require a one-shot sync use: chronyd -q
If you require a one-shot time check, without setting the time use: chronyd -Q
Configuring timedatectl and timesyncd
The current status of time and time configuration via timedatectl and timesyncd can be checked with timedatectl status .
If chrony is running it will automatically switch to:
Via timedatectl an admin can control the timezone, how the system clock should relate to the hwclock and if permanent synronization should be enabled or not. See man timedatectl for more details.
timesyncd itself is still a normal service, so you can check its status also more in detail via.
The nameserver to fetch time for timedatectl and timesyncd from can be specified in /etc/systemd/timesyncd.conf and additional config files can be stored in /etc/systemd/timesyncd.conf.d/ . The entries for NTP= and FallbackNTP= are space separated lists. See man timesyncd.conf for more.
Serve the Network Time Protocol
If in addition to synchronizing your system you also want to serve NTP information you need an NTP server. There are several options with chrony, ntpd and open-ntp. The recommended solution is chrony.
chrony(d)
The NTP daemon chronyd calculates the drift and offset of your system clock and continuously adjusts it, so there are no large corrections that could lead to inconsistent logs for instance. The cost is a little processing power and memory, but for a modern server this is usually negligible.
Installation
To install chrony, from a terminal prompt enter:
This will provide two binaries:
chronyd — the actual daemon to sync and serve via the NTP protocol
chronyc — command-line interface for chrony daemon
Chronyd Configuration
Edit /etc/chrony/chrony.conf to add/remove server lines. By default these servers are configured:
See man chrony.conf for more details on the configuration options. After changing the any of the config file you have to restart chrony:
Of the pool 2.ubuntu.pool.ntp.org as well as ntp.ubuntu.com also support ipv6 if needed. If one needs to force ipv6 there also is ipv6.ntp.ubuntu.com which is not configured by default.
Serving the NTP Protocol
You can install chrony (above) and configure special Hardware (below) for a local synchronization
and as-installed that is the default to stay on the secure and conservative side. But if you want to serve NTP you need adapt your configuration.
To enable serving the NTP protocol you’ll need at least to set the allow rule to which controls which clients/networks you want chrony to serve NTP to.
An example would be
See the section “NTP server” in the man page for more details on how you can control and restrict access to your NTP server.
View status
Use chronyc to see query the status of the chrony daemon. For example to get an overview of the currently available and selected time sources.
Certain chronyc commands are privileged and can not be run via the network without explicitly allowing them. See section Command and monitoring access in man chrony.conf for more details. A local admin can use sudo as usually as this will grant him access to the local admin socket /var/run/chrony/chronyd.sock .
PPS Support
Chrony supports various PPS types natively. It can use kernel PPS API as well as PTP hardware clock. Most general GPS receivers can be leveraged via GPSD. The latter (and potentially more) can be accessed via SHM or via a socket (recommended). All of the above can be used to augment chrony with additional high quality time sources for better accuracy, jitter, drift, longer-or-short term accuracy (Usually each kind of clock type is good at one of those, but non-perfect at the others). For more details on configuration see some of the external PPS/GPSD resource listed below.
Note: at the release of 20.04 there was a bug which until fixed you might want to add this content to your /etc/apparmor.d/local/usr.sbin.gpsd .
Example configuration for GPSD to feed Chrony
For the setup you need
$ sudo apt install gpsd chrony
But you will want to test/debug your setup and especially the GPS reception, therefore also install
$ sudo apt install pps-tools gpsd-clients
GPS devices usually will communicate via serial interfaces, yet the most common type these days are USB GPS devices which have a serial converter behind USB. If you want to use this for PPS please be aware that the majority does not signal PPS via USB. Check the GPSD hardware list for details. The examples below were run with a Navisys GR701-W.
When plugging in such a device (or at boot time) dmesg should report serial connection of some sorts, example:
We see above that it appeared as ttyUSB0 . To later on have chrony accept being feeded time information by that we have to set it up in /etc/chrony/chrony.conf (Please replace USB0 to whatever applies to your setup):
Then restart chrony to make the socket available and waiting.
sudo systemctl restart chrony
Next one needs to tell gpsd which device to manager, therefore in /etc/default/gpsd we set:
DEVICES=»/dev/ttyUSB0″
Furthermore the default use-case of gpsd is, well for gps position tracking. Therefore it will normally not consume any cpu since it is not running the service but waiting on a socket for clients. Furthermore the client will then tell gpsd what it requests and gpsd will only do that.
For the use case of gpsd as PPS-providing-daemon you want to set the option to:
- immediately start even without a client connected, this can be set in GPSD_OPTIONS of /etc/default/gpsd :
- GPSD_OPTIONS=»-n»
- enable the service itself and not wait for a client to reach the socket in the future:
- sudo systemctl enable /lib/systemd/system/gpsd.service
Restarting gpsd will now initialize the PPS from GPS and in dmesg you will see
In case you have multiple PPS the tool ppsfind might be useful to identify which PPS belongs to which GPS. You could check that with:
To get any further you need your GPS to get a lock.
Tools like cgps or gpsmon need to report a 3D Fix for the data being any good.
Then you’d want to check to really have PPS data reported on that with ppstest
Next one might want to ensure that the pps device really submits PPS data, to do so run ppstest :
Ok, gpsd is now running, the GPS reception has found a fix and this is fed into chrony .
Now lets check that from the point of view of chrony .
Initially (e.g. before gpsd has started or before it has a lock) those will be new and “untrusted” sources marked with an “?”. If your devices stay in the “?” state and won’t leave it even after quite some time then gpsd seems not to feed any data to chrony and you’d need to debug why.
Over time chrony will classify them as good or bad.
In the example case the raw GPS had too much deviation but PPS is good.
And finally after a while it used the hardware PPS input as it was better:
The PPS might also be ok but used in a combined way with e.g. the selected server.
See man chronyc for more details about how all these combinations will look like.
And if you wonder if your shm based GPS data is any good, you can check for that as well.
First of all chrony will not only tell you if it classified it as good or bad. Via sourcestats you can also check the details
You can also track the raw data that gpsd or other ntpd compliant refclocks are sending via shared memory by using ntpshmmon :
NTS Support
In Chrony 4.0 (first appeared in Ubuntu 21.04 Hirsute) support for Network Time Security “NTS” as added.
NTS Server
To set up your server with NTS you’ll need certificates so that the server can authenticate itself and based on that allow to encrypt and verify the NTP traffic.
In addition to the allow statement that any chrony working as NTP server needs there are two mandatory config entries that will be needed. Those for the certificates like
Example entries would look like:
It is important to note that for isolation reasons chrony by default runs as user and group _chrony . Therefore you need to grant access to the certificates for that user.
$ sudo chown _chrony:_chrony /etc/chrony/*.pem
Then restart chrony systemctl restart chrony and it will be ready to provide NTS based time service.
A running chrony server has various statistics, one also accounts the number of NTS connections that were established (or dropped):
And there is also a per-client statistic which can be enabled by the -p option of the clients command.
For more complex scenarios there are more advanced options to configure NTS documented in the man page.
A Note about certificate placement:
Chrony by default is isolated via apparmor and in addition uses all kind of protect* features of systemd. Due to that there are not many paths chrony can access for the certificates. But /etc/chrony/* is allowed as read-only and that is enough.
Check /etc/apparmor.d/usr.sbin.chronyd if you want other paths or allow custom paths in /etc/apparmor.d/local/usr.sbin.chronyd .
NTS Client
The client needs to specify server as usual ( pool directives do not work with NTS). As usual after the server adress options can be listed and there nts has to be added.
server iburst nts
One can check the authdata of the connections the client established like
Again there are more advanced options documented in the man page. Common use cases are specifying an explicit trusted certificate.
Bad Clocks and secure time syncing — “A Chicken and Egg” Problem:
There is one problem with systems that have very bad clocks. NTS is based on TLS and that needs a a somewhat correct clock. Due to that an NTS based sync might fail. On Hardware affected by this one can consider using the nocerttimecheck option which allows to set a number of times time can be synced without checking validation and expiration.
Источник


