- Установка видеокарт Intel в linux
- Материал из Пингвиньи радостей
- Содержание
- Драйвер VESA
- Драйвер INTEL
- Настройка отдельных видеокарт
- How To Switch Between Intel and Nvidia Graphics Card on Ubuntu
- Which Graphics Card Should You Use?
- Step 1: Check What Graphics Card You’ve Got
- Step 2: Check What Graphics Card You Laptop is Using
- Step 3: Install Nvidia Graphics Card Driver
- Step 4: Switch to Nvidia Graphics Card
- How to Uninstall Nvidia Drivers
- Включение гибридной графики в Ubuntu на ноутбуках Nvidia + Intel (OpenGL, Vulkan)
- Введение
- 1. Устанавливаем драйвер
- 2. Настраиваем видеокарту
- 3. Запуск приложения с использованием дискретной графики
- Заключение
- Установка драйвера Intel в Ubuntu
- Официальный установщик драйверов Intel
- Установка драйвера Intel в Ubuntu
- Выводы
- Linux Mint Forums
- [SOLVED] nvidia to intel gpu switching
- [SOLVED] nvidia to intel gpu switching
- Re: nvidia to intel gpu switching
- Re: nvidia to intel gpu switching
- Re: nvidia to intel gpu switching
- Re: nvidia to intel gpu switching
- Re: nvidia to intel gpu switching
- Re: nvidia to intel gpu switching
- Re: nvidia to intel gpu switching
- Re: nvidia to intel gpu switching
- Re: nvidia to intel gpu switching
Установка видеокарт Intel в linux
Материал из Пингвиньи радостей
Содержание
Статья с описанием установки видеокарт Intel в Linux
Как правило видеокарты Intel это встроенные в материнскую плату графические адаптеры, поддерживающие работу как в текстовом так и в графическом режимах. Для запуска видеокарты в текстовом режиме (в режиме консоли) не требуется дополнительных действий. Для использования графического режима требуется установка/настройка X-сервера и активизация драйверов. В графическом режиме видеокарты Intel поддерживают как 2D так и 3D ускорение графики.
Поддержка работы видеокарты в графическом режиме осуществляется пакетом Xorg. Подключение установленных драйверов и настройка видеокарты осуществляется в файле конфигурации — /etc/X11/xorg.conf. Если драйвер видеокарты в файле конфигурации не указан или самого файла нет вовсе, операционная система (например от debian squeeze и выше) самостоятельно определит и установит совместимый драйвер.
Для включения графических режимов видеокарт Intel могут быть использованы драйвера vesa и intel.
Драйвер VESA
Видеокарты Intel поддерживают работу в графическом режиме vesa. Описание настройки X-сервера и файла конфигурации /etc/X11/xorg.conf в режиме vesa приведено в статьях Xorg и Установка видеокарт в linux.
Некоторые часто используемые команды
Драйвер INTEL
Специальный драйвер intel, включённые в поставку Xorg, обеспечивают поддержку графического ускорения видеокарт Intel.
Для установки драйвера intel на примере операционной системы debian squeeze
- устанавливается драйвер intel
- добавляется в файл конфигурации /etc/X11/xorg.conf секция
- перезапускается X-сервер, а в случае изменения настроек KMS — перезапускается рабочая станция целиком
- проверяется ускорение 3D с помощью пакета Mesa-utils
Настройка отдельных видеокарт
В таблице приведены ссылки на статьи в википедии с описание настройки отдельных видеокарт Intel
Источник
How To Switch Between Intel and Nvidia Graphics Card on Ubuntu
These days, it is common to see two graphics cards on laptops: Intel graphics card and Nvidia graphics card. This tutorial will show you how to seamlessly switch between Intel and Nvidia graphics card on Ubuntu.
Which Graphics Card Should You Use?
For gaming and 3D charting that requires a lot of graphics power, use the discrete Nvidia card. If you are not interested in gaming or 3D charting, the integrated Intel graphics card, which is embedded in the CPU, is good enough and it consumes less energy than Nvidia card does, resulting in less energy consumption and longer battery hours.
Step 1: Check What Graphics Card You’ve Got
The first thing you need to do is to check what graphics card your laptop has. This is a very easy task on Ubuntu. Just paste the following command in the terminal window.

As you can see, my laptop has Intel and Nvidia Graphics card. If this is also the case for you, then continue to read this article.
Step 2: Check What Graphics Card You Laptop is Using
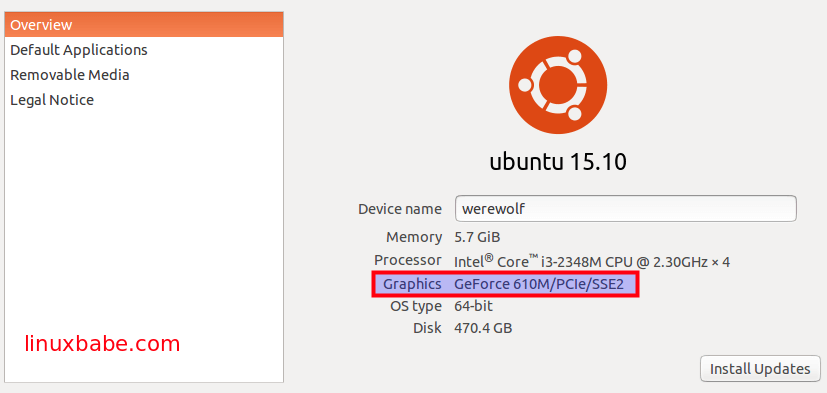
Ubuntu uses Intel graphics by default. If you think you made some changes to this before and you don’t remember what graphics card is being used, then go to system settings > details , and you will see the graphics card being used right now.
Step 3: Install Nvidia Graphics Card Driver
Ubuntu comes with the open source nouveau driver which is included in the Linux kernel for Nvidia cards. However, this driver lacks 3D acceleration support. For best graphics performance, we can use the software-properties-gtk program to install the proprietary driver. Enter the below command in the terminal window.
This will open up the software & updates window. Click the Additional Drivers tab. You can see what driver is being used for Nvidia card (Nouveau by default) and a list of proprietary drivers.

You can choose the highest version. You can also open up a new terminal window and enter the following command to see which binary driver is recommended for your specific card.
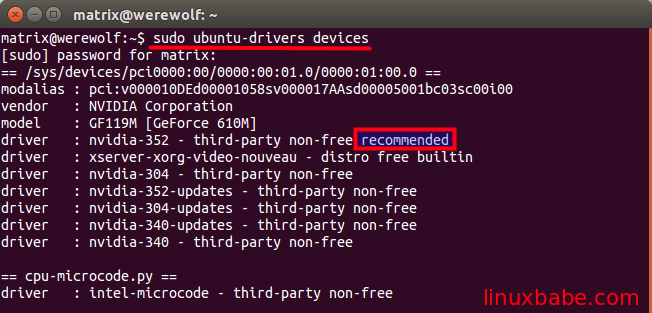
As you can see, nvidia-352 is recommended for my Nvidia card, so I enter this command to install it.
After the proprietary driver is installed, re-open software & updates window, you should see that the newly installed driver is being used for Nvidia card. If it’s not being used, select it and click the Apply Changes button at the bottom-right corner.

Now we have installed the proprietary driver for Nvidia graphics but we still are using the Intel Graphics card.
Step 4: Switch to Nvidia Graphics Card
After you selected the proprietary driver for Nvidia, You may have to reboot your computer to enable PRIME support. If PRIME supported is not enabled, you might encounter the below message.
Once rebooted, open Nvidia X Server Settings from Unity Dash. Alternatively, you can issue this command to open it.
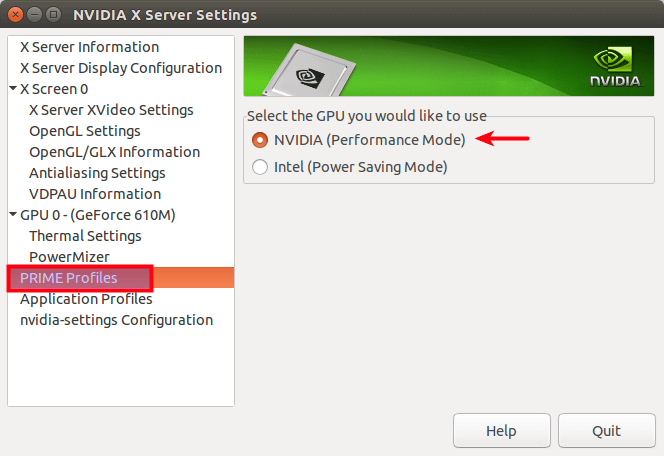
Click PRIME Profiles tab on the left pane, and then select Nvidia card on the right pane. If you don’t have PRIME Profiles, reboot your computer so PRIME can be enabled.
Now go to System Settings > Details , you will see the Nvidia Graphics card.
To switch back to Intel graphics, simply select Intel in PRIME Profiles . You can also use terminal commands to switch graphics card. For example, this command will switch to Intel graphics card.
To switch to Nvidia card:
To check which card is being used right now, run this command:
How to Uninstall Nvidia Drivers
Sometimes Nvidia drivers can fail and you get a blank desktop with no panel or launcher. Sometimes you may encounter the following error:
In these cases, you would want to uninstall Nvidia drivers completely which is quite simple to do. Just run the following command to remove all packages that start with nvidia in the package name.
As always, if you found this post useful, subscribe to our free newsletter or follow us on Google+, Twitter or like our Facebook page.
Источник
Включение гибридной графики в Ubuntu на ноутбуках Nvidia + Intel (OpenGL, Vulkan)
Введение
Это простая инструкция как включить гибридную графику intel-nvidia на ноутбуке. Чтобы определенные приложения запускались на дискретном чипе, а другие на встроенном. На свое удивление в интернете не нашел простую инструкцию того, как запускать определенные приложения, используя дискретную графику. Так что напишу так просто, на сколько считаю нужным
У меня система KDE Neon 5.21 — по большому счету — Ubuntu LTS с окружением рабочего стола KDE Plasma 5.21, видеочип GeForce MX150
1. Устанавливаем драйвер
a) Если у вас система на Qt (Как правило окружение KDE или LXQt), то с помощью данной команды через терминал загрузим программу для установки драйверов:
Если у вас система на GTK то с помощью это команды:
Хотя разницы принципиальной нет
b) Затем запускаем ее с правами root
Можно так же добавить ярлык для запуска в меню приложений
Инструкция для KDE
/.local/share/applications/ создадим файл software properties qt.desktop с таким содержанием
И файл software properties qt.sh в той же папке:
После перезагрузки ярлык появится в меню
Но это далеко не обязательно, вполне достаточно запустить из консоли для наших целей настройки гибридной графики
c) Переходим на последнюю вкладку Additional drivers и устанавливаем нужный драйвер. Я выбрал самой последней версии, который не tested и не server

d) После установки перезагружаем устройство
2. Настраиваем видеокарту
a) Загружаем следующую программу:
b) Переходим в PRIME Profiles Здесь мы видим три пункта:
NVIDIA (Performance Mode) — работать только на дискретной графике. Сильно потребляет батарею в несложных задачах, а так же ноутбук начинает греться. Зато система работает намного быстрее, но это того не стоит. У меня после установки драйвера этот пункт включился автоматически
NVIDIA On-Demand — некоторые приложения будут использовать дискретную графику nvidia, но по-умолчанию встроенная intel. Как запустить конкретное приложение с дискретной графикой напишу дальше
NVIDIA (Power Saving Mode) — отключение дискретной графики
Выбираем второй вариант — NVIDIA On-Demand , и перезагружаем систему
3. Запуск приложения с использованием дискретной графики
Это то, что сложнее всего гуглилось.
Для запуска приложения с использованием графики nvidia нужно задать для OpenGL две переменные среды:
для Vulkan только:
Делать это надо перед командой для запуска приложения. Например, нам нужно запустить из терминала приложение program с использованием дискретной графики. Нужно вызвать его так:
Соответственно, если у приложения есть ярлык (.desktop) в меню приложений, то надо изменить команду запуска в ярлыке. В KDE Plasma нужно нажать на него ПКМ, открыть свойства (или «изменить приложение. «), перейти во вкладку «приложение» и перед командой приписать данную приставку. В других средах похожего стола примерно так же
Пример: ярлык игры Wolfenstein — Blade of Agony
Можно сделать это же действие через текстовый редактор. Открываем ярлык, находим Exec= , и приписываем перед коммандой данную приставку __NV_PRIME_RENDER_OFFLOAD=1 __GLX_VENDOR_LIBRARY_NAME=nvidia
Заключение
Данный метод, как я понял, точно работают для программ, использующих библиотеки OpenGL и Vulkan. У меня, к сожалению, не получилось запустить так Windows приложение через Wine, которое использует DirectX, но это уже совсем другая история. (OpenGL приложения под Wine работают)
Источник
Установка драйвера Intel в Ubuntu
В отличие от драйверов видеокарт от других производителей, таких как Nvidia и AMD, часть драйвера Intel для интегрированных видеокарт встроена в ядро, а другая часть в пакет mesa-utils. Таким образом если вы используете последнюю версию ядра и свежую версию mesa-utils то, скорее всего, вы используете самую свежую версию драйвера Intel.
В этой статье мы рассмотрим как выполняется установка драйвера Intel в Ubuntu если он не установлен по умолчанию, а также как получить самую последнюю версию.
Официальный установщик драйверов Intel
Раньше существовал установщик драйверов от Intel, позволяющий установить последнюю версию драйвера в Ubuntu или Fedora, но потом компания прекратила поддержку этой утилиты. Скачать её можно здесь. Но последняя версия пакета вышла в 2018 году, и с тех пор уже вышло много новых ядер и новых версий дистрибутива Ubuntu. Сейчас в репозиториях Ubuntu версия драйвера более новая чем там.
Установка драйвера Intel в Ubuntu
Вы можете посмотреть какой сейчас драйвер видеокарты используется с помощью команды lspci:
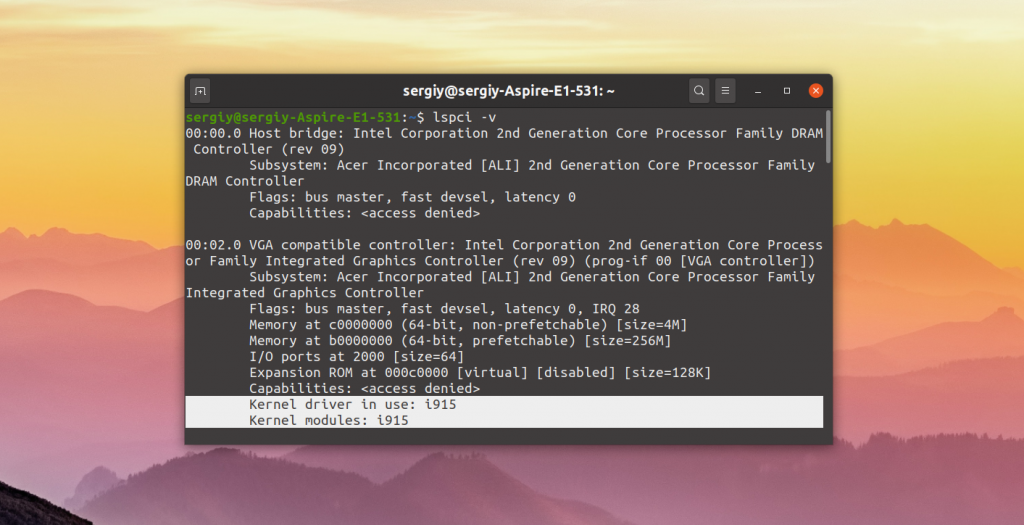
Как видите, в данном примере используется i915, это драйвер видеокарты от Intel. Он работает и ничего больше устанавливать не нужно. Если же в этой строчке находится что-то другое, можно попытаться установить драйвер.
Для установки части драйвера для Xorg и Mesa достаточно установить в систему такие пакеты:
sudo apt install xserver-xorg-video-intel
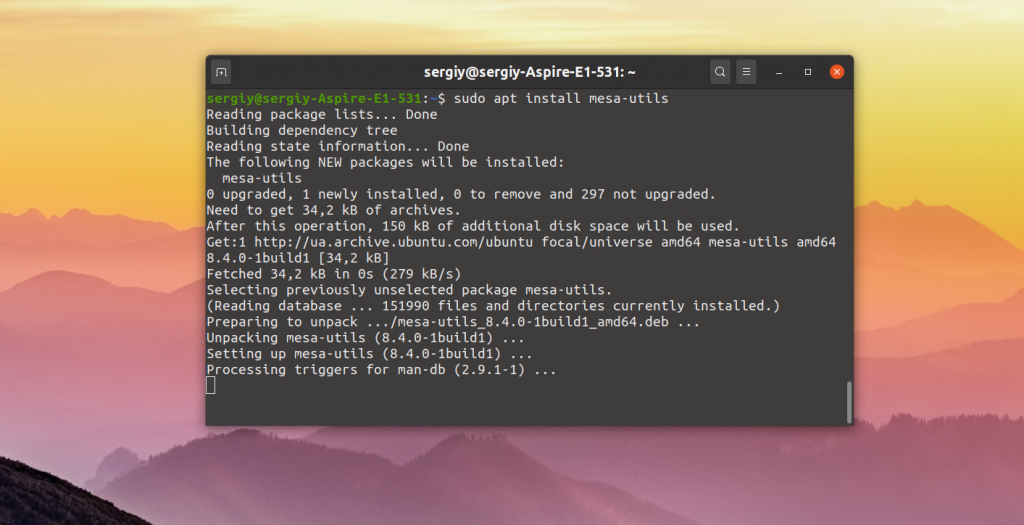
sudo apt install mesa-utils
Если вы хотите получить самую последнюю версию драйвера можно воспользоваться специальным PPA. Для добавления репозитория в систему выполните:
sudo add-apt-repository ppa:oibaf/graphics-drivers
Затем просто обновите систему и перезагрузите компьютер:
sudo apt full-upgrade
Выводы
Вот и все. Теперь вы знаете как выполняется установка драйвера Intel Ubuntu. В отличие от драйверов для Nvidia, в большинстве случаев здесь всё уже установлено. И вам не надо думать как поддерживать актуальную версию этого драйвера в своей системе. Если у вас остались вопросы, спрашивайте в комментариях!
Источник
Linux Mint Forums
Welcome to the Linux Mint forums!
[SOLVED] nvidia to intel gpu switching
[SOLVED] nvidia to intel gpu switching
Post by getaway » Sat May 18, 2019 10:03 pm
From the moment I installed 19.0 on my Asus laptop, I didn’t know how to switch between the 2 gpu’s it is equiped with (nvidia and intel graphics). I upgraded today to 19.1 and it’s still the same.
The «Nvidia server settings» doesn’t give me any mean to choose between gpu’s
I think this is a very newby problem, but I am a real one.
Thank you if any suggestion

Re: nvidia to intel gpu switching
Post by roblm » Sun May 19, 2019 8:29 am
If your laptop supports Nvidia’s Optimus technology, then you should see a PRIME Profiles page when Nvidia Settings is opened, after the Nvidia driver is installed in Driver Manager.
If you don’t see that page, then there is no Optimus support or the Nvidia driver is not installed or loading.
Open the Terminal, use these commands and post the output:
6. Use this command to upload the Xorg.0.log file to terminal.com pastebin:
cat /var/log/Xorg.0.log | nc termbin.com 9999
Post the URL link that displays in the Terminal window.
Re: nvidia to intel gpu switching
Post by RIH » Sun May 19, 2019 9:10 am
i am runing 19.1 Cinnamon on a Lenovo Z50.
If I look at Driver Manager I see this..
Re: nvidia to intel gpu switching
Post by getaway » Sun May 19, 2019 11:57 am
Hello Robim and RIH
From Nvidia settings window, I don’t have the line «Prime profiles»
and in the notification zone of the menu bar, I have no nvidia icone as suggested by RIH
Following are the output from the 6 terminal commands you asked me.
I’m clearly unable to interpret them.
I thank you a lot for your attention.
Re: nvidia to intel gpu switching
Post by roblm » Sun May 19, 2019 12:17 pm
Was Mint 19 a new installation or did you upgrade from Mint 18.x?
What is the output of this command: ls /etc/modprobe.d
Re: nvidia to intel gpu switching
Post by getaway » Sun May 19, 2019 12:30 pm
19.1 has been an upgrade from 19.0
For 19.0 I think it was a plain new install, but I’m not quiet sure
Here is the output you asked for:
Re: nvidia to intel gpu switching
Post by roblm » Sun May 19, 2019 12:54 pm
Use this command and then reboot: sudo update-initramfs -u
If there is no change, then use this command and post the output: sudo prime-select nvidia
Re: nvidia to intel gpu switching
Post by getaway » Sun May 19, 2019 1:19 pm
Nothing changed with update-initramfs, after reboot.
Here is the output (very short indeed. ) of prime-select nvidia
Re: nvidia to intel gpu switching
Post by roblm » Sun May 19, 2019 1:25 pm
Re: nvidia to intel gpu switching
Post by getaway » Sun May 19, 2019 1:52 pm
Yes it changed that time.
1. the window for nvidia settings looks like the one you showed me at first, and nvidia icon was shown in notification zone.
2. after changing for intel gpu within that window, the system got frozen. So, dirty shut down and reboot again. After reboot, the icon in the notification was the intel one.
3. I tried a few times to change gpu, nvidia to intel and reverse. The system didn’t get frozen again. It looks that in the nvidia setting window, you can change the gpu, and it looks ok, except the notification zone which is only updated after a new reboot.
But it works, I am happy.
Thank you very much for help and I shall make this subject «solved».
Источник


