- Kali Linux on Android using Linux Deploy
- Kali Linux on any Android Phone or Tablet
- Linux on android linux deploy
- Установка дистрибутивов Linux рядом с Android
- Устанавливаем дистрибутив Linux на Android
- Шаг 1: Получение root-прав
- Шаг 2: Установка Linux Deploy
- Шаг 3: Настройка Linux Deploy
- Шаг 4: Установка и запуск Linux
Kali Linux on Android using Linux Deploy
Kali Linux on any Android Phone or Tablet
Getting Kali Linux to run on ARM hardware has been a major goal for us since day one. So far, we’ve built native images for the Samsung Chromebook, Odroid U2, Raspberry Pi, RK3306, Galaxy Note 10.1, CuBox, Efika MX, and BeagleBone Black to name a few. This however does not mean you cannot install Kali Linux in a chroot on almost any modern device that runs Android. In fact, the developers of Linux Deploy have made it extremely easy to get any number of Linux distributions installed in a chroot environment using a simple GUI builder.
Prerequisites
- A device running Android 2.1 and above, rooted.
- At least 5 GB free space on internal or external storage.
- A fast, wireless internet connection.
- Patience to wait for a distribution to bootstrap from the network.
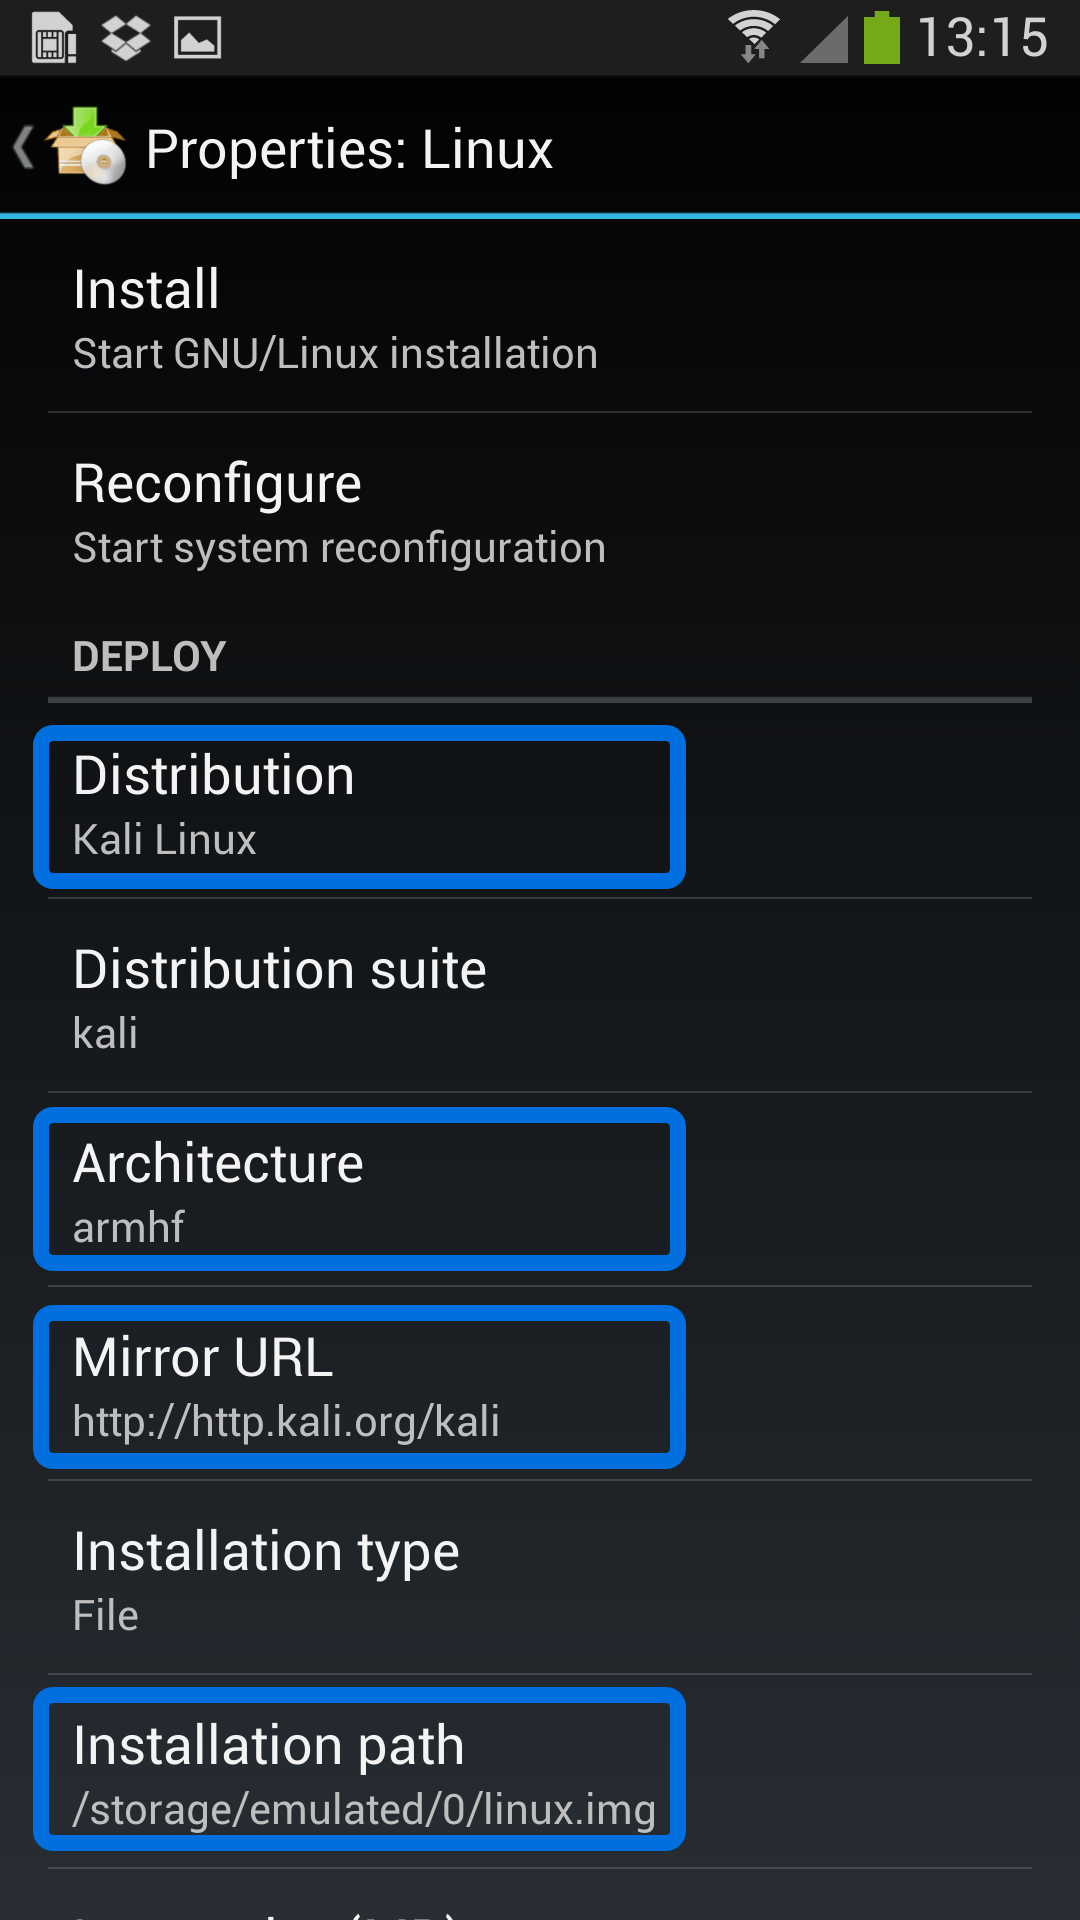
Configuring Linux Deploy for Kali
There’s actually very little to be done to get Kali installed. By choosing Kali Linux in the “Distribution” tab, you’ve pretty much covered the important stuff. Optionally, you can choose your architecture, verify that the Kali mirror is correct, set your installation type and location on your Android device, etc. Generally speaking, the defaults provided by Linux Deploy are good to begin with.
Building the Kali Image
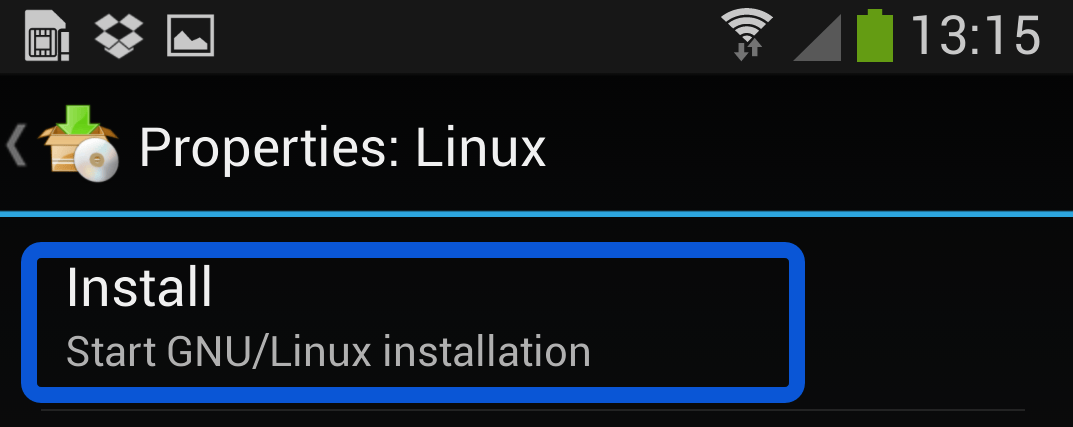
Once you are happy with all the settings, hitting the “install” button will start a Kali Linux bootstrap directly from our repositories. Depending on your Internet connection speed, this process could take a while. You’ll be downloading a base install of Kali Linux (with no tools) at minimum.
Starting up your chrooted Kali
Once the installation is complete, you can have Linux Deploy automatically mount and load up your Kali Linux chroot image. This also includes the starting of services such as SSH and VNC for easier remote access. All of this is automagically done by hitting the “start” button. You should see Linux Deploy setting up your image with output similar to the following:
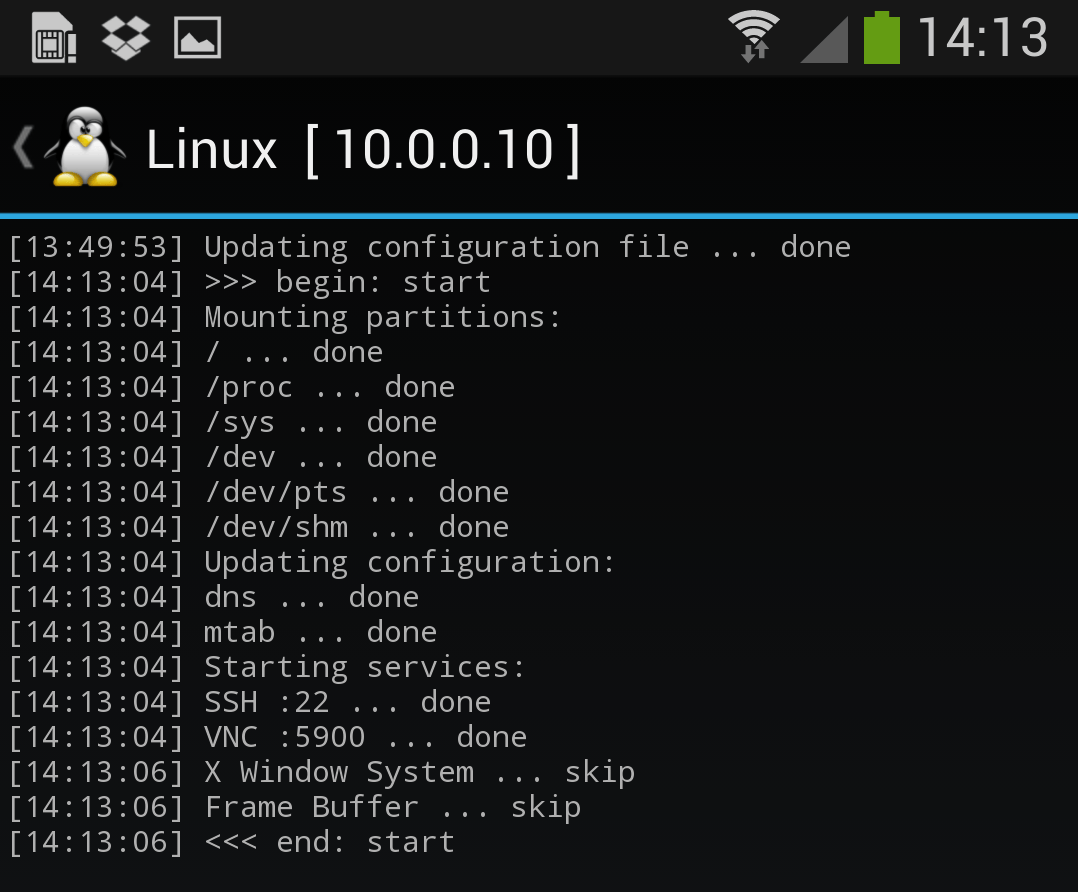
At this stage, Linux Deploy has started a VNC and SSH server inside your chrooted Kali image. You can connect to the Kali session remotely using the IP address assigned to your Android device (in my case, 10.0.0.10).
Logging in to your chrooted Kali
Now you can use either a SSH or VNC client to access your Kali instance. The VNC password is “changeme” and the SSH credentials are “android” for the username (configured via Linux Deploy) and “changeme” as the password.
Image Size Considerations
If left unchanged, Linux Deploy will automatically set an image size of around 4 GB, for a “naked” installation of Kali. If you would like to install additional Kali tools down the road, you might want to consider using a larger image size, which is configurable via the settings in Linux Deploy.
Local VNC Connections
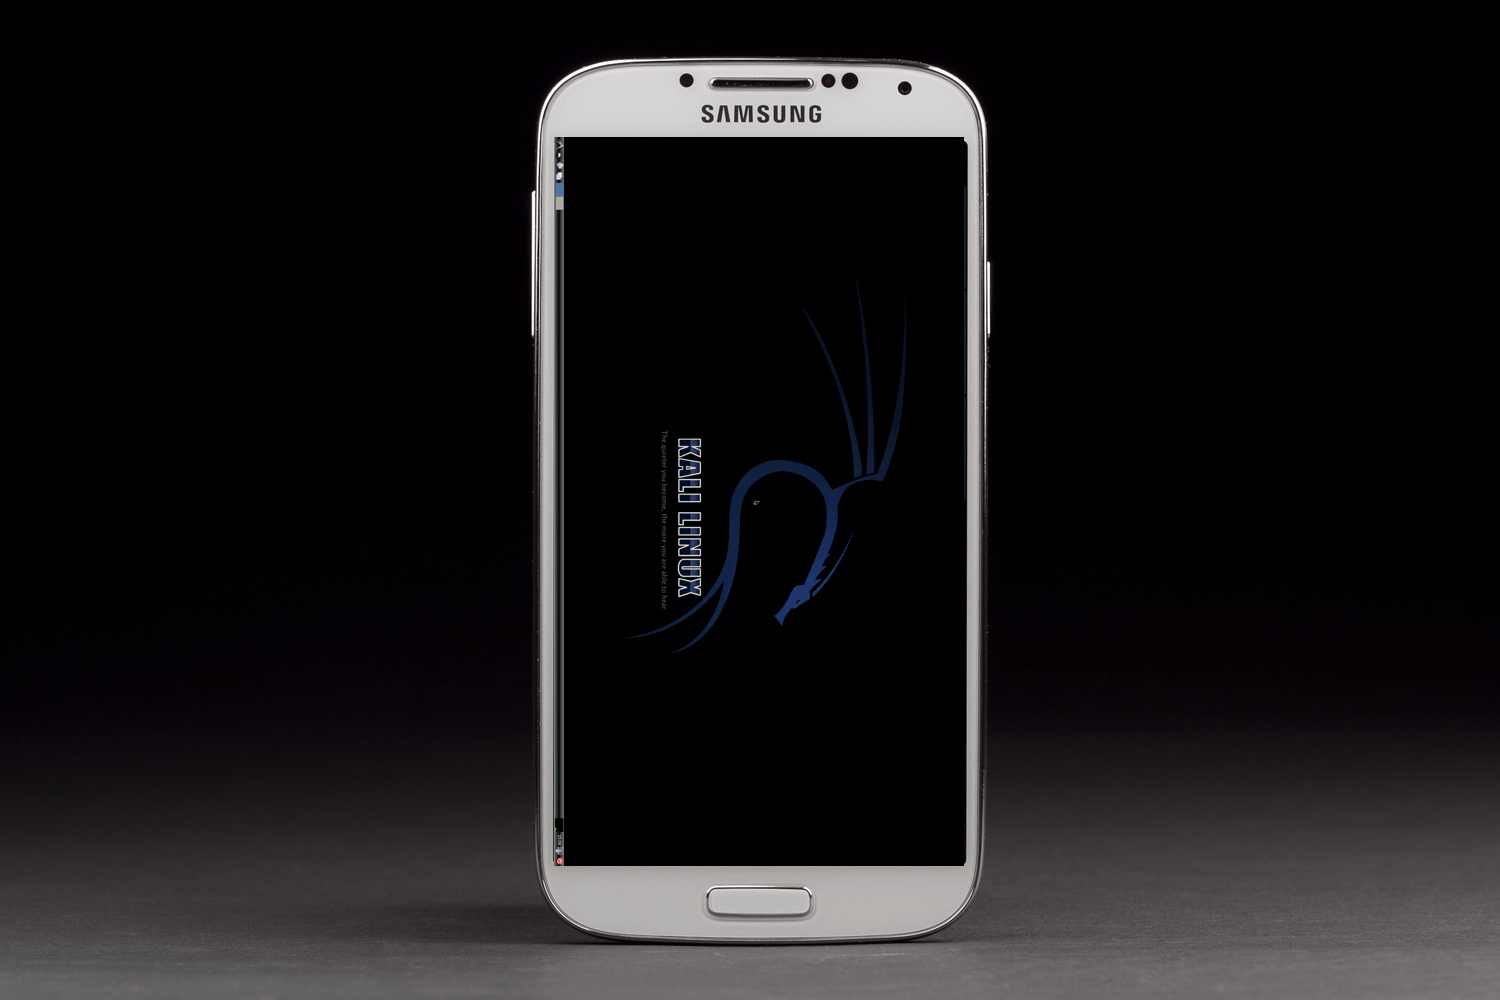
We had to try a couple of VNC clients to get one to work properly. Although controlling Kali through a local VNC client isn’t the most convenient of tasks, it certainly is possible. However, we suspect that most people will be SSH’ing into this instance. The picture below was overlayed with a Kali Linux desktop screenshot taken from a Galaxy S4.
Anyone fancy a simple smartphone hardware backdoor?
Источник
Linux on android linux deploy
Copyright (C) 2012-2019 Anton Skshidlevsky, GPLv3
This application is open source software for quick and easy installation of the operating system (OS) GNU/Linux on your Android device.
The application creates a disk image or a directory on a flash card or uses a partition or RAM, mounts it and installs an OS distribution. Applications of the new system are run in a chroot environment and working together with the Android platform. All changes made on the device are reversible, i.e. the application and components can be removed completely. Installation of a distribution is done by downloading files from official mirrors online over the internet. The application can run better with superuser rights (root).
The program supports multi language interface. You can manage the process of installing the OS, and after installation, you can start and stop services of the new system (there is support for running your scripts) through the UI. The installation process is reported as text in the main application window. During the installation, the program will adjust the environment, which includes the base system, SSH server, VNC server and desktop environment. The program interface can also manage SSH and VNC settings.
Installing a new operating system takes about 15 minutes. The recommended minimum size of a disk image is 1024 MB (with LXDE), and without a GUI — 512 MB. When you install Linux on the flash card with the FAT32 file system, the image size should not exceed 4095 MB! After the initial setup the password for SSH and VNC generated automatically. The password can be changed through «Properties -> User password» or standard OS tools (passwd, vncpasswd).
The app is available for download in Google Play and GitHub.


- Bootstrap: Alpine, Arch, CentOS, Debian, Fedora, Kali, Slackware, Ubuntu, Docker or from rootfs.tar
- Installation type: image file, directory, disk partition, RAM
- Supported file systems: ext2, ext3, ext4
- Supported architectures: arm, arm64, x86, x86_64, emulation mode (ARM
x86)
Do not work update operating environment or errors appear in debug mode: «Permission denied», «Socket operation on non-socket» or other.
Install compatible BusyBox in /system/xbin, add path /system/xbin in «Settings -> PATH variable», update the operating environment «Settings -> Update ENV». Before upgrading the environment, it is desirable restart the device. After that, the container options must be selected «Properties -> File system -> Auto» and «Propetries -> Image size (MB) -> 2000», because «busybox mke2fs» is not supperted an option «-t» to specify type of file system and not supperted image greater 2 GB. Now you can start a new installation «Menu -> Install».
Making an image on sdcard return an error «Read-only file system».
If you are using SuperSU utility you need to uncheck «mount namespace separation» in SuperSU settings. See documentation.
Installing an application on Google Play fails with the message «Unknown error code during application installation: -24».
You need to remove the application directory: /data/data/ru.meefik.linuxdeploy
SD card read / write speed (10 class) on Android (Samsung Galaxy S II) for file systems vfat, ext2, ext4:
- vfat: read speed 14.1 MB/s; write speed 12.0 MB/s
- ext2: read speed 14.9 MB/s; write speed 3.9 MB/s
- ext4: read speed 14.9 MB/s; write speed 16.6 MB/s
- ext2 (loop): read speed 17.0 MB/s; write speed 7.4 MB/s
- ext4 (loop): read speed 17.2 MB/s; write speed 8.8 MB/s
Installation time and use space on disk (Debian wheezy/armhf on Samsung Galaxy S II):
Источник
Установка дистрибутивов Linux рядом с Android
Бесплатные дистрибутивы, основанные на ядре Linux, могут быть установлены не только на компьютеры, но и доступны на мобильных устройствах. Помимо этого, создаются специальные версии операционных систем, где интерфейс и инструменты переделаны под смартфоны и планшеты. Обычно желание установить бесплатный дистрибутив появляется у обладателей телефонов под управлением Android. Инсталлируемая таким образом Линукс будет находиться рядом с основной ОС, а юзер сам выберет систему для загрузки. Далее мы хотим продемонстрировать выполнение этой процедуры на примере одной из самых популярных программ.
Устанавливаем дистрибутив Linux на Android
В осуществлении поставленной задачи нет ничего сложного, ведь требуется только наличие достаточного количества свободного места во внутренней памяти устройства и активное подключение к интернету. Единственное, с чем могут возникнуть трудности — получение root-прав, но при помощи полноценных инструкций эта цель тоже будет выполнена быстро и без проблем.
Приведенные далее руководства не подойдут для установки дистрибутивов Kali Linux, поскольку будет использовано несовместимое программное обеспечение. Развернутые инструкции по этой теме вы найдете в отдельном материале по ссылке ниже.
Шаг 1: Получение root-прав
Используемое далее программное обеспечение для выполнения инсталляции потребует рут-права. По умолчанию они не предоставляются на Android, их нужно получать через специальные сторонние средства. Тогда перед юзером открываются безграничные возможности в управлении ОС. Данный шаг самый сложный, поэтому с ним следует разобраться в первую очередь, чтобы продолжить дальнейшую операцию. Детальные руководства по методу получения root-прав на мобильном устройстве вы найдете в отдельной нашей статье, перейдя по следующей ссылке.
Шаг 2: Установка Linux Deploy
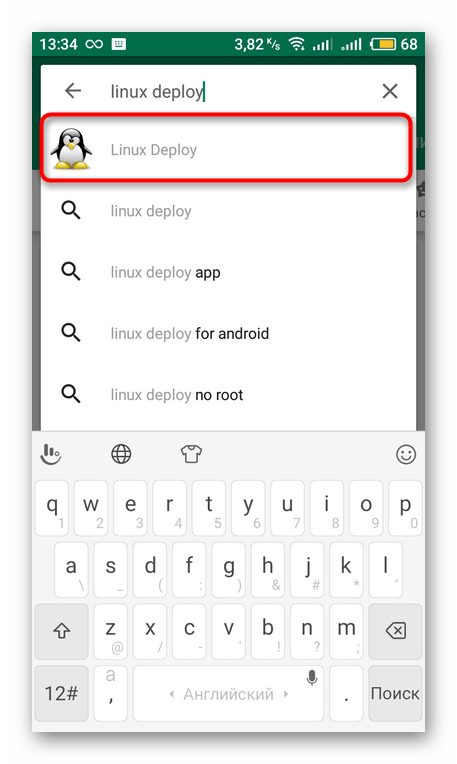
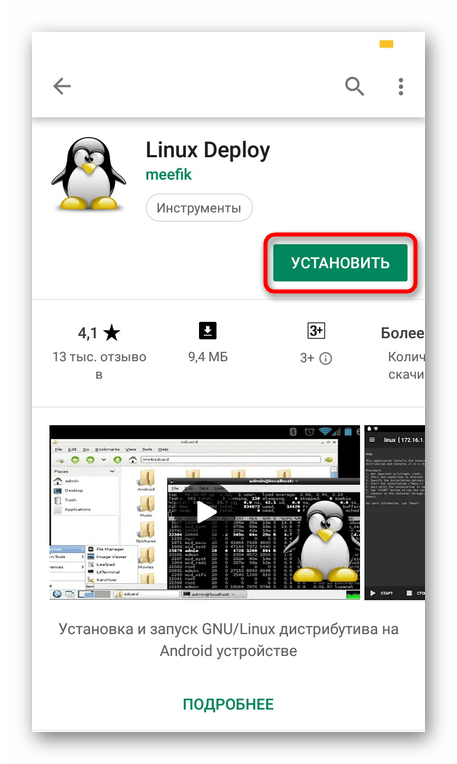
После удачного получения прав суперпользователя можно приступать к непосредственной установке Linux. Скачивание большинства популярных дистрибутивов доступно при помощи приложения Linux Deploy, которое выполнит все необходимые действия. Его нужно лишь установить и настроить. Первая задача выполняется так:
- Откройте Google Play Market и перейдите на страницу приложения.
Начните установку, щелкнув на соответствующую кнопку.
Шаг 3: Настройка Linux Deploy
Теперь у вас на смартфоне имеются права суперпользователя и необходимое программное обеспечение, а значит все готово для дальнейшей установки. Осталось только выбрать путь и версию дистрибутива, что осуществляется непосредственно в Linux Deploy.
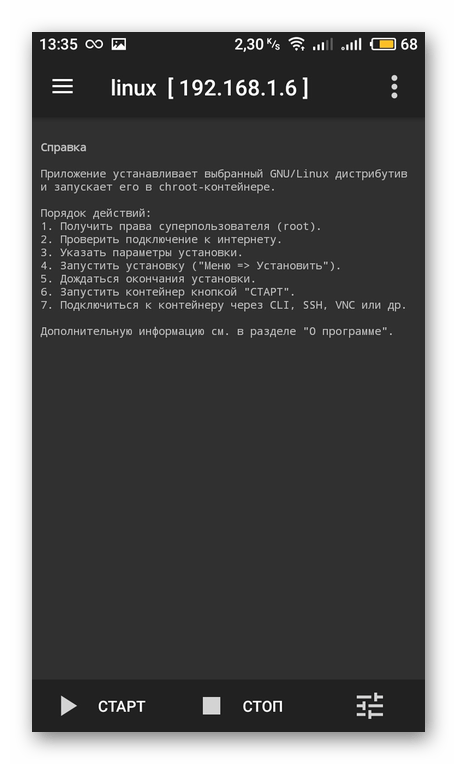
- Запустите приложение и ознакомьтесь с представленной инструкцией. В ней описываются общие правила установки Linux.
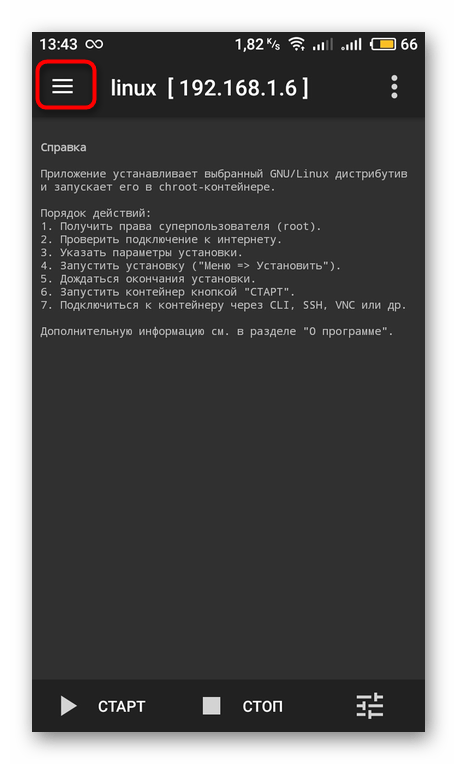
Раскройте дополнительное меню, тапнув на иконку в виде трех горизонтальных полос.
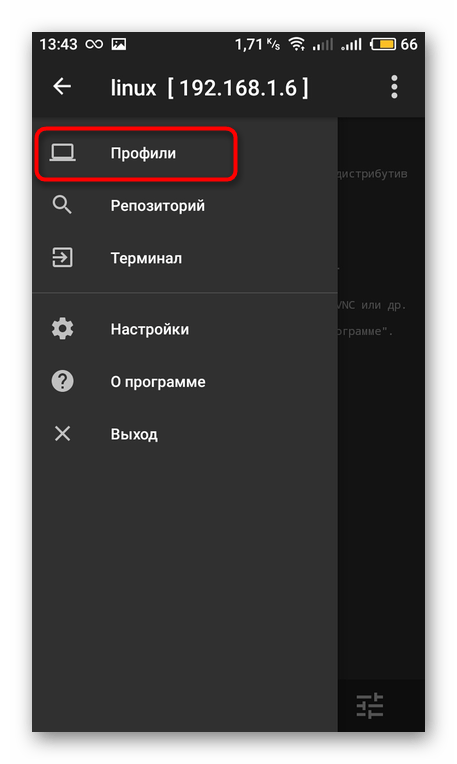
Здесь перейдите в раздел «Профили».
Создайте новый профиль и задайте ему имя. Доступно создание неограниченного количества учетных записей. Каждой из них присваиваются индивидуальные настройки, то есть можно инсталлировать несколько дистрибутивов рядом.

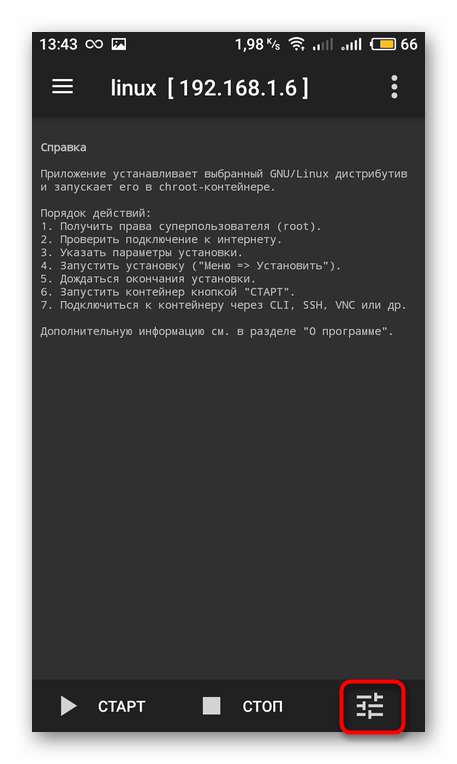
Вернитесь в главное меню и переместитесь к категории с настройками операционной системы.
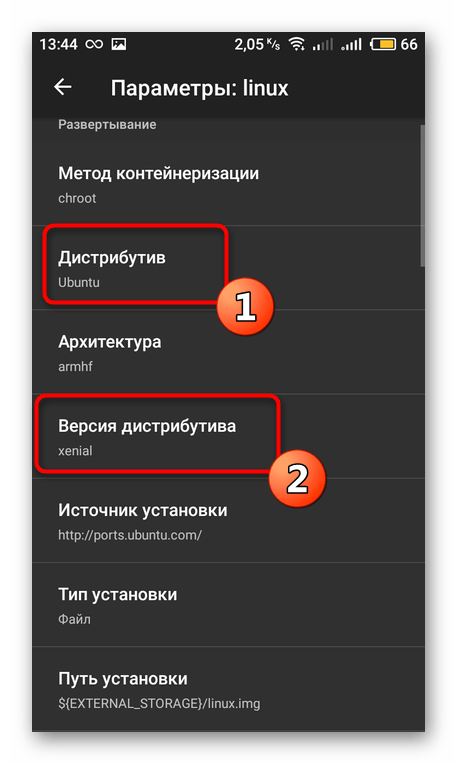
Выберите дистрибутив и его версию на свое усмотрение.
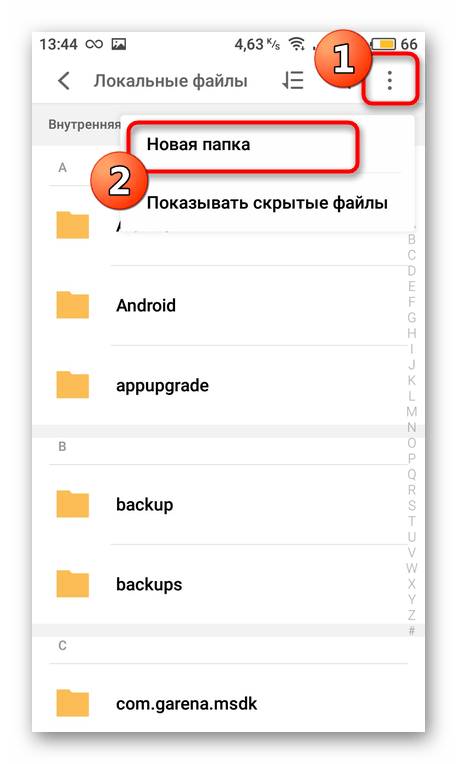
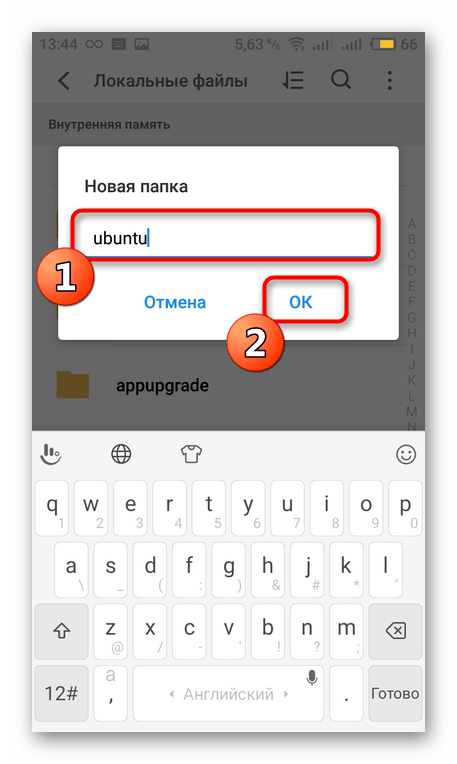
На время отложите Linux Deploy и запустите удобный файловый менеджер или стандартный Проводник. Там в любом месте создайте папку, назвав ее именем ОС. Туда и будут установлены все файлы.
Задайте ей произвольное название, чтобы запомнить место хранения данных. Запишите или скопируйте путь к этой директории.
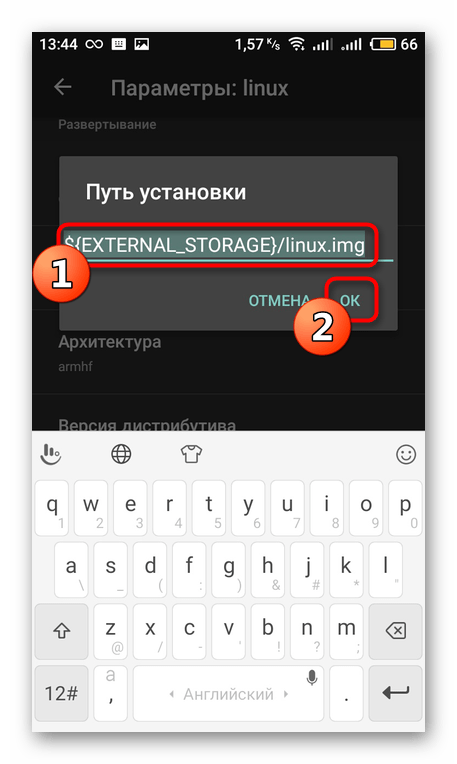
Вернитесь в приложение и в пункте «Путь установки» задайте расположение нужной папки.
Шаг 4: Установка и запуск Linux
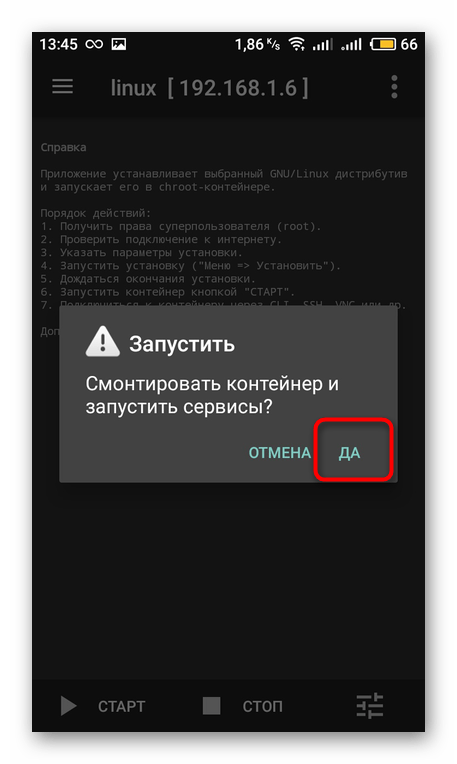
Перед запуском инсталляции повторно убедитесь в том, что все параметры были заданы верно, ведь неправильные настройки иногда приводят к отказу работы устройства, а решается это только сбросом конфигурации до заводского состояния. После этого нажмите на кнопку «Старт».
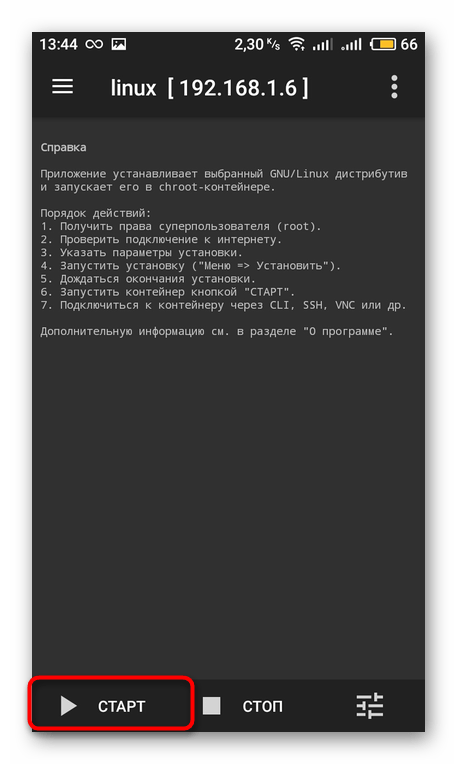
Соглашайтесь с действиями при отображении системных уведомлений. Затем будет произведена перезагрузка Android. Повторное нажатие на «Старт» запустит гостевую операционную систему.
Выше вы разобрались с инсталляцией Linux в качестве гостевой ОС на девайс под управлением Андроид. Как видите, ничего в этом сложного нет, главное — получить права суперпользователя и выполнить правильную конфигурацию приложения. Все файлы оно загрузит из открытых источников и установит их самостоятельно.
Помимо этой статьи, на сайте еще 12315 инструкций.
Добавьте сайт Lumpics.ru в закладки (CTRL+D) и мы точно еще пригодимся вам.
Отблагодарите автора, поделитесь статьей в социальных сетях.
Источник


