- Linux Software Repositories
- Overview
- The Linux Package Signing Keys
- Key Details
- Command line key installation for APT
- Command line key installation for RPM
- Your desktop on Google Cloud Platform
- VNC on Google Compute Engine instances
- Creating a new project
- Creating a new instance
- Installing a VNC server
- Setting up the VNC server
- Installing a VNC client
- Opening the firewall
- Connecting to the VNC server
- Troubleshooting
- Cleaning up and costs
- Create your own Ubuntu Server on Google Cloud Platform
- Google Compute Engine (GCE)
- Post Configuration
- Next steps
- About the author
- Ranvir Singh
Linux Software Repositories
Overview
Google’s Linux software packages will automatically configure the repository settings necessary to keep your Google Linux applications up-to-date. Please download and install packages from the appropriate product pages.
The Linux Package Signing Keys
Google’s Linux packages are signed with GNU Privacy Guard (GPG) keys. Google’s packages will automatically configure your package manager to verify product updates with the public signing key, but you may also install it separately if, for instance, you want to verify the integrity of an initial package download. Follow the instructions below to manually configure your package manager to use the keys.
Key Details
- Download: https://dl.google.com/linux/linux_signing_key.pub
- Key ID: Google, Inc. Linux Package Signing Key
- Fingerprint: 4CCA 1EAF 950C EE4A B839 76DC A040 830F 7FAC 5991
- Google, Inc. (Linux Package Signing Authority)
- Fingerprint: EB4C 1BFD 4F04 2F6D DDCC EC91 7721 F63B D38B 4796
Command line key installation for APT
On an APT-based system (Debian, Ubuntu, etc.), download the key and then use apt to install it.
Recent versions of apt-get will automatically attempt to verify packages on download. If an appropriate key is not found or if the package is corrupted, you will get a message like the following:
Command line key installation for RPM
On an RPM-based system (Fedora, SUSE, Mandriva, RHEL, etc.), download the key and then use rpm to install it.
You can verify the key installation by running:
To manually verify an RPM package, you can run the command:
Источник
Your desktop on Google Cloud Platform
VNC on Google Compute Engine instances

Having servers on the cloud is great: you can access them from anywhere and at anytime! You can easily ssh into your server and do whatever you want, right?
Well, what if you want to browse the web? I want to use Chrome! Or you could use Lynx … but I’ve heard it’s not CSS3 compatible. This is a little tutorial that will take you through all the steps to have GUI access to a Google Compute Engine instance.
Important: if you start an instance you’ll be charged per minute. Go to the end of this post to see how to stop it and get $300 in credits!
Update: My next post will discuss how to make this connection secure by using VNC over VPN.
Creating a new project
Visit the developers console, log in, and create a project if needed clicking on the Create Project button. Navigate the left menu to list the VM instances running on your project: Compute > Compute Engine > VM instances. If it’s the first time you do this for this project it might take a bit longer, since it’s setting some stuff up, don’t worry this happens only once.
Creating a new instance

Click on the Create Instance button to access the instance creation form. Choose a name for your instance. Any instance type and linux distribution would work, but if you want to go with something safe choose n1-standard-1 with backports-debian-7-wheezy-v20150423.
Choose a zone close to you to have the best latency in your connection.
If you’d like to use Windows the instances already come with support for RDP (Remote Desktop Protocol) so you don’t need any extra steps.
Installing a VNC server
Once your instance is running you can SSH directly into it by simply clicking the SSH button. This also handles the authentication for you, really handy!
Once connected let’s update our sources list and install some extra packages:
Before we continue configuring the VNC server that will allow us to access our instance through a desktop environment we should install one. You can install your favorite one:
a) If you like Gnome and are not in a hurry:
Gnome is beautiful … and heavy! So be patient while everything gets installed, two to five minutes is completely normal.
b) If you prefer something faster to install you might like Xfce:
Setting up the VNC server
Now that our instance has a desktop environment let’s make it accessible via VNC. Start the vncserver, and follow the directions to create a password
Note: this password will grant access to your instance, so make it strong.
If everything went fine your VNC server is now running and listening on port 5901. You can verify this with netcat from the Google Compute Engine instance:
Installing a VNC client
There’s many options available, my favorite one is RealVNC Viewer. Install one but don’t try to connect to your server just yet: it will fail as the firewall rules don’t allow it.
Opening the firewall
In order to communicate with our instance we need its external IP. You can find it on the Developers Console.

Let’s try to connect to it using netcat again:
Regardless of the tool you use the connection will fail, this is expected as the firewall rules block all communications by default for security reasons.
Let’s fix that.
Navigate to the configuration for the default network “Compute > Compute Engine > Network” and then click on default. Or you could also click here and choose your project.
We’re going to add a new firewall rule, pressing the corresponding button.

Choose a descriptive name for the rule.
We will allow traffic coming from any source, which is why we use 0.0.0.0/0, the IP mask equivalent to a wildcard.
The traffic will be on the port 5901 for protocol TCP and going to instances tagged as vnc-server.
The last step is to tag our instance as a vnc-server, for that go back to the VM description page and click on “add tags”

Connecting to the VNC server
Let’s first of all make sure that the connection is now allowed by the firewall:
Great! Everything seems ready for our VNC client to connect. Open your VNC viewer and connect to the IP of your Compute Engine instance on port 5901.

To connect you’ll need to provide the password you gave at the beginning of this tutorial.

And voilà! You can now use your favorite Desktop environment on your Google Compute Engine instance.
Troubleshooting
If you still cannot connect to VNC after you have created a firewall rule you should make sure that your IP has not been banned by sshguard.
To see if this is the case you can run:
If your output differs from this one flush the table and retry:
Cleaning up and costs
An instance running on the cloud has a cost but the good news is that you can simply stop it and restart whenever you need it again. Click on the Stop button and you’ll be charged only for the associated disk which at the moment of writing of this article is 40¢ per month. I dare you finding a cheaper cup of coffee in San Francisco!
Finally, if you’re new to the Google Cloud Platform make sure to get into the Free Trial to access $300 in credit so you can try it out and have some fun!
I hope this was useful. Feel free to add any comments for feedback or questions on twitter.
Источник
Create your own Ubuntu Server on Google Cloud Platform
Sometimes, all we need is a simple VM. Despite the uprising of containers, VMs are still useful and simple. You don’t have to worry about giving your application permissions for a different Database service, an object store service etc. Everything from compute to storage can be contained within a single (scalable) VM.
In this post, let’s dive into how one can spin up a Ubuntu server in Google’s Cloud Platform.
Google Compute Engine (GCE)
GCE is the product that actually lets you configure and deploy virtual machines on Google’s infrastructure. Everything from the amount of resources to the networking capabilities, SSH-keys and Operating system are selected herein.
Login to your Google Cloud Platform dashboard, and search for GCE. At once Compute Engine will show up in the results, click on it.

Here’s an overview of Compute Engine: 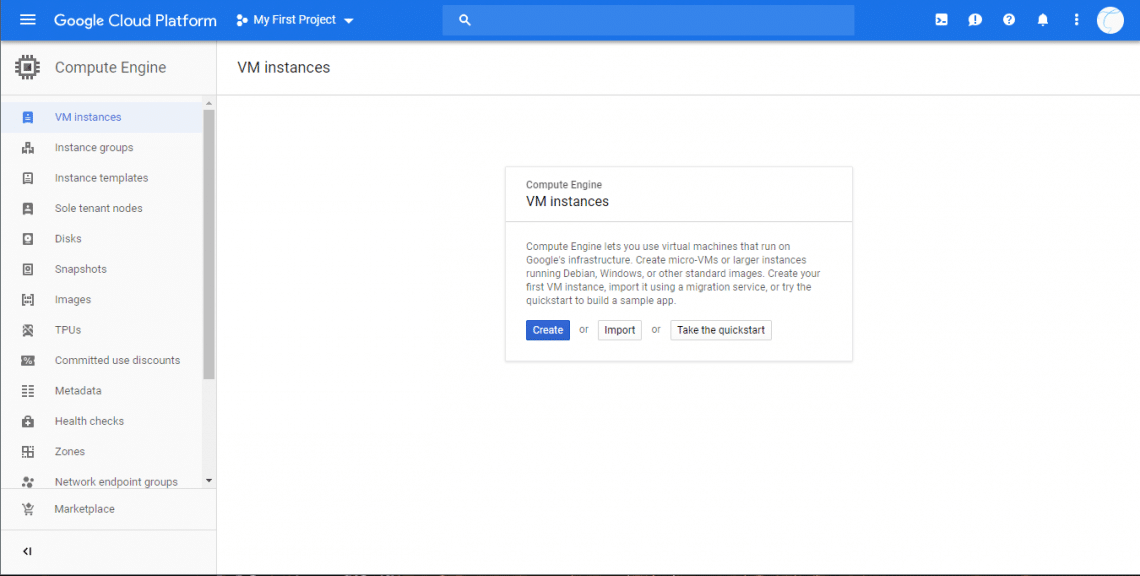
As you can see, the side menu has a lot of options for managing your VMs and monitoring them. We will stick to VM instances for now. Since this lets us create a single VM. If you wish to create a group of them “Instance groups” might serve you better.
Let’s start by clicking on Create, as shown in the screenshot above.

A VM template with all the default values provided by Compute Engine will appear. Let’s configure a few of the defauls. I’ll leave the CPU to 1 vCPU and memory to 3.75 GB as those values are good enough for a demo. If you want more/less resources for optimal price and performance, feel free to tweak these parameters.
First thing I will tweak is the boot disk. We want Ubuntu, so, under boot disk, click on Change and select Ubuntu 18.04 LTS. This disk will have the OS installed and the remaining space is what you will use for your application, packages, etc. (unless you are adding extra block storage). So if you want more storage than the default 10GB, make sure to increase the size, as shown below.
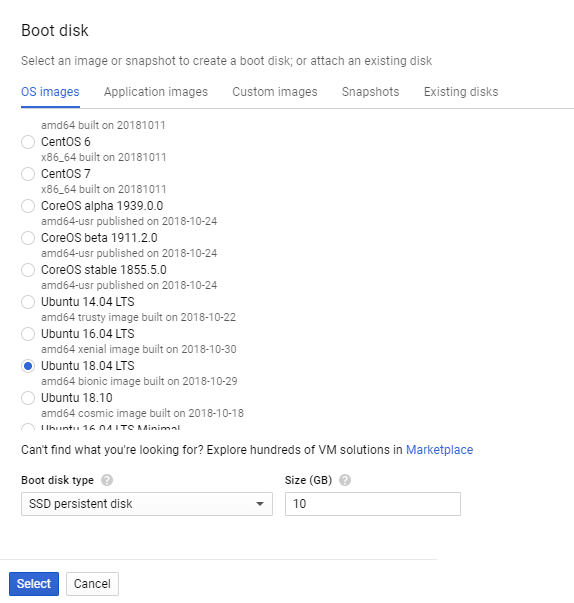
Moreover, for better performance you can select SSD persistent disk. This is a significant improvement over standard persistent disk. Once the boot disk is selected to be Ubuntu, we can just create the VM and have a Ubuntu server installed in the cloud for us.
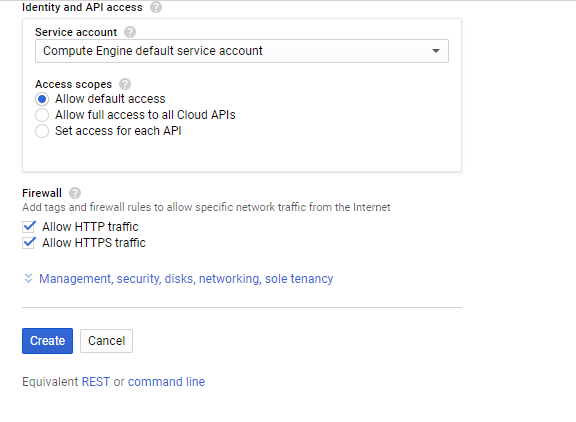
However, let’s configure, for convenience sake, Firewall and SSH keys.
If you wish to host an HTTP or HTTPS server, make sure to check the boxes saying “Allow HTTP Traffic” and “Allow HTTPS Traffic”. Most websites would need this, and so would most API servers, reverse proxy servers, etc. As for the Identity and API access parameters are concerned, you can leave that to default.
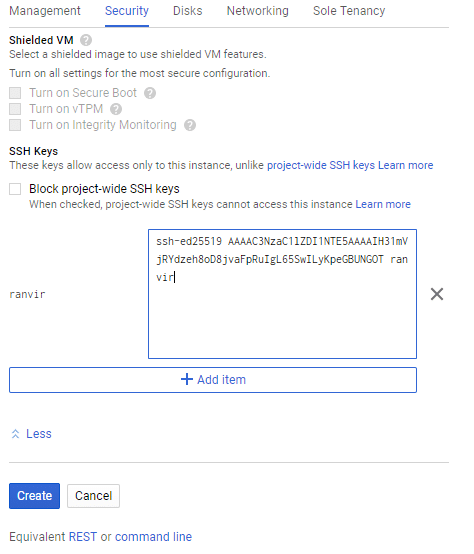
Now click on “Management, security, disks…” section to access more customization features. Within this dropdown go to Security and you can paste your public ssh key in here. The username within the key will also be created inside the VM. For example, the key
Will create a user named ranvir with sudo access and place the SSH key within this user’s home directory (
/.ssh/authorized_keys) so you can access the VM remotely.
We are almost done. Review the monthly estimated price this VM will cost you as well as the region where it will be spun up, by scrolling all the way up again. Regions are a subjective, but important parameter. For someone trying to create a VPN, a VPN several time zones away is better suited. On the other hand, if you require lower latencies, you need to select a region nearest to you.
Then click on create and you have your Ubuntu VM up and running!
Post Configuration
In order to make sure that you can ssh into the VM reliably as well as point domain names to this VM, you would need a static public IP address. If you view the Compute Engine dashboard, you will see the status of your VM along with its external (public) IP.
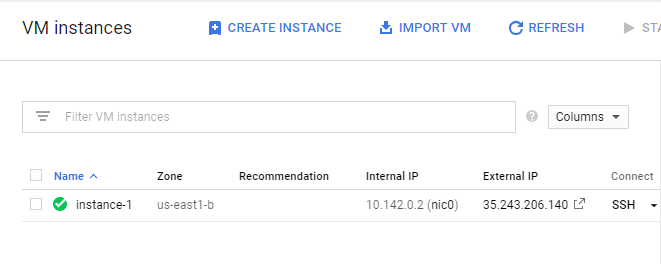
But if you click on the VM’s name (instance-1 in my case) then you will notice that the IP is, in fact, ephemeral.

This means trouble, especially if you are using external domain name servers to point your FQDN towards this IP address. To change this to static, click on Edit, from the top menu. Scroll back to network interfaces (nic0, in our case) and edit it.
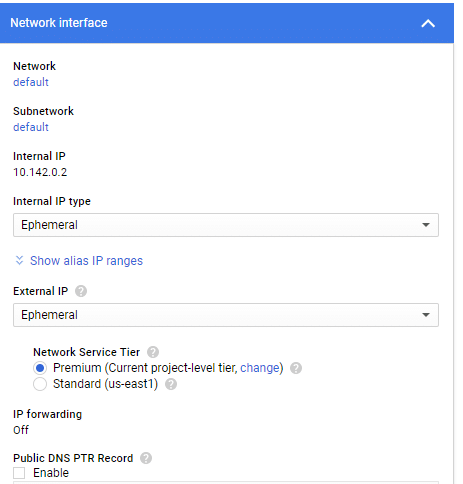
Click on Ephemeral under the External IP and select Create IP address.
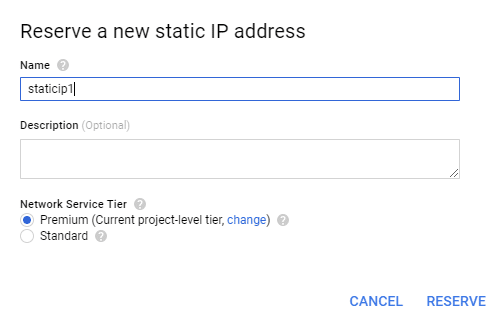
It will open up a dialogue box asking you for a name to give to this new static IP. Give it a reasonable name and click Reserve. You will notice that the external IP of the VM has indeed changed and, hopefully, for the last time.
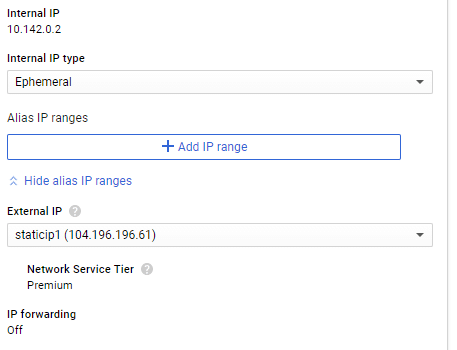
You can now try to ssh into this VM via its external IP. Remember the username that was associated with your public SSH key? Just use that along with the static IP you obtain, like in my case it would be:
Your username and IP would be very different from mine, use those instead.
Next steps
When it comes to computation, automation is the name of the game. VMs are often created as a disposable entity in the cloud, especially if you just want to use them for a few hours of testing, or running batch processes, etc.
Now that you know how to create a VM using the GUI, try automating the process using the gcloud CLI or the REST API. Whatever actions you perform on the Compute Engine GUI, an equivalent HTTP request or gcloud command is available in the bottom of the page.

Use them to automate the tedious process of spinning up VMs. This will help you save an enormous amount of time.
About the author

Ranvir Singh
I am a tech and science writer with quite a diverse range of interests. A strong believer of the Unix philosophy. Few of the things I am passionate about include system administration, computer hardware and physics.
Источник


