- How to Enable (UP)/Disable (DOWN) Network Interface Port (NIC) in Linux?
- 1) Bring UP/Down Network Interface, using ifconfig command
- 2) How to enable and disable Network Interface using ifdown/ifup command?
- 3) Bringing UP/Down Network Interface using ip command?
- 4) How to enable & disable Network Interface using nmcli command?
- 5) Bringing UP/Down Network Interface using systemctl command?
- 6) Bringing UP/Down Network Interface using nmtui tool?
- 🇺🇸 Как включить (UP) и отключить (DOWN) порт сетевого интерфейса (NIC) в Linux?
- 1) Как подключить и отключить сетевой интерфейс в Linux с помощью команды ifconfig?
- 2) Как включить и отключить сетевой интерфейс в Linux с помощью команды ifdown / up?
- 3) Как вывести из строя или поднять сетевой интерфейс в Linux с помощью команды ip?
- 4) Как включить и отключить сетевой интерфейс в Linux с помощью команды nmcli?
- 5) Как вывести из строя сетевой интерфейс в Linux с помощью команды nmtui?
- Introduction to Linux interfaces for virtual networking
- Bridge
- Bonded interface
- Team device
- VXLAN
- MACVLAN
- IPVLAN
- MACVTAP/IPVTAP
- MACsec
- VXCAN
- IPOIB
- NLMON
- Dummy interface
- Additional resources
- netdevsim interface
How to Enable (UP)/Disable (DOWN) Network Interface Port (NIC) in Linux?
In servers, Network interfaces either physical or virtual can be enabled or disabled by running some commands.
If any change is performed in NIC due to which the interface is down, the interface can be brought up through multiple ways but we would like to suggest six best methods as mentioned below:
Commands as follows:
- ifconfig command: ifconfig command is used to configure a network interface. It provides a lot of information about NIC.
- ifdown/ifup Command: ifdown command bring the network interface down whereas the ifup command brings the network interface up.
- ip Command: ip command is used to manage NIC. It is a replacement of old and deprecated ifconfig command. It is similar to ifconfig command but has many powerful features which is not available with ifconfig command.
- nmcli Command: nmcli is a command-line tool for controlling Network Manager and to report network status.
- systemctl command: systemctl command is a tool which is responsible for controlling the systemd system and service manager.
- nmtui Command: nmtui is a curses‐based TUI application for interacting with Network Manager.
ip command shows the available network interface card information in the Linux system. According to the below output, two network interfaces (enp0s3 & enp0s8) are up and running in the system.
1) Bring UP/Down Network Interface, using ifconfig command
ifconfig runs at boot time to set up network interfaces and provides a lot of information about the NIC. In this example, let us see, how to bring up and down the interface using ifconfig command.
Common Syntax for ifconfig:
Run the following command to bring down the enp0s3 interface in the system. Please remember to enter the interface name of your system, instead of “enp0s3” as mentioned in this example.
As per the following output, enp0s3 interface is down
Please run the following command to bring up the enp0s3 interface.
“enp0s3” interface status can be further verified by running the following command.
2) How to enable and disable Network Interface using ifdown/ifup command?
‘ifdown’ command brings the Network interface down whereas the ‘ifup’ command bring the Network interface up.
Note: These commands does not work on new interface device bearing the names enpXXX .
Common Syntax for ifdown/ifup:
Run the following command to bring down the eth1 interface.
Run the following command to check, if the eth1 interface is down.
Run the following command to bring up the eth1 interface.
“eth1” interface status can be further verified by running the following command.
As mentioned earlier, ifup and ifdown does not support the latest interface device bearing the names such as enpXXX . Unknown interface message will appear when executed.
3) Bringing UP/Down Network Interface using ip command?
In this example, let us discuss how to bring Up/Down the Network interface using ip command.
Common Syntax for ip:
Run the following command to bring down the enp0s3 interface.
enp0s3 interface is down, as per the following output.
Run the following command to bring up the enp0s3 interface.
“enp0s3” interface status can be further verified by running the following command.
4) How to enable & disable Network Interface using nmcli command?
nmcli command can be used as a replacement for nm-applet or other graphical clients. nmcli is used to create, display, edit, delete, activate and deactivate network connections, as well as control and display network device status.
nmcli command performs most of the task using profile name instead of device name . Run the following command to identify the interface names.
Common Syntax for nmcli:
As stated, enter the profile name instead of device name to bring down the interface. Run the following command to bring down the enp0s3 interface.
According to the below output, enp0s3 interface is down.
Run the following command to bring up the enp0s3 interface.
Now the enp0s3 interface is up.
5) Bringing UP/Down Network Interface using systemctl command?
The ‘systemctl’ command can be used to apply a new configuration for the network service which brings down and brings up all the Network Interface Cards (NICs) to load the new configuration.
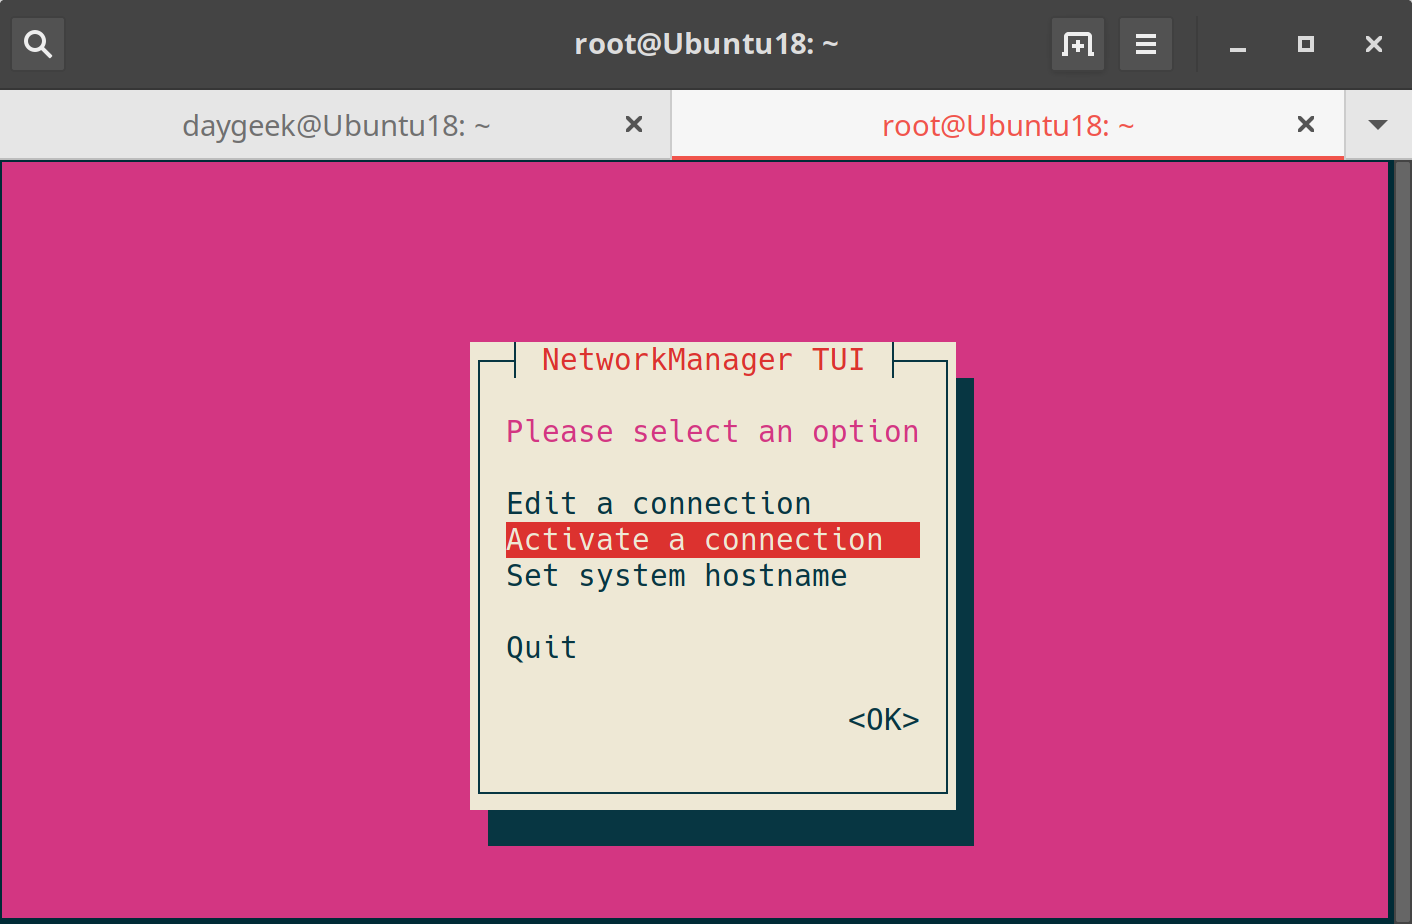
6) Bringing UP/Down Network Interface using nmtui tool?
nmtui is a curses based TUI application used for interacting with Network Manager.
It allows us to easily configure the network interfaces on Linux system using GUI.
Run the following command to launch the nmtui interface. Select “Activate a connection” and hit “OK”
Select the desired interface to bring down and then hit “Deactivate” button.
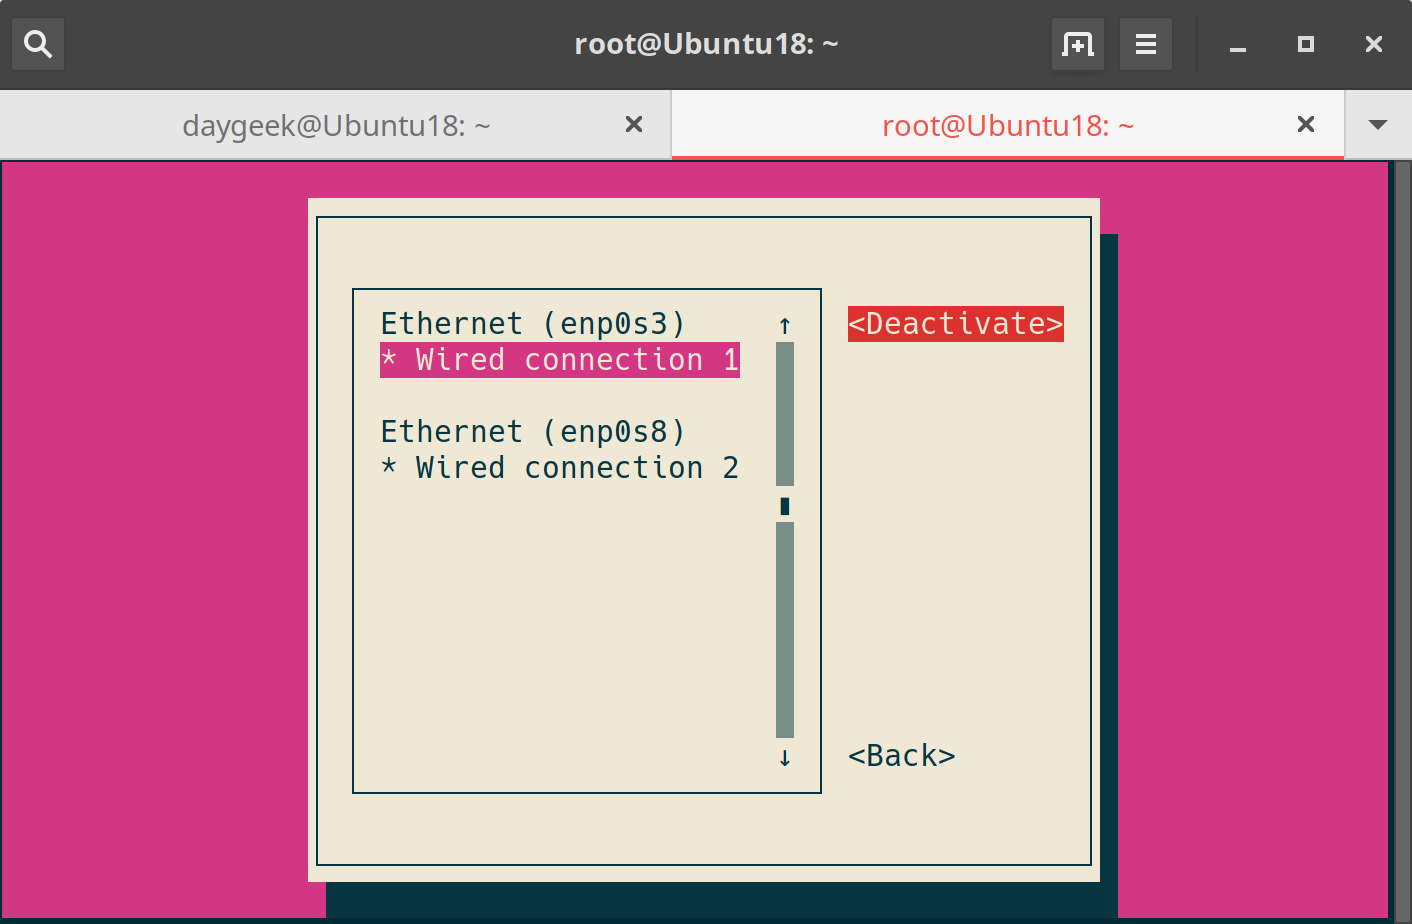
For activation, please perform the same procedure as above.
Источник
🇺🇸 Как включить (UP) и отключить (DOWN) порт сетевого интерфейса (NIC) в Linux?
Вам может потребоваться выполнить эти команды в соответствии с вашими требованиями.
Я могу привести несколько примеров, где вам это понадобится.
При добавлении нового сетевого интерфейса или при создании нового виртуального сетевого интерфейса из исходного физического интерфейса.
вам может понадобиться отослать эти команды, чтобы вызвать новый интерфейс.
Кроме того, если вы внесли какие-либо изменения или если они не работают, вам нужно выполнить одну из следующих команд, чтобы применить их.
Это можно сделать разными способами, и мы хотели бы добавить лучшие пять методов, которые мы использовали в статье.
Это можно сделать, используя следующие пять методов.
- Команда ifconfig: Команда ifconfig используется для настройки сетевого интерфейса. Он предоставляет много информации о NIC.
- Команда ifdown / up: команда ifdown отключает сетевой интерфейс, а команда ifup запускает сетевой интерфейс.
- Команда ip: команда ip используется для управления NIC. Это замена старой и устаревшей команды ifconfig. Она похожа на команду ifconfig, но имеет много мощных функций, которые недоступны в команде ifconfig.
- Команда nmcli: nmcli – это инструмент командной строки для управления NetworkManager и создания отчетов о состоянии сети.
- Команда nmtui: nmtui – это основанное на curses приложение TUI для взаимодействия с NetworkManager.
Приведенные ниже выходные данные показывают информацию о доступной сетевой карте (NIC) в моей системе Linux.
1) Как подключить и отключить сетевой интерфейс в Linux с помощью команды ifconfig?
Команда ifconfig используется для настройки сетевого интерфейса.
Он используется во время загрузки для настройки интерфейсов по мере необходимости.
Он предоставляет много информации о NIC.
Мы можем использовать команду ifconfig, когда нам нужно внести какие-либо изменения в сетевую карту.
Общий синтаксис для ifconfig:
Выполните следующую команду, чтобы отключить интерфейс enp0s3 в Linux.
Запишите его, вы должны ввести имя вашего интерфейса вместо нашего варианта.
Да действительно, данный интерфейс не работает согласно следующему выводу.
Выполните следующую команду, чтобы включить интерфейс enp0s3 в Linux.
Да, данный интерфейс работает сейчас согласно следующему выводу.
2) Как включить и отключить сетевой интерфейс в Linux с помощью команды ifdown / up?
Команда ifdown отключает сетевой интерфейс, а команда ifup – поднимает сетевой интерфейс.
Примечание. Она не работает с новым интерфейсным именем устройства, таким как enpXXX.
Общий синтаксис для ifdown / ifup:
Выполните следующую команду, чтобы отключить интерфейс eth1 в Linux.
Выполните следующую команду, чтобы включить интерфейс eth1 в Linux.
Да, данный интерфейс работает сейчас согласно следующему выводу.
ifup и ifdown не поддерживают последние имена интерфейсных устройств enpXXX.
При запуске команды я получил следующее сообщение.
3) Как вывести из строя или поднять сетевой интерфейс в Linux с помощью команды ip?
Команда ip используется для управления картой сетевого интерфейса (NIC).
Это замена старой и устаревшей команды ifconfig в современных системах Linux.
Она похожа на команду ifconfig, но имеет много мощных функций, которые недоступны в команде ifconfig.
Общий синтаксис для IP:
Выполните следующую команду, чтобы отключить интерфейс enp0s3 в Linux.
Да, данный интерфейс не работает согласно следующему выводу.
Выполните следующую команду, чтобы включить интерфейс enp0s3 в Linux.
Да, данный интерфейс работает сейчас согласно следующему выводу.
4) Как включить и отключить сетевой интерфейс в Linux с помощью команды nmcli?
nmcli – это инструмент командной строки для управления NetworkManager и создания отчетов о состоянии сети.
Его можно использовать в качестве замены для nm-applet или других графических клиентов. nmcli используется для создания, отображения, редактирования, удаления, активации и деактивации сети.
подключения, а также контролировать и отображать состояние сетевого устройства.
Выполните следующую команду, чтобы определить имя интерфейса, потому что команда nmcli выполняет большую часть задачи, используя имя профиля вместо имени устройства.
Общий синтаксис для IP:
Выполните следующую команду, чтобы отключить интерфейс enp0s3 в Linux.
Вы должны дать имя профиля вместо имени устройства, чтобы отключить его.
Да, данный интерфейс не работает согласно следующему выводу.
Выполните следующую команду, чтобы включить интерфейс enp0s3 в Linux. Вы должны дать имя профиля вместо имени устройства, чтобы включить его.
Да, данный интерфейс работает сейчас согласно следующему выводу.
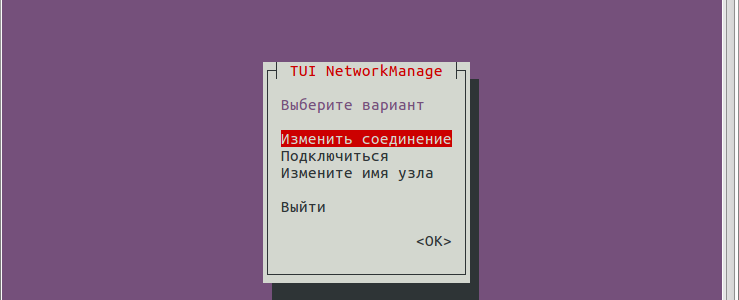
5) Как вывести из строя сетевой интерфейс в Linux с помощью команды nmtui?
nmtui – приложение TUI на основе curses для взаимодействия с NetworkManager.
При запуске nmtui пользователю предлагается выбрать действие для выполнения, если оно не было указано в качестве первого аргумента.
Запустите следующую команду, чтобы запустить интерфейс nmtui.
Выберите «Подключится» и нажмите «ОК».
Выберите интерфейс, который хотите отключить, затем нажмите кнопку «отключить».
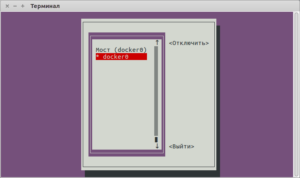
Для активации выполните ту же процедуру, что и выше.
Источник
Introduction to Linux interfaces for virtual networking

Linux has rich virtual networking capabilities that are used as basis for hosting VMs and containers, as well as cloud environments. In this post, I will give a brief introduction to all commonly used virtual network interface types. There is no code analysis, only a brief introduction to the interfaces and their usage on Linux. Anyone with a network background might be interested in this blog post. A list of interfaces can be obtained using the command ip link help .
This post covers the following frequently used interfaces and some interfaces that can be easily confused with one another:
After reading this article, you will know what these interfaces are, what’s the difference between them, when to use them, and how to create them.
For other interfaces like tunnel, please see An introduction to Linux virtual interfaces: Tunnels
Bridge
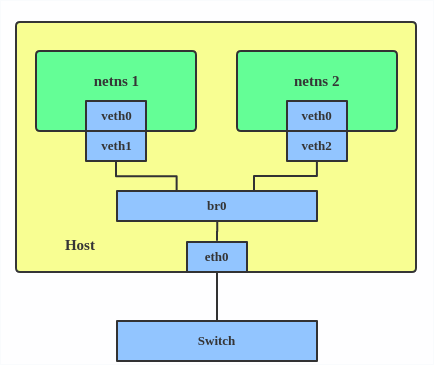
A Linux bridge behaves like a network switch. It forwards packets between interfaces that are connected to it. It’s usually used for forwarding packets on routers, on gateways, or between VMs and network namespaces on a host. It also supports STP, VLAN filter, and multicast snooping.
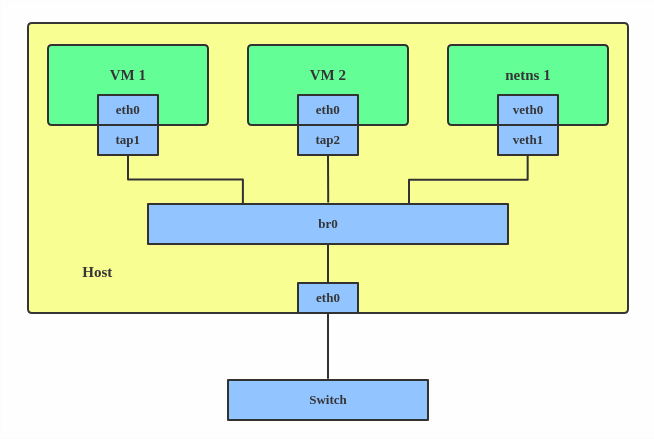
Use a bridge when you want to establish communication channels between VMs, containers, and your hosts.
Here’s how to create a bridge:
This creates a bridge device named br0 and sets two TAP devices ( tap1 , tap2 ), a VETH device ( veth1 ), and a physical device ( eth0 ) as its slaves, as shown in the diagram above.
Bonded interface
The Linux bonding driver provides a method for aggregating multiple network interfaces into a single logical «bonded» interface. The behavior of the bonded interface depends on the mode; generally speaking, modes provide either hot standby or load balancing services.
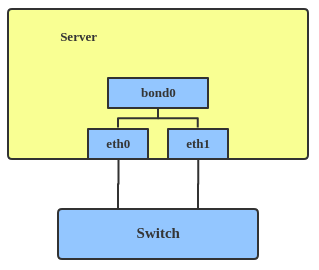
Use a bonded interface when you want to increase your link speed or do a failover on your server.
Here’s how to create a bonded interface:
This creates a bonded interface named bond1 with mode active-backup. For other modes, please see the kernel documentation.
Team device
Similar a bonded interface, the purpose of a team device is to provide a mechanism to group multiple NICs (ports) into one logical one (teamdev) at the L2 layer.

The main thing to realize is that a team device is not trying to replicate or mimic a bonded interface. What it does is to solve the same problem using a different approach, using, for example, a lockless (RCU) TX/RX path and modular design.
But there are also some functional differences between a bonded interface and a team. For example, a team supports LACP load-balancing, NS/NA (IPV6) link monitoring, D-Bus interface, etc., which are absent in bonding. For further details about the differences between bonding and team, see Bonding vs. Team features.
Use a team when you want to use some features that bonding doesn’t provide.
Here’s how to create a team:
This creates a team interface named team0 with mode active-backup , and it adds eth0 and eth1 as team0 ‘s sub-interfaces.
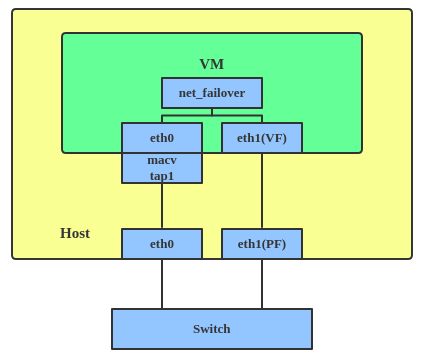
A new driver called net_failover has been added to Linux recently. It’s another failover master net device for virtualization and manages a primary (passthru/VF [Virtual Function] device) slave net device and a standby (the original paravirtual interface) slave net device.
A VLAN, aka virtual LAN, separates broadcast domains by adding tags to network packets. VLANs allow network administrators to group hosts under the same switch or between different switches.
The VLAN header looks like:
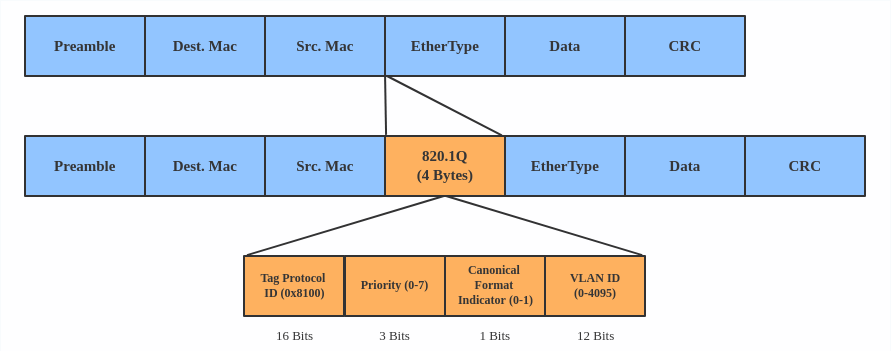
Use a VLAN when you want to separate subnet in VMs, namespaces, or hosts.
Here’s how to create a VLAN:
This adds VLAN 2 with name eth0.2 and VLAN 3 with name eth0.3 . The topology looks like this:
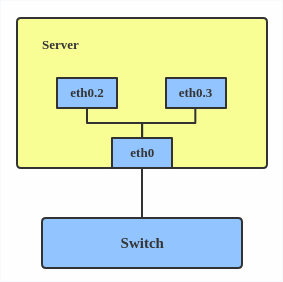
Note: When configuring a VLAN, you need to make sure the switch connected to the host is able to handle VLAN tags, for example, by setting the switch port to trunk mode.
VXLAN
VXLAN (Virtual eXtensible Local Area Network) is a tunneling protocol designed to solve the problem of limited VLAN IDs (4,096) in IEEE 802.1q. It is described by IETF RFC 7348.
With a 24-bit segment ID, aka VXLAN Network Identifier (VNI), VXLAN allows up to 2^24 (16,777,216) virtual LANs, which is 4,096 times the VLAN capacity.
VXLAN encapsulates Layer 2 frames with a VXLAN header into a UDP-IP packet, which looks like this:
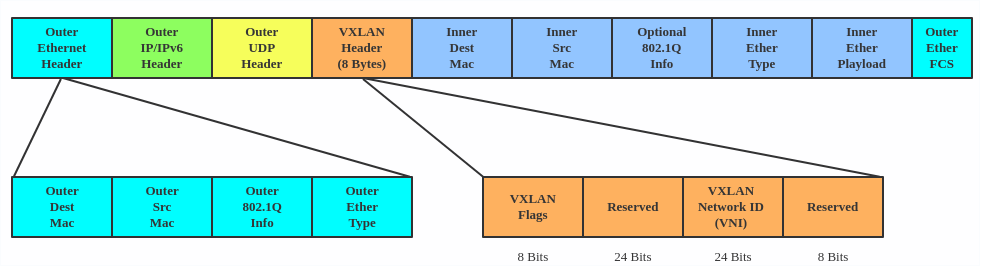
VXLAN is typically deployed in data centers on virtualized hosts, which may be spread across multiple racks.
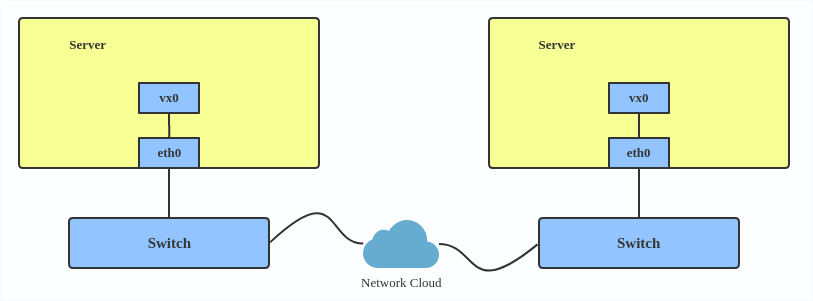
Here’s how to use VXLAN:
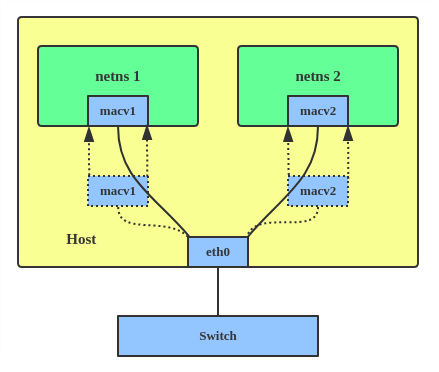
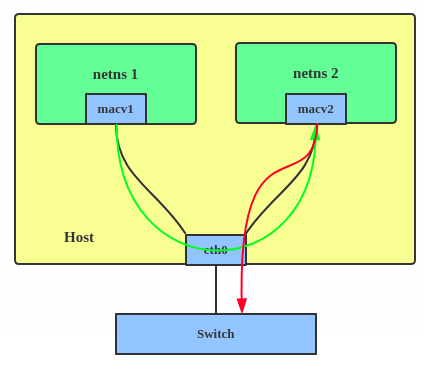
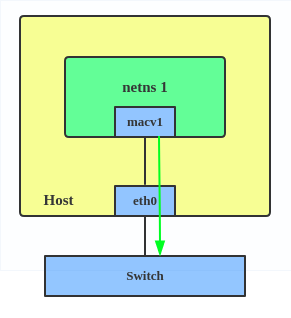
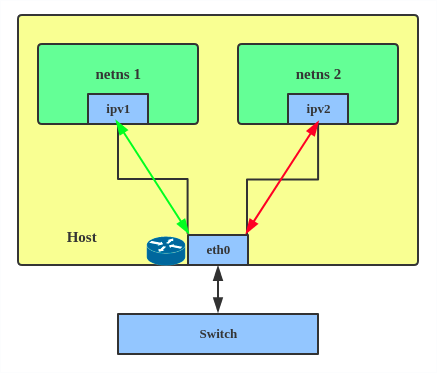
MACVLAN
With VLAN, you can create multiple interfaces on top of a single one and filter packages based on a VLAN tag. With MACVLAN, you can create multiple interfaces with different Layer 2 (that is, Ethernet MAC) addresses on top of a single one.
Before MACVLAN, if you wanted to connect to physical network from a VM or namespace, you would have needed to create TAP/VETH devices and attach one side to a bridge and attach a physical interface to the bridge on the host at the same time, as shown below.
Now, with MACVLAN, you can bind a physical interface that is associated with a MACVLAN directly to namespaces, without the need for a bridge.
There are five MACVLAN types:
1. Private: doesn’t allow communication between MACVLAN instances on the same physical interface, even if the external switch supports hairpin mode.
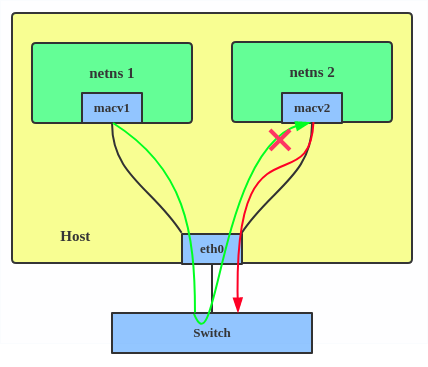
2. VEPA: data from one MACVLAN instance to the other on the same physical interface is transmitted over the physical interface. Either the attached switch needs to support hairpin mode or there must be a TCP/IP router forwarding the packets in order to allow communication.
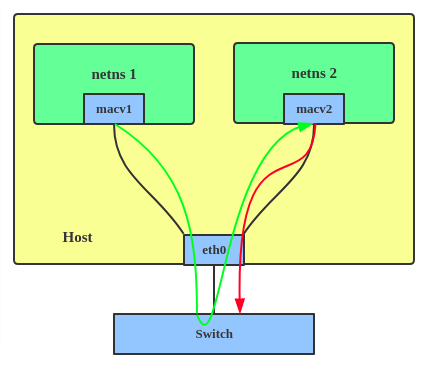
3. Bridge: all endpoints are directly connected to each other with a simple bridge via the physical interface.
4. Passthru: allows a single VM to be connected directly to the physical interface.
5. Source: the source mode is used to filter traffic based on a list of allowed source MAC addresses to create MAC-based VLAN associations. Please see the commit message.
The type is chosen according to different needs. Bridge mode is the most commonly used.
Use a MACVLAN when you want to connect directly to a physical network from containers.
Here’s how to set up a MACVLAN:
This creates two new MACVLAN devices in bridge mode and assigns these two devices to two different namespaces.
IPVLAN
IPVLAN is similar to MACVLAN with the difference being that the endpoints have the same MAC address.
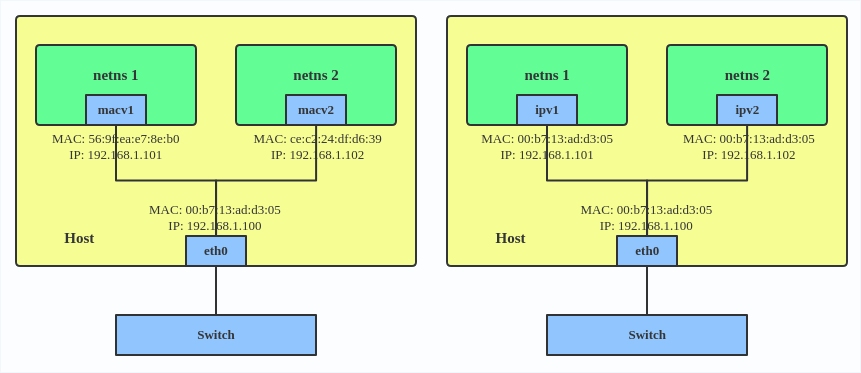
IPVLAN supports L2 and L3 mode. IPVLAN L2 mode acts like a MACVLAN in bridge mode. The parent interface looks like a bridge or switch.
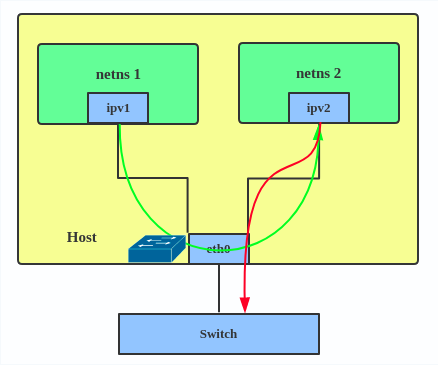
In IPVLAN L3 mode, the parent interface acts like a router and packets are routed between endpoints, which gives better scalability.
Regarding when to use an IPVLAN, the IPVLAN kernel documentation says that MACVLAN and IPVLAN «are very similar in many regards and the specific use case could very well define which device to choose. if one of the following situations defines your use case then you can choose to use ipvlan —
(a) The Linux host that is connected to the external switch / router has policy configured that allows only one mac per port.
(b) No of virtual devices created on a master exceed the mac capacity and puts the NIC in promiscuous mode and degraded performance is a concern.
(c) If the slave device is to be put into the hostile / untrusted network namespace where L2 on the slave could be changed / misused.»
Here’s how to set up an IPVLAN instance:
This creates an IPVLAN device named ipvl0 with mode L2, assigned to namespace ns0 .
MACVTAP/IPVTAP
MACVTAP/IPVTAP is a new device driver meant to simplify virtualized bridged networking. When a MACVTAP/IPVTAP instance is created on top of a physical interface, the kernel also creates a character device/dev/tapX to be used just like a TUN/TAP device, which can be directly used by KVM/QEMU.
With MACVTAP/IPVTAP, you can replace the combination of TUN/TAP and bridge drivers with a single module:
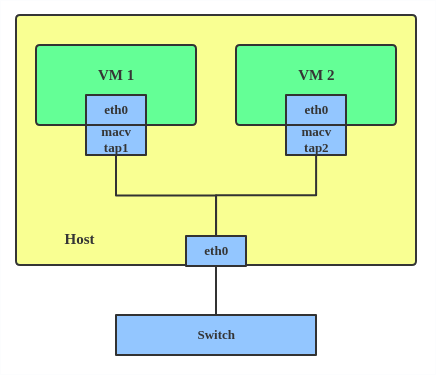
Typically, MACVLAN/IPVLAN is used to make both the guest and the host show up directly on the switch to which the host is connected. The difference between MACVTAP and IPVTAP is same as with MACVLAN/IPVLAN.
Here’s how to create a MACVTAP instance:
MACsec
MACsec (Media Access Control Security) is an IEEE standard for security in wired Ethernet LANs. Similar to IPsec, as a layer 2 specification, MACsec can protect not only IP traffic but also ARP, neighbor discovery, and DHCP. The MACsec headers look like this:
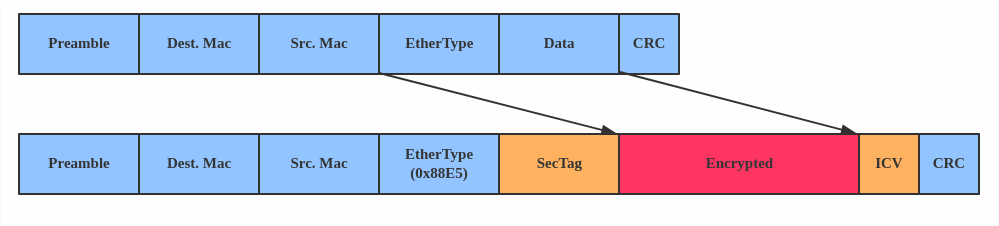
The main use case for MACsec is to secure all messages on a standard LAN including ARP, NS, and DHCP messages.

Here’s how to set up a MACsec configuration:
Note: This only adds a MACsec device called macsec0 on interface eth1 . For more detailed configurations, please see the «Configuration example» section in this MACsec introduction by Sabrina Dubroca.
The VETH (virtual Ethernet) device is a local Ethernet tunnel. Devices are created in pairs, as shown in the diagram below.
Packets transmitted on one device in the pair are immediately received on the other device. When either device is down, the link state of the pair is down.
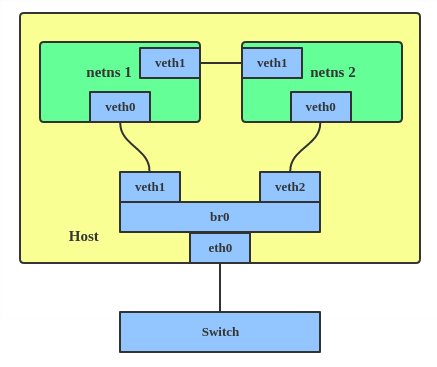
Use a VETH configuration when namespaces need to communicate to the main host namespace or between each other.
Here’s how to set up a VETH configuration:
This creates two namespaces, net1 and net2 , and a pair of VETH devices, and it assigns veth1 to namespace net1 and veth2 to namespace net2 . These two namespaces are connected with this VETH pair. Assign a pair of IP addresses, and you can ping and communicate between the two namespaces.
Similar to the network loopback devices, the VCAN (virtual CAN) driver offers a virtual local CAN (Controller Area Network) interface, so users can send/receive CAN messages via a VCAN interface. CAN is mostly used in the automotive field nowadays.
For more CAN protocol information, please refer to the kernel CAN documentation.
Use a VCAN when you want to test a CAN protocol implementation on the local host.
Here’s how to create a VCAN:
VXCAN
Similar to the VETH driver, a VXCAN (Virtual CAN tunnel) implements a local CAN traffic tunnel between two VCAN network devices. When you create a VXCAN instance, two VXCAN devices are created as a pair. When one end receives the packet, the packet appears on the device’s pair and vice versa. VXCAN can be used for cross-namespace communication.
Use a VXCAN configuration when you want to send CAN message across namespaces.
Here’s how to set up a VXCAN instance:
Note: VXCAN is not yet supported in Red Hat Enterprise Linux.
IPOIB
An IPOIB device supports the IP-over-InfiniBand protocol. This transports IP packets over InfiniBand (IB) so you can use your IB device as a fast NIC.
The IPoIB driver supports two modes of operation: datagram and connected. In datagram mode, the IB UD (Unreliable Datagram) transport is used. In connected mode, the IB RC (Reliable Connected) transport is used. The connected mode takes advantage of the connected nature of the IB transport and allows an MTU up to the maximal IP packet size of 64K.
For more details, please see the IPOIB kernel documentation.
Use an IPOIB device when you have an IB device and want to communicate with a remote host via IP.
Here’s how to create an IPOIB device:
NLMON
NLMON is a Netlink monitor device.
Use an NLMON device when you want to monitor system Netlink messages.
Here’s how to create an NLMON device:
This creates an NLMON device named nlmon0 and sets it up. Use a packet sniffer (for example, tcpdump ) to capture Netlink messages. Recent versions of Wireshark feature decoding of Netlink messages.
Dummy interface
A dummy interface is entirely virtual like, for example, the loopback interface. The purpose of a dummy interface is to provide a device to route packets through without actually transmitting them.
Use a dummy interface to make an inactive SLIP (Serial Line Internet Protocol) address look like a real address for local programs. Nowadays, a dummy interface is mostly used for testing and debugging.
Here’s how to create a dummy interface:
The IFB (Intermediate Functional Block) driver supplies a device that allows the concentration of traffic from several sources and the shaping incoming traffic instead of dropping it.
Use an IFB interface when you want to queue and shape incoming traffic.
Here’s how to create an IFB interface:
This creates an IFB device named ifb0 and replaces the root qdisc scheduler with SFQ (Stochastic Fairness Queueing), which is a classless queueing scheduler. Then it adds an ingress qdisc scheduler on eth0 and redirects all ingress traffic to ifb0 .
For more IFB qdisc use cases, please refer to this Linux Foundation wiki on IFB.
Additional resources
- Virtual networking articles on the Red Hat Developer blog
- Dynamic IP Address Management in Open Virtual Network (OVN)
- Non-root Open vSwitch in Red Hat Enterprise Linux
- Open vSwitch articles on the Red hat Developer Blog
netdevsim interface
netdevsim is a simulated networking device which is used for testing various networking APIs. At this time it is particularly focused on testing hardware
offloading, tc/XDP BPF and SR-IOV.
A netdevsim device can be created as follows
To enable tc offload:
To load XDP BPF or tc BPF programs:
To add VFs for SR-IOV testing:
To change the vf numbers, you need to disable them completely first:
Note : netdevsim is not compiled in RHEL by default
Источник


