- How to get octal file permissions on Linux/Unix command line
- How to get octal file permissions on Linux/Unix command line
- How to get octal file permissions from Linux command line
- A note about macOS/BSD stat command
- Conclusion
- Translate rwx Permissions into Octal Format in Linux
- If You Appreciate What We Do Here On TecMint, You Should Consider:
- How do I use chmod to manage file permissions?
- An Intro to Understanding Octal Notation for Linux and Mac File Permissions — and Managing Them Using chmod
- Overview
- Understanding octal file permissions
- Break Down of Octal Notation
- How Do I change File Permissions Using chmod?
- Where and how to get help
- Where to go from here
- Linux File Permission Tutorial: How to Check and Change Permissions
- How to View Check Permissions in Linux
- Check Permissions using GUI
- Check Permissions in Command-Line with Ls Command
- Using Chmod Command to Change File Permissions
- Define File Permission with Symbolic Mode
- Define File Permission in Octal/Numeric Mode
- Changing User File and Group Ownership
How to get octal file permissions on Linux/Unix command line
How to get octal file permissions on Linux/Unix command line
To get file or file system status try the stat command. However, the syntax for stat is different on GNU/Linux and BSD/macOS Unix like systems.
How to get octal file permissions from Linux command line
The syntax is as follows to get octal file permissions on Linux:
stat fileName
stat -c ‘Format’ file
The default output is as follows on a GNU/Linux:
$ stat /etc/passwd
Sample outputs:
To just see octal file permissions on a GNU/Linux:
$ stat -c ‘%a’ /etc/passwd
Sample outputs:
Another useful command that displays file permissions in both format:
$ stat -c ‘%A %a %n’ /etc/passwd
Sample outputs:
Where format is as follows:
| Format | Description |
|---|---|
| %a | access rights in octal (note ‘#’ and ‘0’ printf flags) |
| %A | access rights in human readable form |
| %b | number of blocks allocated (see %B) |
| %B | the size in bytes of each block reported by %b |
| %C | SELinux security context string |
| %d | device number in decimal |
| %D | device number in hex |
| %f | raw mode in hex |
| %F | file type |
| %g | group ID of owner |
| %G | group name of owner |
| %h | number of hard links |
| %i | inode number |
| %m | mount point |
| %n | file name |
| %N | quoted file name with dereference if symbolic link |
| %o | optimal I/O transfer size hint |
| %s | total size, in bytes |
| %t | major device type in hex, for character/block device special files |
| %T | minor device type in hex, for character/block device special files |
| %u | user ID of owner |
| %U | user name of owner |
| %w | time of file birth, human-readable; – if unknown |
| %W | time of file birth, seconds since Epoch; 0 if unknown |
| %x | time of last access, human-readable |
| %X | time of last access, seconds since Epoch |
| %y | time of last data modification, human-readable |
| %Y | time of last data modification, seconds since Epoch |
| %z | time of last status change, human-readable |
| %Z | time of last status change, seconds since Epoch |
A note about macOS/BSD stat command
The syntax is as follows for BSD stat command to get octal file permissions on BSD or macOS:
stat fileName
stat -f «Format» fileName
The default output is as follows:
$ stat /etc/passwd
Sample outputs:
To just see octal file permissions
$ stat -f «%OLp» /etc/passwd
Sample outputs:
To displays file permissions in both format:
$ stat -f «%Sp %OLp %N» /etc/passwd
Sample outputs:
- No ads and tracking
- In-depth guides for developers and sysadmins at Opensourceflare✨
- Join my Patreon to support independent content creators and start reading latest guides:
- How to set up Redis sentinel cluster on Ubuntu or Debian Linux
- How To Set Up SSH Keys With YubiKey as two-factor authentication (U2F/FIDO2)
- How to set up Mariadb Galera cluster on Ubuntu or Debian Linux
- A podman tutorial for beginners – part I (run Linux containers without Docker and in daemonless mode)
- How to protect Linux against rogue USB devices using USBGuard
Join Patreon ➔
Conclusion
You just learned how to use the stat command to get octal file permissions from command line. See stat command man page by typing the man command :
$ man stat
🐧 Get the latest tutorials on Linux, Open Source & DevOps via
Источник
Translate rwx Permissions into Octal Format in Linux
Sometimes you may find it useful to display the access rights of files or directories in octal form instead of rwx or perhaps you want to display both.
Instead of using good old ls -l command, in most modern Linux distributions (if not all) you will find stat , an utility that displays file or filesystem status.
When run without arguments but followed by a given filename, stat will display a good deal of information about the file or directory. If used with the -c option, stat allows you to specify an output format. It is precisely this option that’s of particular interest to us.
To display all files in the current working directory followed by the access rights in octal form, type:
Sample Output
In the command above, the format sequence:
- %n – means file name
- %a – means access rights in octal form
Alternatively, you can append %a to %A , the argument passed to stat if you want to display the permissions in rwx format as well.
In that case, you can type:
Sample Output
To view the file type in the output, you can add %F format sequence.
There are several other format sequences you can specify, refer to the stat man page to find out more.
In this tip, we have covered an important Linux utility called stat, that helps you to display a file or file system status. Our main focus here was to translate the rwx access rights from the traditional ls -l output to octal form.
As I had mentioned earlier on, many modern Linux distributions now come with stat utility. But you must also remember that your shell may come with its own version of stat, therefore refer to your shell’s documentation for more information concerning options and how to use them.
If You Appreciate What We Do Here On TecMint, You Should Consider:
TecMint is the fastest growing and most trusted community site for any kind of Linux Articles, Guides and Books on the web. Millions of people visit TecMint! to search or browse the thousands of published articles available FREELY to all.
If you like what you are reading, please consider buying us a coffee ( or 2 ) as a token of appreciation.

We are thankful for your never ending support.
Источник
How do I use chmod to manage file permissions?
An Intro to Understanding Octal Notation for Linux and Mac File Permissions — and Managing Them Using chmod
Overview
Chmod is a command line utility that is used for manually managing the access and permissions to files and directories on Linux, Mac, and other Unix like operating systems. According to the man page document for chmod: «The chmod utility modifies the file mode bits of the listed files as specified by the mode operand. It may also be used to modify the Access Control Lists (ACLs) associated with the listed files». While there are multiple ways of handling the editing of file permissions via chmod, we have chosen to focus primarily on octal notation.
Understanding octal file permissions
Octal notation is a numerical system for modifying the permissions on Linux, Mac and other Unix like file systems. Each octal permission can be represented by 3 or 4 numbers; where each of these numbers is an «octal», meaning they range from 0-7. Each one of the numbers represents permissions that can be set to either a file or directory.
Break Down of Octal Notation
* This article focuses on chmod using 3 numbers. If you’re looking to have to use 4 numbers, to set a sticky bit, SUID or SGID, you will need to see the third article in this series. — link here —
When made up of 3 numbers, each of on the «octals» represents each of the groups that have access to a file. For example the octal 724 presents a situation where 7 is the octal for setting Owner permissions, 2 represents Group permissions, and 4 represents other permissions. Heres a breakdown
example octal: «724»
Owner — 7
Group — 2
Other — 4
Each one of these numbers allows the read, write, and execute permissions per group. All possible combinations for RWX access are, and can be express by these octal numbers and their relative values, where read is equal to 4, write is equal to 2, and execute is 1. Here is a break down
Combining these together help up communicate the permissions we wish to set. For example if I wanted to have read and write access, I would have a value of 6, as read is 4, write is 2, so combined they equal 6.
example octal: «724»
Owner Permissions — 7 = rwx
Group Permissions — 2 = -w-
Other Permissions — 4 = r—
Pulling it all together:
Once decoded you’re able to get a makeup of the permissions that are being set, in the case of 724, the break down becomes -rwx-w-r—, where file type is a file denoted by the leading «-«, owner is able to read, write, and execute. Group is only able to write, and other is only able to read.
How Do I change File Permissions Using chmod?
* Please note there are multiple ways of using chmod, within this article we have chosen to only show examples using octal notation.
Chmod is quite simple to use while using octal notation. The structure of the command is simply:
chmod
Using chmod to change myfile.txt’s permissions
$ chmod 777 myfile.txt
You can then confirm the change using ls -l
$ ls -al
output being:
-rwxrwxrwx 1 root root 4096 Sep 24 2016 myfile.txt
«-rwxrwxrwx» being «myfile.txt’s» new permissions, which permit the following:
Owner: rwx — 7
Group: rwx — 7
Other: rwx — 7
Using chmod to change myfile.txt’s permissions
$ chmod 142 myfile.txt
Confirming the change using ls -l
$ ls -al
output being:
—xr—w- 1 root root 4096 Sep 24 2016 myfile.txt
«—xr—w-» being «myfile.txt’s» new permissions, which permit the following:
Owner: —x — 1
Group: r— — 4
Other: -w- — 2
Where and how to get help
Chmod is a very complex command line utility, with a large number of options. If you need further help you can check the following resources:
From the command line:
Using chmod’s help flag from the command line
$ chmod -h
Websites:
If all else fails Stack Overflow and Super User are always a good source of info along with well respected q and a.
Where to go from here
This article is part 2 of 3 in the series on file permissions.
Источник
Linux File Permission Tutorial: How to Check and Change Permissions
Home » SysAdmin » Linux File Permission Tutorial: How to Check and Change Permissions
Linux, like other Unix-like operating systems, allows multiple users to work on the same server simultaneously without disrupting each other.
Individuals sharing access to files pose a risk exposing classified information or even data loss if other users access their files or directories. To address this, Unix added the file permission feature to specify how much power each user has over a given file or directory.
In this tutorial, you will learn how to view and change file permissions in Linux.

How to View Check Permissions in Linux
To start with file permissions, you have to find the current Linux permission settings. There are two options to choose from, depending on your personal preference: checking through the graphical interface or using the command.
Check Permissions using GUI
Finding the file (directory) permission via the graphical user interface is simple.
1. Locate the file you want to examine, right-click on the icon, and select Properties.
2. This opens a new window initially showing Basic information about the file.
Navigate to the second tab in the window, labeled Permissions.

3. There, you’ll see that the permission for each file differs according to three categories:
- Owner (the user who created the file/directory)
- Group (to which the owner belongs to)
- Others (all other users)
For each file, the owner can grant or restrict access to users according to the categories they fall in.
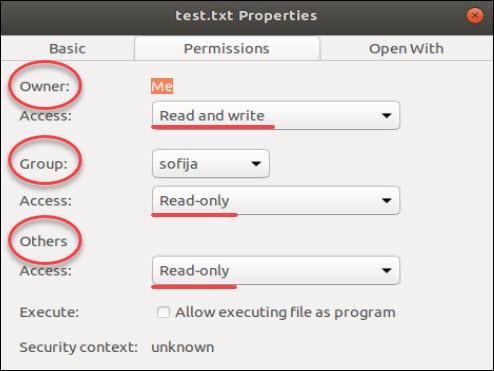
In our example, the owner of the file test.txt has access to “Read and write”, while other members of its group, as well as all other users, have “Read-only” access. Therefore, they can only open the file, but cannot make any modifications.
To alter the file configuration, the user can open the drop-down menu for each category and select the desired permission.
Additionally, you can make the file executable, allowing it to run as a program, by checking the Execute box.
Check Permissions in Command-Line with Ls Command
If you prefer using the command line, you can easily find a file’s permission settings with the ls command, used to list information about files/directories. You can also add the –l option to the command to see the information in the long list format.
To check the permission configuration of a file, use the command:
For instance, the command for the previously mentioned file would be:

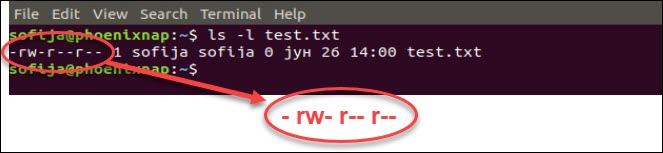
As seen in the image above, the output provides the following information:
- file permission
- the owner (creator) of the file
- the group to which that owner belongs to
- the date of creation.
It shows the permission settings, grouped in a string of characters (-, r, w, x) classified into four sections:
- File type. There are three possibilities for the type. It can either be a regular file (–), a directory (d) or a link (i).
- File permission of the user (owner)
- File permission of the owner’s group
- File permission of other users
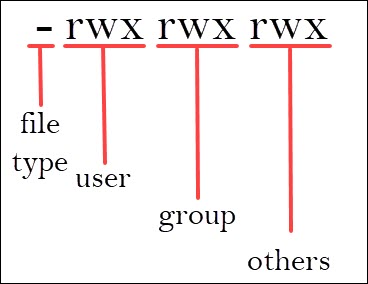
The characters r, w, and x stand for read, write, and execute.
The categories can have all three privileges, just specific ones, or none at all (represented by –, for denied).
Users that have reading permission can see the content of a file (or files in a directory). However, they cannot modify it (nor add/remove files in a directory). On the other hand, those who have writing privileges can edit (add and remove) files. Finally, being able to execute means the user can run the file. This option is mainly used for running scripts.
In the previous example, the output showed that test.txt is a regular file with read and write permission assigned to the owner, but gives read-only access to the group and others.
Using Chmod Command to Change File Permissions
As all Linux users, you will at some point need to modify the permission settings of a file/directory. The command that executes such tasks is the chmod command.
The basic syntax is:
There are two ways to define permission:
- using symbols (alphanumerical characters)
- using the octal notation method
Define File Permission with Symbolic Mode
To specify permission settings using alphanumerical characters, you’ll need to define accessibility for the user/owner (u), group (g), and others (o).
Type the initial letter for each class, followed by the equal sign (=) and the first letter of the read (r), write (w) and/or execute (x) privileges.
To set a file, so it is public for reading, writing, and executing, the command is:
To set permission as in the previously mentioned test.txt to be:
• read and write for the user
• read for the members of the group
• read for other users
Use the following command:
Note: There is no space between the categories; we only use commas to separate them.
Another way to specify permission is by using the octal/numeric format. This option is faster, as it requires less typing, although it is not as straightforward as the previous method.
Instead of letters, the octal format represents privileges with numbers:
- r(ead) has the value of 4
- w(rite) has the value of 2
- (e)x(ecute) has the value of 1
- no permission has the value of 0
The privileges are summed up and depicted by one number. Therefore, the possibilities are:
- 7 – for read, write, and execute permission
- 6 – for read and write privileges
- 5 – for read and execute privileges
- 4 – for read privileges
As you have to define permission for each category (user, group, owner), the command will include three (3) numbers (each representing the summation of privileges).
For instance, let’s look at the test.txt file that we symbolically configured with the chmod u=rw,g=r,o=r test.txt command.
The same permission settings can be defined using the octal format with the command:
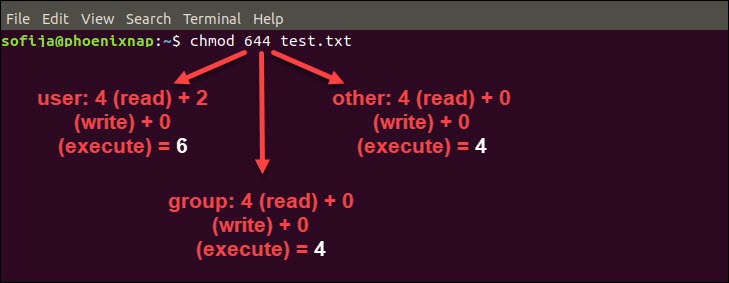
Define File Permission in Octal/Numeric Mode
Note: If you need a more in-depth guide on how to use Chmod In Linux to change file permissions recursively, read our Chmod Recursive guide.
Changing User File and Group Ownership
Aside from changing file permissions, you may come across a situation that requires changing the user file ownership or even group ownership.
Performing either of these tasks requires you first need to switch to superuser privileges. Use one of the options outlined in the previous passage.
To change the file ownership use the chown command:
Instead of [user_name] type in the name of the user who will be the new owner of the file.
To change the group ownership type in the following command:
Instead of [group_name] type in the name of the group that will be the new owner of the file.
Learning how to check and change permissions of Linux files and directories are basic commands all users should master. To change file’s group permissions, you might find helpful our article on how to use the chgrp command.
No matter whether you prefer using the GUI or command-line, this article should help you better understand how to use file permissions.
Источник


