- How to Install PostgreSQL with pgAdmin4 on Linux Mint 20
- Step 1: Install PostgreSQL Database on Linux Mint
- Step 2: Install pgAdmin4 on Linux Mint
- If You Appreciate What We Do Here On TecMint, You Should Consider:
- Как установить PostgreSQL с pgAdmin4 на Linux Mint 20
- Шаг 1: Установите базу данных PostgreSQL на Linux Mint
- Шаг 2: Установите pgAdmin4 на Linux Mint
- How to Install PostgreSQL and pgAdmin4 in Ubuntu 20.04
- Prerequisites:
- Installing PostgreSQL in Ubuntu 20.04
- Creating Database in PostgreSQL
- Configuring PostgreSQL Client Authentication
- Installing pgAdmin4 in Ubuntu
- Accessing pgAdmin4 Web Interface
- If You Appreciate What We Do Here On TecMint, You Should Consider:
How to Install PostgreSQL with pgAdmin4 on Linux Mint 20
pgAdmin is an open-source feature-rich, frontend management tool that allows you to easily administer and manage your PostgreSQL relational database from a web browser.
It provides an easy-to-use user interface that simplifies the creation and monitoring of databases and database objects. PgAdmin 4 is an improvement of the earlier pgAdmin tool and is available for Linux, Windows, macOS systems, and even a Docker container.
In this tutorial, you will learn how to install PostgreSQL with pgAdmin4 on Linux Mint 20.
Step 1: Install PostgreSQL Database on Linux Mint
1. To start off, launch your terminal and update your packages using the apt package manager as shown.
Once the update is complete, proceed to the next step.
Since pgAdmin4 provides a frontend interface for the management of PostgreSQL database objects, it’s essential to have PostgreSQL installed first.
2. To do this, we are going to install the postgresql package and postgresql-contrib which offers extended features that extend the functionality of PostgreSQL.
![]() Install PostgreSQL on Linux Mint
Install PostgreSQL on Linux Mint
3. Usually, PostgreSQL starts automatically on boot up. You can confirm this using the command given below:
![]() Check PostgreSQL Status
Check PostgreSQL Status
4. To log in to your PostgreSQL instance, first switch to the postgres user. The Postgres user comes included by default with the installation of PostgreSQL. Then run the psql command as shown.
![]() Connect to PostgreSQL Shell
Connect to PostgreSQL Shell
5. Additionally, you can check if the database server is accepting incoming connections as shown.
![]() Check PostgreSQL Accepting Incoming Connections
Check PostgreSQL Accepting Incoming Connections
Step 2: Install pgAdmin4 on Linux Mint
pgAdmin4 is available for Ubuntu 16.04 and later versions and can easily be installed using the APT package manager. The same cannot support Linux Mint 20 and Pgadmi4 developers are yet to include support that allows users to easily install the frontend management tool using the APT package manager.
6. The only viable option is to install pgAdmin4 from a virtual environment. So first, we will install the prerequisite packages as shown.
![]() Install Prerequisite Packages
Install Prerequisite Packages
7. Next, install the Python virtual environment and associated dependencies.
![]() Install Python Virtual Environment
Install Python Virtual Environment
8. Next, create a directory where you will create a virtual environment.
9. Then create the virtual environment as shown. Here, pgadmin4env is the name of the virtual environment.
![]() Create Virtual Environment for pgAdmim4
Create Virtual Environment for pgAdmim4
10. Once the virtual environment is in place, activate it as shown.
11. Then use the pip tool to install pgadmin4 as shown.
![]() Install PgAdmin4 in Linux Mint
Install PgAdmin4 in Linux Mint
12. Next, create a configuration file config_local.py.
and add the lines below.
![]() Create PgAdmin4 Configuration
Create PgAdmin4 Configuration
13. To start the pgAdmin4 management tool, invoke the command:
![]() Start PgAdmin4 Service
Start PgAdmin4 Service
14. Finally, head over to your browser and browse the address shown.
You will be prompted to set the master password, so proceed and set a strong password and click the ‘Ok’ button.
![]() Set PgAdmin4 Password
Set PgAdmin4 Password
15. To make things easier, you can create an alias in the
/.bashrc file as shown.
16. Next, update the bashrc file.
17. Finally, you can start the pgAdmin4 management tool by simply invoking the startpg command.
![]() Start PgAdmin4 Tool
Start PgAdmin4 Tool
Once again head over to your browser and log in to the PgAdmin4 interface. And this concludes the installation of pgAdmin4 on Linux Mint.
If You Appreciate What We Do Here On TecMint, You Should Consider:
TecMint is the fastest growing and most trusted community site for any kind of Linux Articles, Guides and Books on the web. Millions of people visit TecMint! to search or browse the thousands of published articles available FREELY to all.
If you like what you are reading, please consider buying us a coffee ( or 2 ) as a token of appreciation.

We are thankful for your never ending support.
Источник
Как установить PostgreSQL с pgAdmin4 на Linux Mint 20
pgAdmin — это многофункциональный инструмент управления интерфейсом с открытым исходным кодом. Который позволяет легко администрировать и управлять реляционной базой данных PostgreSQL из веб-браузера.
Он обеспечивает простой в использовании пользовательский интерфейс, который упрощает создание и мониторинг баз данных, а так же объектов базы данных. PgAdmin 4 является улучшением более раннего инструмента pgAdmin и доступен для систем Linux, Windows, macOS.
В этой статье вы узнаете, как установить PostgreSQL с помощью pgAdmin4 на Linux Mint 20.
Шаг 1: Установите базу данных PostgreSQL на Linux Mint
1. Для начала запустите терминал и обновите пакеты с помощью диспетчера пакетов apt, как показано ниже.
После завершения обновления перейдите к следующему шагу.
Поскольку pgAdmin4 предоставляет интерфейс frontend для управления объектами базы данных PostgreSQL. Очень важно сначала установить PostgreSQL.
2. Для этого требуется установить пакет postgresql и postgresql-contrib, который предлагает расширение функций PostgreSQL.
$ sudo apt install postgresql postgresql-contrib
3. Обычно PostgreSQL запускается автоматически при загрузке. Вы можете подтвердить это с помощью приведенной ниже команды:
$ sudo systemctl status postgresql
4. Чтобы войти в PostgreSQL, для начала переключитесь на пользователя postgres. Пользователь Postgres входит в комплект поставки по умолчанию вместе с установкой PostgreSQL. Затем выполните команду psql, как показано на рисунке.
5. Кроме того, вы можете проверить, принимает ли сервер базы данных входящие соединения.
Шаг 2: Установите pgAdmin4 на Linux Mint
pgAdmin4 доступен для Ubuntu 16.04 и более поздних версий. Он его можно установить с помощью APT package manager. Разработчики Pgadmi4 еще не включили поддержку Linux Mint позволяющую пользователям легко устанавливать инструмент управления фронтендом с помощью APT package manager.
6. Единственный жизнеспособный вариант — это установить pgAdmin4 из виртуальной среды. Итак, для начала мы установим необходимые пакеты, как показано на рисунке.
$ sudo apt install libgmp3-dev build-essential libssl-dev
7. Затем установите виртуальную среду Python и связанные с ней зависимости.
$ sudo apt install python3-virtualenv python3-dev libpq-dev
8. Далее создайте каталог, в котором вы будете создавать виртуальную среду.
9. Затем создайте виртуальную среду, как показано ниже. Здесь pgadmin4env — это имя виртуальной среды.
10. Как только виртуальная среда установлена, активируйте ее, как показано ниже.
11. Затем требуется использовать инструмент pip для установки pgadmin4.
12. Далее создайте файл конфигурации config_local.py.
$ sudo nano pgadmin4env/lib/python3.8/site-packages/pgadmin4/config_local.py
И добавьте в этот файл строки которые написаны ниже.
import os
DATA_DIR = os.path.realpath(os.path.expanduser(u’
/.pgadmin/’))
LOG_FILE = os.path.join(DATA_DIR, ‘pgadmin4.log’)
SQLITE_PATH = os.path.join(DATA_DIR, ‘pgadmin4.db’)
SESSION_DB_PATH = os.path.join(DATA_DIR, ‘sessions’)
STORAGE_DIR = os.path.join(DATA_DIR, ‘storage’)
SERVER_MODE = False
13. Чтобы запустить средство управления pgAdmin4, вызовите команду:
14. Теперь, перейдите в свой браузер и введите адрес указанный ниже.
Вам будет предложено установить мастер-пароль, поэтому установите надежный пароль и нажмите кнопку «ОК«.
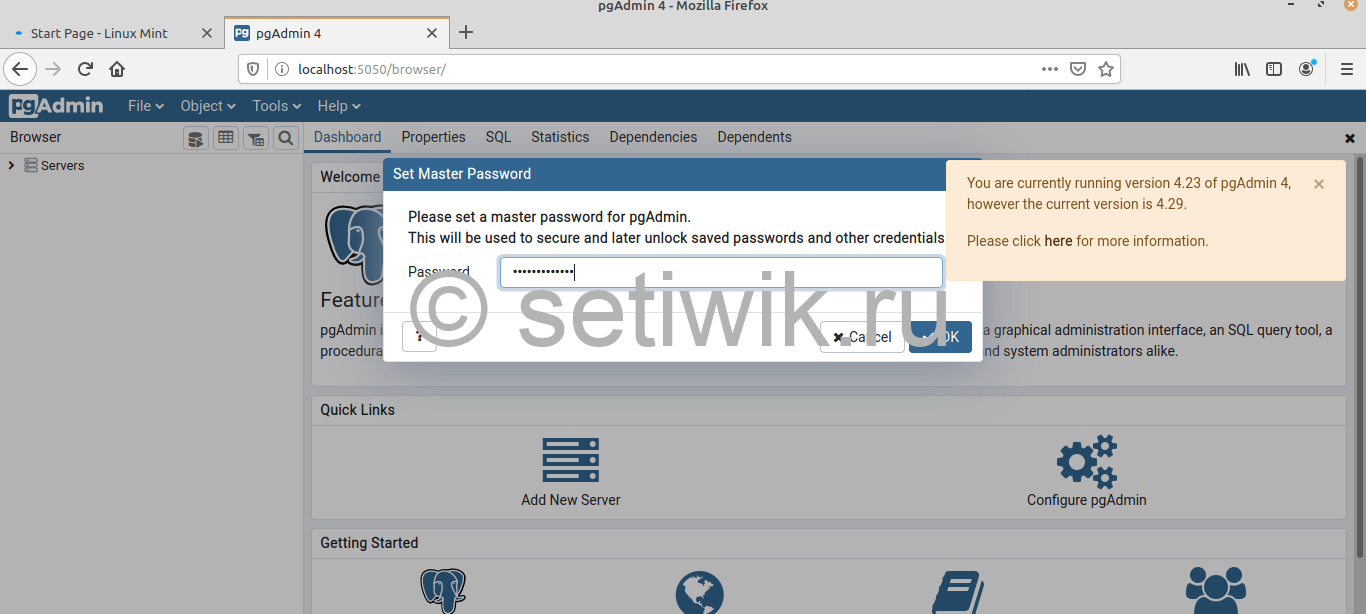 Установить Пароль PgAdmin4
15. Чтобы упростить задачу, вы можете создать алиас (псевдоним) в файле
/.bashrc, как показано ниже.
16. Затем обновите файл bashrc.
17. Ну и теперь наконец вы можете запустить инструмент управления pgAdmin4, просто вызвав команду startpg.
Еще раз зайдите в свой браузер и войдите в интерфейс PgAdmin4. На этом установка pgAdmin4 в Linux Mint завершается.
Источник
How to Install PostgreSQL and pgAdmin4 in Ubuntu 20.04
This guide will walk you through the instructions to install PostgreSQL 12 relational and object-oriented database management systems and pgAdmin4, a commonly-used web-based PostgreSQL database server administration tool. We will show how to install the latest version of pgAdmin4 that is v4.23.
Prerequisites:
Let’s get started…
Installing PostgreSQL in Ubuntu 20.04
Log into your Ubuntu system and update the system software packages using the following apt command.
Now install the latest version of PostgreSQL from the default Ubuntu repositories.
During the installation, the installer will create a new PostgreSQL cluster (a collection of databases that will be managed by a single server instance), thus initialize the database. The default data directory is /var/lib/postgresql/12/main and the configurations files are stored in the /etc/postgresql/12/main directory.
After PostgreSQL installed, you can confirm that the PostgreSQL service is active, running and is enabled under systemd using the following systemctl commands:
![]() Check PostgreSQL Status
Check PostgreSQL Status
Also, confirm that the Postgresql server is ready to accept connections from clients as follows:
![]() PostgreSQL Accepting Client Connections
PostgreSQL Accepting Client Connections
Creating Database in PostgreSQL
To create a new database in PostgreSQL, you need to access the PostgreSQL database shell (psql) program. First, switch to the postgres system user account and run the psql command as follows:
Now create a new database and a user using the following commands.
![]() Create a Database in PostgreSQL
Create a Database in PostgreSQL
Configuring PostgreSQL Client Authentication
PostgreSQL uses client authentication to decide which user accounts can connect to which databases from which hosts and this is controlled by settings in the client authentication configuration file, which on Ubuntu is located at /etc/postgresql/12/main/pg_hba.conf.
Open this file using your favorite text editor as shown.
PostgreSQL uses many types of client authentication methods including peer, ident, password, and md5 (read the PostgreSQL 12 documentation for a detailed explanation of each method).
md5 is the most secure and recommended because it requires the client to supply a double-MD5-hashed password for authentication. So, ensure that the entries below have md5 as the under method:
After making changes in the Client Authentication configuration file, you will need to restart the PostgreSQL service.
Installing pgAdmin4 in Ubuntu
pgAdmin4 is not available in the Ubuntu repositories. We need to install it from the pgAdmin4 APT repository. Start by setting up the repository. Add the public key for the repository and create the repository configuration file.
Then install pgAdmin4,
The above command will install numerous required packages including Apache2 webserver to serve the pgadmin4-web application in web mode.
Once the installation is complete, run the web setup script which ships with the pgdmin4 binary package, to configure the system to run in web mode. You will be prompted to create a pgAdmin4 login email and password as shown in the screenshot below.
This script will configure Apache2 to serve the pgAdmin4 web application which involves enabling the WSGI module and configuring the pgAdmin application to mount at pgadmin4 on the webserver so you can access it at:
It also restarts the Apache2 service to apply the recent changes.
Remember to replace [email protected] with your email address and set a strong secure password as well:
![]() Set Up PgAdmin in Ubuntu
Set Up PgAdmin in Ubuntu
Accessing pgAdmin4 Web Interface
To access the pgAdmin4 web application interface, open a web browser, and use the following address to navigate:
Once the login page loads, enter the email address and password you created in the previous section while configuring the pgAdmin4 to run in web mode.
![]() PgAdmin Login
PgAdmin Login
After a successful login, you will be land in the pgAdmin4 web application dashboard. To connect to a server, click on Add New Server as highlighted in the following screenshot.
![]() Add New Server in PgAdmin
Add New Server in PgAdmin
Next, enter the connection in General settings (Name, Server group, and a comment). Then click Connections as highlighted in the following screenshot.
![]() Add New Connection in PgAdmin
Add New Connection in PgAdmin
Next, enter the PostgreSQL database server hostname/address, Port number (leave 5432 to use default), select the Maintenance database (which should be postgres), enter the database username and password.
![]() PostgreSQL Database Settings
PostgreSQL Database Settings
If the database access credentials are OK and the server-client authentication configuration is too, pgAdmin4 should successfully connect to the database server.
![]() PostgreSQL Databases
PostgreSQL Databases
That’s all! For more information, see the PostgreSQL 12 documentation and pgAdmin 4 documentation. Remember to share your thoughts with us via the comment section below.
If You Appreciate What We Do Here On TecMint, You Should Consider:
TecMint is the fastest growing and most trusted community site for any kind of Linux Articles, Guides and Books on the web. Millions of people visit TecMint! to search or browse the thousands of published articles available FREELY to all.
If you like what you are reading, please consider buying us a coffee ( or 2 ) as a token of appreciation.
We are thankful for your never ending support.
Источник


