- Linux pipes tips & tricks
- Pipe — что это?
- Логика
- Простой дебаг
- Исходный код, уровень 1, shell
- Исходный код, уровень 2, ядро
- Tips & trics
- Linux Pipe Command with Examples
- Prerequisites
- Syntax
- Sort the list using pipes
- Display file data of a corresponding range
- Pipe and more command
- Count the number of files
- Process identification
- Get sub-directories using pipe
- Get files using pipe
- Use multiple pipes in a single command
- Fetch particular data with pipes
- Conclusion
- About the author
- Aqsa Yasin
- Linux Tutorial — 11. Piping and Redirection
- Piping and Redirection!
- Introduction
- So what are they?
- Redirecting to a File
- Some Observations
- Saving to an Existing File
- Redirecting from a File
- Redirecting STDERR
- Piping
- More Examples
- Summary
- Activities
Linux pipes tips & tricks
Pipe — что это?
Pipe (конвеер) – это однонаправленный канал межпроцессного взаимодействия. Термин был придуман Дугласом Макилроем для командной оболочки Unix и назван по аналогии с трубопроводом. Конвейеры чаще всего используются в shell-скриптах для связи нескольких команд путем перенаправления вывода одной команды (stdout) на вход (stdin) последующей, используя символ конвеера ‘|’:
grep выполняет регистронезависимый поиск строки “error” в файле log, но результат поиска не выводится на экран, а перенаправляется на вход (stdin) команды wc, которая в свою очередь выполняет подсчет количества строк.
Логика
Конвеер обеспечивает асинхронное выполнение команд с использованием буферизации ввода/вывода. Таким образом все команды в конвейере работают параллельно, каждая в своем процессе.
Размер буфера начиная с ядра версии 2.6.11 составляет 65536 байт (64Кб) и равен странице памяти в более старых ядрах. При попытке чтения из пустого буфера процесс чтения блокируется до появления данных. Аналогично при попытке записи в заполненный буфер процесс записи будет заблокирован до освобождения необходимого места.
Важно, что несмотря на то, что конвейер оперирует файловыми дескрипторами потоков ввода/вывода, все операции выполняются в памяти, без нагрузки на диск.
Вся информация, приведенная ниже, касается оболочки bash-4.2 и ядра 3.10.10.
Простой дебаг
Исходный код, уровень 1, shell
Т. к. лучшая документация — исходный код, обратимся к нему. Bash использует Yacc для парсинга входных команд и возвращает ‘command_connect()’, когда встречает символ ‘|’.
parse.y:
Также здесь мы видим обработку пары символов ‘|&’, что эквивалентно перенаправлению как stdout, так и stderr в конвеер. Далее обратимся к command_connect():make_cmd.c:
где connector это символ ‘|’ как int. При выполнении последовательности команд (связанных через ‘&’, ‘|’, ‘;’, и т. д.) вызывается execute_connection():execute_cmd.c:
PIPE_IN и PIPE_OUT — файловые дескрипторы, содержащие информацию о входном и выходном потоках. Они могут принимать значение NO_PIPE, которое означает, что I/O является stdin/stdout.
execute_pipeline() довольно объемная функция, имплементация которой содержится в execute_cmd.c. Мы рассмотрим наиболее интересные для нас части.
execute_cmd.c:
Таким образом, bash обрабатывает символ конвейера путем системного вызова pipe() для каждого встретившегося символа ‘|’ и выполняет каждую команду в отдельном процессе с использованием соответствующих файловых дескрипторов в качестве входного и выходного потоков.
Исходный код, уровень 2, ядро
Обратимся к коду ядра и посмотрим на имплементацию функции pipe(). В статье рассматривается ядро версии 3.10.10 stable.
fs/pipe.c (пропущены незначительные для данной статьи участки кода):
Если вы обратили внимание, в коде идет проверка на флаг O_NONBLOCK. Его можно выставить используя операцию F_SETFL в fcntl. Он отвечает за переход в режим без блокировки I/O потоков в конвеере. В этом режиме вместо блокировки процесс чтения/записи в поток будет завершаться с errno кодом EAGAIN.
Максимальный размер блока данных, который будет записан в конвейер, равен одной странице памяти (4Кб) для архитектуры arm:
arch/arm/include/asm/limits.h:
Для ядер >= 2.6.35 можно изменить размер буфера конвейера:
Максимально допустимый размер буфера, как мы видели выше, указан в файле /proc/sys/fs/pipe-max-size.
Tips & trics
В примерах ниже будем выполнять ls на существующую директорию Documents и два несуществующих файла: ./non-existent_file и. /other_non-existent_file.
Перенаправление и stdout, и stderr в pipe
или же можно использовать комбинацию символов ‘|&’ (о ней можно узнать как из документации к оболочке (man bash), так и из исходников выше, где мы разбирали Yacc парсер bash):
Перенаправление _только_ stderr в pipe
Shoot yourself in the foot
Важно соблюдать порядок перенаправления stdout и stderr. Например, комбинация ‘>/dev/null 2>&1′ перенаправит и stdout, и stderr в /dev/null.
Получение корректного кода завершения конвейра
По умолчанию, код завершения конвейера — код завершения последней команды в конвеере. Например, возьмем исходную команду, которая завершается с ненулевым кодом:
И поместим ее в pipe:
Теперь код завершения конвейера — это код завершения команды wc, т.е. 0.
Обычно же нам нужно знать, если в процессе выполнения конвейера произошла ошибка. Для этого следует выставить опцию pipefail, которая указывает оболочке, что код завершения конвейера будет совпадать с первым ненулевым кодом завершения одной из команд конвейера или же нулю в случае, если все команды завершились корректно:
Shoot yourself in the foot
Следует иметь в виду “безобидные” команды, которые могут вернуть не ноль. Это касается не только работы с конвейерами. Например, рассмотрим пример с grep:
Здесь мы печатаем все найденные строки, приписав ‘new_’ в начале каждой строки, либо не печатаем ничего, если ни одной строки нужного формата не нашлось. Проблема в том, что grep завершается с кодом 1, если не было найдено ни одного совпадения, поэтому если в нашем скрипте выставлена опция pipefail, этот пример завершится с кодом 1:
В больших скриптах со сложными конструкциями и длинными конвеерами можно упустить этот момент из виду, что может привести к некорректным результатам.
Источник
Linux Pipe Command with Examples
Prerequisites
To apply pipe commands on Linux, you need to have a Linux environment in your system. This can be done by downloading a virtual box and configuring an Ubuntu file on it. Users must have privileges to access the applications required.
Syntax
Command 1 | command 2 | command 3 | ……
Sort the list using pipes
The pipe has much functionality used to filter, sort, and display the text in the list. One of the common examples is described here. Suppose we have a file named file1.txt having the names of the students. We have used the cat command to fetch the record of that file.

The data present in this file is unordered. So, to sort the data, we need to follow a piece of code here.

Through the respective output, you can see that students’ names are arranged alphabetically in a sequence from a to z.
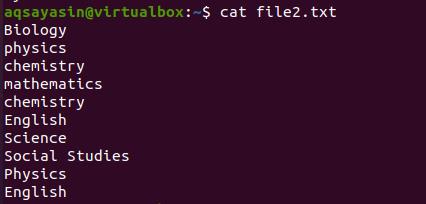
Beside this. Suppose we want to get an output in sorted form plus removing redundancy. We will use the same command and a “uniq” keyword in addition to the default command. Let’s consider a file named file2.txt having the names of subjects in it. The same command is used for fetching data.
Now we will use the command to remove all the words that are duplicated in the file.
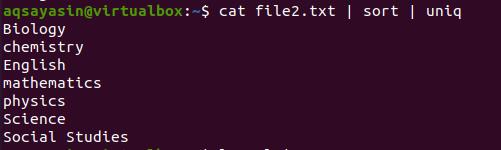
The output shows that the elements are organized and arranged alphabetically. At the same time, all the words that were duplicated are removed. The above command will only display the output, but we will use the below-cited command to save them.
The output will be saved in another file with the same extension.
Display file data of a corresponding range
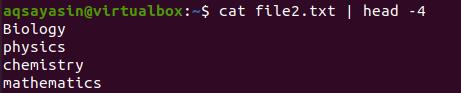
It is very annoying when you want to get some data only from the start, but the command gives you all the matching items in your system. You can use the ‘head’ keyword. It helps to limit your output with concerning some range. i.e., in this example, we have declared the range up to 4. So the data will be from the first 4 lines of the file. Consider the same file file2.txt as we have taken an example above.
Similar to head, we can also use the tail option. This will limit the output to the last lines according to the range given.
Pipe and more command
By using more command, all the output is displayed at a time on the screen. The pipe act as a container and displays all the output data as an input of ls-l. Because the output is a long list of files.
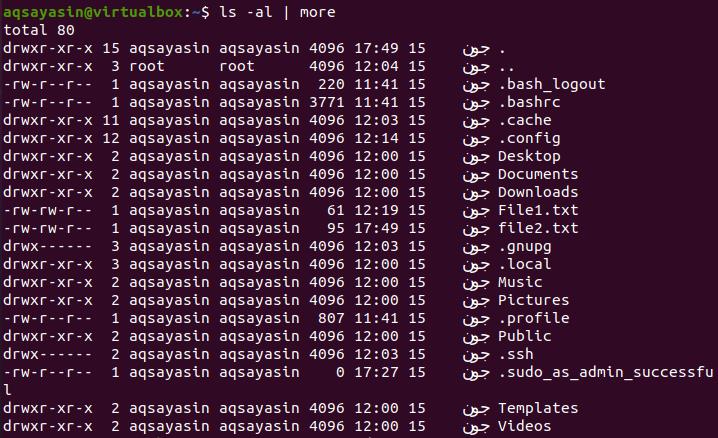
Ls is used to display all possible data of the respective command. It firstly displays the total number of data related to the corresponding query.
Count the number of files
It is a common need to know the number of files currently present. And it is not necessary to use the grep or cat command to fetch data of all the types. We can use pipe in this case either. The command used is written as:

Whereas wc is “word count” used to count the files present.
Process identification
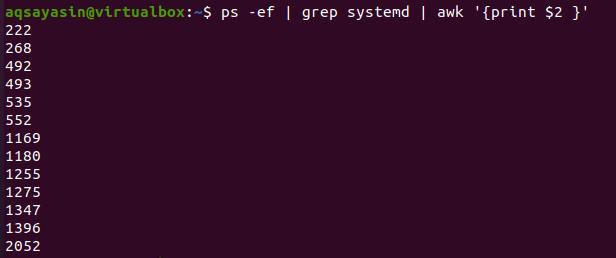
Many complicated tasks are also performed by using the pipe in our commands. The command we are discussing now is used to display the process ids of the systemd processes.
The awk command’s $2 displays the data of $2 that is the second column.
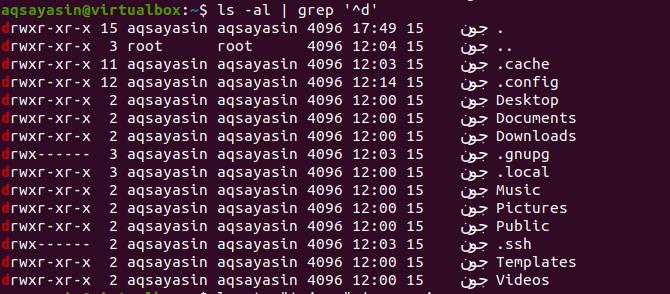
Get sub-directories using pipe
One of the pipeline commands we have used to get all the present subdirectories in the current directory is one of the pipe queries in the pipeline commands we have used. We have used the grep command here. Grep only functions to show the data starting from the ‘d’. The pipe will help in retrieving the respective data of all the directories. ‘^d’ is used here.
Get files using pipe
To get the files from the system of respective extensions, we can get this by using the pipe in our commands. The first example is finding the java files in the system. ‘locate’ and ‘grep’ help get the files of respective extensions.

‘*’ is used to fetch all the files in the system. Currently, we have a single file present in our system. The second example is to get the files with the extension of the text. The entire command is the same only the file extension is changed.

Use multiple pipes in a single command
In this example, unlike the earlier ones, we have used more than one pipe in a single command to elaborate its functionality. Consider a file named file3.txt.
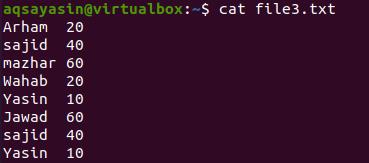
Now we want to get the record of the word that matched with the name we have provided in the command. Here cat command is used to fetch the data from a particular file. Grep is used to select that specific word from the file. ‘tee’ is used to save the result in another file. And wc is to count the resultant data. So the result is shown below.

The word is matched with the 2 contents. We can display the data from the new sample file to display the whole result, where the result is being stored.
Fetch particular data with pipes
In this example, we want to get the data from the file having ‘h’ in its content.

The result shows that the fetched data is according to the search by the ‘h’ command. Moving towards the following example. Here we want to fetch the items of the file having ‘s’ in it, but we have applied a condition of case sensitivity. Both upper and lower case alphabets will be fetched.
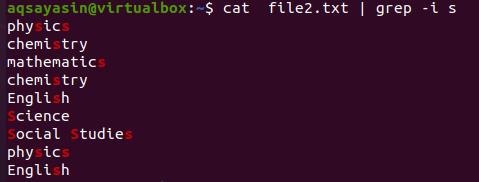
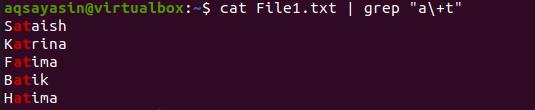
The result is shown in the image. Next, we will display the students’ names having alphabets ‘a’ and ‘t’ combined in the word. The result is in the below-cited image.
Conclusion
The article depicts the versatility of pipe in Linux commands. However, it is quite simple but works in a manner to resolve many complex queries. This command-line utility is easily implementable and compatible with UNIX and Linux operating systems.
About the author

Aqsa Yasin
I am a self-motivated information technology professional with a passion for writing. I am a technical writer and love to write for all Linux flavors and Windows.
Источник
Linux Tutorial — 11. Piping and Redirection
Piping and Redirection!
Keeping the data flowing
Introduction
Learn how easy it is to use piping and redirection to create powerful workflows that will automate your work, saving you time and effort.
In the previous two sections we looked at a collection of filters that would manipulate data for us. In this section we will see how we may join them together to do more powerful data manipulation.
There is a bit of reading involved in this section. Even though the mechanisms and their use are quite simple, it is important to understand various characteristics about their behaviour if you wish to use them effectively.
So what are they?
Every program we run on the command line automatically has three data streams connected to it.
- STDIN (0) — Standard input (data fed into the program)
- STDOUT (1) — Standard output (data printed by the program, defaults to the terminal)
- STDERR (2) — Standard error (for error messages, also defaults to the terminal)

Piping and redirection is the means by which we may connect these streams between programs and files to direct data in interesting and useful ways.
We’ll demonstrate piping and redirection below with several examples but these mechanisms will work with every program on the command line, not just the ones we have used in the examples.
Redirecting to a File
Normally, we will get our output on the screen, which is convenient most of the time, but sometimes we may wish to save it into a file to keep as a record, feed into another system, or send to someone else. The greater than operator ( > ) indicates to the command line that we wish the programs output (or whatever it sends to STDOUT) to be saved in a file instead of printed to the screen. Let’s see an example.
- ls
- barry.txt bob example.png firstfile foo1 video.mpeg
- ls > myoutput
- ls
- barry.txt bob example.png firstfile foo1 myoutput video.mpeg
- cat myoutput
- barry.txt
- bob
- example.png
- firstfile
- foo1
- myoutput
- video.mpeg
Let’s break it down:
- Line 1 Let’s start off by seeing what’s in our current directory.
- Line 3 Now we’ll run the same command but this time we use the > to tell the terminal to save the output into the file myoutput. You’ll notice that we don’t need to create the file before saving to it. The terminal will create it automatically if it does not exist.
- Line 4 As you can see, our new file has been created.
- Line 6 Let’s have a look at what was saved in there.
Some Observations
You’ll notice that in the above example, the output saved in the file was one file per line instead of all across one line when printed to the screen. The reason for this is that the screen is a known width and the program can format its output to suit that. When we are redirecting, it may be to a file, or it could be somewhere else, so the safest option is to format it as one entry per line. This also allows us to easier manipulate that data later on as we’ll see further down the page.
When piping and redirecting, the actual data will always be the same, but the formatting of that data may be slightly different to what is normally printed to the screen. Keep this in mind.
You’ll also notice that the file we created to save the data into is also in our listing. The way the mechanism works, the file is created first (if it does not exist already) and then the program is run and output saved into the file.
Saving to an Existing File
If we redirect to a file which does not exist, it will be created automatically for us. If we save into a file which already exists, however, then it’s contents will be cleared, then the new output saved to it.
- cat myoutput
- barry.txt
- bob
- example.png
- firstfile
- foo1
- myoutput
- video.mpeg
- wc -l barry.txt > myoutput
- cat myoutput
- 7 barry.txt
We can instead get the new data to be appended to the file by using the double greater than operator ( >> ).
- cat myoutput
- 7 barry.txt
- ls >> myoutput
- cat myoutput
- 7 barry.txt
- barry.txt
- bob
- example.png
- firstfile
- foo1
- myoutput
- video.mpeg
Redirecting from a File
If we use the less than operator ( wc -l myoutput
A lot of programs (as we’ve seen in previous sections) allow us to supply a file as a command line argument and it will read and process the contents of that file. Given this, you may be asking why we would need to use this operator. The above example illustrates a subtle but useful difference. You’ll notice that when we ran wc supplying the file to process as a command line argument, the output from the program included the name of the file that was processed. When we ran it redirecting the contents of the file into wc the file name was not printed. This is because whenever we use redirection or piping, the data is sent anonymously. So in the above example, wc recieved some content to process, but it has no knowledge of where it came from so it may not print this information. As a result, this mechanism is often used in order to get ancillary data (which may not be required) to not be printed.
We may easily combine the two forms of redirection we have seen so far into a single command as seen in the example below.
- wc -l myoutput
- cat myoutput
- 7
Redirecting STDERR
Now let’s look at the third stream which is Standard Error or STDERR. The three streams actually have numbers associated with them (in brackets in the list at the top of the page). STDERR is stream number 2 and we may use these numbers to identify the streams. If we place a number before the > operator then it will redirect that stream (if we don’t use a number, like we have been doing so far, then it defaults to stream 1).
- ls -l video.mpg blah.foo
- ls: cannot access blah.foo: No such file or directory
- -rwxr—r— 1 ryan users 6 May 16 09:14 video.mpg
- ls -l video.mpg blah.foo 2> errors.txt
- -rwxr—r— 1 ryan users 6 May 16 09:14 video.mpg
- cat errors.txt
- ls: cannot access blah.foo: No such file or directory
Maybe we wish to save both normal output and error messages into a single file. This can be done by redirecting the STDERR stream to the STDOUT stream and redirecting STDOUT to a file. We redirect to a file first then redirect the error stream. We identify the redirection to a stream by placing an & in front of the stream number (otherwise it would redirect to a file called 1).
- ls -l video.mpg blah.foo > myoutput 2>&1
- cat myoutput
- ls: cannot access blah.foo: No such file or directory
- -rwxr—r— 1 ryan users 6 May 16 09:14 video.mpg
Piping
So far we’ve dealt with sending data to and from files. Now we’ll take a look at a mechanism for sending data from one program to another. It’s called piping and the operator we use is ( | ) (found above the backslash ( \ ) key on most keyboards). What this operator does is feed the output from the program on the left as input to the program on the right. In the example below we will list only the first 3 files in the directory.
- ls
- barry.txt bob example.png firstfile foo1 myoutput video.mpeg
- ls | head -3
- barry.txt
- bob
- example.png
We may pipe as many programs together as we like. In the below example we have then piped the output to tail so as to get only the third file.
- ls | head -3 | tail -1
- example.png
Any command line arguments we supply for a program must be next to that program.
I often find people try and write their pipes all out in one go and make a mistake somewhere along the line. They then think it is in one point but in fact it is another point. They waste a lot of time trying to fix a problem that is not there while not seeing the problem that is there. If you build your pipes up incrementally then you won’t fall into this trap. Run the first program and make sure it provides the output you were expecting. Then add the second program and check again before adding the third and so on. This will save you a lot of frustration.
You may combine pipes and redirection too.
- ls | head -3 | tail -1 > myoutput
- cat myoutput
- example.png
More Examples
Below are some more examples to give an idea of the sorts of things you can do with piping. There are many things you can achieve with piping and these are just a few of them. With experience and a little creative thinking I’m sure you’ll find many more ways to use piping to make your life easier.
All the programs used in the examples are programs we have seen before. I have used some command line arguments that we haven’t covered yet however. Look up the relevant man pages to find out what they do. Also you can try the commands yourself, building up incrementally to see exactly what each step is doing.
In this example we are sorting the listing of a directory so that all the directories are listed first.
- ls -l /etc | tail -n +2 | sort cat myoutput —>
- drwxrwxr-x 3 nagios nagcmd 4096 Mar 29 08:52 nagios
- drwxr-x— 2 news news 4096 Jan 27 02:22 news
- drwxr-x— 2 root mysql 4096 Mar 6 22:39 mysql
- .
In this example we will feed the output of a program into the program less so that we can view it easier.
- ls -l /etc | less
- (Full screen of output you may scroll. Try it yourself to see.)
Identify all files in your home directory which the group has write permission for.
| grep ‘^. w’
Create a listing of every user which owns a file in a given directory as well as how many files and directories they own.
- ls -l /projects/ghosttrail | tail -n +2 | sed ‘s/\s\s*/ /g’ | cut -d ‘ ‘ -f 3 | sort | uniq -c
- 8 anne
- 34 harry
- 37 tina
- 18 ryan
Summary
Activities
Let’s mangle some data:
- First off, experiment with saving output from various commands to a file. Overwrite the file and append to it as well. Make sure you are using a both absolute and relative paths as you go.
- Now see if you can list only the 20th last file in the directory /etc.
- Finally, see if you can get a count of how many files and directories you have the execute permission for in your home directory.
Источник


