- Change Private Key Format to Use with PuTTY
- Before You Begin
- Background
- What Do You Need?
- Changing the Format of the SSH Private Key
- (Optional) Convert ppk format to OpenSSH
- Конвертирование ключей OpenSSH для PuTTY и наоборот
- Перекодируем на Linux-машине OpenSSH-ключ в формат PPK
- Перекодируем на Linux-машине PPK-ключ для использования с OpenSSH
- Перекодируем ключи Windows-машине
- Change Private Key Format to Use with PuTTY
- Options
- Before You Begin
- Purpose
- Time to Complete
- Background
- What Do You Need?
- Run the PuTTYgen
- Changing the Format of the SSH Key
 Change Private Key Format to Use with PuTTY
 Change Private Key Format to Use with PuTTY
Before You Begin
 Before You Begin
This 10-minute tutorial shows you how to change your private key format to use with PuTTY, which is a Secure Shell (SSH) client for Windows that can connect to a remote machine. If you’re using SSH on Linux, then this tutorial isn’t for you.
Background
PuTTY doesn’t support the SSH private key format created by the Oracle Cloud wizards. You need to convert the private key to the PuTTY required format. To connect to a remote machine with PuTTY, your private key should have a ppk format.
For this tutorial, we assume that you already created an Oracle GoldenGate Cloud service instance and have a privateKey file unzipped from the sshkeybundle.zip that’s generated when creating the service instance.
If you don’t have these, then create a cloud service instance and generate a public/private key pair for it.
Note: Some Oracle Public Cloud services such as Oracle Storage Cloud Service don’t provide access to their VMs with private keys. Instead you use REST API calls to access the service. This tutorial is for cloud services that allow SSH access to their VMs and therefore, you create a public/private key for the SSH access.
What Do You Need?
- Windows
- PuTTY (http://www.PuTTY.org)
- An SSH private key file unzipped from the ssheybundle.zip, downloaded when you created an Oracle GoldenGate Cloud service instance.
Changing the Format of the SSH Private Key
 Changing the Format of the SSH Private Key
After you download and install PuTTY:
- Make a copy of your private key just in case you lose it when changing the format.
- From the Start menu, go to All Programs > PuTTY >PuTTYgen and run the PuTTYgen program.
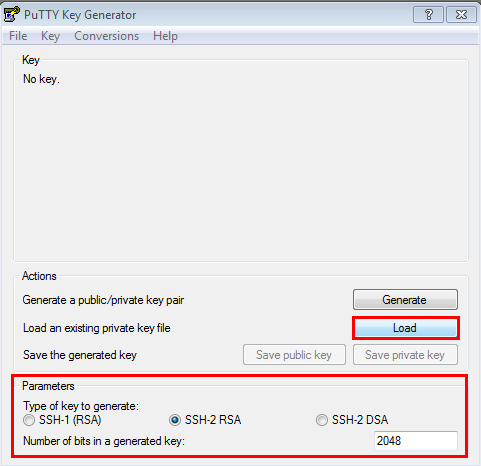
- In the Parameters section:
- For Type of Key to generate, select RSA.
- For Number of bits in a generated key, leave the default value of 2048 .
- Click Load. Description of the illustration 004.
- In the Load private key window, change the PuTTY Private Key Files (*.ppk) drop-down menu option to All Files (*.*). Description of the illustration 005.
- Find and select the Private Key file that you unzipped from the sshkeybundle.zip file, after you created an Oracle Cloud service instance. In this example, it’s called privateKey. Description of the illustration 006.
- Click Open.
- In the PuTTYgen Notice dialog box, click OK. Description of the illustration 008.
- Change the key comment from imported-openssh-key to something meaningful. This comment appears on your PuTTY screen when you connect to your VM.
- Click Save private key. Description of the illustration 010.
- In the PuTTYgen Warning dialog box, click Yes. Description of the illustration 011.
 Description of the illustration 004.
 Description of the illustration 005.
 Description of the illustration 006.
 Description of the illustration 008.
 Description of the illustration 010.
 Description of the illustration 011.
 Note: The warning message suggests that you use a passphrase for extra privacy so no one can access the instance with just the private key. However, having a passphrase makes it complicated to automate, so decide whether or not to add a passphrase in the field.
If you decide to enter a passphrase, then remember it, because you can’t access the instance without it.
If you’re planning to use the private key with the ppk format for a SOCKS5 proxy connection on Linux, then you must set a passphrase. An easier way is to use the private key without the ppk format.
 Description of the illustration 012.
(Optional) Convert ppk format to OpenSSH
 (Optional) Convert ppk format to OpenSSH
Another option is to convert the ppk format to an OpenSSH format using the PuTTygen program:
- Run the puTTygen program.
- Click Load.
- Select your private key that ends in .ppk and click Open.
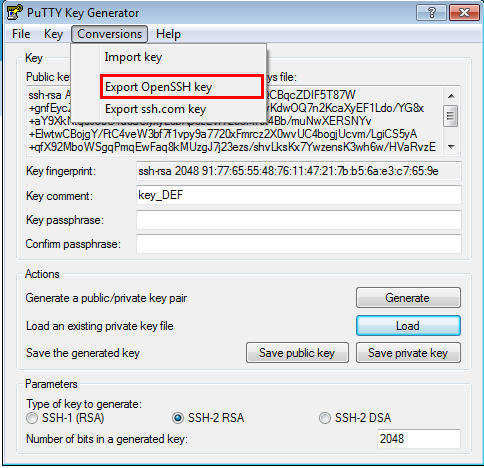
- Click the Conversions menu option.
- Click Export OpenSSH key. Description of the illustration 005.
- If you want a passphrase, enter it in the Key passphrase field and confirm it. Ensure that you know this passphrase later, because it’s not retrievable.
- If you didn’t choose a passphrase, confirm that you don’t want one. Description of the illustration 007.
- Give your private key a new name. For example, SSHprivateKey and click Save. Description of the illustration 008.
- Close the puTTygen program.
- Confirm that your new private key has been saved in the location that you specified. Description of the illustration 010.
 Description of the illustration 005.
 Description of the illustration 007.
 Description of the illustration 008.
 Description of the illustration 010.
Источник
Конвертирование ключей OpenSSH для PuTTY и наоборот
Популярным SSH-клиентом для Windows является PuTTY, на Linux же администраторы обычно используют утилиту ssh из состава пакета OpenSSH. Каждый из этих инструментов является кроссплатформенным, но за пределами «родных» платформ они используются редко.
Если есть необходимость работать как из под Windows, так и из под Linux то возникает проблема при попытке использования одних и тех же ключей с разными утилитами (они используют разные форматы хранения ключей). Далее будет показано как можно конвертировать ключи из формата OpenSSH в PPK (PuTTY) и обратно.
На Windows-машине должна быть установлена последняя версия PuTTY (обязательно вместе с puttygen.exe). На Linux-машине в зависимости от направления кодирования понадобятся ssh-keygen из состава OpenSSH и puttygen из состава PuTTY. В Debian/Ubuntu их можно установить командой:
Перекодируем на Linux-машине OpenSSH-ключ в формат PPK
Допустим что у нас есть ключ, сгенерированный командой:
Чтобы перекодировать его в формат PPK достаточно выполнить команду:
Перекодируем на Linux-машине PPK-ключ для использования с OpenSSH
Тут нам так же поможет утилита puttygen. Извлекаем приватный ключ:
Извлекаем публичный ключ:
Так же публичный ключ можно извлечь командой:
Перекодируем ключи Windows-машине
Здесь нам снова поможет утилита puttygen. В версии для Windows она имеет удобный графический интерфейс. Независимо от направления конвертирования необходимо в меню «Conversions» выбрать пункт «Import key» и указать исходный файл.
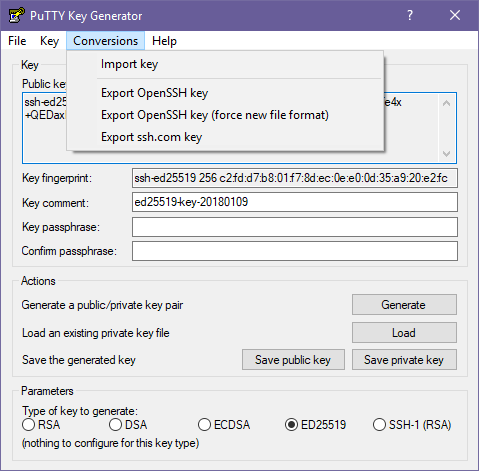
Для получения ключа в формате PPK достаточно нажать кнопку «Save private key» и указать имя файла для сохранения. Для получения приватного ключа в формате OpenSSH нужно выбрать в меню «Conversions» пункт «Export OpenSSH key» и указать имя файла.
К сожалению красивого способа получить публичный ключ в формате OpenSSH на Windows нет. Но если очень хочется то проблему решится конечно же можно:)
Для начала нужно открыть PPK-файл в любом текстовом редакторе (ВАЖНО! ключ не должен быть зашифрован!) и увидеть примерно вот такую картину:
Здесь в строке «PuTTY-User-Key-File-2» указывается тип ключа, а цифра в строке «Public-Lines» указывает сколько строк ниже неё содержат данные публичного ключа. Достаточно собрать все эти данные в одну строчку и получится публичный ключ. В нашем примере результат будет таким:
Эту строку можно сразу добавлять в authorized_keys на ваших серверах. На этом всё. Приятной работы!
Источник
Change Private Key Format to Use with PuTTY
Options
Expand All Topics
Hide All Images
Before You Begin
Purpose
This tutorial shows you how to change your private key format, to use with PuTTY, which is a Secure Shell (SSH) client for Windows that can connect to a remote machine. If you’re using SSH on Linux, then this tutorial isn’t for you.
Time to Complete
Approximately 10 minutes
Background
PuTTY doesn’t support the SSH private key format created by the Oracle Cloud wizards, so you have to convert the private key to the PuTTY required format. To connect to a remote machine with PuTTY, your private key should have a ppk format.
What Do You Need?
- Windows
- PuTTY http://www.PuTTY.org
- An SSH private key file unzipped from the ssheybundle.zip, provided when you created an Oracle Cloud service instance
Run the PuTTYgen
After you download and install PuTTY:
- Make a copy of your private key just in case you lose it when changing the format.
- From the Start menu, go to All Programs then PuTTY and then PuTTYgen and run the PuTTYgen program.
- In the Parameters section:
- For Type of Key to generate, select SSH-2 RSA.
- For Number of bits in a generated key, leave the default value of 2048 .
- Click Load. Description of this image
 Description of this image
Changing the Format of the SSH Key
For this tutorial, we assume that you already created an Oracle Cloud service instance named DB12C-ABC. and that you have a privateKey file unzipped from the sshkeybundle.zip that’s generated when creating the service instance.
If you don’t have these, then create a cloud service instance and generate a public/private key pair for it.
Note: Some Oracle Public Cloud services such as Oracle Storage Cloud Service don’t provide access to their VMs with private keys. Instead you use REST API calls to access the service. This tutorial is for cloud services that allow SSH access to their VMs and therefore, you create a public/private key for the SSH access.
- Change the PuTTY Private Key Files (*.ppk) drop-down menu option to All Files (*.*). Description of this image
- Find and select the Private Key file that you unzipped from the sshkeybundle.zip file, after you created an Oracle Cloud service instance. In this example, it’s called privateKey. Description of this image
- Click Open.
- In the PuTTYgen Notice dialog box, click OK. Description of this image
- Change the key comment from imported-openssh-key to something meaningful. This comment appears on your PuTTY screen when you connect to your VM.
- Click Save private key. Description of this image
- In the PuTTYgen Warning dialog box, click Yes. Description of this image
 Description of this image
 Description of this image
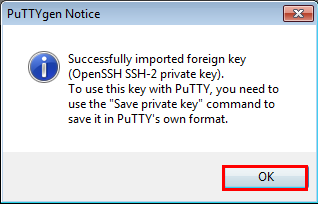 Description of this image
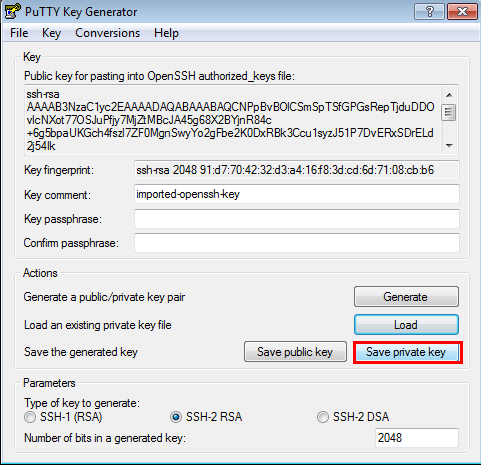 Description of this image
 Description of this image
 Note: The warning message suggests that you use a passphrase for extra privacy so no one can access the instance with just the private key. However, having a passphrase makes it complicated to automate, so decide whether or not to add a passphrase in the field.
If you decide to enter a passphrase, then remember it, because you can’t access the instance without it.
Note: If you’re planning to use the private key with the ppk format for a SOCKS5 proxy connection on Linux, then you must set a passphrase. An easier way is to use the private key without the ppk format.
 Description of this image
Another option is to convert the ppk format to an OpenSSH format using the PuTTygen program performing the following steps:
- Run the puTTygen program.
- Click Load.
- Select your private key that ends in .ppk and then click Open.
- Click the Conversions menu option.
- Click Export OpenSSH key.
- If you want a passphrase, enter it in the Key passphrase field and confirm it. Ensure that you know this passphrase later, because it’s not retrievable.
- If you didn’t choose a passphrase, confirm that you don’t want one.
- Give your private key a new name. For example SSHprivateKey and then click Save.
- Close the puTTygen program.
- Confirm that your new private key has been saved in the location that you specified.


Источник


