- Заметки про motd
- Linux print out the motd
- What others do
- Ubuntu
- Gentoo
- CentOS
- Fedora
- FreeBSD
- Historic information: /etc/motd in Debian 6 (squeeze, EOL 2014) and before
- How to update your /etc/motd
- How to keep your /etc/motd from being overwritten
- Old school «don’t touch my motd» approach
- Who was responsible for /etc/motd?
- Вики IT-KB
- Инструменты пользователя
- Инструменты сайта
- Боковая панель
- Настраиваем динамический motd в Debian GNU/Linux 8
- Как показать MOTD в Linux
- Добавить дополнительное сообщение
- Заключение
- Own your bits
- Customize your MOTD login message in Debian and Ubuntu
- Short history
- Files involved
- How to then?
- Some ideas
- Play with it
- References
- Author: nachoparker
- 3 Comments
Заметки про motd
motd — message of the day, сообщение отображаемое при входе в Linux-систему (на примере Ubuntu).
Раньше файл, содержащий приветствие располагался в /etc/motd , сейчас же это набор скриптов, располагающихся в каталоге /etc/update-motd.d/ :
Порядок отображения, как правило, в порядке заданных приоритетов — 00, 10 и тп…
В результате выполнения отображается:
Много лишнего для нас — не так ли?
Я отключу часть и добавлю своё приветствие.
Создам файл и сделаю его исполняемым.
Теперь открываю его в любом редакторе и добавляю:
Где -e — включить поддержку вывода Escape последовательностей, \033[34m и \033[33m — цвета текста, \033[0m — сброс цветов.
Доступны такие цвета текста:
\033[30m — чёрный;
\033[31m — красный;
\033[32m — зелёный;
\033[33m — желтый;
\033[34m — синий;
\033[35m — фиолетовый;
\033[36m — голубой;
\033[37m — серый.
И такие цвета фона:
\033[40m — чёрный;
\033[41m — красный;
\033[42m — зелёный;
\033[43m — желтый;
\033[44m — синий;
\033[45m — фиолетовый;
\033[46m — голубой;
\033[47m — серый;
\033[0m — сбросить все до значений по умолчанию.
Просмотреть результат можно командой sudo run-parts /etc/update-motd.d или cat /var/run/motd.dynamic .
00-header — содержит само приветствие Welcome to Ubuntu 18.04.5 LTS (GNU/Linux 4.15.0-118-generic x86_64)
10-help-text — ссылки на информацию и сапппорт
50-landscape-sysinfo ведет к сприпту для получения системной информации
50-motd-news — какие-то новости
80-livepatch — информация про Livepatch
80-esm — информация об Extended Security Maintenance — Расширенное обслуживание системы безопасности
Далее скрипты об обновлениях, перезагрузке и тд.
Для отключения ненужных сообщений просто задаю им права 400 .
Источник
Linux print out the motd
The actual motd is generated and printed by pam_motd, see its manpage. pam_motd is called twice from /etc/pam.d/login and /etc/pam.d/sshd: Once to print the contents from /run/motd.dynamic and once to print the static (and user editable) content from /etc/motd and /etc/motd.d.
/run/motd.dynamic is updated by pam_motd by executing all executable files from /etc/update-motd.d (via run-parts, see also #931185). If you want additional dynamic information in your motd, /etc/update-motd.d is the place to put your scripts. This is a Debian- and Ubuntu-specific patch that might not be present in other flavours of GNU/Linux distributions and is not factored into upstream PAM. Ubuntu has a man page for a no longer existing update-motd executable which describes what pam_motd does in current versions of Debian.
This code has had security issues in the past (CVE-2010-0832, CVE-2011-3628). No Debian version that is currently under official support is affected by those issues.
For your information, this C code is currently used to execute /etc/update-motd.d
sshd has its own option «?PrintMotd» in /etc/ssh/sshd_config. This defaults to «yes», but is set to «no» in Debian’s default configuration since you get the motd twice otherwise: Once printed by pam_motd, the second time by sshd itself. Please note that the motd doesn’t show on multiplexed ssh connections, only on the «first» session that also does the authentication.
What others do
Ubuntu
Since Ubuntu Intrepid Ibex (2008.10), Ubuntu handles the motd the same way as Debian does it since Debian 8 (jessie, EOL 2018). Is it therefore basically compatible.
By default Ubuntu ships with a set of scripts that add the number of packages to be update (for example).
Gentoo
Gentoo doesn’t display the motd file by default, but this can be enabled in login.defs (see this Gentoo wiki page).
According to this Arch wiki page, Arch doesn’t seem to do anything special to /etc/motd other than display it on boot.
CentOS
2019/06: CentOS install pam_motd, but doesn’t use it. sshd is in default configuration and therefore prints the motd on login automatically.
Fedora
2019/06: Uses pam_motd
FreeBSD
In FreeBSD, the motd file is also generated through a boot script, which will preserve modifications by changing only the line that matches (loosely) the uname that gets updated on reboots. The magic lines:
Historic information: /etc/motd in Debian 6 (squeeze, EOL 2014) and before
Debian used to have a peculiar way of handling /etc/motd. The motd was updated at every reboot, in a boot script ( /etc/init.d/bootmisc.sh in lenny and below, /etc/init.d/bootlogs in squeeze), which basically ran the following:
Since /etc/motd was a symlink to /var/run/motd in Debian, this worked.
Then the pam_motd based method came around, and for a short while, evaluation of /etc/update-motd.d was done by the update-motd pacakge every 10 minutes instead of on-demand via pam_motd.
How to update your /etc/motd
Since /etc/motd basically got overwritten at every reboot, you needed to instead update /etc/motd.tail and either reboot (!!) or also edit /etc/motd.tail or run the above commands. There was a bug report (437176) to provide an easier command to allow you to update only /etc/motd.tail.
How to keep your /etc/motd from being overwritten
This way, /etc/motd would not have been a symlink to the updated one anymore and woul have therefore always stayed the same. The downside to this was that you did not see the latest kernel version in the motd.
Old school «don’t touch my motd» approach
Similar to the above, this approach also made sure dynamic information could be displayed.
Who was responsible for /etc/motd?
Here’s a list of packages which did that work:
base-files basically took care of installing the motd on boot but did not replace it on upgrade (see /usr/share/doc/base-files/README)
Источник
Вики IT-KB
Пошаговые руководства, шпаргалки, полезные ссылки.
Инструменты пользователя
Инструменты сайта
Боковая панель
Настраиваем динамический motd в Debian GNU/Linux 8
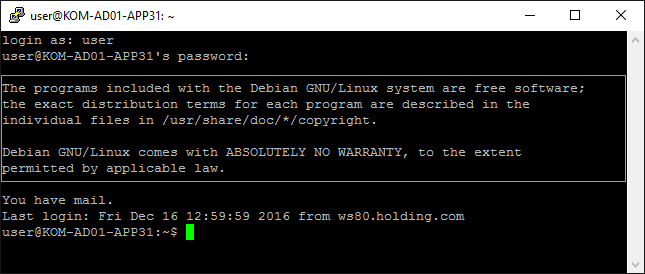
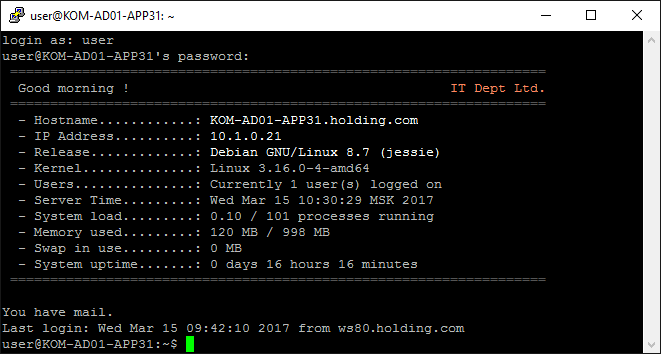
После регистрации пользователя в Linux-системе, как правило, отображается так называемое «сообщение дня» — message of the day или сокращённо motd. В Debian GNU/Linux 8 (Jessie) это сообщение имеет «грустный» вид.
Попробуем сделать это сообщение информативней и полезней для администратора. Создадим специальный каталог, который будет содержать наши скрипты, которые будут использоваться для генерации динамического motd.
Создадим в этом каталоге файл скрипта и сделаем его исполняемым:
Отредактируем наш скрипт:
Наполним файл скрипта содержимым «по вкусу». Например я взял вариант из проекта riespandi — Dynamic SSH Banner и немного его подправил под свои нужды. В итоге получилось примерно следующее:
Сохраним скрипт, удалим статический motd-файл и вместо него создадим символическую ссылку на файл /var/run/motd, который будет обновляться при каждом входе в систему нами скриптом.
После проделанных изменений войдём в систему локально или через SSH и проверим результат:
Если всё сделано, а результата нет, то возможно стоит проверить настройки PAM.
За вызов механизма обновления motd при входе в систему отвечают настройки в файлах политик PAM. Например в файле nano /etc/pam.d/sshd за это отвечают 2 строчки вызова библиотеки pam_motd.so
Дополнительные источники информации:
 Автор первичной редакции:
Алексей Максимов
Время публикации: 15.03.2017 10:00
Источник
Как показать MOTD в Linux
Главное меню » Linux » Как показать MOTD в Linux

Добавить дополнительное сообщение
Мы можем предоставить любой текст для отображения при входе в систему удаленного пользователя на машине, создав новый файл с именем motd в каталоге /etc. Для создания и редактирования файла /etc/motd, воспользуемся редактором nano:
В этот пустой файл вы можете добавить любой текст по вашему выбору, который вы хотите отобразить как MOTD.
Например, мы можем написать «Добро пожаловать на первую машину andreyex». После написания этого сообщения сохраните его и закройте редактор nano с помощью сочетаний клавиш CTRL + S и CTRL + X.
После написания MOTD и сохранения файла /etc/motd. Получите IP-адрес серверной системы, используя команду, введенную ниже:
Войдите в систему с любого другого компьютера в сети через SSH в целях тестирования и укажите IP-адрес сервера, за которым следует команда SSH, как показано ниже:
Если вы собираетесь войти в систему в первый раз, он попросит аутентифицировать соединение, поэтому введите «YES» и нажмите Enter.
После этого терминал запросит пароль пользователя. Введите пароль и нажмите Enter, чтобы войти в систему на сервере.
Здесь, на выходном снимке экрана, вы можете видеть, что созданное нами сообщение отображается успешно.
Вот как просто и легко написать собственное сообщение и показать MOTD в Linux.
Теперь, что, если нам не нужны все другие текстовые сообщения по умолчанию, и мы предоставим только настраиваемый MOTD. Для этого нам просто нужно отключить или удалить разрешения на выполнение всех файлов и скриптов MOTD. Чтобы отключить разрешения для исполняемого файла, введите команду:
После отключения разрешений для исполняемых файлов сценариев MOTD, снова войдите на серверную машину с другой машины через SSH.
Вы можете увидеть, насколько эффективно пропали все сообщения MOTD по умолчанию, и у нас есть чистый пользовательский MOTD.
Заключение
Этот пост предоставляет простое и легкое решение о том, как показать MOTD в Linux, создав новый файл MOTD в каталоге /etc и записав в него желаемое сообщение. Более того, мы научились отключать сообщение MOTD по умолчанию и показывать настраиваемое сообщение MOTD.
Если вы нашли ошибку, пожалуйста, выделите фрагмент текста и нажмите Ctrl+Enter.
Источник
Own your bits
Technology with a focus on Open Source
Customize your MOTD login message in Debian and Ubuntu

This is a little guide to display dynamic login messages on a Debian system.
This is one of those things where the internet has plenty of resources, but they are mostly outdated and contradictory. Even typing man motd in Debian is a sad experience.
It is not a difficult thing to do but it can be a big waste of time to sort out the contradictions.
Hopefully, this post will help get the big picture from one single place.
Short history
Ancient times
Time ago, most distributions just printed the contents of /etc/motd upon login.
MOTD stands for message of the day (although it was static), and was put in place at installation time, only to be changed at upgrade time maybe.
Some distributions such as Arch keep operating this way.
Ubuntu came along
Then, Ubuntu Intrepid Ibex (2008) introduced a package update-motd, which consisted of
- a script called update-motd.
- an entry in /etc/cron.d calling update-motd every 10 minutes.
- a folder /etc/update-motd.d
The script runs all the scripts in /etc/update-motd.d using run-parts, then stores all output in /var/run/motd.
/etc/motd was then made into a symbolic link to /var/run/motd
And pam_motd copied it
Then, PAM thought that that was actually a cool idea and copied it from Ubuntu. In modern Linux, PAM is in charge of login authentication.
SSH uses the pam_motd module
Ok, now we have yet another file, /run/motd.dynamic.
We can see that they almost literally copied the code.
For this reason, even in Debian if we create the folder /etc/update-motd.d, which does not exist by default, it will be run at every login in the same way as if we had Ubuntu’s update-motd package installed.
Confusing huh? Well it gets worse because over time, Debian and Ubuntu have changed things, like the scripts populated in /etc/update-motd.d and the use of special files.
Files involved
- /etc/motd – The classic, static file. Does not exist anymore in Ubuntu 16.04 LTS, not even as a symbolic link to /var/run/motd. If it is created, however its contents will be printed too.
- /var/run/motd – This was used by Ubuntu’s first implementation. It is not used anymore. It is just ignored by PAM.
- /var/run/motd.dynamic – This is what is shown on login currently. It is updated by /etc/init.d/motd at every boot. It is also updated by PAM by running the scripts in /etc/update-motd.d/, if they exist.
- /etc/motd.tail – The Ubuntu package used to populate /etc/update-motd.d. One of them would cat the contents of this file so it was easy to add static content. That script does not exist in the package anymore, so the file does not have the intended effect.
How to then?
Okay, so once we understand why Google confuses us, it is pretty easy to customize our MOTD.
First, make sure to disable /etc/init.d/motd, as it writes to /var/run/motd.dynamic.
In my Raspbian Jessie, for instance it already came disabled. Just in case
Then, just delete current static MOTD, create /etc/update-motd.d folder and place scripts in it.
Scripts are run by run-parts, so they need not have an extension. They must start with digits so they will be run in order.
Finally, you can opt to get rid of the “last login” message if you want
This is a simple example
Next login we will get
Some ideas
FIGlet
You can use good old FIGlet. It will take your input and create some text based ASCII art.
You can even get “fonts” for it here
System info
You can play with lm-sensors to get information such as fan speed or temperature.
Also, you can print any of the typical system info provided by standard tools.
Here is one example output

Termpix
You can get even fancier using tools like termpix. This tool creates ASCII art from pictures, and shows better if we have half block capable fonts available.

This is what I used for the MOTD in NextCloudPi.
landscape-sysinfo
This one is Ubuntu only.
Banner
Boxes
List all different designs with
lolcat
You can spice up your creations with trippy rainbow colors with lolcat

Play with it
No need to risk your system. Test your ideas in a Docker container.
, and the official Ubuntu container.
References

Author: nachoparker
3 Comments
As you point out: “It is not a difficult thing to do but it can be a big waste of time to sort out the contradictions”. So, thank you very much for sorting this out!
For me the missing part was sshd pam_mot.d, which was not activated on my server so nothing would show whatsoever. Its quite easy to overlook this setting, so if anyone else has trouble actually showing the motd this might be worth a look.
This is a great post. It has cleared up a lot of confusion in regards to the MOTD message usage for debian/raspbian.
I have also stumbled upon the issue of PAM not being enabled on my ssh server settings.
I enabled it and followed the recommendation for using session checks:
sudo vim /etc/ssh/sshd_config
UsePAM yes
PasswordAuthentication no
ChallengeResponseAuthentication no
Источник


