- Stress testing
- Contents
- Stress testing software
- Low load examples
- Writing to an image file
- Updating patches for OpenWRT
- Stressing CPU and Memory
- stress
- MPrime
- Linpack
- Systester (AKA SuperPi for Windows)
- Intel Processor Diagnostic Tool
- Stressing memory
- Discovering Errors
- Стресс-тестирование систем в Linux – утилита stress-ng
- Основные особенности и возможности stress-ng
- Синтаксис stress-ng
- Основные опции stress-ng
- Тестирование процессора
- Тестирование дисковой подсистемы
- Тестирование памяти
- Комплексное тестирование
- Заключение
Stress testing
![]() This article or section needs language, wiki syntax or style improvements. See Help:Style for reference.
This article or section needs language, wiki syntax or style improvements. See Help:Style for reference.![]()
Running an overclocked or undervolted PC is fine as long as it is stable and that the temperature of its components do not exceed their acceptable range. There are several programs available to assess system stability through stress testing the system and thereby the overclock level.
Contents
Stress testing software
This section lists stress testing software and classifies it by processor task as high, medium, or low. It is important to stress test using mixed loads to verify stability under many use cases.
| Work load | Program/Task | Description |
|---|---|---|
| Low | ||
| updating patches | Custom script Refreshing hundreds of kernel patches in the OpenWRT project, see #Low load examples. | |
| Medium | ||
| Cc/Gcc | Both cc/gcc compilation is a great method of stress testing. Both are available in the base-devel group. | |
| HandBrake-cli | handbrake-cli can be used to encode using high quality settings. | |
| Systester | systester AUR Systester is a multithreaded piece of software capable of deriving values of pi out to 128,000,000 decimal places. It has built in check for system stability. | |
| Stressful Application Test | stressapptest AUR is a memory interface test. | |
| High | stress | stress is a simple CPU, memory, I/O, and disk workload generator implemented in C. |
| mprime | mprime-bin AUR factors large numbers and is an excellent way to stress CPU and memory. | |
| linpack | linpack AUR — Linpack makes use of the BLAS (Basic Linear Algebra Subprograms) libraries for performing basic vector and matrix operations. and is an excellent way to stress CPUs for stability. |
It is recommended to use programs in all three categories to assess the overall system stability. It can happen that a system is more sensitive to a test from the low than from the high demand category. Higher demand voltage programs require the most CPU core voltage (VCORE) due to intense hardware usage to perform their tasks. Medium demand and Low demand workloads do not always call for the highest VCORE when running and as such can be more prone to throwing errors for systems that are undervolted relative to the clock speed requested.
Low load examples
Writing to an image file
A good stability test under a low load workload is using dd to format an image. This can be a physical disk or a loop mounted image. The script below uses mounted image and cycles through each core one-by-one. Note that you should adjust the variables in the top of script to match your system. By default the script will run the command just once per core. It can be easily customized to run on known-weak cores rather than scanning all core 0 through n by altering the for loop. Run the script as root.
Updating patches for OpenWRT
A good stability test of a low load workload is to run though updating the patch sets in the OpenWRT project. Follow these steps.
Stressing CPU and Memory
stress
stress performs a loop that calculates the square root of a random number in order to stress the CPU. It can run simultaneously several workers to load all the cores of a CPU for example. It can also generate memory, I/O or disk workload depending on the parameters passed. The FAQ provides examples and explanations.
To spawn 4 workers spinning on sqrt(), use the command:
MPrime
MPrime (also known as Prime95 in its Windows and MacOS implementation) is recognized universally as one defacto measure of system stability. MPrime under torture test mode will perform a series of very CPU intensive calculations and compare the values it gets to known good values.
The Linux implementation is called mprime AUR and is available in the AUR.
To run mprime, simply open a shell and type «mprime»:
When the software loads, simply answer ‘N’ to the first question to begin the torture testing:
There are several options for the torture test (menu option 15).
- Small FFTs (option 1) to stress the CPU
- In-place large FFTs (option 2) to test the CPU and memory controller
- Blend (option 3) is the default and constitutes a hybrid mode which stresses the CPU and RAM.
Errors will be reported should they occur both to stdout and to
/results.txt for review later. Many do not consider a system as ‘stable’ unless it can run the Large FFTs for a 24 hour period.
/results.txt ; note that the two runs from 26-June indicate a hardware failure. In this case, due to insufficient vcore to the CPU:
Linpack
linpack AUR makes use of the BLAS (Basic Linear Algebra Subprograms) libraries for performing basic vector and matrix operations. It is an excellent way to stress CPUs for stability (only Intel CPUs are supported). After installation, users should copy /usr/share/linpack/linpack.conf to
/.config/linpack.conf and adjust it according to the amount of memory on the system.
Systester (AKA SuperPi for Windows)
Systester AUR is available in the AUR in both cli and gui version. It tests system stability by calculating up to 128 millions of Pi digits and includes error checking. Note that one can select from two different calculation algorithms: Quadratic Convergence of Borwein and Gauss-Legendre. The latter being the same method that the popular SuperPi for Windows uses.
A cli example using 8 threads is given:
Intel Processor Diagnostic Tool
The Intel Processor Diagnostic Tool is a tool that verifies the functionality of an Intel Microprocessor by stress testing the CPU. A Fedora Linux LiveUSB ISO images are available. The LiveUSB image allows you to stress test your machine without using your main operating system; such method might be useful in extreme cases especially when dealing with cold reboots/crashes.
Burn the image to a USB stick by using dd or Gnome Disks and then boot the Live CD. Once booted, open the terminal and type the following command to install Intel Processor Diagnostic Tool for 64-bit machines:
Once it is installed, you can run the Diagnostic Tool by clicking on the IPDT Icon that is located on the desktop.
Stressing memory
Use MemTest86 (proprietary) or Memtest86+ (GPL) to test your memory (RAM). There are «new» and «old» testers:
- «New» versions do not support BIOS. For a new version, use a proprietary MemTest86 version greater or equal to 8. Install it as memtest86-efiAUR or boot the Arch Linux install image.
- «Old» versions do not support UEFI nor DDR4. Old versions are available as GPL memtest86+ (development discontinued). It is roughly equal to proprietary MemTest86 version 4. After installation, update GRUB: it will auto-detect the package and allow users to boot directly to it.
Discovering Errors
Some stressing applications like #MPrime or #Linpack have built in consistency checks to discover errors due to non-matching results. A more general and simple method for measuring hardware instabilities can be found in the kernel itself. To use it, simply filter the journal on a crash like so:
Multicore chips can also give info as to which physical/logical core gave the error. This can be important if users are optimizing settings on a per-core basis.
The kernel can throw these errors while the stressing application is running, before it ends the calculation and reports the error, thus providing a very sensitive method to assess stability. Consider the following from a Ryzen 5900X:
This chip as 12 physical cores. In this case, CPU 21 can be traced back to physical core 10. Use lstopo from hwloc to print the hardware topology.
Источник
Стресс-тестирование систем в Linux – утилита stress-ng
Для организации и проведения нагрузочного стресс-тестирования в Linux-системах существует утилита stress-ng. С помощью неё несложно сгенерировать реальную рабочую нагрузку на тестируемые подсистемы и, соответственно, оценить её возможности. Утилита, традиционно для Linux, предоставляет для работы интерфейс командной строки. Однако, это ни в коей мере не делает её неудобной. Со своими задачами она справляется на «отлично». В данной статье приведены инструкции, отражающие основы работы с утилитой stress-ng для некоторых самых распространённых ситуаций в стресс-тестировании систем на основе Linux.
Основные особенности и возможности stress-ng
Возможности, которыми обладает утилита stress-ng, довольно широки. Об этом свидетельствует огромное количество всевозможных опций, которыми её наделили разработчики.
Но ключевой особенностью stress-ng является то, что это полноценный инструмент со встроенными тестами. В отличие от многих других аналогов, при выполнении теста не производится обращений к сторонним и/или внешним ресурсам. Таким образом, stress-ng абсолютно самодостаточна. Практически в любом дистрибутиве Linux она доступна в стандартном репозитории и устанавливается с помощью системы управления пакетами (СУП) дистрибутива. Например, в Ubuntu:
Кроме всего прочего, stress-ng в своём составе очень качественные тесты для тестирования процессоров, в совокупности позволяющие наиболее полно сгенерировать нагрузку на CPU, используя такие методы как целочисленные и с плавающей запятой, битовые операции, комплексные вычисления и т. д.
Синтаксис stress-ng
Как уже было отмечено, stress-ng имеет настолько огромный набор опций, что в рамках данной статьи целесообразнее остановиться лишь на основных, позволяющих протестировать все основные подсистемы: CPU, виртуальную память, а также дисковую подсистему.
Синтаксис stress-ng довольно прост:
Задаёт конкретный метод тестирования виртуальной памяти. По-умолчанию выполняются все доступные для данной категории тесты, последовательно друг за другом. Подробнее в официальном руководстве по команде man stress-ng.
—vm-method mЗадаёт конкретный метод тестирования виртуальной памяти. По-умолчанию выполняются все доступные для данной категории тесты, последовательно друг за другом. Подробнее в официальном руководстве по команде man stress-ng.
Основные опции stress-ng
В таблице ниже указаны основные опции утилиты
| Опция | Значение |
| —class name | Задаёт тип теста. В качестве name указывается например cpu, memory, vm, io и другие. |
| —metrics | Указывает, что по завершению теста должна быть выведена статистика основных метрик, отражающих поведение системы во время теста. |
| —metrics-brief | То же, что и —metrics, но выводит ненулевые метрики. |
| —cpu-method method | Задаёт метод генерации нагрузки для процессора. По-умолчанию выполняются все доступные для данной категории тесты, последовательно друг за другом. Более подробно об этой опции можно узнать, выполнив команду man stress-ng. |
| —cpu N | Запускает для стресс-теста процессора N стрессоров для каждого его потока. |
| —cpu-ops N | Указывает, через какое количество bogo-операций необходимо остановить тест CPU. |
| —hdd-ops N | Указывает, через какое количество bogo-операций необходимо остановить тест жёстких дисков. |
| —hdd-bytes N | Записывает N байт для каждого процесса работы с жёстким диском. По-умолчанию равно 1 Гб. |
| —vm N | Запускает для стресс-теста виртуальной памяти N стрессоров. |
| —vm-bytes N | Размещает N байт для каждого процесса работы с памятью. По-умолчанию равно 256 Мб. Объём также может быть указан в процентах от общего объёма виртуальной памяти в системе. Значения можно задавать в бфйтах, килобайтах, мегабайтах и гигабайтах, используя суффиксы b, k, m и g соответственно. |
| —sequential N | Задает N количество потоков для выполнения тестов, если N не указано или равно 0, то количество потоков равно числу процессоров. |
Для удобства и быстрого составления необходимых тестов рекомендуется пользоваться также некоторыми вспомогательными опциями, например:
- что бы запустить несколько экземпляров каждого стресс-теста используется опция —all N, где N – необходимое количество экземпляров;
- для установки таймаута, т. е. времени продолжительности стресс-теста используется опция —timeout.
Тестирование процессора
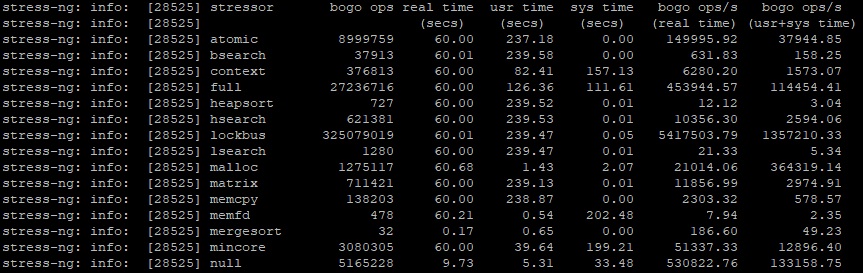
Для подавляющего большинства ситуаций классическим примером стресс-теста можно использовать тест, выполняемый следующей командой:
В данном тесте задействованы 16 потоков для тестирования 16-поточного процессора. Вывод результатов может быть следующим:

Естественно количество потоков следует задавать в соответствии со спецификацией используемого процессора.
Тестирование дисковой подсистемы
Для проведения стресс-тестирования накопителей, таких как жёсткие диски можно для начала провести низкоуровневый тест ввода вывода
Вывод команды будет следующим

Еще один стресс-тест дисков можно выполнить командой
В данном случае будет запущено 5 стрессоров для жёстких дисков, которые будут остановлены по завершении 100 тыс. bogo-операций.
Во время тестирования можно смотреть загрузку командой iostat
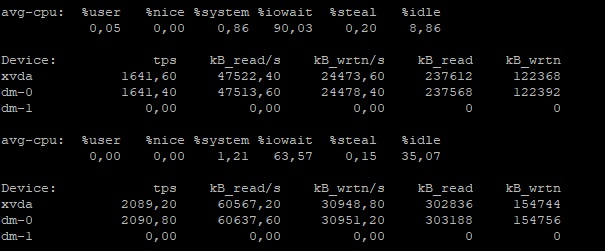
Тестирование памяти
Что бы провести стресс-тест памяти используйте команду
После окончания мы получим результат проверки приблизительно следующего вида
Комплексное тестирование
Если необходимо провести комплексное стресс-тестирование, можно задействовать работу нескольких основных подсистем вместе одной командой:
Эта команда запустит тест для CPU в 8 потоков, тест виртуальной памяти с размещением в ней одного гигабайта данных, а также 4 стрессора для тестирования операций ввода/вывода.
Что бы запустить тестирование всего «железа», используется команда
Эта команда запустит все тесты. После выполнения результат будет выведен в консоль. Во время выполнения команды лучше компьютер не трогать
Заключение
В заключение стоит ещё раз отметить, что утилита stress-ng по своим возможностям очень универсальна и позволяет качественно протестировать любую систему. Приведенные выше примеры охватывают наиболее распространённые ситуации по нагрузочному тестированию Linux-систем. Для проведения специфичных или более сложных тестов рекомендуется обращаться к официальному руководству по использованию утилиты, доступному по команде man stress-ng.
Если вы нашли ошибку, пожалуйста, выделите фрагмент текста и нажмите Ctrl+Enter.
Источник


