- Использование HTTP proxy и SOCKS в Linux
- curl: передача данных через proxy
- wget: закачка файлов через proxy
- ssh: доступ к серверам
- Соксификатор dante
- DNS запросы через proxy
- Proxy server
- Contents
- HTTPS MITM proxies
- Environment variables
- Keep proxy through sudo
- Automation with network managers
- About libproxy
- Web proxy options
- Simple Proxy with SSH
- Using a SOCKS proxy
- curl and pacman
- Proxy settings on GNOME3
- Microsoft NTLM proxy
- Configuration
- How To Use Proxy Server To Access Internet at Shell Prompt With http_proxy Variable
- Set http_proxy shell variable on Linux/OS X/Unix bash shell
- How do I setup proxy variable for all users?
- A note about enabling proxy access to a specific user
- How do I use password protected proxy server using various command line options?
- How to configure proxy settings on Ubuntu 18.04
- Overview
- Ubuntu Desktop Network Settings
- Ubuntu Terminal Proxy Settings
- Single User Temporary Proxy Settings
- Single User Persistent Proxy Settings
- All Users
Использование HTTP proxy и SOCKS в Linux
В Linux существует много полезных консольных команд, которые при необходимости хотелось бы запустить через proxy. Некоторые приложения имеют встроенную поддержку proxy, а некоторые нет. Далее описано как пользоваться востребованными утилитами через proxy, даже теми, которые этой поддержки не имеют.
curl: передача данных через proxy
curl имеет полноценную поддержку как HTTP proxy так и SOCKS.
Для тестирования возможно использовать proxy сервера из бесплатных списков (socks — sockslist.net, и HTTP proxy — proxyhttp.net). Проверка IP адреса будет производиться с помощью ресурса check-host.net
Часть параметров curl можно записать в файл
С помощью time и curl также можно замерить время отклика сервера:
Результат будет выглядеть так:
wget: закачка файлов через proxy
wget имеет встроенную поддержку proxy. Недостаток лишь в том, что только поддержку HTTP proxy. Для использования совместно с SOCKS рекомендуется использовать соксификатор dante.
Чтобы все время не указывать —proxy-user и —proxy-password можно их прописать в файл
ssh: доступ к серверам
Для доступа к серверам через ssh и proxy также лучше использовать соксификатор dante.
Соксификатор dante
С помощью socksify можно направить через proxy почти любое приложение, не только консольное.
Чтобы все время не вводить данные о proxy можно создать файл /etc/socks.conf
Пример для SOCKS:
Пример для HTTP proxy с авторизацией:
А также экспортировать переменные SOCKS_USERNAME и SOCKS_PASSWORD, если для SOCKS или HTTP proxy требуется авторизация:
DNS запросы через proxy
Часто требуется чтобы и преобразование имен происходило через proxy. Если использовать dante, то запрос на преобразование имен идет и через proxy, и через именной сервер указанный в /etc/resolv.conf . Понять почему же идет два одинаковых запроса вместо одного не удалось. Поэтому можно предложить два варианта:
1) Закомментировать именные сервера в файле /etc/resolv.conf, чтобы преобразование имен шло только через proxy. Это отразится на всей системе.
2) Изменить /etc/resolv.conf и выставить именные сервера необходимой страны, или просто отличные от серверов провайдера. Например установить сервера Google:
Чтобы данные не были перезаписаны именными серверами провайдера (при переподключении), можно запретить обновление списка именных серверов сетевому менеджеру (NetworkManager/wicd) или DHCP-клиенту (спасибо ergil за корректировку).
Или воспользоваться «грубым» методом — запрещением изменения файла /etc/resolv.conf:
Если есть какие-то дополнения, пожалуйста, напишите, это будет полезно узнать и применить.
Источник
Proxy server
In computer networks, a proxy server is a server (a computer system or an application) that acts as an intermediary for requests from clients seeking resources from other servers.
Contents
HTTPS MITM proxies
When debugging HTTPS connections it is sometimes useful to intercept them outside of the browser. In order for the TLS MITM to work you need to trust a certificate authority of the proxy either in your browser or system-wide.
- Charles — Graphical trialware written in Java.
https://www.charlesproxy.com/ || charlesAUR
- Fiddler — Proprietary and graphical, running on Mono.
https://www.telerik.com/fiddler || fiddlerAUR
- mitmproxy — Command-line and web interface, written in Python, also has API.
https://mitmproxy.org/ || mitmproxy
- sslsplit — Works with any TLS connections but cannot act as a HTTP proxy in a browser, written in C.
https://www.roe.ch/SSLsplit || sslsplit
Environment variables
 This article or section needs expansion.
/.config/environment.d/*.conf . (Discuss in Talk:Proxy server)
Some programs, such as wget and (used by pacman) curl, use environment variables of the form protocol_proxy to determine the proxy for a given protocol (e.g. HTTP, FTP, . ).
Below is an example on how to set these variables in a shell:
Some programs look for the all caps version of the environment variables.
If the proxy environment variables are to be made available to all users and all applications, the above mentioned export commands may be added to a script, say proxy.sh inside /etc/profile.d/ . The script has to be then made executable. This method is helpful while using a desktop environment like Xfce which does not provide an option for proxy configuration. For example, Chromium browser will make use of the variables set using this method while running XFCE.
Alternatively, there is a tool named proxyman-git AUR which claims to configure system-wide proxy settings easily. It also handles proxy configurations of other software like git, npm, Dropbox, etc. The project is inspired from Alan Pope’s idea of making a script.
Alternatively you can automate the toggling of the variables by adding a function to your .bashrc (thanks to Alan Pope for original script idea)
Omit username or password if they are not needed.
As an alternative, you may want to use the following script. Change the strings YourUserName , ProxyServerAddress:Port , LocalAddress and LocalDomain to match your own data, then edit your
/.bashrc to include the edited functions. Any new bash window will have the new functions. In existing bash windows, type source
/.bashrc . You may prefer to put function definitions in a separate file like functions then add source functions to .bashrc instead of putting everything in .bashrc . You may also want to change the name «myProxy» into something short and easy to write.
Keep proxy through sudo
If the proxy environment variables are set for the user only they will get lost when running commands with sudo (or when programs use sudo internally).
A way to prevent that is to add the following line to a sudo configuration file:
Automation with network managers
- NetworkManager cannot change the environment variables.
- netctl could set-up these environment variables but they would not be seen by other applications as they are not child of netctl.
About libproxy
libproxy (which is available in the extra repository) is an abstraction library which should be used by all applications that want to access a network resource. It still is in development but could lead to a unified and automated handling of proxies in GNU/Linux if widely adopted.
The role of libproxy is to read the proxy settings from different sources and make them available to applications which use the library. The interesting part with libproxy is that it offers an implementation of the Web Proxy Autodiscovery Protocol and an implementation of Proxy Auto-Config that goes with it.
The /usr/bin/proxy binary takes URL(s) as argument(s) and returns the proxy/proxies that could be used to fetch this/these network resource(s).
As of 06/04/2009 libproxy is required by libsoup. It is then indirectly used by the midori browser.
Web proxy options
- Squid is a very popular caching/optimizing proxy
- Privoxy is an anonymizing and ad-blocking proxy
- tinyproxy is a small, efficient HTTP/SSL proxy daemon
- For a simple proxy, ssh with port forwarding can be used
Simple Proxy with SSH
Connect to a server (HOST) on which you have an account (USER) as follows
For PORT, choose some number which is not an IANA registered port. This specifies that traffic on the local PORT will be forwarded to the remote HOST. ssh will act as a SOCKS server. Software supporting SOCKS proxy servers can simply be configured to connect to PORT on localhost.
Using a SOCKS proxy
There are two cases:
- the application you want to use handles SOCKS5 proxies (for example Firefox), then you just have to configure it to use the proxy.
- the application you want to use does not handle SOCKS proxies, then you can try to use tsocks or proxychains-ng .
In Firefox, you can use the SOCKS proxy in the menu Preferences > Network > Settings. Choose Manual Proxy Configuration, and set the SOCKS Host (and only this one, make sure the other fields, such as HTTP Proxy or SSL Proxy are left empty). For example, if a SOCKS5 proxy is running on localhost port 8080, put 127.0.0.1 in the SOCKS Host field, 8080 in the Port field, and validate.
If using proxychains-ng, the configuration takes place in /etc/proxychains.conf . You may have to uncomment the last line (set by default to use Tor), and replace it with the parameters of the SOCKS proxy. For example, if you are using the same SOCKS5 proxy as above, you will have to replace the last line by:
Then, proxychains-ng can be launched with
Where program can be any program already installed on your system (e.g. xterm, gnome-terminal, etc).
If using tsocks, the configuration takes place in /etc/tsocks.conf . See tsocks.conf(5) for the options. An example minimum configuration looks like this:
curl and pacman
You may set the all_proxy environment variable to let curl and pacman (which uses curl) use your socks5 proxy:
Proxy settings on GNOME3
Some programs like Chromium and Firefox can use the settings stored by GNOME. These settings can be modified through the gnome-control-center front end and also through gsettings.
This configuration can also be set to automatically execute when NetworkManager connects to specific networks, by using the proxydriver AUR package.
Microsoft NTLM proxy
In a Windows network, NT LAN Manager (NTLM) is a suite of Microsoft security protocols which provides authentication, integrity, and confidentiality to users.
cntlm AUR from the AUR stands between your applications and the NTLM proxy, adding NTLM authentication on-the-fly. You can specify several «parent» proxies and Cntlm will try one after another until one works. All authenticated connections are cached and reused to achieve high efficiency.
Configuration
Change settings in /etc/cntlm.conf as needed, except for the password. Then run:
This will generate encrypted password hashes according to your proxy hostname, username and password.
Источник
How To Use Proxy Server To Access Internet at Shell Prompt With http_proxy Variable
I ‘m behind a squid proxy server. How do I access internet via proxy server when I use wget, lynx and other utilities from a shell prompt on a Linux or Unix-like systems?
Linux and UNIX-like systems has environment variable called http_proxy. It allows you to connect text based session and/or applications via the proxy server. All you need is proxy server IP address (URL) and port values. This variable is almost used by all utilities such as elinks, lynx, wget, curl and others commands.
| Tutorial details | |
|---|---|
| Difficulty level | Easy |
| Root privileges | No |
| Requirements | Linux/Unix shell promot |
| Est. reading time | 2 mintues |
Set http_proxy shell variable on Linux/OS X/Unix bash shell
Type the following command to set proxy server:
$ export http_proxy=http://server-ip:port/
$ export http_proxy=http://127.0.0.1:3128/
$ export http_proxy=http://proxy-server.mycorp.com:3128/
If the proxy server requires a username and password then add these to the URL. For example, to include the username foo and the password bar:
$ export http_proxy=http://foo:bar@server-ip:port/
$ export http_proxy=http://foo:bar@127.0.0.1:3128/
$ export http_proxy=http://USERNAME:PASSWORD@proxy-server.mycorp.com:3128/
How do I setup proxy variable for all users?
To setup the proxy environment variable as a global variable, open /etc/profile file:
# vi /etc/profile
Add the following information:
export http_proxy=http://proxy-server.mycorp.com:3128/
OR
export http_proxy=http://USERNAME:PASSOWRD@proxy-server.mycorp.com:3128/
Save and close the file.
A note about enabling proxy access to a specific user
To enable proxy access for a specific user, add the lines user shell profile. For the default bash shell, the profile is the file .bash_profile. For example, enable proxy access for a specifc user called vivek, type:
$ vi $HOME/.bash_profile
OR
# vi /home/vivek/.bash_profile
Append the following line:
export http_proxy=http://USERNAME:PASSOWRD@proxy-server.mycorp.com:3128/
Save and close the file.
- No ads and tracking
- In-depth guides for developers and sysadmins at Opensourceflare✨
- Join my Patreon to support independent content creators and start reading latest guides:
- How to set up Redis sentinel cluster on Ubuntu or Debian Linux
- How To Set Up SSH Keys With YubiKey as two-factor authentication (U2F/FIDO2)
- How to set up Mariadb Galera cluster on Ubuntu or Debian Linux
- A podman tutorial for beginners – part I (run Linux containers without Docker and in daemonless mode)
- How to protect Linux against rogue USB devices using USBGuard
Join Patreon ➔
How do I use password protected proxy server using various command line options?
You can simply use wget command as follows:
$ wget —proxy-user=USERNAME —proxy-password=PASSWORD http://path.to.domain.com/some.html
Lynx command has the following syntax:
$ lynx -pauth=USER:PASSWORD http://domain.com/path/html.file
Curl command has following syntax:
$ curl —proxy-user user:password http://url.com/
🐧 Get the latest tutorials on Linux, Open Source & DevOps via
Источник
How to configure proxy settings on Ubuntu 18.04
Overview
Proxies are commonly found on business networks, but they are increasingly becoming popular for personal use. The following tutorial will show you multiple ways of setting your proxy in Ubuntu 18.04, allowing you to browse the Internet with additional privacy.
This tutorial will cover the following three areas. Use the one the fits your needs.
Desktop: learn how to set your proxy settings from within the desktop.
Terminal: set environment variables for your proxy server when using a terminal or console.
All users: setting the proxy settings for all users on the system.
Ubuntu Desktop Network Settings
To configure your proxy settings in Ubuntu Desktop you need to access Network Settings. Within there you can set a number of parameters, including proxy settings for HTTP traffic, HTTPS traffic, and FTP traffic.
Equally as important as setting your Internet proxy settings is setting Ignore Hosts, to prevent local traffic from going through your proxy server.
To set your proxy in Ubuntu Desktop, do the following:
- Open the Application launcher by clicking the “Show Applications” icon, located at the bottom of the left-hand quick application access bar.
- Type in ‘Settings’
- Click the ‘Settings’ icon.
- From the left-hand navigation, click the Network tab.
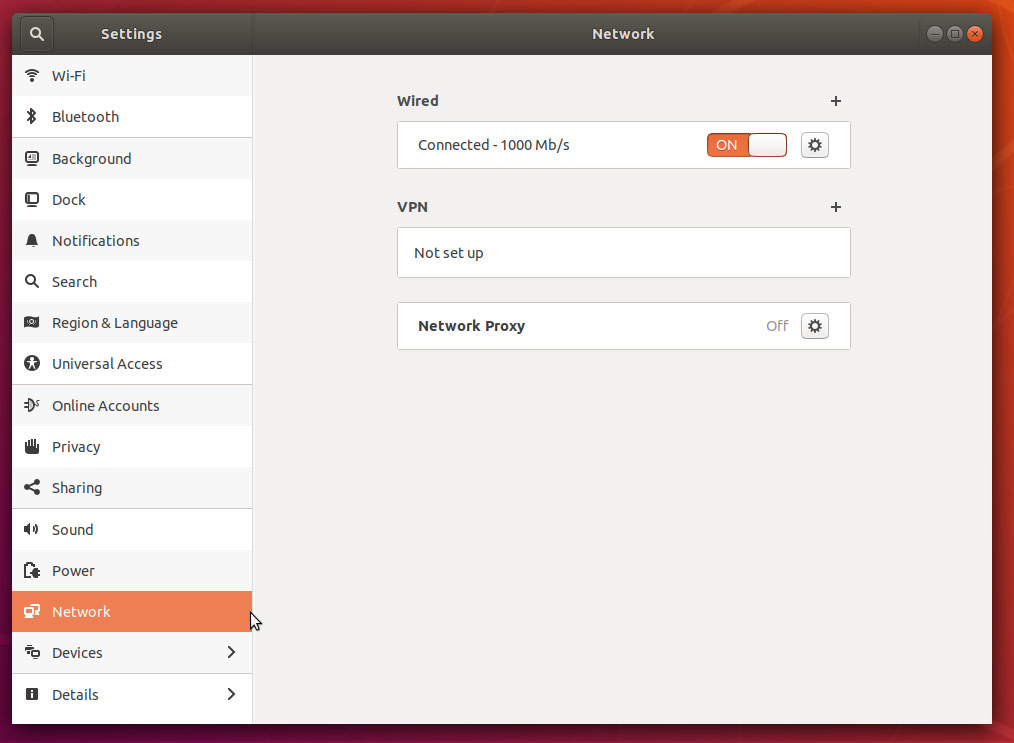 Network Settings Configuration Screen
Click the cog icon near the Network Proxy label.
Network settings proxy icon
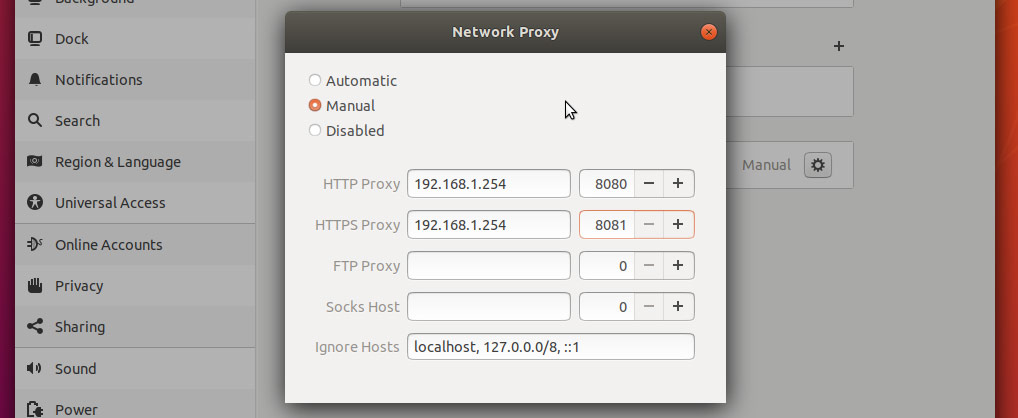 Ubuntu Proxy Settings Dialog Box
Ubuntu Terminal Proxy Settings
Like every Linux distribution, proxy settings can be set using environment variables. There are a number of variables available to use, ranging from HTTP traffic to FTP traffic.
Proxy settings can be either persistent by setting them in your profile, or non-persistent by setting them from the shell session.
| Variable | Description |
|---|---|
| http_proxy | Proxy server for HTTP Traffic. |
| https_proxy | Proxy server for HTTPS traffic |
| ftp_proxy | Proxy server for FTP traffic |
| no_proxy | Patterns for IP addresses or domain names that shouldn’t use the proxy |
The value for every proxy setting, except for no_proxy, uses the same template. They all require a hostname, but you may optionally specify a proxy server port and your user credentials if required to do so. For example:
Single User Temporary Proxy Settings
You may not always want to force Internet traffic through a proxy. Sometimes you need to override existing settings, and you can do this safely by setting the proxy environment variables from the command line.
The following will set a proxy for HTTP and HTTPS, while preventing local traffic from going through the proxy. Our example proxy server endpoint is my.proxy.server:8080 for HTTP traffic and my.proxy.server:8081 for HTTPS.
- Open a Terminal window where you need proxy access.
- Set and export the HTTP_PROXY variable.
- Set and export the HTTPS_PROXY variable.
- Set and export the NO_PROXY variable to prevent local traffic from being sent to the proxy.
Single User Persistent Proxy Settings
- Open your bash profile file into a text editor.
- Add the following lines, modifying them to match your environment.
- Save your settings.
- The proxy settings will be applied the next time you start a session, by logging into the server or opening a new Terminal window from a Desktop.
- To force apply your new proxy settings in the current Terminal session, execute the source command against your bash profile.
All Users
You will need administrative rights to perform this task. All versions of Ubuntu and Debian have a file called /etc/environment. Within this file, we can set global variables and other such things.
Similar to how you set proxy settings for your own local proxy, we’ll be adding the environment variables to this file. The variables will be set when a new user session is created, which is to say when you log in next.
- Using an administrator account, open /etc/environment into a text editor.
- Add the following lines, modifying them to fit your environment. Username and password may be omitted, if not required.
For example, if you do not need to enter a username or password, and your proxy server is my.proxyserver.net at port 8080, and you do not want local traffic going through the proxy, you would enter the following:
Источник


