- Как настроить прокси в Linux
- Как настроить прокси в Linux
- В статье показано как настроить прокси в любой версии ОС Linux.
- Рассмотрим настройку переменных для использования прокси
- Тестирование работы
- Setting Up Proxy with Ubuntu Desktop GUI
- Setting Up Proxy with Ubuntu Desktop Terminal
- Setting Up Permanent Proxy for Single User
- Setting Up Permanent Proxy for All User
- Setting Up Proxy Temporary for Single User
- Setting Up Proxy for APT
- Conclusion
- Linux Proxy Server Settings – Set Proxy For Command Line
- Export Proxy Server Settings
- Test The Proxy Server From The Linux Command-Line
- Unset Linux Proxy Variables
- Automate Proxy Server Settings In Linux
- Lists of Free Public Proxy Servers
- Как настроить прокси в Linux
- Рассмотрим настройку переменных для использования прокси
- Тестирование работы
- Использование HTTP proxy и SOCKS в Linux
- curl: передача данных через proxy
- wget: закачка файлов через proxy
- ssh: доступ к серверам
- Соксификатор dante
- DNS запросы через proxy
Как настроить прокси в Linux
Как настроить прокси в Linux
В статье показано как настроить прокси в любой версии ОС Linux.
Прокси-сервер или proxy — в переводе с англ. «представитель» — сервер как комплекс программ в компьютерных сетях, позволяющий клиентам выполнять косвенные запросы к другим сетевым службам. В рамках данного материала прокси понимается сервер выполняющий доступ к глобальной сети интернет.
Проще всего для использования прокси в командной строке, но в зависимости от типа трафика, Вы можете определить переменные окружения http_proxy, https_proxy или ftp_proxy.
Практически все утилиты командой строки, такие как curl, wget, ssh, apt-get, ftp, wget, yum и прочие, используют данные переменные.
Рассмотрим настройку переменных для использования прокси
Используйте следующий синтаксис для настройки таких типов трафика как http, https и ftp из командной строки:
$ export ftp_proxy=»http://proxy-server:port»
$ export http_proxy=»http://proxy-server:port»
$ export https_proxy=»https://proxy-server:port»
Используйте следующий синтаксис, если прокси-сервер требует аутентификацию:
$ export http_proxy=»http://user:pass@proxy-server:port»
$ export https_proxy=»https://user:pass@proxy-server:port»
$ export ftp_proxy=»http://user:pass@proxy-server:port»
Если Ваш пароль содержит спец. символы, Вы должны заменить их на ASCII коды.
Например символ собаки «@», должен быть заменен на «%40» (т. е. p@ss = p%40ss).
Тестирование работы
Используйте следующую команду для проверки текущих переменных прокси:
$ env | grep -i proxy
Можно проверить работу прокси, узнав ваш внешний IP адрес из командной строки:
Источник
Last Updated: September 21st, 2020 by 
Generally Proxies are used in business networks to prevent attacks and unexpected access and intrusions into the internal networks.
A proxy server can act as an intermediary between the client computer and the internet, and allows you to implement Internet access controls like authentication for Internet connection, sharing Internet connections, bandwidth control and content filtering and blocking.
If your home or office network is behind a proxy server, then you will need to setup proxy in order to browse the Internet.
In this tutorial, we will show you several ways to configure proxy settings in Ubuntu desktop.
Setting Up Proxy with Ubuntu Desktop GUI
You can setup the proxy in Ubuntu Desktop by following the below steps:
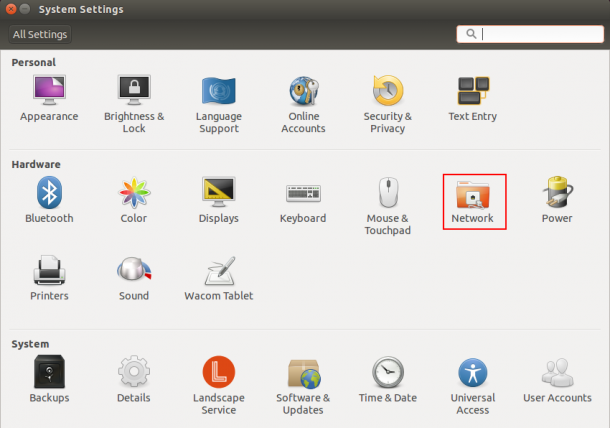
1. Open System Settings in Ubuntu as shown below:
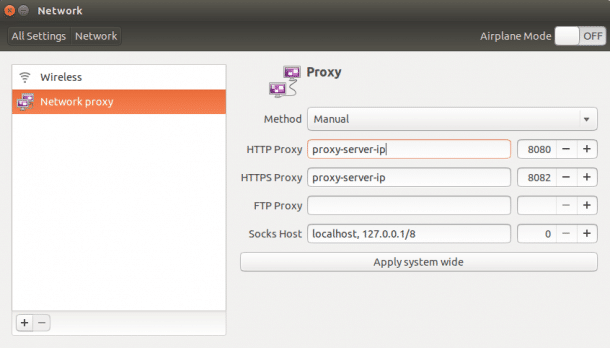
2. Click on the Network => Network Proxy as shown below:
3. In the Method drop down list, choose Manual, provide proxy server’s hostname or IP address and port number.
4. Click on Apply system wide to apply the changes.
Setting Up Proxy with Ubuntu Desktop Terminal
You can also set proxy settings using environment variables. There are several environment variables available in Linux to setup a proxy for HTTP, HTTPS and FTP.
You can setup proxy for temporary usage and permanent for single and all users.
The basic syntax of setting up proxy as shown below:
Setting Up Permanent Proxy for Single User
You can setup a permanent proxy for a single user by editing the
First, login to your Ubuntu system with a user that you want to set proxy for.
Next open the terminal interface and edit the
/.bashrc file as shown below:
Add the following lines at the end of the file that matches with your proxy server:
export http_proxy=username:password@proxy-server-ip:8080
export https_proxy=username:password@proxy-server-ip:8082
export ftp_proxy=username:password@proxy-server-ip:8080
exprot no_proxy=localhost, 127.0.0.1
Save and close the file when you are finished.
Then to activate your new proxy settings for the current session, use the following command:
Setting Up Permanent Proxy for All User
You can also setup Permanent proxy for all users by setting up global variables in /etc/environment file.
To do so, login with root or administrative user and edit the /etc/environment file:
Add the following lines at the end of the file that matches with your proxy server:
http_proxy=»http://username:password@proxy-server-ip:8080/»
https_proxy=»http://username:password@proxy-server-ip:8082/»
ftp_proxy=»http://username:password@proxy-server-ip:8083/»
no_proxy=»localhost,127.0.0.1. 1
Save and close the file when you are finished. You will need to logout and login again to activate the proxy settings.
Setting Up Proxy Temporary for Single User
In some cases, you don’t want to use proxy settings everytime. Then, you can set proxy environment variables temporary from the command line.
To setup and export the HTTP_PROXY variable temporary, open your terminal interface and run the following command:
To setup and export the HTTPS_PROXY variable, run the following command:
Setting Up Proxy for APT
If you want to install some packages from the Ubuntu repository, you will need to create a separate proxy configuration file for APT.
To configure proxy settings for APT, you can simply create proxy configuration file under /etc/apt/apt.conf.d/.
Add the following lines:
Acquire::http::Proxy «http://username:password@proxy-server-ip:8080/»;
Acquire::https::Proxy «https://username:password@proxy-server-ip:8081/»;
Save and close the file when you are finished. Now, you can install any package in your system.
You can also install the package by specifying your proxy settings with your command as shown below:
‘http://username:password@proxy-server-ip:8080’ apt-get install package-name
Conclusion
In the above guide, we learned how to setup proxy in Ubuntu using several methods. I hope you have now enough knowledge to setup proxy on Ubuntu system.
Источник
Linux Proxy Server Settings – Set Proxy For Command Line
To use a proxy on the Linux command-line, you can set the environment variables http_proxy , https_proxy or ftp_proxy , depending on the traffic type.
These proxy server settings are used by the almost all Linux command-line utilities, e.g. ftp , wget , curl , ssh , apt-get , yum and others.
If you don’t know yet which proxy server to use, you can take one from the lists of the free public proxy servers at the end of this article.
Cool Tip: Need to improve security of the Linux system? Encrypt DNS traffic and get the protection from DNS spoofing! Read more →
Export Proxy Server Settings
Set these variables to configure Linux proxy server settings for the command-line tools:
If a proxy server requires authentication, set the proxy variables as follows:
Special Characters: If your password contains special characters, you must replace them with ASCII codes, for example the at sign @ must be replaced by the %40 code, e.g. p@ssword = p%40ssword .
Test The Proxy Server From The Linux Command-Line
First off all it is required to check that the proxy server settings are set in the corresponding proxy variables.
Than it is required to ensure that your public IP address has changed.
Also it would be interesting to measure and compare response time of the remote resources and the Internet speed with and without proxy.
Check the current proxy server settings:
Check your public IP address from the Linux command-line:
Compare the difference in the response time with the configured proxy and without it:
Check the Internet download speed through the proxy:
Unset Linux Proxy Variables
Use the following commands to disable proxy:
Cool Tip: Stay anonymous during port scanning! Use Nmap + Tor + ProxyChains ! Safe and easy penetration testing! Read more →
Automate Proxy Server Settings In Linux
If you use the same proxy server settings for the https , http and ftp traffic, you can use the following commands to set and unset the proxy settings:
If you use a proxy server often, you can create Bash functions as follows (add to your
Now use the setproxy and unsetproxy commands to set and unset Linux proxy server settings.
Lists of Free Public Proxy Servers
WARNING: Free public proxy servers can insert your IP address into the headers of requests or sniff your traffic! Don’t use them to transfer sensitive data and do not expect anonymity!
- Hide My Ass
- Proxy Server List
- Anonymous Public Proxy Servers
- Daily HTTP Proxies
Cool Tip: Even if you use proxy server, all your DNS queries still go to the name servers of your ISP (Internet Service Provider)! Improve anonymity, by using free public name servers! Read more →
Источник
Как настроить прокси в Linux
Прокси-сервер или proxy — в переводе с англ. «представитель» — сервер как комплекс программ в компьютерных сетях, позволяющий клиентам выполнять косвенные запросы к другим сетевым службам. В рамках данного материала прокси понимается сервер выполняющий доступ к глобальной сети интернет.
Проще всего для использования прокси в командной строке, но в зависимости от типа трафика, Вы можете определить переменные окружения http_proxy, https_proxy или ftp_proxy.
Практически все утилиты командой строки, такие как curl, wget, ssh, apt-get, ftp, wget, yum и прочие, используют данные переменные.
Рассмотрим настройку переменных для использования прокси
Используйте следующий синтаксис для настройки таких типов трафика как http, https и ftp из командной строки:
$ export ftp_proxy=»http://proxy-server:port»
$ export http_proxy=»http://proxy-server:port»
$ export https_proxy=»https://proxy-server:port»
Используйте следующий синтаксис, если прокси-сервер требует аутентификацию:
$ export http_proxy=»http://user:pass@proxy-server:port»
$ export https_proxy=»https://user:pass@proxy-server:port»
$ export ftp_proxy=»http://user:pass@proxy-server:port»
Если Ваш пароль содержит спец. символы, Вы должны заменить их на ASCII коды.
Например символ собаки «@», должен быть заменен на «%40» (т. е. p@ss = p%40ss).
Тестирование работы
Используйте следующую команду для проверки текущих переменных прокси:
$ env | grep -i proxy
Можно проверить работу прокси, узнав ваш внешний IP адрес из командной строки:
Источник
Использование HTTP proxy и SOCKS в Linux
В Linux существует много полезных консольных команд, которые при необходимости хотелось бы запустить через proxy. Некоторые приложения имеют встроенную поддержку proxy, а некоторые нет. Далее описано как пользоваться востребованными утилитами через proxy, даже теми, которые этой поддержки не имеют.
curl: передача данных через proxy
curl имеет полноценную поддержку как HTTP proxy так и SOCKS.
Для тестирования возможно использовать proxy сервера из бесплатных списков (socks — sockslist.net, и HTTP proxy — proxyhttp.net). Проверка IP адреса будет производиться с помощью ресурса check-host.net
Часть параметров curl можно записать в файл
С помощью time и curl также можно замерить время отклика сервера:
Результат будет выглядеть так:
wget: закачка файлов через proxy
wget имеет встроенную поддержку proxy. Недостаток лишь в том, что только поддержку HTTP proxy. Для использования совместно с SOCKS рекомендуется использовать соксификатор dante.
Чтобы все время не указывать —proxy-user и —proxy-password можно их прописать в файл
ssh: доступ к серверам
Для доступа к серверам через ssh и proxy также лучше использовать соксификатор dante.
Соксификатор dante
С помощью socksify можно направить через proxy почти любое приложение, не только консольное.
Чтобы все время не вводить данные о proxy можно создать файл /etc/socks.conf
Пример для SOCKS:
Пример для HTTP proxy с авторизацией:
А также экспортировать переменные SOCKS_USERNAME и SOCKS_PASSWORD, если для SOCKS или HTTP proxy требуется авторизация:
DNS запросы через proxy
Часто требуется чтобы и преобразование имен происходило через proxy. Если использовать dante, то запрос на преобразование имен идет и через proxy, и через именной сервер указанный в /etc/resolv.conf . Понять почему же идет два одинаковых запроса вместо одного не удалось. Поэтому можно предложить два варианта:
1) Закомментировать именные сервера в файле /etc/resolv.conf, чтобы преобразование имен шло только через proxy. Это отразится на всей системе.
2) Изменить /etc/resolv.conf и выставить именные сервера необходимой страны, или просто отличные от серверов провайдера. Например установить сервера Google:
Чтобы данные не были перезаписаны именными серверами провайдера (при переподключении), можно запретить обновление списка именных серверов сетевому менеджеру (NetworkManager/wicd) или DHCP-клиенту (спасибо ergil за корректировку).
Или воспользоваться «грубым» методом — запрещением изменения файла /etc/resolv.conf:
Если есть какие-то дополнения, пожалуйста, напишите, это будет полезно узнать и применить.
Источник


