- Permissions
- File Permissions
- chmod
- Directory Permissions
- Becoming the Superuser for a Short While
- Changing File Ownership
- Changing Group Ownership
- Further Reading
- How To Set Readonly File Permissions On Linux / Unix Web Server DocumentRoot
- How to set files in read-only mode
- How to to set directories in read-only mode
- A warning about write permission
- Understanding Linux File Permissions
- Permission Types
- Explicitly Defining Permissions
- Using Binary References to Set permissions
Permissions
The Unix-like operating systems, such as Linux differ from other computing systems in that they are not only multitasking but also multi-user.
What exactly does this mean? It means that more than one user can be operating the computer at the same time. While a desktop or laptop computer only has one keyboard and monitor, it can still be used by more than one user. For example, if the computer is attached to a network, or the Internet, remote users can log in via ssh (secure shell) and operate the computer. In fact, remote users can execute graphical applications and have the output displayed on a remote computer. The X Window system supports this.
The multi-user capability of Unix-like systems is a feature that is deeply ingrained into the design of the operating system. If we remember the environment in which Unix was created, this makes perfect sense. Years ago before computers were «personal,» they were large, expensive, and centralized. A typical university computer system consisted of a large mainframe computer located in some building on campus and terminals were located throughout the campus, each connected to the large central computer. The computer would support many users at the same time.
In order to make this practical, a method had to be devised to protect the users from each other. After all, we wouldn’t want the actions of one user to crash the computer, nor would we allow one user to interfere with the files belonging to another user.
This lesson will cover the following commands:
- chmod — modify file access rights
- su — temporarily become the superuser
- sudo — temporarily become the superuser
- chown — change file ownership
- chgrp — change a file’s group ownership
File Permissions
On a Linux system, each file and directory is assigned access rights for the owner of the file, the members of a group of related users, and everybody else. Rights can be assigned to read a file, to write a file, and to execute a file (i.e., run the file as a program).
To see the permission settings for a file, we can use the ls command. As an example, we will look at the bash program which is located in the /bin directory:
Here we can see:
- The file «/bin/bash» is owned by user «root»
- The superuser has the right to read, write, and execute this file
- The file is owned by the group «root»
- Members of the group «root» can also read and execute this file
- Everybody else can read and execute this file
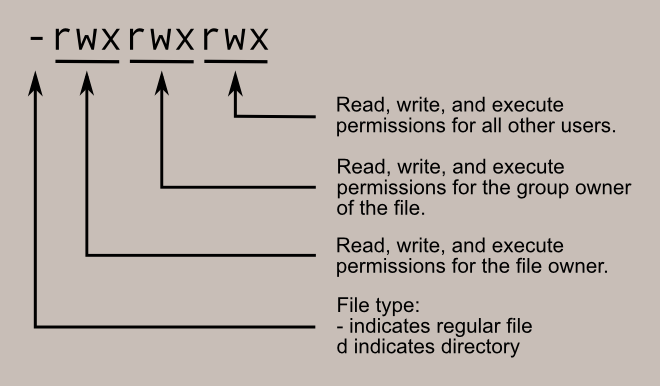
In the diagram below, we see how the first portion of the listing is interpreted. It consists of a character indicating the file type, followed by three sets of three characters that convey the reading, writing and execution permission for the owner, group, and everybody else.
chmod
The chmod command is used to change the permissions of a file or directory. To use it, we specify the desired permission settings and the file or files that we wish to modify. There are two ways to specify the permissions. In this lesson we will focus on one of these, called the octal notation method.
It is easy to think of the permission settings as a series of bits (which is how the computer thinks about them). Here’s how it works:
Now, if we represent each of the three sets of permissions (owner, group, and other) as a single digit, we have a pretty convenient way of expressing the possible permissions settings. For example, if we wanted to set some_file to have read and write permission for the owner, but wanted to keep the file private from others, we would:
Here is a table of numbers that covers all the common settings. The ones beginning with «7» are used with programs (since they enable execution) and the rest are for other kinds of files.
| Value | Meaning |
| 777 | (rwxrwxrwx) No restrictions on permissions. Anybody may do anything. Generally not a desirable setting. |
| 755 | (rwxr-xr-x) The file’s owner may read, write, and execute the file. All others may read and execute the file. This setting is common for programs that are used by all users. |
| 700 | (rwx——) The file’s owner may read, write, and execute the file. Nobody else has any rights. This setting is useful for programs that only the owner may use and must be kept private from others. |
| 666 | (rw-rw-rw-) All users may read and write the file. |
| 644 | (rw-r—r—) The owner may read and write a file, while all others may only read the file. A common setting for data files that everybody may read, but only the owner may change. |
| 600 | (rw——-) The owner may read and write a file. All others have no rights. A common setting for data files that the owner wants to keep private. |
Directory Permissions
The chmod command can also be used to control the access permissions for directories. Again, we can use the octal notation to set permissions, but the meaning of the r, w, and x attributes is different:
- r — Allows the contents of the directory to be listed if the x attribute is also set.
- w — Allows files within the directory to be created, deleted, or renamed if the x attribute is also set.
- x — Allows a directory to be entered (i.e. cd dir ).
Here are some useful settings for directories:
| Value | Meaning |
|---|---|
| 777 | (rwxrwxrwx) No restrictions on permissions. Anybody may list files, create new files in the directory and delete files in the directory. Generally not a good setting. |
| 755 | (rwxr-xr-x) The directory owner has full access. All others may list the directory, but cannot create files nor delete them. This setting is common for directories that you wish to share with other users. |
| 700 | (rwx——) The directory owner has full access. Nobody else has any rights. This setting is useful for directories that only the owner may use and must be kept private from others. |
Becoming the Superuser for a Short While
It is often necessary to become the superuser to perform important system administration tasks, but as we know, we should not stay logged in as the superuser. In most distributions, there is a program that can give you temporary access to the superuser’s privileges. This program is called su (short for substitute user) and can be used in those cases when you need to be the superuser for a small number of tasks. To become the superuser, simply type the su command. You will be prompted for the superuser’s password:
After executing the su command, we have a new shell session as the superuser. To exit the superuser session, type exit and we will return to your previous session.
In most modern distributions, an alternate method is used. Rather than using su , these systems employ the sudo command instead. With sudo , one or more users are granted superuser privileges on an as needed basis. To execute a command as the superuser, the desired command is simply preceded with the sudo command. After the command is entered, the user is prompted for the their own password rather than the superuser’s:
In fact, modern distributions don’t even set the root account password thus making it impossible to log in as the root user. A root shell is still possible with sudo by using the «-i» option:
Changing File Ownership
We can change the owner of a file by using the chown command. Here’s an example: Suppose we wanted to change the owner of some_file from «me» to «you». We could:
Notice that in order to change the owner of a file, we must have superuser privileges. To do this, our example employed the sudo command to execute chown .
chown works the same way on directories as it does on files.
Changing Group Ownership
The group ownership of a file or directory may be changed with chgrp . This command is used like this:
In the example above, we changed the group ownership of some_file from its previous group to «new_group». We must be the owner of the file or directory to perform a chgrp .
Further Reading
- Chapter 9 of The Linux Command Line covers this topic in much more detail.
© 2000-2021, William E. Shotts, Jr. Verbatim copying and distribution of this entire article is permitted in any medium, provided this copyright notice is preserved.
Linux® is a registered trademark of Linus Torvalds.
Источник
How To Set Readonly File Permissions On Linux / Unix Web Server DocumentRoot
How to set files in read-only mode
The syntax is:
## use only for files ##
chmod 0444 /var/www/html/*
chmod 0444 /var/www/html/*.php
How to to set directories in read-only mode
TO set directories in read-only mode, enter:
## use only for dirs ##
chmod 0444 /var/www/html/
chmod 0444 /path/to/your/dir/
# ***************************************************************************
# Say webserver user/group is www-data, and file-owned by ftp-data user/group
# ***************************************************************************
# All files/dirs are read-only
chmod -R 0444 /var/www/html/
# All files/dir owned by ftp-data
chown -R ftp-data:ftp-data /var/www/html/
# All directories and sub-dirs has 0445 permission (so that webserver user www-data can read our files)
find /var/www/html/ -type d -print0 | xargs -0 -I <> chmod 0445 «<>»
To find all files (including sub-directories in /var/www/html) and set read-only permission, enter:
However, you need to set set read-only and execute permission on /var/www/html and all sub-directories so that web server can enter into your DocumentRoot, enter:
A warning about write permission
Please note that write access on a directory /var/www/html/ allows anyone to remove or add new files. In other words, you may need to set a read-only permission for /var/www/html/ directory itself:
In some cases you can change file owner and group to set tight permissions as per your setup:
Источник
Understanding Linux File Permissions
Although there are already a lot of good security features built into Linux-based systems, one very important potential vulnerability can exist when local access is granted – – that is file permission based issues resulting from a user not assigning the correct permissions to files and directories. So based upon the need for proper permissions, I will go over the ways to assign permissions and show you some examples where modification may be necessary.
Basic File Permissions
Permission Groups
Each file and directory has three user based permission groups:
- owner – The Owner permissions apply only the owner of the file or directory, they will not impact the actions of other users.
- group – The Group permissions apply only to the group that has been assigned to the file or directory, they will not effect the actions of other users.
- all users – The All Users permissions apply to all other users on the system, this is the permission group that you want to watch the most.
Permission Types
Each file or directory has three basic permission types:
- read – The Read permission refers to a user’s capability to read the contents of the file.
- write – The Write permissions refer to a user’s capability to write or modify a file or directory.
- execute – The Execute permission affects a user’s capability to execute a file or view the contents of a directory.
Viewing the Permissions
You can view the permissions by checking the file or directory permissions in your favorite GUI File Manager (which I will not cover here) or by reviewing the output of the “ls -l” command while in the terminal and while working in the directory which contains the file or folder.
The permission in the command line is displayed as: _rwxrwxrwx 1 owner:group
- User rights/Permissions
- The first character that I marked with an underscore is the special permission flag that can vary.
- The following set of three characters (rwx) is for the owner permissions.
- The second set of three characters (rwx) is for the Group permissions.
- The third set of three characters (rwx) is for the All Users permissions.
- Following that grouping since the integer/number displays the number of hardlinks to the file.
- The last piece is the Owner and Group assignment formatted as Owner:Group.
Modifying the Permissions
When in the command line, the permissions are edited by using the command chmod. You can assign the permissions explicitly or by using a binary reference as described below.
Explicitly Defining Permissions
To explicity define permissions you will need to reference the Permission Group and Permission Types.
The Permission Groups used are:
The potential Assignment Operators are + (plus) and – (minus); these are used to tell the system whether to add or remove the specific permissions.
The Permission Types that are used are:
- r – Read
- w – Write
- x – Execute
So for an example, lets say I have a file named file1 that currently has the permissions set to _rw_rw_rw, which means that the owner, group and all users have read and write permission. Now we want to remove the read and write permissions from the all users group.
To make this modification you would invoke the command: chmod a-rw file1
To add the permissions above you would invoke the command: chmod a+rw file1
As you can see, if you want to grant those permissions you would change the minus character to a plus to add those permissions.
Using Binary References to Set permissions
Now that you understand the permissions groups and types this one should feel natural. To set the permission using binary references you must first understand that the input is done by entering three integers/numbers.
A sample permission string would be chmod 640 file1, which means that the owner has read and write permissions, the group has read permissions, and all other user have no rights to the file.
The first number represents the Owner permission; the second represents the Group permissions; and the last number represents the permissions for all other users. The numbers are a binary representation of the rwx string.
You add the numbers to get the integer/number representing the permissions you wish to set. You will need to include the binary permissions for each of the three permission groups.
So to set a file to permissions on file1 to read _rwxr_____, you would enter chmod 740 file1.
Owners and Groups
I have made several references to Owners and Groups above, but have not yet told you how to assign or change the Owner and Group assigned to a file or directory.
You use the chown command to change owner and group assignments, the syntax is simplechown owner:group filename, so to change the owner of file1 to user1 and the group to family you would enter chown user1:family file1.
Advanced Permissions
The special permissions flag can be marked with any of the following:
- _ – no special permissions
- d – directory
- l– The file or directory is a symbolic link
- s – This indicated the setuid/setgid permissions. This is not set displayed in the special permission part of the permissions display, but is represented as a s in the read portion of the owner or group permissions.
- t – This indicates the sticky bit permissions. This is not set displayed in the special permission part of the permissions display, but is represented as a t in the executable portion of the all users permissions
Setuid/Setgid Special Permissions
The setuid/setguid permissions are used to tell the system to run an executable as the owner with the owner’s permissions.
Be careful using setuid/setgid bits in permissions. If you incorrectly assign permissions to a file owned by root with the setuid/setgid bit set, then you can open your system to intrusion.
You can only assign the setuid/setgid bit by explicitly defining permissions. The character for the setuid/setguid bit is s.
So do set the setuid/setguid bit on file2.sh you would issue the command chmod g+s file2.sh.
Sticky Bit Special Permissions
The sticky bit can be very useful in shared environment because when it has been assigned to the permissions on a directory it sets it so only file owner can rename or delete the said file.
You can only assign the sticky bit by explicitly defining permissions. The character for the sticky bit is t.
To set the sticky bit on a directory named dir1 you would issue the command chmod +t dir1.
To some users of Mac- or Windows-based computers you don’t think about permissions, but those environments don’t focus so aggressively on user based rights on files unless you are in a corporate environment. But now you are running a Linux-based system and permission based security is simplified and can be easily used to restrict access as you please.
So I will show you some documents and folders that you want to focus on and show you how the optimal permissions should be set.
- home directories– The users’ home directories are important because you do not want other users to be able to view and modify the files in another user’s documents of desktop. To remedy this you will want the directory to have the drwx______ (700) permissions, so lets say we want to enforce the correct permissions on the user user1’s home directory that can be done by issuing the command chmod 700 /home/user1.
- bootloader configuration files– If you decide to implement password to boot specific operating systems then you will want to remove read and write permissions from the configuration file from all users but root. To do you can change the permissions of the file to 700.
- system and daemon configuration files– It is very important to restrict rights to system and daemon configuration files to restrict users from editing the contents, it may not be advisable to restrict read permissions, but restricting write permissions is a must. In these cases it may be best to modify the rights to 644.
- firewall scripts – It may not always be necessary to block all users from reading the firewall file, but it is advisable to restrict the users from writing to the file. In this case the firewall script is run by the root user automatically on boot, so all other users need no rights, so you can assign the 700 permissions.
Other examples can be given, but this article is already very lengthy, so if you want to share other examples of needed restrictions please do so in the comments.
If you have anything to add or want to make a comment or correction please do so in the comments. I look forward to your feedback and wish you the best in your future with Linux-based systems.
Источник


