- Understanding Linux File Permissions
- Permission Types
- Explicitly Defining Permissions
- Using Binary References to Set permissions
- Linux File Permission Tutorial: How to Check and Change Permissions
- How to View Check Permissions in Linux
- Check Permissions using GUI
- Check Permissions in Command-Line with Ls Command
- Using Chmod Command to Change File Permissions
- Define File Permission with Symbolic Mode
- Define File Permission in Octal/Numeric Mode
- Changing User File and Group Ownership
Understanding Linux File Permissions
Although there are already a lot of good security features built into Linux-based systems, one very important potential vulnerability can exist when local access is granted – – that is file permission based issues resulting from a user not assigning the correct permissions to files and directories. So based upon the need for proper permissions, I will go over the ways to assign permissions and show you some examples where modification may be necessary.
Basic File Permissions
Permission Groups
Each file and directory has three user based permission groups:
- owner – The Owner permissions apply only the owner of the file or directory, they will not impact the actions of other users.
- group – The Group permissions apply only to the group that has been assigned to the file or directory, they will not effect the actions of other users.
- all users – The All Users permissions apply to all other users on the system, this is the permission group that you want to watch the most.
Permission Types
Each file or directory has three basic permission types:
- read – The Read permission refers to a user’s capability to read the contents of the file.
- write – The Write permissions refer to a user’s capability to write or modify a file or directory.
- execute – The Execute permission affects a user’s capability to execute a file or view the contents of a directory.
Viewing the Permissions
You can view the permissions by checking the file or directory permissions in your favorite GUI File Manager (which I will not cover here) or by reviewing the output of the “ls -l” command while in the terminal and while working in the directory which contains the file or folder.
The permission in the command line is displayed as: _rwxrwxrwx 1 owner:group
- User rights/Permissions
- The first character that I marked with an underscore is the special permission flag that can vary.
- The following set of three characters (rwx) is for the owner permissions.
- The second set of three characters (rwx) is for the Group permissions.
- The third set of three characters (rwx) is for the All Users permissions.
- Following that grouping since the integer/number displays the number of hardlinks to the file.
- The last piece is the Owner and Group assignment formatted as Owner:Group.
Modifying the Permissions
When in the command line, the permissions are edited by using the command chmod. You can assign the permissions explicitly or by using a binary reference as described below.
Explicitly Defining Permissions
To explicity define permissions you will need to reference the Permission Group and Permission Types.
The Permission Groups used are:
The potential Assignment Operators are + (plus) and – (minus); these are used to tell the system whether to add or remove the specific permissions.
The Permission Types that are used are:
- r – Read
- w – Write
- x – Execute
So for an example, lets say I have a file named file1 that currently has the permissions set to _rw_rw_rw, which means that the owner, group and all users have read and write permission. Now we want to remove the read and write permissions from the all users group.
To make this modification you would invoke the command: chmod a-rw file1
To add the permissions above you would invoke the command: chmod a+rw file1
As you can see, if you want to grant those permissions you would change the minus character to a plus to add those permissions.
Using Binary References to Set permissions
Now that you understand the permissions groups and types this one should feel natural. To set the permission using binary references you must first understand that the input is done by entering three integers/numbers.
A sample permission string would be chmod 640 file1, which means that the owner has read and write permissions, the group has read permissions, and all other user have no rights to the file.
The first number represents the Owner permission; the second represents the Group permissions; and the last number represents the permissions for all other users. The numbers are a binary representation of the rwx string.
You add the numbers to get the integer/number representing the permissions you wish to set. You will need to include the binary permissions for each of the three permission groups.
So to set a file to permissions on file1 to read _rwxr_____, you would enter chmod 740 file1.
Owners and Groups
I have made several references to Owners and Groups above, but have not yet told you how to assign or change the Owner and Group assigned to a file or directory.
You use the chown command to change owner and group assignments, the syntax is simplechown owner:group filename, so to change the owner of file1 to user1 and the group to family you would enter chown user1:family file1.
Advanced Permissions
The special permissions flag can be marked with any of the following:
- _ – no special permissions
- d – directory
- l– The file or directory is a symbolic link
- s – This indicated the setuid/setgid permissions. This is not set displayed in the special permission part of the permissions display, but is represented as a s in the read portion of the owner or group permissions.
- t – This indicates the sticky bit permissions. This is not set displayed in the special permission part of the permissions display, but is represented as a t in the executable portion of the all users permissions
Setuid/Setgid Special Permissions
The setuid/setguid permissions are used to tell the system to run an executable as the owner with the owner’s permissions.
Be careful using setuid/setgid bits in permissions. If you incorrectly assign permissions to a file owned by root with the setuid/setgid bit set, then you can open your system to intrusion.
You can only assign the setuid/setgid bit by explicitly defining permissions. The character for the setuid/setguid bit is s.
So do set the setuid/setguid bit on file2.sh you would issue the command chmod g+s file2.sh.
Sticky Bit Special Permissions
The sticky bit can be very useful in shared environment because when it has been assigned to the permissions on a directory it sets it so only file owner can rename or delete the said file.
You can only assign the sticky bit by explicitly defining permissions. The character for the sticky bit is t.
To set the sticky bit on a directory named dir1 you would issue the command chmod +t dir1.
To some users of Mac- or Windows-based computers you don’t think about permissions, but those environments don’t focus so aggressively on user based rights on files unless you are in a corporate environment. But now you are running a Linux-based system and permission based security is simplified and can be easily used to restrict access as you please.
So I will show you some documents and folders that you want to focus on and show you how the optimal permissions should be set.
- home directories– The users’ home directories are important because you do not want other users to be able to view and modify the files in another user’s documents of desktop. To remedy this you will want the directory to have the drwx______ (700) permissions, so lets say we want to enforce the correct permissions on the user user1’s home directory that can be done by issuing the command chmod 700 /home/user1.
- bootloader configuration files– If you decide to implement password to boot specific operating systems then you will want to remove read and write permissions from the configuration file from all users but root. To do you can change the permissions of the file to 700.
- system and daemon configuration files– It is very important to restrict rights to system and daemon configuration files to restrict users from editing the contents, it may not be advisable to restrict read permissions, but restricting write permissions is a must. In these cases it may be best to modify the rights to 644.
- firewall scripts – It may not always be necessary to block all users from reading the firewall file, but it is advisable to restrict the users from writing to the file. In this case the firewall script is run by the root user automatically on boot, so all other users need no rights, so you can assign the 700 permissions.
Other examples can be given, but this article is already very lengthy, so if you want to share other examples of needed restrictions please do so in the comments.
If you have anything to add or want to make a comment or correction please do so in the comments. I look forward to your feedback and wish you the best in your future with Linux-based systems.
Источник
Linux File Permission Tutorial: How to Check and Change Permissions
Home » SysAdmin » Linux File Permission Tutorial: How to Check and Change Permissions
Linux, like other Unix-like operating systems, allows multiple users to work on the same server simultaneously without disrupting each other.
Individuals sharing access to files pose a risk exposing classified information or even data loss if other users access their files or directories. To address this, Unix added the file permission feature to specify how much power each user has over a given file or directory.
In this tutorial, you will learn how to view and change file permissions in Linux.

How to View Check Permissions in Linux
To start with file permissions, you have to find the current Linux permission settings. There are two options to choose from, depending on your personal preference: checking through the graphical interface or using the command.
Check Permissions using GUI
Finding the file (directory) permission via the graphical user interface is simple.
1. Locate the file you want to examine, right-click on the icon, and select Properties.
2. This opens a new window initially showing Basic information about the file.
Navigate to the second tab in the window, labeled Permissions.

3. There, you’ll see that the permission for each file differs according to three categories:
- Owner (the user who created the file/directory)
- Group (to which the owner belongs to)
- Others (all other users)
For each file, the owner can grant or restrict access to users according to the categories they fall in.
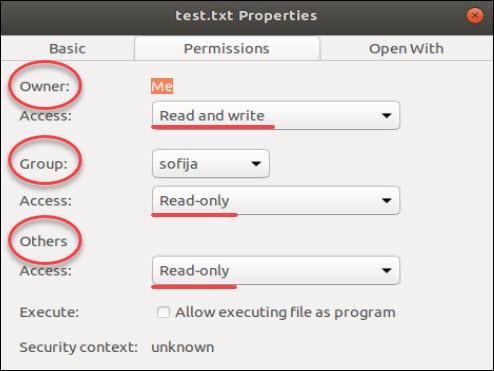
In our example, the owner of the file test.txt has access to “Read and write”, while other members of its group, as well as all other users, have “Read-only” access. Therefore, they can only open the file, but cannot make any modifications.
To alter the file configuration, the user can open the drop-down menu for each category and select the desired permission.
Additionally, you can make the file executable, allowing it to run as a program, by checking the Execute box.
Check Permissions in Command-Line with Ls Command
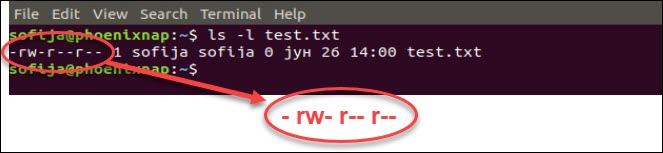
If you prefer using the command line, you can easily find a file’s permission settings with the ls command, used to list information about files/directories. You can also add the –l option to the command to see the information in the long list format.
To check the permission configuration of a file, use the command:
For instance, the command for the previously mentioned file would be:

As seen in the image above, the output provides the following information:
- file permission
- the owner (creator) of the file
- the group to which that owner belongs to
- the date of creation.
It shows the permission settings, grouped in a string of characters (-, r, w, x) classified into four sections:
- File type. There are three possibilities for the type. It can either be a regular file (–), a directory (d) or a link (i).
- File permission of the user (owner)
- File permission of the owner’s group
- File permission of other users
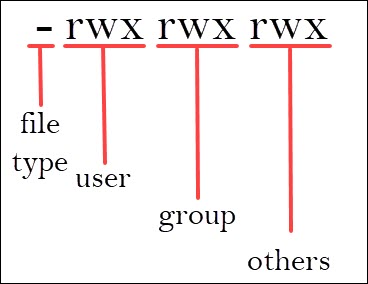
The characters r, w, and x stand for read, write, and execute.
The categories can have all three privileges, just specific ones, or none at all (represented by –, for denied).
Users that have reading permission can see the content of a file (or files in a directory). However, they cannot modify it (nor add/remove files in a directory). On the other hand, those who have writing privileges can edit (add and remove) files. Finally, being able to execute means the user can run the file. This option is mainly used for running scripts.
In the previous example, the output showed that test.txt is a regular file with read and write permission assigned to the owner, but gives read-only access to the group and others.
Using Chmod Command to Change File Permissions
As all Linux users, you will at some point need to modify the permission settings of a file/directory. The command that executes such tasks is the chmod command.
The basic syntax is:
There are two ways to define permission:
- using symbols (alphanumerical characters)
- using the octal notation method
Define File Permission with Symbolic Mode
To specify permission settings using alphanumerical characters, you’ll need to define accessibility for the user/owner (u), group (g), and others (o).
Type the initial letter for each class, followed by the equal sign (=) and the first letter of the read (r), write (w) and/or execute (x) privileges.
To set a file, so it is public for reading, writing, and executing, the command is:
To set permission as in the previously mentioned test.txt to be:
• read and write for the user
• read for the members of the group
• read for other users
Use the following command:
Note: There is no space between the categories; we only use commas to separate them.
Another way to specify permission is by using the octal/numeric format. This option is faster, as it requires less typing, although it is not as straightforward as the previous method.
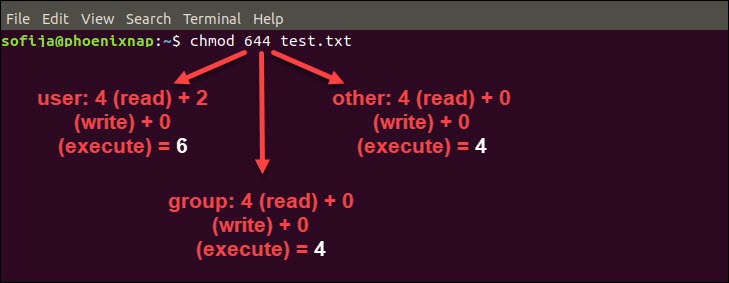
Instead of letters, the octal format represents privileges with numbers:
- r(ead) has the value of 4
- w(rite) has the value of 2
- (e)x(ecute) has the value of 1
- no permission has the value of 0
The privileges are summed up and depicted by one number. Therefore, the possibilities are:
- 7 – for read, write, and execute permission
- 6 – for read and write privileges
- 5 – for read and execute privileges
- 4 – for read privileges
As you have to define permission for each category (user, group, owner), the command will include three (3) numbers (each representing the summation of privileges).
For instance, let’s look at the test.txt file that we symbolically configured with the chmod u=rw,g=r,o=r test.txt command.
The same permission settings can be defined using the octal format with the command:
Define File Permission in Octal/Numeric Mode
Note: If you need a more in-depth guide on how to use Chmod In Linux to change file permissions recursively, read our Chmod Recursive guide.
Changing User File and Group Ownership
Aside from changing file permissions, you may come across a situation that requires changing the user file ownership or even group ownership.
Performing either of these tasks requires you first need to switch to superuser privileges. Use one of the options outlined in the previous passage.
To change the file ownership use the chown command:
Instead of [user_name] type in the name of the user who will be the new owner of the file.
To change the group ownership type in the following command:
Instead of [group_name] type in the name of the group that will be the new owner of the file.
Learning how to check and change permissions of Linux files and directories are basic commands all users should master. To change file’s group permissions, you might find helpful our article on how to use the chgrp command.
No matter whether you prefer using the GUI or command-line, this article should help you better understand how to use file permissions.
Источник


