- ИТ База знаний
- Полезно
- Навигация
- Серверные решения
- Телефония
- Корпоративные сети
- Установка VirtualBox 6.0 на Linux
- Про Linux за 5 минут?
- Что нового в VirtualBox 6.0
- Установка VirtualBox 6.0 в Red Hat Enterprise Linux, CentOS и Fedora
- Полезно?
- Почему?
- RHEL 8 VirtualBox Quick Install
- Overview
- Before you begin
- Create the VM
- Optional VM configuration:
- Networking
- Improved Network Performance with virtio (Windows and Linux hosts only)
- Copy and Paste
- Installation
- 1. Boot the RHEL 8 installer
- 2. Select software to be installed
- 3. Choose disks/partitions for installation
- 4. Disable kdump to save memory
- 5. Configure and enable the network connection
- 6. Begin the installation
- 7. Create your user ID and set the root password,
- 8. Reboot and eject installation media
- System registration
- First Boot
- System Registration During First Boot
- System Registration from the command line
- Install updates
- Updating from the command line
- Cockpit Web console
- Enabling the Cockpit Web Console
- Using the Cockpit web console
- VirtualBox Guest Additions
- Coding time
ИТ База знаний
Курс по Asterisk
Полезно
— Узнать IP — адрес компьютера в интернете
— Онлайн генератор устойчивых паролей
— Онлайн калькулятор подсетей
— Калькулятор инсталляции IP — АТС Asterisk
— Руководство администратора FreePBX на русском языке
— Руководство администратора Cisco UCM/CME на русском языке
— Руководство администратора по Linux/Unix
Навигация
Серверные решения
Телефония
FreePBX и Asterisk
Настройка программных телефонов
Корпоративные сети
Протоколы и стандарты
Установка VirtualBox 6.0 на Linux
VirtualBox — это кроссплатформенное программное обеспечение для виртуализации с открытым исходным кодом, которое может быть установлено в любой операционной системе и позволяет устанавливать и запускать несколько гостевых операционных систем на одном компьютере.
Мини — курс по виртуализации
Знакомство с VMware vSphere 7 и технологией виртуализации в авторском мини — курсе от Михаила Якобсена

Например, если вы установите его в своей системе Linux, вы можете запустить операционную систему Windows XP в качестве гостевой ОС или запустить ОС Linux в вашей системе Windows и так далее. Таким образом, вы можете установить и запустить столько гостевых операционных систем, сколько вам нужно, единственным ограничением является дисковое пространство и память.
Недавно Oracle выпустила последнюю стабильную версию Virtualbox 6.0.0,и новейшая версия Virtual Box включает в себя много значительных изменений и новые функции.

Про Linux за 5 минут?

Что нового в VirtualBox 6.0
- Добавлена поддержка экспорта виртуальной машины в Oracle Cloud Infrastructure;
- Значительно улучшена поддержка HiDPI и масштабирования, а также улучшенное обнаружение и конфигурация для каждой машины;
- Большая доработка пользовательского интерфейса с легкой и простой настройкой виртуальных машин;
- Новый файловый менеджер позволяет пользователю управлять гостевой файловой системой и копировать файлы между хостом и гостем;
- Основное обновление эмуляции устройств с трехмерной графикой для гостей Linux;
- Утилита vboximg-mount для хостов позволяет пользователям получать доступ к содержимому гостевых дисков на хосте;
- Добавлена поддержка использования Hyper-V на хосте Windows;
Вы можете посмотреть подробности о VirtualBox 6.0 на их официальной странице журнала изменений.
В этом руководстве объясняется, как установить VirtualBox 6.0 в системах RHEL, CentOS и Fedora, используя собственный репозиторий VirtualBox с инструментами YUM и DNF (для выпусков Fedora 22+).
Также в этом руководстве объясняется, как установить VirtualBox 6.0 в системах Debian, Ubuntu и Linux Mint, используя собственный репозиторий VirtualBox с помощью команды APT-GET или APT.
Установка VirtualBox 6.0 в Red Hat Enterprise Linux, CentOS и Fedora
Если у вас установлена более ранняя версия Virtualbox, удалите ее перед установкой последней версии.
Добавление VirtualBox Repository
Затем добавьте собственный репозиторий VirtualBox для установки последней версии VirtualBox 6.0 в следующих системах.
Для RHEL/CentOS 7/6
Для RHEL/CentOS 5
Для For Fedora 24-29
Установка пакеты зависимостей для VirtualBox
VirtualBox использует модуль ядра vboxdrv для управления и выделения физической памяти для гостевых операционных систем. Без этого модуля вы все еще можете использовать VirtualBox для создания и настройки виртуальных машин, но они не будут работать.
Итак, чтобы сделать VirtualBox полностью функциональным, вам нужно сначала обновить вашу систему, а затем установить некоторые дополнительные модули, такие как DKMS, kernel-headers и kernel-devel, а также некоторые пакеты зависимостей.
Установка VirtualBox 6.0
После того, как вы установили все необходимые пакеты зависимостей, вы можете установить последнюю версию VirtualBox, используя следующую команду.
Перестройте модули ядра для VirtualBox 6.0
Приведенная ниже команда автоматически создаст группу и пользователя vboxusers, а также найдет и автоматически перестроит необходимые модули ядра.
Для Fedora 22+ и CentOS/RHEL 7
Для Fedora 18-16 и CentOS/RHEL 6/5
Если вышеуказанный процесс сборки завершится неудачно, вы получите предупреждающие сообщения, подобные приведенным ниже.
В этом случае вам нужно сначала проверить ваше установленное ядро, а затем установить нужные kernel-devel, используя следующие команды.
Внимание: в команде CURRENT_KERNEL нужно заменить на то, что вы получите, выполнив команды uname -r
Затем замените user_name в следующей команде вашим собственным именем пользователя.
Если вы получили какое-либо сообщение об ошибке, например, KERN_DIR, или если ваш исходный каталог ядра не был автоматически обнаружен процессом сборки, вы можете установить его с помощью следующей команды. Убедитесь, что вы изменили версию ядра в соответствии с вашей системой, как показано ниже.
Установка VirtualBox 6.0 в Debian, Ubuntu и Linux Mint
Сначала удалите любую более раннюю версию Virtualbox, если таковая имеется.
Затем установите последнюю версию VirtualBox 6.0, используя официальный репозиторий Virtualbox. Чтобы добавить репозиторий, используйте следующую команду, как показано ниже.
Запуск VirtualBox 6.0
Просто выполните следующую команду, чтобы запустить ее из терминала, или используйте панель запуска из меню для запуска VirtualBox.
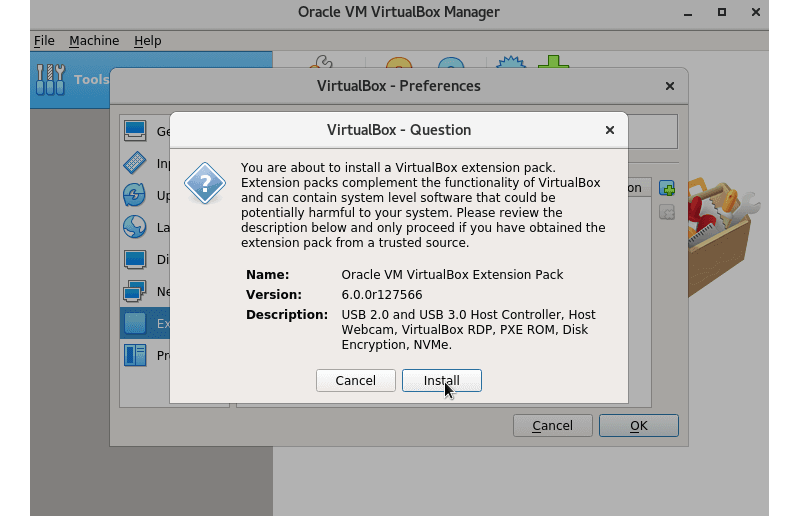
Установка пакета расширений VirtualBox
Если вам нужны дополнительные функции, такие как VirtualBox RDP, PXE, ROM с поддержкой E1000 и хост-контроллером USB 2.0 и т. Д. Вам необходимо загрузить и установить пакет расширений VirtualBox с помощью следующей команды wget.
Чтобы установить пакет расширений, после того, как вы загрузили vbox-extpack, откройте его при помощи Virtualbox, как показано ниже.
Если это не сработает, откройте Virtaulbox — «Настройки» — «Расширения» и найдите vbox-extpack для его установки.
Обновление VirtualBox
Если вы хотите обновить VirtualBox до последней версии в будущем, вы можете просто запустить следующую команду, чтобы обновить его.
На Ubuntu/Linux Mint
Удаление VirtualBox
Если вы хотите полностью удалить VirtualBox, просто используйте следующую команду, чтобы полностью удалить его из вашей системы.
На Ubuntu/Linux Mint
Вы также можете скачать VirtualBox 6.0 для других платформ Linux, Windows и Mac OS X с официального сайта.
Мини — курс по виртуализации
Знакомство с VMware vSphere 7 и технологией виртуализации в авторском мини — курсе от Михаила Якобсена
Полезно?
Почему?
😪 Мы тщательно прорабатываем каждый фидбек и отвечаем по итогам анализа. Напишите, пожалуйста, как мы сможем улучшить эту статью.
😍 Полезные IT – статьи от экспертов раз в неделю у вас в почте. Укажите свою дату рождения и мы не забудем поздравить вас.
Источник
RHEL 8 VirtualBox Quick Install

Overview
This overview covers the key steps for installing Red Hat Enterprise Linux 8 so you can get started with software development.
This tutorial does not replace the Red Hat Enterprise Linux 8 Installation Guide. Instead, this tutorial provides an overview of the key steps for software developers. For detailed instructions, see the RHEL 8 documentation.
You’ll install a system with a full graphical desktop that you can use for exploring RHEL 8. Unlike prior versions of RHEL 8, there are no separate downloads for server, workstation, or desktop.
Before you begin
To follow the steps in this guide you will need:
- A no-cost Red Hat Developer subscription and the RHEL 8 Binary DVD .iso file. When you register and download through developers.redhat.com, a subscription will be automatically added to your account.
- Your Red Hat username and password. Your account was created during step one. You will need this to register the system attach it to your subscription. Completing these steps are required for your system to download software from Red Hat.
- A system that meets the following requirements:
- A 64-bit x86 machine with with hardware virtualization assistance (Intel VT-X or AMD-V).
- At least 4 GB of RAM.
- At least 28 GB of available disk space for the VM and the .iso file.
- Has VirtualBox installed.
- Hardware virtualization needs to be enabled in the BIOS/UEFI setup for your system.
- On Windows it may be necessary to disable Hyper-V in order to avoid conflicts with VirtualBox.
Create the VM
In VirtualBox, create a new VM with the following criteria::
- 2 GB of RAM at a minimum. 4 GB or larger is recommended.
- A 20 GB or larger virtual disk.
- 2 or more Virtual CPUs are recommended.
Configure the VM to boot from the RHEL 8 Binary DVD .iso file that you downloaded earlier. In the VM’s settings, under Storage, select the optical drive under the IDE controller. Then, use the CD icon drop down menu on the right to select Choose Virtual Optical Disk File.
Optional VM configuration:
Networking
The default networking choice NAT is the easiest to use, but you will not be able to access services such as ssh or http running on the RHEL VM from the host or the network. However, you can define port forwards in the Advanced section under the network adapter configuration to provide access.
For example, in order to use ssh, define a port forward from Host Port 2222 to Guest Port 22. This will allow you to use ssh on the host machine by using port 2222:
Alternatively, you can attach the VM to directly network by sharing the network adapter from the host system as a bridged network adapter. In this configuration, the VM gets its own IP address, usually using your network’s DHCP server. The VM appears on the network the same way a physical computer would with its own hardware MAC address. The host’s network adapter is shared by a device driver that is installed by VirtualBox. The VM’s virtual network adapter can only be bridged to one physical network adapter at a time. If your system has more than one network adapter you need to choose which one to attach to. If your system switches between wired and wireless connections, you will need to switch the adapter that the VM is bridged to when changing between wired and wireless.
Improved Network Performance with virtio (Windows and Linux hosts only)
For improved VM network performance on Windows and Linux hosts, in the VM’s settings under Network Adapter Type select Paravirtualized Network (virtio-net). The paravirtualized adapter removes much of the overhead of emulating a hardware network adapter.
Copy and Paste
In the VM settings General, on the Advanced tab, set Shared clipboard and Drag’n’Drop to Bidirectional. Copy and paste requires VirtualBox Guest Additions to be installed. After the RHEL VM is fully installed and has been registered, you can install the kernel packages that are required to install VirtualBox Guest Additions.
Tip: to copy and paste before you have setup VirtualBox Guest Additions, use ssh from a Terminal Window on the host. You’ll be able to copy and paste text to and from the Terminal window.
Installation
Now you are ready to run the RHEL 8 installer.
TL;DR The installation steps are:
- Select software to be installed. Choose the Workstation base environment, add Development Tools, Graphical Administration Tools, and Container tools. Note: Do not select Server with a GUI.
- Choose the disks/partitions to use for installation.
- Disable kdump to save memory.
- Configure and enable the network connection so that networking starts at boot. Optionally set the host name.
- Set the root password
- Create your regular user ID and make your ID an administrator so you can use sudo .
1. Boot the RHEL 8 installer
Boot your system using the bootable installation media containing the RHEL 8 Binary DVD .iso:

Note: During boot, you can skip the media checking step by hitting the Esc key
On the following screens, select your preferred language and keyboard layout to use during installation.
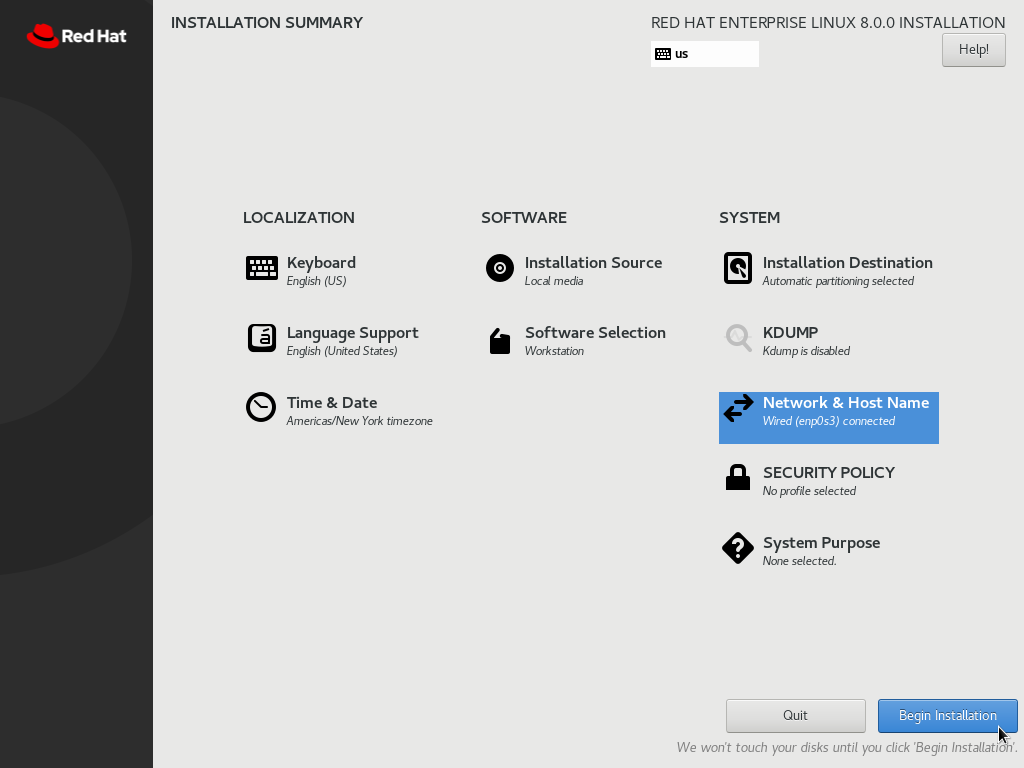
You should now see the main screen for configuring your installation:
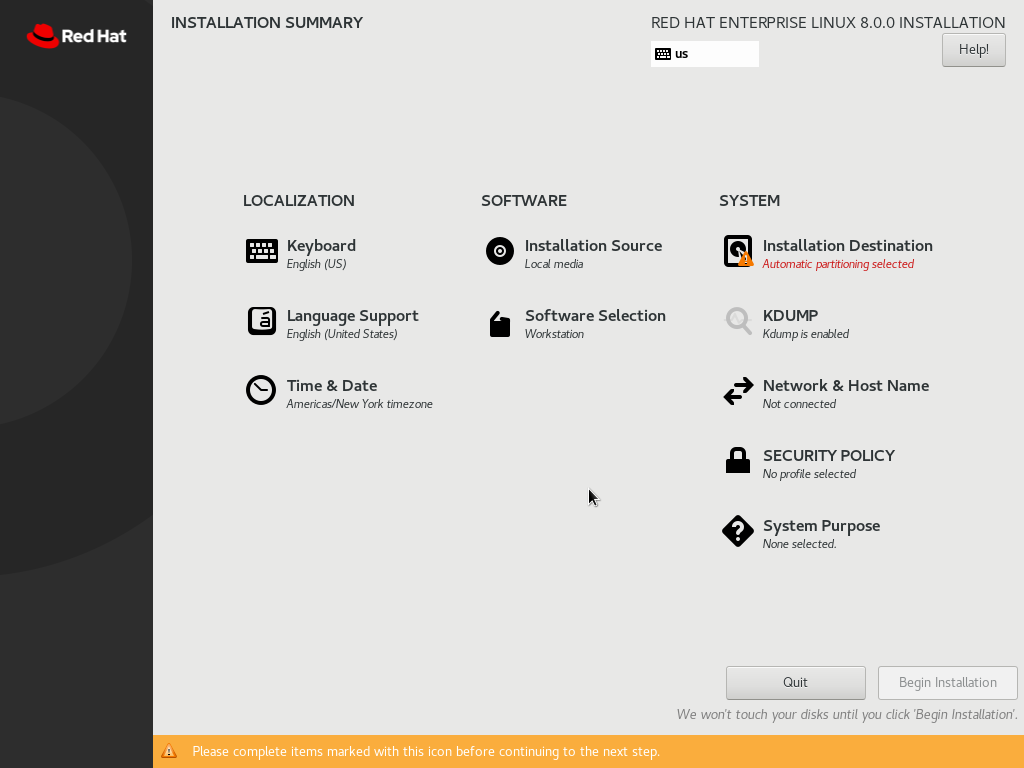
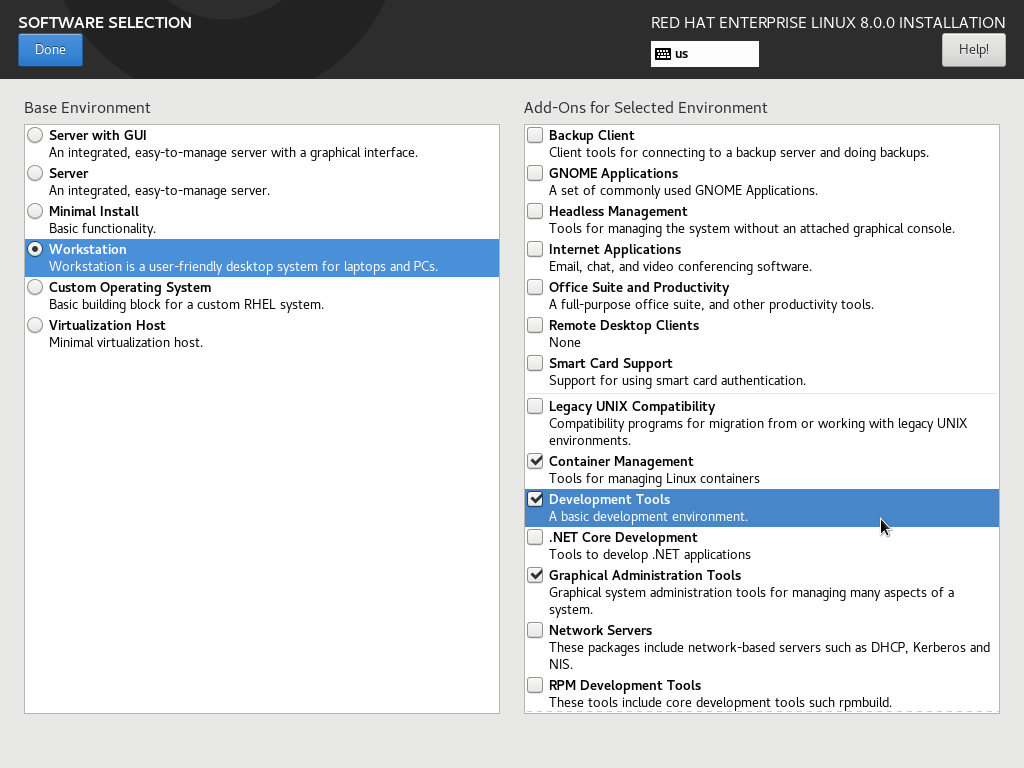
2. Select software to be installed
Click Software Selection under SOFTWARE. We recommend that you:
- Choose Workstation on the left under Base Environment
- Then, choose Container Management, Development Tools, and Graphical Admin Tools.
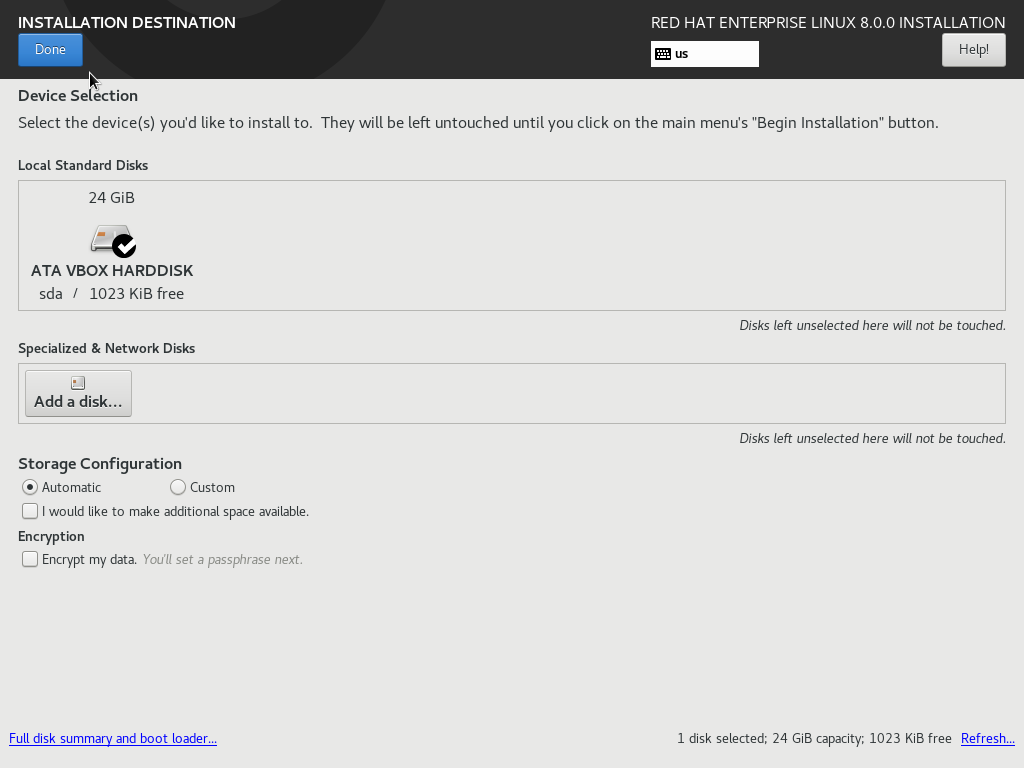
3. Choose disks/partitions for installation
Click Installation Destination under SYSTEM. Choose the disks/partitions to use for installing RHEL. See the Red Hat Enterprise Linux 8 Installation Guide for more information.
Note: if your system only has one disk and you are using the whole disk for the installation, just click Done
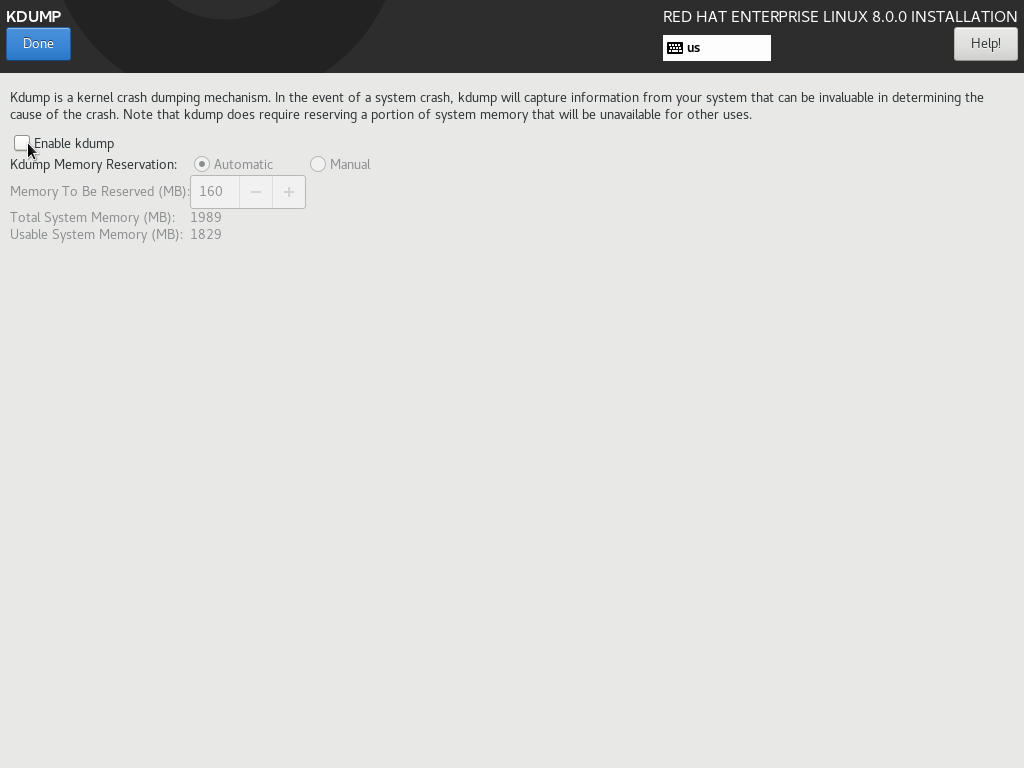
4. Disable kdump to save memory
Next, To save memory turn off kdump by clicking Kdump under SYSTEM. Then, uncheck Enable Kdump.
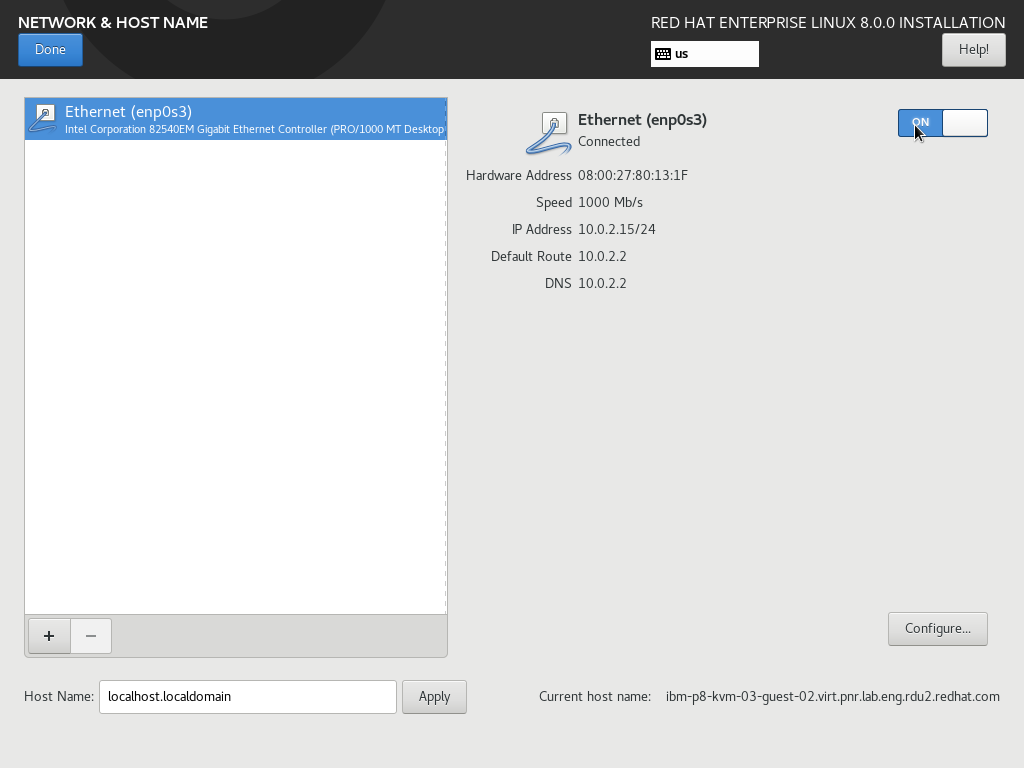
5. Configure and enable the network connection
Next, configure the Network and optionally set the host name. Click Network & Host Name under SYSTEM. Then:
- Select your network adapter from the list. if you need to change any network settings click Configure… .
- Turn the adapter on by clicking the toggle to the right of the OFF button in the upper right corner.
- Optionally, you can set the system’s host name on the lower left.
Note: If you do not enable the network adapter here, you will not have network connectivity when you boot the system.
6. Begin the installation
When you are satisfied with your configuration, click Begin Installation.
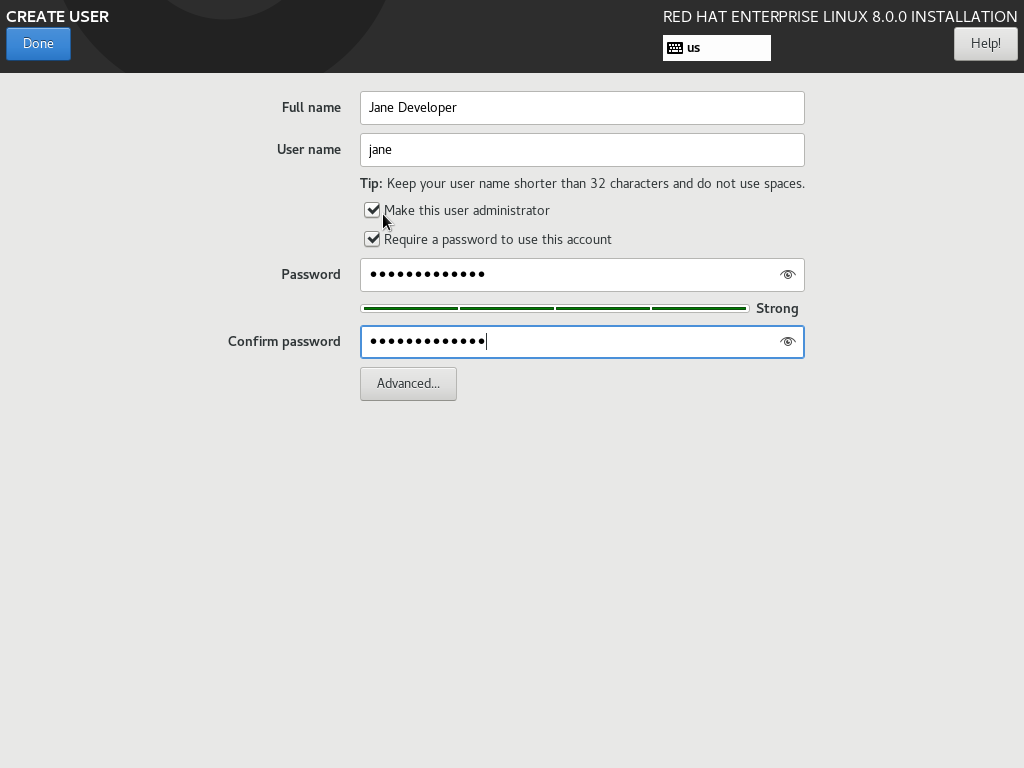
7. Create your user ID and set the root password,
While the installation is proceeding, click Root Password to set the root (Administrator) password.
Next, create the regular user ID that you will use to log into the system by clicking User Creation.
Important note: Select Make this user administrator. This will enable sudo for your user ID.
8. Reboot and eject installation media
When installation is complete, click Reboot in the lower right corner.
Important note: While your system is rebooting, don’t forget to eject the installation media so that you don’t inadvertently reboot into the RHEL 8 installer again
If you have a machine (or VM) that reboots too quickly to eject the installation media, you can try:
- Change the boot order in the BIOS
- Shutdown the system and then restart the system to. Eject the media during POST, or use the appropriate key for your BIOS (such F12, F10, Enter) to select a boot device.
- On VirtualBox, select Devices from the VM’s window menu, then select Optical Drives ->Remove disc from virtual drive to eject the installation ISO. If the system has already booted into the installer, you will need to click Force Unmount. Then reset the VM, either through the Machine menu, or using the keyboard shortcut Right CTRL + R (Windows/Linux) or Left Command + R (Mac). The VM should then boot from the virtual hard disk.
- On Hyper-V, select Media from the VM’s menu. Then select Eject for the RHEL 8 DVD.
System registration
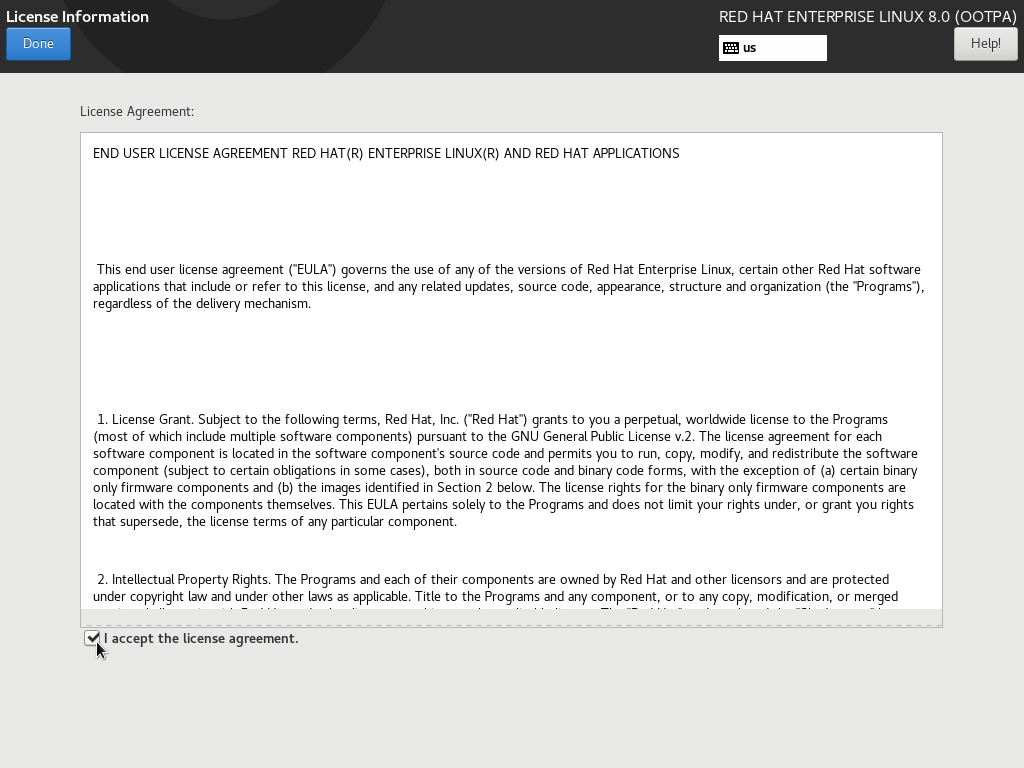
First Boot
When the system reboots, click License Information to accept the license agreement. On the License Information screen, Click I accept the license agreement under the text of the license.
System Registration During First Boot
Your system needs to be registered to download software and updates from Red Hat. When you joined Red Hat Developers, a no-cost developer subscription was added to your account. Registering your system attaches it to your subscription.
If you configured and started the network connection during installation, you can register the system now using the graphical interface. If you didn’t activate your network connection, follow the instructions below to register with the subscription-manager CLI.
To register your system, click Subscription Manager. On the next screen, if you need to configure a proxy click Configure Proxy, otherwise click Next.
On the following screen, enter your Red Hat username and password. When you joined Red Hat Developers, a Red Hat account was created for you. This the login that you use for Red Hat sites such as the Red Hat Customer Portal, access.redhat.com. Then, click Register.
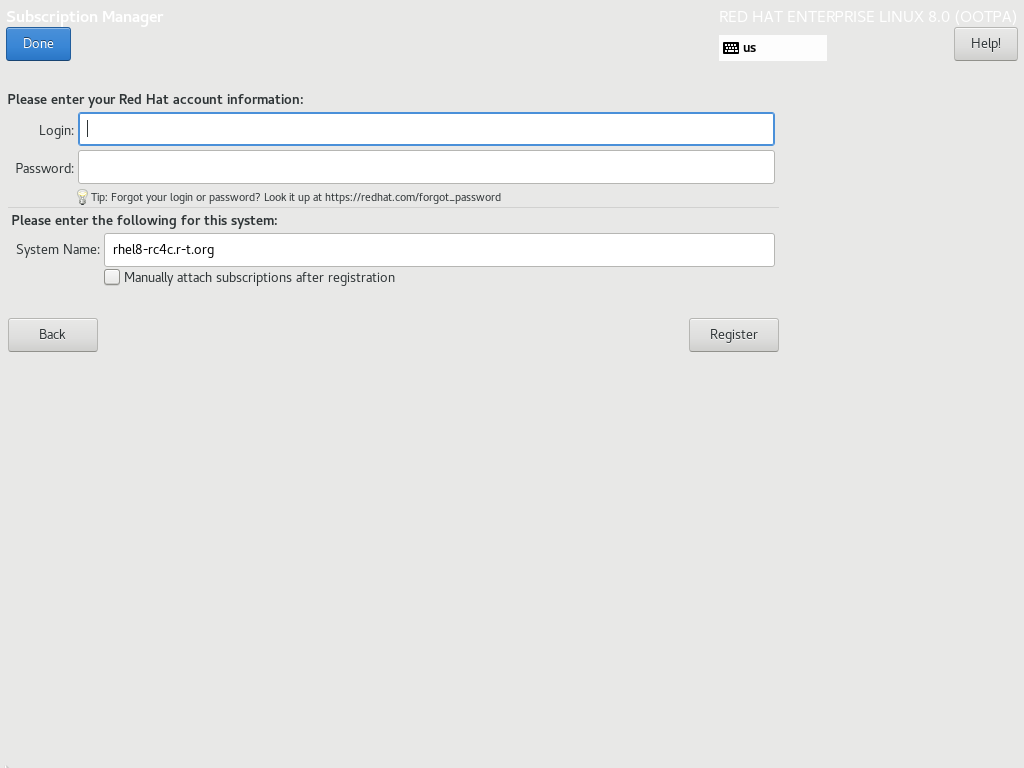
On the Confirm subscription screen, if more than one subscription is listed, select Red Hat Developer Subscription. Then, click Attach. When registration completes, click Done.
Next, click Finish Configuration.
Log into the system with the user ID and password you created during installation.
During your first login, set your language, keyboard layout, and enable or disable location services. Then, connect your online accounts or click Skip. Next Click Start Using Red Hat Enterprise Linux. After you’ve reviewed the GNOME Getting Started info, close the window.
System Registration from the command line
If you didn’t register your system during the first boot, you can register at any time using the command line. Start a Terminal window by clicking Activities in the upper left corner. Then select the Terminal icon on the lower left. Alternatively, start typing terminal in the search box and then hit enter to accept the Terminal auto-completion.

In the terminal window, start a root shell:
Next, register your system with Red Hat Subscription Management:
Enter your Red Hat username and password. When registration has completed, you’ll see:
Check that you now have the BaseOS and AppStream repos enabled with yum repolist :
Install updates
Once your system has been registered, you can use the command line or web console to install the latest updates.
Updating from the command line
use yum update form within a Terminal session to install the latest updates.
If an updated kernel package is installed during updates, you should reboot your system:
Cockpit Web console
Red Hat Enterprise Linux 8 includes a web-based console called Cockpit that simplifies administration tasks especially for users who are new to Linux.
Enabling the Cockpit Web Console
Out of the box, Cockpit isn’t enabled. We recommend that you enable Cockpit. To enable it, run the command below one time. You don’t have to worry about Cockpit consuming resources if you don’t use it. The following command tells systemd to only start Cockpit when it is accessed.
By default, the system firewall will prevent access to Cockpit from the network. To allow access from the network:
Using the Cockpit web console
To access the Cockpit web console, start Firefox from the Activities menu, Then enter the URL: http://localhost:9090/
Log into Cockpit either your regular user ID or the root user ID.
To use Cockpit from the network use: https:// :9090/
Note: a self-signed SSL/TLS certificate is installed by default, which will generate a security exception because it isn’t signed by a trusted CA. You will have to agree to proceed.
VirtualBox Guest Additions
Adding VirtualBox Guest Additions to the RHEL VM improves the usability in a number of ways:
- Enables copy and paste between the host and VM.
- Eliminates the need for the VM to capture the mouse pointer. The integrated mouse pointer is much smoother.
- The VMs screen is dynamically resizable so you can have more space to edit.
- Folders can be easily shared between the host and the VM making it easy to share source code.
First, make sure you’ve installed the latest updates using the instructions above. During installation a kernel module will be compiled and installed. There are a few prerequisites. First you should have installed Development Tools during system installation. If not, use:
Next, install kernel development packages so you can build loadable kernel modules:
Now insert the VirtualBox Guest Additions CD image using the Devices menu entry on the VM’s window. A pop-up will ask you if you want to run the software on the CD image. Click Run.
A terminal window will pop-up as the guest additions are built and installed. When complete, hit enter to close the window.
Some of the improvements, such as the mouse pointer integration will be immediately available. Others improvements won’t be available until after the VM is rebooted.
Coding time
Use these documents for creating your first applications on Red Hat Enterprise Linux 8.
Источник


