- How to Recover a Damaged Memory Card in Ubuntu
- Method 1: Repairing the Memory Card with Ubuntu’s Standard Tools
- Method 2: Repairing a Memory Card on a Dual-Boot Ubuntu System
- Method 3: Using the Testdisk Program
- Method 4: Using PhotoRec to Restore Files Without a File System
- Unix etc.
- Unix, Linux and related technologies.
- Recovering Data from a Corrupted SD Card
- General Plan
- Safety First
- First Look at the Data
- Identify the File System
- Attempt to Mount the File System
- Taking an Image of the File System
- Repairing the File System Image
- Mounting the Repaired Image and Recovering Files
- Conclusion
- 5 thoughts on “ Recovering Data from a Corrupted SD Card ”
- Leave a Reply Cancel reply
How to Recover a Damaged Memory Card in Ubuntu
Memory cards are an excellent way to transfer information between mobile devices, digital cameras and PCs. If you receive a “Damaged Memory Card – Please Format” or similar error from a Google Android or Apple iOS device, then there might still be some hope for data recovery as long as you declined to format the card. Properly eject it, and then make sure that its in good shape. Sometimes full-sized SD, SDHC and SDXC cards become loose in their cases, and can be gently pushed back together. Most microSD, microSDHC and microSDXC cards don’t have this problem, but it’s still possible to clean off the contacts and such.
When you attach your card to your PC, you’ll want to make sure that you do so firmly, but gently. Ensure you don’t bend the card, and make sure that it’s attached correctly to ensure a good connection. This might seem like a minor detail, but it will help quite a bit when it comes to using Ubuntu’s tools to recover data from damaged Secure Digital file systems.
Method 1: Repairing the Memory Card with Ubuntu’s Standard Tools
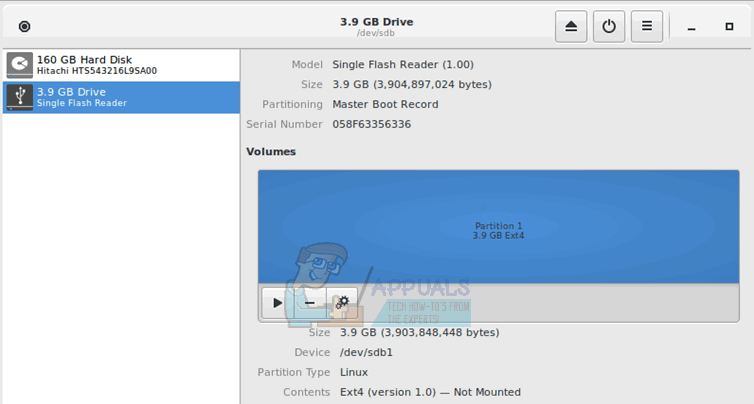
Open the GNOME Disks Utility from the Dash, KDE or Whisker menu and locate the device file name for your particular flash reader. It will generally call it “Single Flash Reader,” and if given the option underneath the storage graph, click on the right-facing arrow to attempt to mount it. If it mounts, then you might be able to copy files off it.
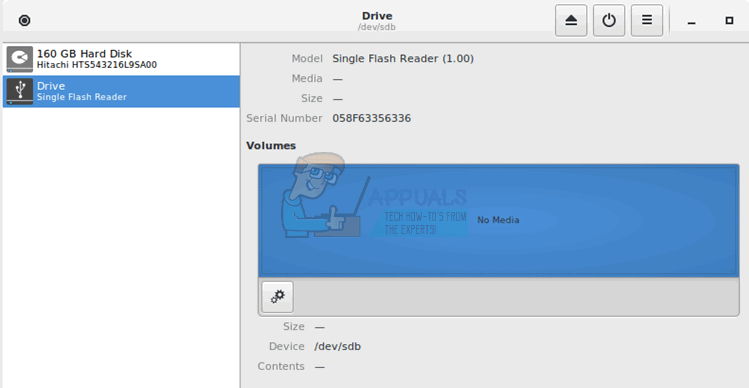
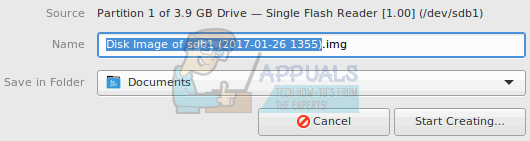
If it reads “No Media,” even if there is a card in the slot, then attempt to disconnect and reconnect the card, then see if anything has changed. If you’re able to, then you might want to try clicking on the gear icon, selecting “Create Disk Image” and then saving it as an .img file.
Eject then insert a different blank memory card of the same size after it concludes, and then write this disk image to the new card with the gear menu. You may be able to mount the new file system, but keep in mind you’ll loose whatever was on the new card, so ensure that it’s completely blank before proceeding.
When the partition is unmounted but Ubuntu detects the drive, you can run a consistency check to attempt recovery of the file system. Assuming you have an FAT12, FAT16 or FAT32 formatted card, then run sudo fsck.msdos -r /dev/sdd1 from the command line to attempt recovery. Replace the sdd1 portion with the name of the partition given in the disks utility. You could instead try using fsck.ext# if you formatted the card to work with one of the Linux file systems. Replace # with the ext number of the system if you can remember it.
Method 2: Repairing a Memory Card on a Dual-Boot Ubuntu System
If you run Ubuntu alongside Microsoft Windows, then you might have luck using the chkdsk command in a Windows command prompt. While Ubuntu has debatably superior support for recovering FAT devices, Windows can sometimes help recover NTFS devices. Reboot the computer, and when GRUB comes up, prompt it to start your installation of Microsoft Windows with the keyboard. Open a File Explorer window by holding down the Windows key and pushing E. Locate the drive letter that Windows assigned to your memory card, but do not format it if Windows asks.
Open a command prompt from the Start Menu, and then type chkdsk /f E:, replacing E: with whatever drive letter it gave. If you get an error returned, however, then Windows hasn’t had any more luck recovering your memory card than Ubuntu had.
Ubuntu does provide two useful programs for working with damaged NTFS-formatted memory cards if you don’t have access to Microsoft Windows. You could try sudo ntfsfix -d /dev/sdd1, replacing the device file with the name of your device. While this isn’t a Linux version of chkdsk, it can repair some NTFS inconsistencies. You might also try using ntfsclone -so dsk.img /dev/sdd1 to take a disk image of an NTFS memory card even if Disks Utility failed to do so. You can then restore it to a blank memory card with sudo ntfsclone -r dsk.img /dev/sdd1. Replace the device files with the correct names in both examples, and keep in mind that restoring a disk image will destroy everything on the device in question. Add the -f switch if Ubuntu complains that the file system is marked dirty.
Method 3: Using the Testdisk Program
Should neither the normal Ubuntu nor Windows programs aided you in recovering your files from your memory card, then you might have more luck with a program called Testdisk. More than likely you don’t have it installed, so from the Ubuntu CLI prompt type sudo apt-get install testdisk to install it. Once it’s installed, run testdisk /log /dev/sdd, replacing /dev/sdd with the actual device name. Depending on how your installation is installed, you might need to use sudo in front of it since it does require direct access to a device file.
While most mobile phones, tablets and digital cameras use the FAT16 or FAT32 file systems, testdisk will also check for HFS and HFS+ from the Macintosh platform as well as NTFS. Once the program is done, head back to Disks Utility from the Ubuntu Dash or KDE menu and see if you can click on the device. Click on the right-pointing arrow to mount it. You might now be able to copy files over in your file manager.
Method 4: Using PhotoRec to Restore Files Without a File System
If Linux can view your memory card as a mass storage device, but it can’t actually detect a file system, then you can use PhotoRec to recover files from it. Users who don’t already have it installed can download it from the Ubuntu or Debian repositories with the sudo apt-get install photorec command.
Источник
Unix etc.
Unix, Linux and related technologies.
Recovering Data from a Corrupted SD Card
SD cards are used in digital cameras, phones and other devices, where their speed and large capacity makes them useful for storing pictures, video and other voluminous multi-media items. It is quite common these days for a mobile device to contain a 16 Gb or 32 Gb SD card.
With the devices being so mobile, backups are easily overlooked. And it is quite easy for an SD card to become corrupted, for example if the card is removed while the device is on, or the battery is taken out while a video is being shot.
I was given a corrupted 16 Gb card and asked to recover the files, if possible. The rest of this post explains how the data was safely restored using simple Linux tools.
The SD card was a 16 Gb Sandisk model from a digital camera. The user’s Windows 7 desktop would not read the card and offered only to reformat it, which was not a viable option as it would have destroyed all the data.
General Plan
As is usual with this sort of recovery, the plan was to take an exact image of the SD card and recover data from that, while leaving the original card untouched.
Safety First
To prevent any further data corruption, I set the card’s read-write tab to “read only“, then inserted it into a Linux laptop.
First Look at the Data
Linux recognised the card straight away and its files were actually visible in the file browser (Thunar in this case), though according to df it was not mounted. I/O errors appeared in the /var/log/messages file however, confirming corruption in the file system. At this point, an attempt could have been made to recover the data by simply copying all of the files off the card using the GUI. But that would have been to risk perpetuating the corruption and/or losing some of the recoverable data. It is better to fix the corruption first, then restore the corrected data.
Identify the File System
The next step is to gather some basic information about the file system.
Ran fdisk:
The device associated with the SD card itself is /dev/mmcblk0. More importantly, /dev/mmcbk0p1 is the device associated with the card’s file system. It looks like the type is FAT32, but that is just an indication derived from the type flag on the partition, and isn’t necessarily the correct file system type. Use blkid for that:
So the file system type is definitely VFAT. And the associated device node is /dev/mmcblk0p1.
Attempt to Mount the File System
I was curious to see if the file system would mount. This was to gather more information about the corruption and was not strictly necessary for the data recovery. If you are in a similar situation, you could just skip forward to the step “Taking an Image of the File system”
Proceeded as follows.
It mounted but put these errors into /var/adm/messages:
Jan 4 00:48:18 Acer kernel: [26294.572758] mmcblk0: error -110 transferring data, sector 10847, nr 1, cmd response 0x900, card status 0x0
Jan 4 00:48:18 Acer kernel: [26294.572765] end_request: I/O error, dev mmcblk0, sector 10847
Jan 4 00:48:18 Acer kernel: [26294.700808] mmcblk0: error -110 transferring data, sector 10844, nr 1, cmd response 0x900, card status 0x0
Jan 4 00:48:18 Acer kernel: [26294.700813] end_request: I/O error, dev mmcblk0, sector 10844
Jan 4 00:48:18 Acer kernel: [26294.700847] FAT-fs (mmcblk0p1): FAT read failed (blocknr 2652)
I kicked of a “cp” command to copy the files from the SD card mounted at /mnt2. It gave these errors:
Jan 4 01:08:53 Acer kernel: [27529.518134] mmcblk0: error -110 transferring data, sector 10844, nr 1, cmd response 0x900, card status 0x0
Jan 4 01:08:53 Acer kernel: [27529.518143] end_request: I/O error, dev mmcblk0, sector 10844
Jan 4 01:08:53 Acer kernel: [27529.518182] FAT-fs (mmcblk0p1): FAT read failed (blocknr 2652)
Jan 4 01:08:53 Acer kernel: [27529.646174] mmcblk0: error -110 transferring data, sector 10844, nr 1, cmd response 0x900, card status 0x0
Jan 4 01:08:53 Acer kernel: [27529.646180] end_request: I/O error, dev mmcblk0, sector 10844
Jan 4 01:08:53 Acer kernel: [27529.646236] FAT-fs (mmcblk0p1): FAT read failed (blocknr 2652)
Jan 4 01:08:53 Acer kernel: [27529.776694] mmcblk0: error -110 transferring data, sector 10844, nr 1, cmd response 0x900, card status 0x0
Jan 4 01:08:53 Acer kernel: [27529.776700] end_request: I/O error, dev mmcblk0, sector 10844
Jan 4 01:09:40 Acer kernel: [27576.220548] FAT-fs (mmcblk0p1): FAT read failed (blocknr 2652)
Jan 4 01:09:40 Acer kernel: [27576.348602] mmcblk0: error -110 transferring data, sector 10844, nr 1, cmd response 0x900, card status 0x0
Jan 4 01:09:40 Acer kernel: [27576.348671] FAT-fs (mmcblk0p1): FAT read failed (blocknr 2652)
Jan 4 01:09:40 Acer kernel: [27576.476781] mmcblk0: error -110 transferring data, sector 10844, nr 1, cmd response 0x900, card status 0x0
Jan 4 01:09:40 Acer kernel: [27576.476812] FAT-fs (mmcblk0p1): FAT read failed (blocknr 2652)
cp: reading `/mnt2/DCIM/100D3100/DSC_1015.MOV’: Input/output error
cp: failed to extend `./DCIM/100D3100/DSC_1015.MOV’: Input/output error
Unmounted the card with umount /mnt2.
Taking an Image of the File System
Made image of card’s file system with dd:
The option conv=noerror,sync tells dd what to do when it encounters any errors on the SD card. Instead of just stopping with an error message, dd will place zeros in the output file corresponding to parts of the card it could not read. (Similar behaviour to dd_rescue)
dd took maybe 45 mins to complete, and produced a large (16 Gb) file called mmcblk0p1.dd. That file contains a copy of the file system residing on the SD card, with unreadable areas replaced by zeros. The next step is to fix the corruption in the image.
Repairing the File System Image
Linux repair tools can be used on the image file just as they can be used on a “real” file system. In this case dosfsck -a was used. Note if dosfsck -a does not work for you, try dosfsck -r instead (see comment from Robert below).
Mounting the Repaired Image and Recovering Files
Restoring the files is simple now. Mounted the file system image as a loopback mount:
mount -t vfat -o loop mmcblk0p1.dd /mnt
Unlike the first exploratory mount above, this put no errors into /var/log/messages. I copied all files from /mnt to a spare USB stick with “cp” command, again monitoring /var/log/messages and finding no errors generated. Over 600 files were restored, totalling about 8 Gb.
Handed the user his restored files on the USB stick, along with the original SD card. The SD card itself was not altered (the read-write tab still being set to “read only”). The user can reformat the card under Windows and copy the files back if he wishes, or back them up elsewhere (recommended).
Conclusion
1. The file system fix command dosfsck could have been applied directly to the card, rather than to an image taken from the card. That is: dosfsck -a /dev/mmcblk0p1 would almost certainly have fixed the card in one step. However this was not attempted due to the risks outlined at the outset of this post, and because the jeopardized data was very important to the user.
2. The damage was quite small. Just one file was lost, seemingly: a large video called DSC_1015.MOV, apparently 1.3 Gb in size (dosfsck output). Perhaps something happened while that file was being written – maybe the battery was removed while shooting the video ? Or the card might have a physical flaw, which is more serious because it will manifest more file system damage sooner or later.
3. The procedure above could apply equally to other devices, eg. thumb drives, external disks, MP3 players, even Sat Nav systems. Any “dumb” gadget that contains a file system but has only limited self-repair abilities. More intelligent items like tablets, ipads and PCs usually repair their file systems automatically.
5 thoughts on “ Recovering Data from a Corrupted SD Card ”
Thank you, you saved my day.
I only had one more complication: dosfsck -a did not work for me (said it won’t fix it]. Fortunately, dosfsck -r did the trick.
Thanks again,
Hi Robert, glad it was useful. The article has been updated with your dosfsck -r info. Cheers.
Thank you so much for this Very useful Article, you saved my day
Thanks for sharing the information. Do you have any idea about the status codes and its meaning? I could see many times status=0x80900. Do you have any document/link which explains about these status codes?
mmcblk0: r/w command failed, status = 0x80900
end_request: I/O error, dev mmcblk0, sector 777
end_request: I/O error, dev mmcblk0, sector 778
end_request: I/O error, dev mmcblk0, sector 779
end_request: I/O error, dev mmcblk0, sector 780
end_request: I/O error, dev mmcblk0, sector 781
end_request: I/O error, dev mmcblk0, sector 782
end_request: I/O error, dev mmcblk0, sector 783
end_request: I/O error, dev mmcblk0, sector 784
end_request: I/O error, dev mmcblk0, sector 785
end_request: I/O error, dev mmcblk0, sector 786
end_request: I/O error, dev mmcblk0, sector 787
I’ve not encountered the 0x80900 error and can’t say what it is exactly. It might indicate that the SD card is bad or the file system is corrupted. An fsck might fix the file system. Or it may be necessary to reformat the card from scratch.
Leave a Reply Cancel reply
This site uses Akismet to reduce spam. Learn how your comment data is processed.
Источник


