- How to Recover a Damaged Memory Card in Ubuntu
- Method 1: Repairing the Memory Card with Ubuntu’s Standard Tools
- Method 2: Repairing a Memory Card on a Dual-Boot Ubuntu System
- Method 3: Using the Testdisk Program
- Method 4: Using PhotoRec to Restore Files Without a File System
- Recover Files from an SD Card Using Linux Utilities
How to Recover a Damaged Memory Card in Ubuntu
Memory cards are an excellent way to transfer information between mobile devices, digital cameras and PCs. If you receive a “Damaged Memory Card – Please Format” or similar error from a Google Android or Apple iOS device, then there might still be some hope for data recovery as long as you declined to format the card. Properly eject it, and then make sure that its in good shape. Sometimes full-sized SD, SDHC and SDXC cards become loose in their cases, and can be gently pushed back together. Most microSD, microSDHC and microSDXC cards don’t have this problem, but it’s still possible to clean off the contacts and such.
When you attach your card to your PC, you’ll want to make sure that you do so firmly, but gently. Ensure you don’t bend the card, and make sure that it’s attached correctly to ensure a good connection. This might seem like a minor detail, but it will help quite a bit when it comes to using Ubuntu’s tools to recover data from damaged Secure Digital file systems.
Method 1: Repairing the Memory Card with Ubuntu’s Standard Tools
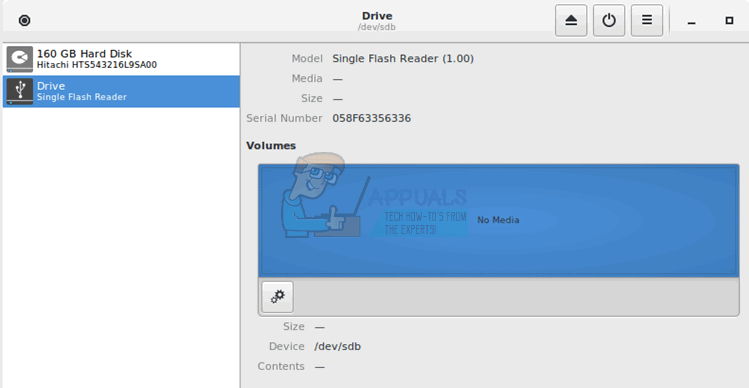
Open the GNOME Disks Utility from the Dash, KDE or Whisker menu and locate the device file name for your particular flash reader. It will generally call it “Single Flash Reader,” and if given the option underneath the storage graph, click on the right-facing arrow to attempt to mount it. If it mounts, then you might be able to copy files off it.
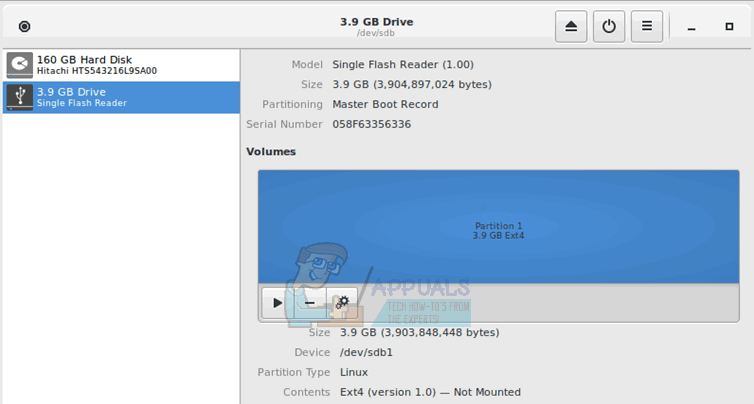
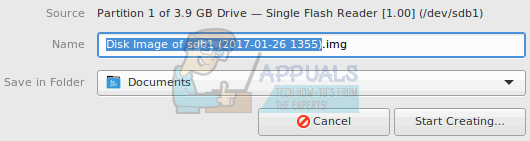
If it reads “No Media,” even if there is a card in the slot, then attempt to disconnect and reconnect the card, then see if anything has changed. If you’re able to, then you might want to try clicking on the gear icon, selecting “Create Disk Image” and then saving it as an .img file.
Eject then insert a different blank memory card of the same size after it concludes, and then write this disk image to the new card with the gear menu. You may be able to mount the new file system, but keep in mind you’ll loose whatever was on the new card, so ensure that it’s completely blank before proceeding.
When the partition is unmounted but Ubuntu detects the drive, you can run a consistency check to attempt recovery of the file system. Assuming you have an FAT12, FAT16 or FAT32 formatted card, then run sudo fsck.msdos -r /dev/sdd1 from the command line to attempt recovery. Replace the sdd1 portion with the name of the partition given in the disks utility. You could instead try using fsck.ext# if you formatted the card to work with one of the Linux file systems. Replace # with the ext number of the system if you can remember it.
Method 2: Repairing a Memory Card on a Dual-Boot Ubuntu System
If you run Ubuntu alongside Microsoft Windows, then you might have luck using the chkdsk command in a Windows command prompt. While Ubuntu has debatably superior support for recovering FAT devices, Windows can sometimes help recover NTFS devices. Reboot the computer, and when GRUB comes up, prompt it to start your installation of Microsoft Windows with the keyboard. Open a File Explorer window by holding down the Windows key and pushing E. Locate the drive letter that Windows assigned to your memory card, but do not format it if Windows asks.
Open a command prompt from the Start Menu, and then type chkdsk /f E:, replacing E: with whatever drive letter it gave. If you get an error returned, however, then Windows hasn’t had any more luck recovering your memory card than Ubuntu had.
Ubuntu does provide two useful programs for working with damaged NTFS-formatted memory cards if you don’t have access to Microsoft Windows. You could try sudo ntfsfix -d /dev/sdd1, replacing the device file with the name of your device. While this isn’t a Linux version of chkdsk, it can repair some NTFS inconsistencies. You might also try using ntfsclone -so dsk.img /dev/sdd1 to take a disk image of an NTFS memory card even if Disks Utility failed to do so. You can then restore it to a blank memory card with sudo ntfsclone -r dsk.img /dev/sdd1. Replace the device files with the correct names in both examples, and keep in mind that restoring a disk image will destroy everything on the device in question. Add the -f switch if Ubuntu complains that the file system is marked dirty.
Method 3: Using the Testdisk Program
Should neither the normal Ubuntu nor Windows programs aided you in recovering your files from your memory card, then you might have more luck with a program called Testdisk. More than likely you don’t have it installed, so from the Ubuntu CLI prompt type sudo apt-get install testdisk to install it. Once it’s installed, run testdisk /log /dev/sdd, replacing /dev/sdd with the actual device name. Depending on how your installation is installed, you might need to use sudo in front of it since it does require direct access to a device file.
While most mobile phones, tablets and digital cameras use the FAT16 or FAT32 file systems, testdisk will also check for HFS and HFS+ from the Macintosh platform as well as NTFS. Once the program is done, head back to Disks Utility from the Ubuntu Dash or KDE menu and see if you can click on the device. Click on the right-pointing arrow to mount it. You might now be able to copy files over in your file manager.
Method 4: Using PhotoRec to Restore Files Without a File System
If Linux can view your memory card as a mass storage device, but it can’t actually detect a file system, then you can use PhotoRec to recover files from it. Users who don’t already have it installed can download it from the Ubuntu or Debian repositories with the sudo apt-get install photorec command.
Источник
Recover Files from an SD Card Using Linux Utilities
I recently dropped my phone and right after I picked it back up the Android OS has been unable to see the contents of the SD Card. I had a couple of photos on there that I really wanted to keep. Luckily my laptop had an SD Card Reader and I had a Micro-SD to SD Converter from my previous efforts to transfer data to my phone. I plugged the SD card into my laptop and I saw the device without issues:
Also checking out fdisk, I saw the following:
Before I did anything with the card, I wanted to create a disk image of the SD Card. Here is what I ran to accomplish this:
Then after doing some research I decided to try out two utilities. One is called “Sleuth Kit”. The first one was available in the yum repositories:
To install the package I ran the following:
The application is GUI driven but to launch it, here is what I ran:
Here is how it looked like:

After I selected ‘proceed’, I saw a screen which determined my partition type:

From here you can go to ‘File Opt’ and select what files to search for, but since it was just a 1GB SD Card, I decided to recover as much as possible. So I just selected ‘search’:

At this screen it’s asking you to choose the partition type. My SD Card used to be Fat32, so I selected the ‘other’ option:

Usually deleted files reside in the free unallocated space, but again since this was a 1GB image, I decided to search all the space. So I selected ‘whole’:

This next screen asked the output directory to save the recovered files to. Before launching photorec, I created a folder called ‘recovery’, so I scrolled down to that folder and then typed ‘C’. After I did that, the recovery process started and here is how it looked like:

After the process finished I saw the following:

So it recovered 426 file total, I then quit the program and went to check out the contents of ‘
The recovery process recovered the file by the inode number and just stored everything in the ‘recup_dir’ folder. Checking out how many jpeg files it recovered, I saw the following:
There was a couple of duplicates but that was okay. I was pretty impressed with the results.
Next I wanted to try out Sleuth Kit. Unfortunately that application is not in the yum repositories, so I had to compile it myself. I first downloaded the source:
I then extracted the source:
I never like running ‘sudo make install’, so I created a folder under /usr/local and gave myself permission to that folder:
I then configured the package to install into my newly created directory:
The configure process didn’t fail so then I decided to build/make the application:
So the compile finished with success as well, which is always good news. I then installed the package:
That finished without issue also. I then checked out the contents of the package and it looked like this:
So this was a pretty standard install, bin is where all the binaries reside, include is where the header files are, lib is for static or shared libraries, and lastly share is where the documentation is located. Here is a list of all the binaries:
If you want to find out what each command does you can check out the man page in the following manner:
After checking out the man pages, and some documentation online I realized I can check out the files on an image by running fls, like so:
This lists the inode number, full path of the file and the file name. That was pretty cool. Also notice the star () next to some files, that means it’s a deleted file. If you want, you can also list all the inodes in the image by running *ils. Here is how it looks like:
To recover a file you can run icat. For example let’s say I wanted to recover ‘ dcim/Camera/1229791492195.jpg’ from the above output. We know the inode number of that file is ‘2173480’. To recover that file, I would run the following:
If you know the inode number, then you can use ffind to find the exact location of that file on the file system. Here is an example:
You can also get file system information by running fsstat like so:
Basically there are a lot of cool tools that allow you to check files and file system information at a lower level. There a lot of cool examples on the ‘FS Analysis’ page.
Now I wanted to recover all the files. I ran into a couple of other links: ‘Reconstructing Heavily Damaged Hard Drives’. Both had their own scripts, so I borrowed most of the content and wrote my own. Here is how it looked like:
So I ran the following to recover all the files:
Now checking out the contents of my output directory, I saw the following:
Checking out how many files I recovered, I saw the following:
Checking out how many jpeg files I got, I saw the following:
Very similar results, but the recovered files had the same folder structure as the original file system, and I really liked that. After running that script, I realized that Sleuth Kit comes with a tool to recover all the files; it’s called tsk_recover. From the man page:
So then I ran the following:
It had recovered less files than my script (380 vs 510), then checking out how many jpeg files I have:
it was the same amount. It turned out that the tsk_recover doesn’t recover zero sized files, cause they are basically empty files, but my script wasn’t that smart and just recovered everything it sees. Regardless to say, I was pretty happy with the tool as well.
After doing some research I found two more tools: foremost. MagicRescue is no longer maintained, but I decided to give it a try. MagicRescue uses “recipes”, or file signatures as I would call them, to identify a certain file type that you are looking for. The application comes with some pre-installed recipes. For example, here is what I ran to recover all the jpeg files from my image:
Checking out the output, I saw the following:
Checking out the count, I saw the following:
Which was more than any other application that I used above, but the man page also recommends running dupemap to get rid of duplicates. I didn’t compile that into my version, so I couldn’t run it. But checking out the pictures, it actually did find a couple of more pictures than the previous two.
Lastly running foremost. Foremost comes with a configuration file under /usr/local/foremost/etc/foremost.conf (or where ever you decided to install the application). Inside that file there are patterns of different file types, for example I un-commented the following lines to search only for jpeg files:
Then running the program:
if you don’t want to use the configuration file, you can specify what file types to search for, like this:
If you want to know the supported file types just check out the man page:
Or you can just run the following:
and that will recover all the files.
Foremost recovered the most amount of jpeg files (7903), but most of them were unreadable. I would say it recovered maybe 1 or 2 more actual readable jpeg files than the rest.
In conclusion, there are a lot of recovery tools out there, so pick your poison:) I personally liked Sleuth Kit for recovery in general, it provided a lot of granular tools. For recovering specific type of files, each (photorec, magicrescue, and foremost) program had their own quirks. Foremost recovered the most but it took a while to manually sit and figure out which one is a valid picture. MagicRescue was good, but it didn’t have that many built in recipes. PhotoRec was the easiest to use but it recovered the least amount of pictures but a lot of mp3 files 🙂 I ran all of them and I was pleased with each one in different ways. So if you are looking for pictures in a disk image just run them all and then sort out the pictures as necessary. I will end with a quote from the man page of MagicRescue:
When not to use MagicRescue
Magic Rescue is not meant to be a universal application for file recovery. It will give good results when you are extracting known file types from an unusable file system, but for many other cases there are better tools available.
If there are intact partitions present somewhere, use gpart to find them.
If file system’s internal data structures are more or less undamaged, use The Sleuth Kit. At the time of writing, it only supports NTFS, FAT, ext[23] and FFS, though.
If you are just looking for a handful of text files, your best option is most likely to search through the block device with a hex editor such as hexedit.
If Magic Rescue does not have a recipe for the file type you are trying to recover, try foremost instead. It recognizes more file types, but in most cases it extracts them simply by copying out a fixed number of bytes after it has found the start of the file. This makes post-processing the output files more difficult.
In many cases you will want to use Magic Rescue in addition to the tools mentioned above. They are not mutually exclusive, e.g. combining magicrescue with dls from The Sleuth Kit could give good results. In many cases you’ll want to use magicrescue to extract its known file types and another utility to extract the rest.
So try everything out and see what works best 🙂
Источник


