- How to Retrieve Windows Files Using a Linux Live CD
- What is a Linux Live CD?
- How Do I Get a Linux Live CD?
- How Do I Make a Bootable Linux USB Drive?
- How Do I Boot My Computer with a USB Drive?
- How To Recover Deleted Files In Linux [Beginner’s Guide]
- How to recover deleted files in Linux using TestDisk
- Step 1
- Step 2
- Step 3
- Step 4
- Step 5
- Step 6
- Step 7
- Step 8
- Step 9
- Step 10
- A few tips on recovering deleted files in Linux using TestDisk
- Dave Merritt
How to Retrieve Windows Files Using a Linux Live CD
The list of tools you’ll need
Sometimes Windows just won’t start. That’s alright, you’ve been making regular backups or syncing your hard drive with a cloud service like Microsoft OneDrive or Google Drive. You haven’t been making backups? You don’t have a cloud storage service? Oh. That’s okay, we’ve got this.

Let’s use a Linux Live CD to get in to that hard drive and rescue our most important files.
You’ll need a Linux Live CD or USB .ISO file, a free program called Rufus, an empty USB drive to put the Live CD on, and another USB drive to put your recovered files on.
The USB drive for your recover files needs to be formatted to FAT32 file format. We’ll show you how to get the Linux Live CD and then use it to recover Windows files from your dead computer.
What is a Linux Live CD?
Linux is an open source operating system (OS). You may have already heard about Linux but didn’t think you’d have any use for it.
A Live CD or Live USB provides a way to use an OS on a computer, without installing it on the computer. We’re going to stick to the USB type, since so many computers don’t have CD or DVD players anymore.
Once you’ve made the live USB, you insert it in to your turned off computer. Then you start the computer and tell it to boot from the USB. The operating system and all its programs stay on the USB. They don’t install on your computer.
The live USB will access your computer’s RAM and CPU to function. It will also give you access to any hard drives that are in your computer.
How Do I Get a Linux Live CD?
Hopefully, you’ve done this before your hard drive stopped working. If not, ask a friend if you could use their computer to make one.
First, you need to download a Linux distribution that does what you need it to do. There are several out there. Let’s use Ultimate Boot CD (UBCD). It is free to download and comes with a lot of programs and tools for drive cloning, data recovery, memory and CPU testing, and BIOS. Get to know how to use these tools and you can possibly fix your failed hard drive too.
You can download it through a peer-to-peer (P2P) tool or do a direct download from one of the mirror sites listed.
If you’d like to try a different Live CD, here are some more options:
- SystemRescue CD – Has antivirus, malware and rootkit removal, and other tools
- Hiren’s Boot CD – Features Mini Windows XP, so you can use Windows tools.
- FalconFour’s UBCD – Similar to Hiren’s but with more tools loaded in Mini Windows XP.
- GParted Live – Mostly focused on hard drive partition management.
- Trinity Rescue Kit – Text based interface, good recovering deleted files or changing passwords.
Also make sure to download Rufus. It’s the easiest and fastest way to make bootable USB drives.
How Do I Make a Bootable Linux USB Drive?
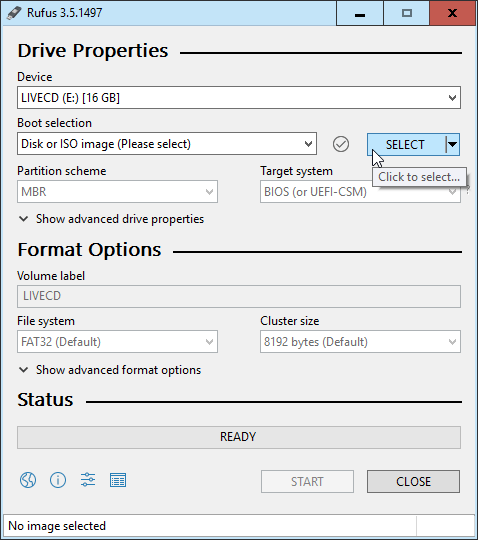
Rufus is a great little program that can help you make any .ISO file into a bootable USB drive. You’ve already downloaded it, so let’s open it.
Make sure you have the correct USB drive selected. This process will completely erase the USB drive. Rufus will already be set to the right setting you need. Click on the SELECT button to choose our UBCD .ISO.
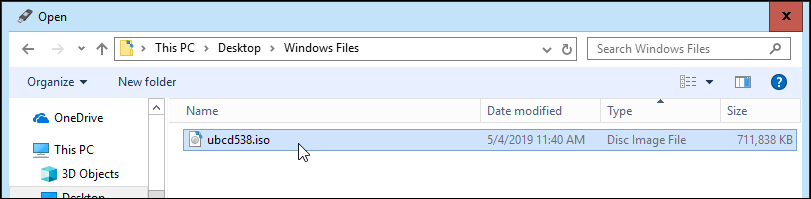
When the file explorer opens, navigate to where you saved the UBCD .ISO and double-click on it to select it.
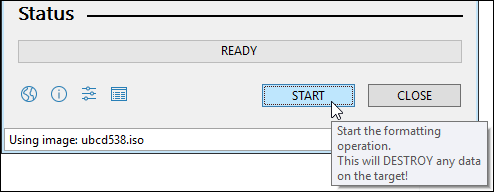
Now, click on the START button. When you hover over the button, you will get a warning, “This will DESTROY any data on the target!”
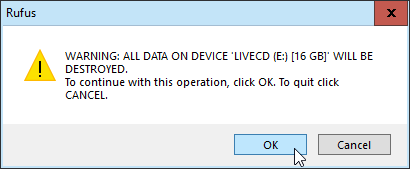
You’ll get another warning that all the data on the USB drive that you selected, “…WILL BE DESTROYED.” Rufus isn’t kidding. Click on OK to continue.
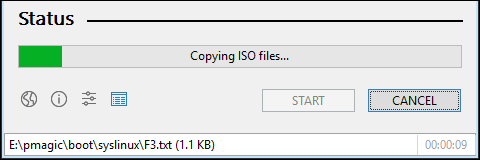
Rufus will start to make the bootable USB drive. You’ll see a progress bar continue across the bottom. It only takes a minute or two, with a USB 3 flash drive.
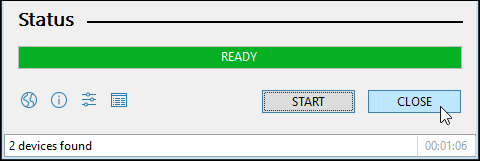
When the status bar says READY, click on CLOSE. Your UBCD bootable USB drive is now ready.
How Do I Boot My Computer with a USB Drive?
It depends on the computer. There are several ways to boot with a USB drive, so it’s best to find the specifics for your computer. The common thread is that when you turn the computer on, you’ll have to press a specific key, or combination of keys, to boot into BIOS and change the default boot drive to your USB.
Check out our article that shows you how to change the boot sequence in the BIOS. Some laptops will allow you to boot to a boot menu outside of BIOS, where you can choose to boot from the USB drive.
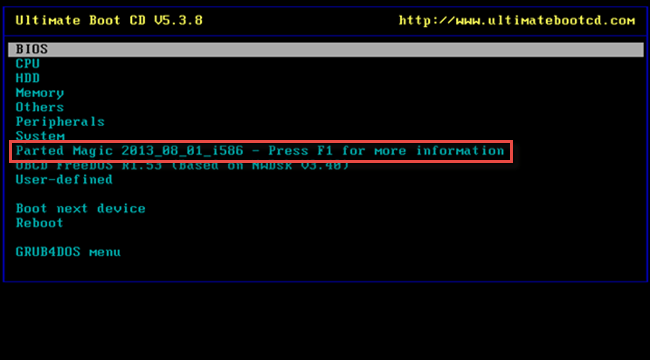
Once you’ve rebooted your computer with UBCD, you’ll see a text-based menu. Use your arrow keys to go down to Parted Magic and tap enter to select it.
Now you’ll get another text menu with three different choices. You can choose either 1. Default settings (Runs from RAM) or 2. Live with default settings. If one doesn’t work, try the other.
You’ll see some text scroll by as the computer starts up the Parted Magic desktop. Then you’ll see a desktop that’s not completely unlike Windows.

Near the top-left corner, you’ll see File Manager. That’s the UBCD equivalent of Windows Explorer. Double-click on that to open it.
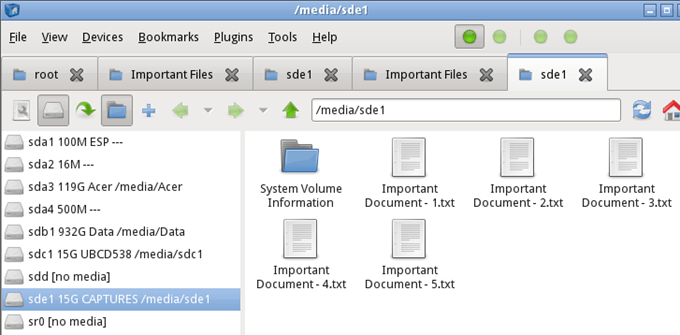
You’ll see several drives in the left-side of the File Manager. It may be obvious which one is the drive that Windows is installed on or it might not. The sure way to tell is that you’ll see a folder called Windows.

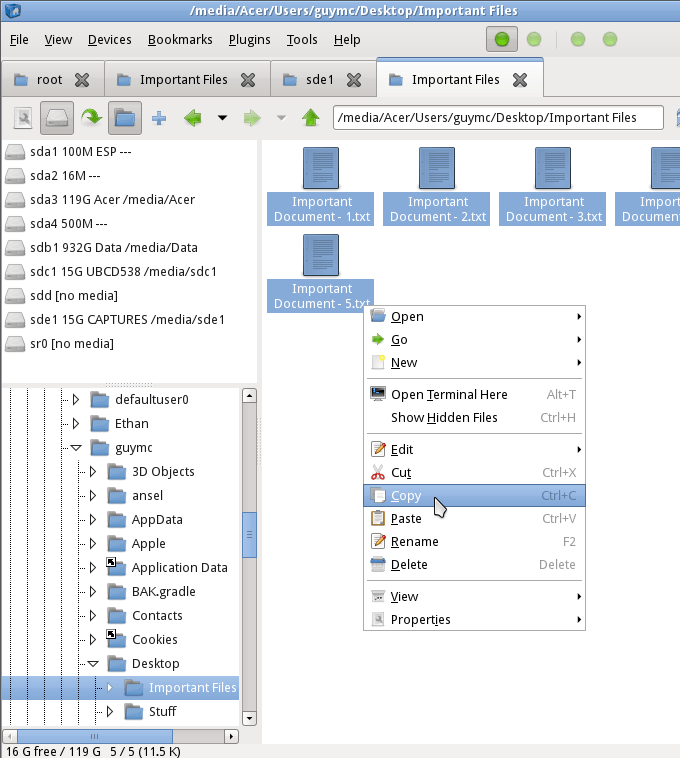
When you find that, you’ve found the drive with the files that you wish to recover. Navigate through there to find the files you’re looking for. Click through Users > Your Account where Your Account is your account’s name.
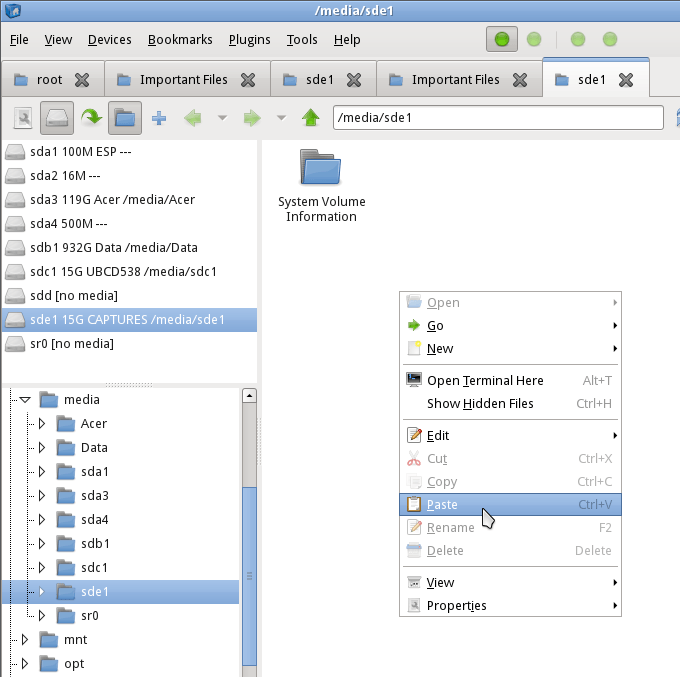
In there, you’ll see My Documents, My Pictures, Desktop, and so on. That’s likely where you’ll find the files you want to recover. When you find them, you can select them just like you would in Windows. Right-click and copy the files.
Then look for your other USB drive where you will paste the files. Once you’ve found it, it’s as simple as right-click and Paste.
Now your files are on your USB drive, ready to put back on your computer once it’s fixed.
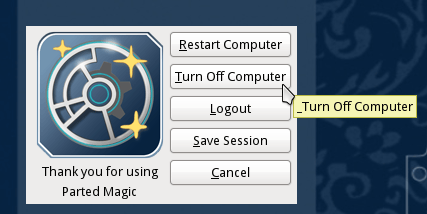
Close out File Manager and click on the start menu button in the bottom-left corner of the screen. In the picture below, there’s a red square around it. Then click on Logout.
Another window will open with some choices on how you can log out. Click on Turn Off Computer.
Once the computer is shut down, remove your USB drives and put the away for safekeeping, until your computer is up and running again.
Guy has been published online and in print newspapers, nominated for writing awards, and cited in scholarly papers due to his ability to speak tech to anyone, but still prefers analog watches. Read Guy’s Full Bio
Источник
How To Recover Deleted Files In Linux [Beginner’s Guide]
Last updated October 29, 2020 By Community 108 Comments
Brief: This article shows you how to recover deleted files in Linux using command line tool Test Disk. It’s an easy to use tool that almost anyone can use to recover lost files in Ubuntu or other Linux distributions.
Have you ever gotten that horrible feeling? The one you get when you realize that you accidentally deleted files and it’s not even in the trash? Often it is immediately preceded by denial: I know I have another copy of it somewhere.
But rather than going through all the stages of grief, don’t worry. And remember you’re not alone; sooner or later everyone does this.
“Don’t worry?” you counter, “I just erased the only copy of my resume!”
No really, don’t worry. All that’s happened is that it’s been bumped off a list. So long as you don’t write onto the drive, it absolutely still exists. In fact, depending on the size of the file and the free space on your drive deleted files can persist indefinitely—even if you do write on the drive.
“Yes, fine” you say, “I’ll rest easy knowing my resume ‘exists’ in some abstract sense. But so far as I’m concerned if I can’t open, edit or print from it, it doesn’t exist in any practical sense. What would really help would be a way to ‘un-delete’ files. And one that doesn’t require an IT forensics lab.”
Really, don’t worry—you don’t need a lab to recover the deleted files. Furthermore, if you can get past using a primitive GUI, it’s actually easy to do! I’ll show you how to use TestDisk to recover deleted files.
How to recover deleted files in Linux using TestDisk

Let me present a simplified example: I took a clean thumb drive added some files, then deleted one. Now, my system has a feature which will directly delete files from removable media, by-passing the “trash” altogether; that is if I choose to “right” click on a file and then choose “delete”. It still presents a warning, but one click on the “yes” button and the file is gone forever. Or appears to be.
But this time I didn’t get that horrible feeling. And no, not because this is a cooked up scenario. I knew that all I had to do was open the terminal type “testdisk” and hit “enter”. When I did this for the first time I had one of my “Linux moments”. Because if you don’t have it—and I didn’t—it tells you how to get it! Just type “sudo apt install testdisk” and enter and you’ll have it in about 10 seconds.
If you prefer videos, you can watch this video of the same tutorial on It’s FOSS YouTube channel:
Step 1
You need to install TestDisk tool first. Most Linux distributions already have this tool in their official repository. In Ubuntu and other Ubuntu based Linux distributions such as Linux Mint, elementary OS etc, you can use the command below to install TestDisk:
sudo apt install testdisk
Arch Linux users can install it from AUR. You can download it for other Linux distributions from the link below:
Though I am using Ubuntu in this tutorial, this doesn’t mean it is only to recover deleted files in Ubuntu Linux. The instructions presented here works for other distributions as well.
Step 2
Run TestDisk in the terminal using the command below:
Step 3
When you open it, you’ll see something that looks like this. Be patient! The interface is actually straightforward but you do have to carefully read the text. Use the arrow keys to navigate and “enter” to select.
Screens that have extra commands will tell you so. Also note that TestDisk 7.0 tends to highlight the next reasonable step. It’s almost always right but do read the screen, since it can’t read your mind. In any case, when it wants you to let it create a log file, indulge it. It’s about to pull you out of a hole.
Step 4
Now, at this point, if you’re lucky, you should see your drive. And you can proceed to the last steps. But let’s assume you’re not, that you have, say, a multi-boot machine. In this case, ownerships can get blurry, and Testdisk needs your permission to open them. You’ll see something like this:
Select “sudo” and enter your password. Hit “enter” and “enter” again on the next screen to create another log file.
Step 5
This time Testdisk displays all your drives. Arrow key to the drive in question and hit enter.
Step 6
Testdisk has again selected the correct setting. This makes sense since a simple storage device is seldom partitioned. Again hit enter:

Step 7
And finally we have to do a little thinking to do. If you read the first screen—and I’ll bet you didn’t—this program isn’t just for recovering deleted files. It’s a powerful disk utility. But if we remember what we’re trying to do the choice is fairly obvious: we’re not trying to fix a disk, we’re trying to recover a file. Select “Advanced” and hit “enter”.
Step 8
At the bottom of the page choose “Undelete” and get ready to see a ghost!
Step 9
Testdisk will scan for files and produce a list of deleted files highlighted in red. Arrow down to it and carefully read the choices at the bottom.

Step 10
Again, bear in mind that Testdisk is a multi-function tool. Most of these options deal with groups of files; we only want our damn resume back! So hit “c”.
As you can see from the scoreboard, we’ve won 1-0. After hitting “c” there are options about where you might want to recover the file to, but it defaults to your home folder. And again this is generally the best thing to do. Navigating in Testdisk is a little tricky, whereas dragging and dropping after the fact is a breeze.
A few tips on recovering deleted files in Linux using TestDisk
First, if you find yourself somewhere you don’t want to be, hit “q” for quit. This won’t close the program, instead, it will act like the “back” button on a program with a full blown GUI, and put you back a page. And just like a “back” button repeating will eventually lead you back to the beginning.
Second, as with anything, the fewer the distractions, the easier it is to find what you’re looking for. In other words, physically detach all other storage drives. In graphically simple environments simplicity is your friend.
Finally, Testdisk can also help you retrieve files that have become inaccessible for other reasons. In fact, this is why I started using the program in the first place. I was trying to save files from a corrupted drive that could not be made to boot. Normally it’s simply a matter of removing said drive any hooking it up to a USB adapter. You can then mount it on another PC and copy the files where ever you want.
But what if the drive is formatted to LVM? This was my problem because a mounted LVM drive looks nothing like a normal Linux OS. None of the usual files appear, and hunting around simply doesn’t help. This, among other reasons, is because most Linux file managers can no longer read ext.2 file systems.
Nevertheless, after a few false starts, I was able to find and save the missing files. Note, however, that the sequence of steps here will be a little different, you may need to use the “analyze” option for Testdisk to make sense of the drive and you may have to poke around a little to find the “home” folder once you do. Furthermore, the files you’re looking for will not appear in red since they were never deleted in the first place. But once you do find them, the copying procedure is basically the same.
With Testdisk and a little luck, you may never lose your resume again as you can always recover deleted files in Linux.
Disclaimer: This tutorial is a reader submission.

Dave Merritt
I’m a 59 years old, fulltime landscaper and parttime PCmedic. I’ve been an avid Linux user for over ten years. In that time, I do not claim to have made every possible mistake, only most of them. I’m a big fan of prog rock, avant jazz and J S Bach, and enjoy reading Neal Stevenson and anything to do with the foundational problems in modern physics.
Like what you read? Please share it with others.
Источник


