- 10 SCP Commands to Transfer Files/Folders in Linux
- Basic Syntax of SCP Command
- Provide the detailed information of the SCP process using the -v parameter
- Provide modification times, access times, and modes from original files
- Make file transfer faster using -C parameter
- Change SCP Cipher to Encrypt Files
- Limiting Bandwidth Usage with SCP Command
- Specify the Specific port to use with SCP
- Copy files inside directory recursively
- Disable progress meter and warning / diagnostic message
- Copy files using SCP through Proxy
- Select different ssh_config file
- If You Appreciate What We Do Here On TecMint, You Should Consider:
- Copying a Directory with SCP
- Downloading a Directory
- Uploading a Directory
- Conclusion
- Копирование файлов scp
- Что такое SCP?
- Копирование файлов scp
- Выводы
10 SCP Commands to Transfer Files/Folders in Linux
Linux administrators should be familiar with the CLI environment. Since GUI mode in Linux servers is not common to be installed. SSH may be the most popular protocol to enable Linux administrators to manage the servers via remote secure way. Built-in with SSH command there is SCP command. SCP is used to copy file(s) between servers in a secure way.
![]() 10 Linux SCP Commands
10 Linux SCP Commands
Basic Syntax of SCP Command
The below command will read as “copy source_file_name” into “destination_folder” at “destination_host” using “username account”.
There are many parameters in the SCP command that you can use. Here are the parameters that may use on daily basis usage.
Provide the detailed information of the SCP process using the -v parameter
The basic SCP command without parameters will copy the files in the background. Users will see nothing unless the process is done or some error appears.
You can use the “-v” parameter to print debug information into the screen. It can help you debugging connection, authentication, and configuration problems.
Sample Output
Provide modification times, access times, and modes from original files
The “-p” parameter will help you with this. An estimated time and the connection speed will appear on the screen.
Sample Output
Make file transfer faster using -C parameter
One of the parameters that can faster your file transfer is the “-C” parameter. The “-C” parameter will compress your files on the go. The unique thing is the compression-only happens in the network. When the file has arrived at the destination server, it will be returning to the original size as before the compression happen.
Take a look at these commands. It is using a single file of 93 Mb.
Sample Output
Copying files without the “-C” parameter will result in 1661.3 seconds. You may compare the result to the command below which using the “-C” parameter.
Sample Output
As you can see, when you are using compression, the transfer process is done in 162.5 seconds. It is 10 times faster than not using the “-C” parameter. If you are copying a lot of files across the network, the “-C” parameter would help you to decrease the total time you need.
The thing that we should notice is that the compression method will not work on any files. When the source file is already compressed, you will not find any improvement there. Files such as .zip, .rar, pictures, and .iso files will not be affected by the “-C” parameter.
Change SCP Cipher to Encrypt Files
By default SCP using “AES-128” to encrypt files. If you want to change to another cipher to encrypt it, you can use the “-c” parameter. Take a look at this command.
The above command tells SCP to use the 3des algorithm to encrypt the file. Please be careful that this parameter using “-c” not “-C“.
Limiting Bandwidth Usage with SCP Command
Another parameter that may be useful is the “-l” parameter. The “-l” parameter will limit the bandwidth to use. It will be useful if you do an automation script to copy a lot of files, but you don’t want the bandwidth is drained by the SCP process.
The 400 value behind the “-l” parameter is mean that we limit the bandwidth for the SCP process to only 50 KB/sec. One thing to remember is that bandwidth is specified in Kilobits/sec (kbps). It is mean that 8 bits are equal to 1 byte.
While SCP counts in Kilobyte/sec (KB/s). So if you want to limit your bandwidth for SCP maximum of only 50 KB/s, you need to set it into 50 x 8 = 400.
Specify the Specific port to use with SCP
Usually, SCP is using port 22 as a default port. But for security reasons, you may change the port into another port. For example, we are using port 2249. Then the command should be like this.
Make sure that it uses capital “P” not “p” since “p” is already used for preserved times and modes.
Copy files inside directory recursively
Sometimes we need to copy the directory and all files/directories inside it. It will be better if we can do it in 1 command. SCP supports that scenario using the “-r” parameter.
When the copy process is done, at the destination server you will found a directory named “documents” with all its files. The folder “documents” is automatically created.
Disable progress meter and warning / diagnostic message
If you choose not to see progress meter and warning / diagnostic messages from SCP, you may disable it using the “-q” parameter. Here’s the example.
As you can see, after you enter the password, there is no information about the SCP process. After the process is complete, you will see a prompt again.
Copy files using SCP through Proxy
The proxy server is usually used in the office environment. Natively, SCP is not proxy configured. When your environment using a proxy, you have to “tell” SCP to communicate with the proxy.
Here’s the scenario. The proxy address is 10.0.96.6 and the proxy port is 8080. The proxy also implemented user authentication. First, you need to create the “
/.ssh/config” file. Second, you put this command inside it.
Then you need to create file “
/.ssh/proxyauth” which contains.
After that, you can do SCP transparently as usual.
Please notice that the corkscrew is might not be installed yet on your system. On my Linux Mint, I need to install it first, using the standard Linux Mint installation procedure.
For other yum-based systems, users can install corkscrew using the following yum command.
Another thing is that since the “
/.ssh/proxyauth” file contains your “username” and “password” in clear-text format, please make sure that the file can be accessed by you only.
Select different ssh_config file
For mobile users who often switch between the company networks and public networks, it will be suffering to always change settings in SCP. It is better if we can put a different ssh_config file to match our needs.
Here’s a sample scenario
Proxy is used in the company network but not in the public network and you regularly switch networks.
By default “ssh_config” file per user will be placed in “
/.ssh/config“. Creating a specific “ssh_config” file with proxy compatibility will make it easier to switch between networks.
When you are on the company network, you can use the “-F” parameter. When you are on a public network, you can skip the “-F” parameter.
That’s all about SCP. You can see man pages of SCP for more detail. Please feel free to leave comments and suggestions.
If You Appreciate What We Do Here On TecMint, You Should Consider:
TecMint is the fastest growing and most trusted community site for any kind of Linux Articles, Guides and Books on the web. Millions of people visit TecMint! to search or browse the thousands of published articles available FREELY to all.
If you like what you are reading, please consider buying us a coffee ( or 2 ) as a token of appreciation.

We are thankful for your never ending support.
Источник
Copying a Directory with SCP

The Unix command scp (which stands for «secure copy protocol») is a simple tool for uploading or downloading files (or directories) to/from a remote machine. The transfer is done on top of SSH, which is how it maintains its familure options (like for specifying identities and credentials) and ensures a secure connection. It’s really helpful to be able to move around files between any machine that supports SSH.
Even if you don’t already know how to use the command, scp should be a bit more familiar to you thanks to its similarity to ssh . The biggest differences come with specifying file/directory paths. In this short article we’ll be dealing with directories specifically.
Downloading a Directory
In this use-case, we want to use scp to download a directory from a remote server to our local machine. To achieve this, we’ll use the -r flag, which tells scp to recursively copy all of the directory’s contents to our machine.
Here is an example of using scp to download a directory:
Pretty simple, right? The -r flag is the only difference between downloading a single file and downloading an entire directory. With -r specified, the directory tree is recursively traversed and each file encountered is downloaded.
One important thing to note is that scp does follow symbolic links within directories, so just be aware in case this matters for your purposes.
Uploading a Directory
The same exact concepts as downloading a directory apply here as well. You’ll probably notice that the only difference is where we specify the source directory within the actual command.
Here is an example of using scp to upload a folder:
When the source path comes first, like in the example above, it is assumed to be referring to a directory on your local machine, which is then recursively transferred to the destination machine thanks to the -r flag, as before.
Conclusion
For more information on the scp command, I’d highly encourage you to check out the docs with man scp . Not only is this the fastest way to learn about the command, but it’s a good habit to get in to for any Unix command.
Источник
Копирование файлов scp
Если у вас есть домашний сервер или сервер в интернете, то вам понадобится способ для безопасного перемещения файлов между машинами. Между локальными машинами мы могли бы просто переносить данные с помощью флешки, но на удаленный сервер нужно передавать данные только через сеть. Есть много способов реализации этой задачи.
В этой статье мы рассмотрим как выполняется копирование файлов с помощью утилиты scp (Secure Copy Command), а также что из себя представляет команда Linux scp. При передаче файлы шифруются, так что больше никто не сможет получить к ним доступ и самое интересное, что вам не нужно настраивать FTP или другое дополнительное программное обеспечение. Будет достаточно сервера SSH.
Что такое SCP?
Команда scp — это утилита, которая работает по протоколу SSH, а значит, все что вам нужно для передачи файла на компьютер, это чтобы на нем был запущен SSH сервер, а также вы должны знать логин и пароль для подключения к нему. С помощью команды scp вы можете не только перемещать файлы между локальной и удаленной системой, но и между двумя удаленными системами. Для этого тоже будет достаточно знать пароли от них. И в отличие от Rsync вам не нужно авторизоваться на одном из серверов.
Копирование файлов scp
Эта статья рассчитана в первую очередь на начинающих, поэтому я попытаюсь объяснять все как можно подробнее. Перед тем, как мы перейдем к практике, нужно рассмотреть общий синтаксис команды:
$ scp опции пользователь1@хост1 : файл пользователь2@хост2: файл
Опции утилиты больше касаются протокола SSH и настраивают общее ее поведение. Дальше следует адрес первого и второго файла. Каждый из них может быть расположен как на локальной, так и на удаленной машине. А теперь рассмотрим основные опции, которые могут нам понадобиться:
- -1 — использовать протокол SSH1;
- -2 — использовать протокол SSH2;
- -B — пакетный режим для передачи нескольких файлов;
- -C — включить сжатие;
- — l — установить ограничение скорости в кбит/сек;
- -o — задать нужную опцию SSH;
- -p — сохранять время модификации;
- -r — рекурсивное копирование директорий;
- -v — более подробный режим.
scp /home/sergiy/file root@losst.ru:/root/
В качестве пользователя нужно использовать любого пользователя, который есть на сервере. Вместо IP вы можете также домен сервера. Только необходимо, чтобы у выбранного пользователя были права записи в указанную папку.
С помощью опции -r вы можете скопировать на удаленную машину целый каталог. Команда будет выглядеть вот так:
scp -r /home/sergiy/photos root@losst.ru:/root/
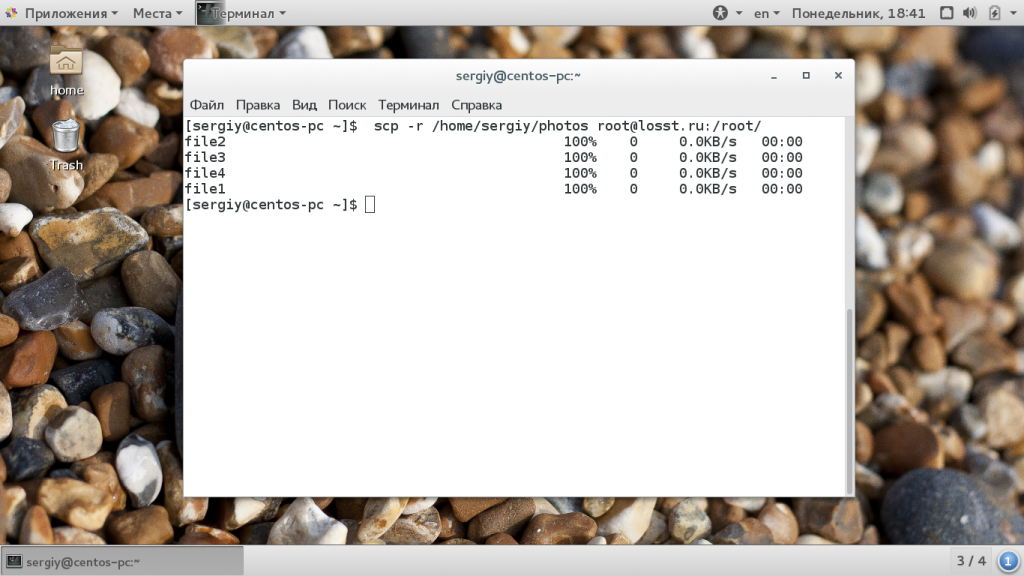
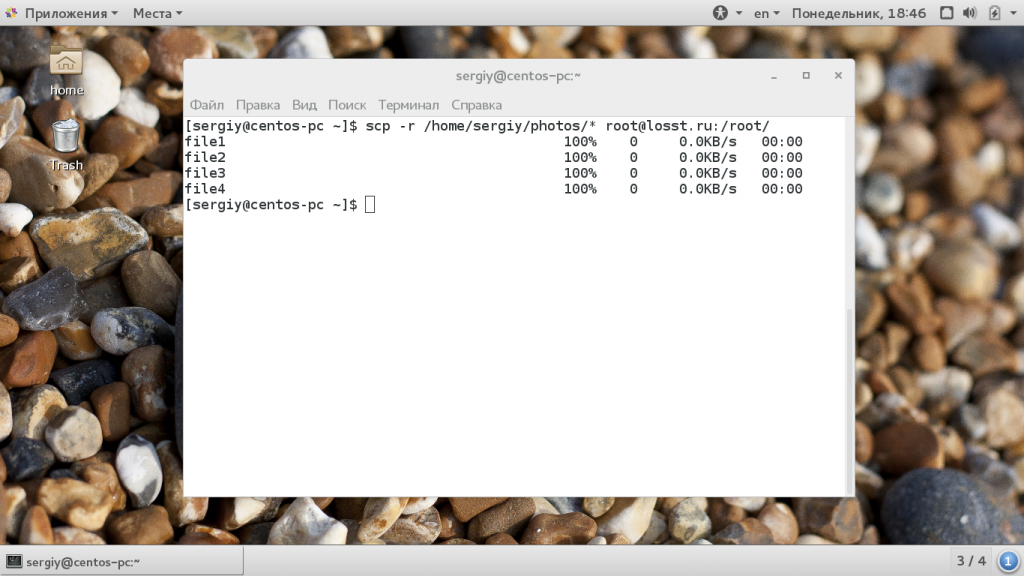
Убедитесь, что у исходного каталога нет косой черты, а у каталога назначения она должна обязательно быть. Немного изменив синтаксис с косой чертой можно передать все файлы из каталога на удаленный сервер:
scp -r /home/sergiy/photos/* root@losst.ru:/root/
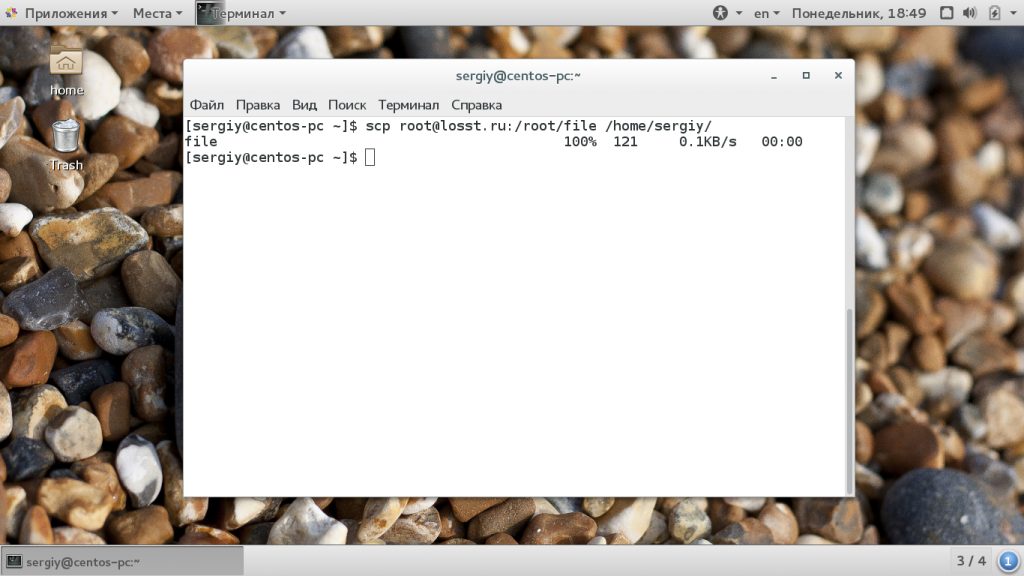
Если поменять местами локальный путь и сервер, то вы сможете копировать файлы scp c удаленного сервера на локальный компьютер:
scp root@losst.ru:/root/file /home/sergiy/
Таким же самым образом вы можете копирование файлов scp или папок с сервера:
scp -r root@losst.ru:/root/photos /home/sergiy/

Обратите внимание, что папка, в которую вы собираетесь копировать должна завершаться косой чертой, иначе папка, которую вы копируете запишется вместо той, в которую нужно скопировать.
Чтобы скачать файл scp из одного сервера на другой, просто необходимо указать данные аутентификации на каждом из них. Например, скопируем один файл:
scp root@losst.ru:/home/root/index.html root@losst.ru:/home/root/www/
Скопируем папку с того же удаленного сервера:
scp root@losst.ru:/root/photos root@losst.ru:/home/root/www/
Выводы
В этой статье мы рассмотрели как выполняется передача файлов scp, как это работает и что вы можете сделать с помощью этой утилиты. Как вы видите, перемещать файлы с одного сервера на другой очень просто. В Linux достаточно понять основы чтобы начать работать эффективнее! А команда scp один из таких инструментов.
Источник


