- ИТ База знаний
- Полезно
- Навигация
- Серверные решения
- Телефония
- Корпоративные сети
- Как пользоваться утилитой screen в Linux?
- Немножко теории
- Установка screen в Linux
- Установка screen в Ubuntu и Debian
- Установка screen в CentOS и Fedora
- Запуск screen в Linux
- Сессия screen с именем
- Как правильно работать с окнами в Windows
- Выход из screen сессии
- Возврат к screen сессии
- Немножко кастомизации screen под вас
- Типовой сценарий использования screen
- Выводы
- screen command in Linux with Examples
- 15 Linux Screen Command for Dealing Terminal Sessions
- How does screen work?
- 1) Invoke new windows
- 2) List all the screen processes
- 3) Main command of screen
- 4) Show screen parameter
- 5) Detaching session
- 6) Reattach a session
- 7) Create a new interactive shell
- 8) Switch between screen windows
- 9) Split windows
- 10) Reconnect to a disconnected ssh session
- 11) Scroll up in screen windows
- 12) See the owner of each screen session
- 13) Sharing a screen session with one account
- 14) Lock screen session
- 15) Terminate screen session
- Conclusion
ИТ База знаний
Курс по Asterisk
Полезно
— Узнать IP — адрес компьютера в интернете
— Онлайн генератор устойчивых паролей
— Онлайн калькулятор подсетей
— Калькулятор инсталляции IP — АТС Asterisk
— Руководство администратора FreePBX на русском языке
— Руководство администратора Cisco UCM/CME на русском языке
— Руководство администратора по Linux/Unix
Навигация
Серверные решения
Телефония
FreePBX и Asterisk
Настройка программных телефонов
Корпоративные сети
Протоколы и стандарты
Как пользоваться утилитой screen в Linux?
Окно в «новую жизнь»
Сейчас вы точно прочувствуете важное команды screen . Бывало ли у вас такое, что вы выполняете (очень долго) команду в консоли — CLI на удаленной машине, будучи подключенным через SSH? Команда долго выполняется и близится к завершению как вдруг пропадает подключение, рвется SSH подключение и все, что вы делали — пропало?
Мини — курс по виртуализации
Знакомство с VMware vSphere 7 и технологией виртуализации в авторском мини — курсе от Михаила Якобсена

Прости, что напомнили. Знаем, это болезненно. Что же, вытрем слезы. Для этих ситуаций есть команда screen о которой мы и поговорим.
Немножко теории
Так называемый screen это терминальный мультиплексор (нас тоже пугает это слово). Другими словами, оно дает нам возможность внутри действующей сессии открыть сколько угодно много виртуальных окон/терминалов. Что важно — процесс, запущенный внутри сессии через screen, будет продолжаться даже тогда, когда вы отключитесь от самой первой сессии.
Установка screen в Linux
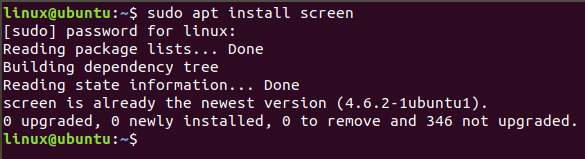
Вообще, пакет screen предустановлен на большинстве современных Linux — дистров. Проверить можно командой:

Если случилось так, что у вас его нет — это можно быстро исправить простой установкой.
Установка screen в Ubuntu и Debian
Установка screen в CentOS и Fedora
Запуск screen в Linux
Чтобы запустить screen в консоли, просто наберите screen . Что может быть проще, не правда ли?
У вас откроется новая сессия в новом окне. Уже здесь вы можете вводить все нужные shell команды. Находясь в режиме скрина (screen) вы можете посмотреть список доступных вам команд управления этим режимом. Вот так:
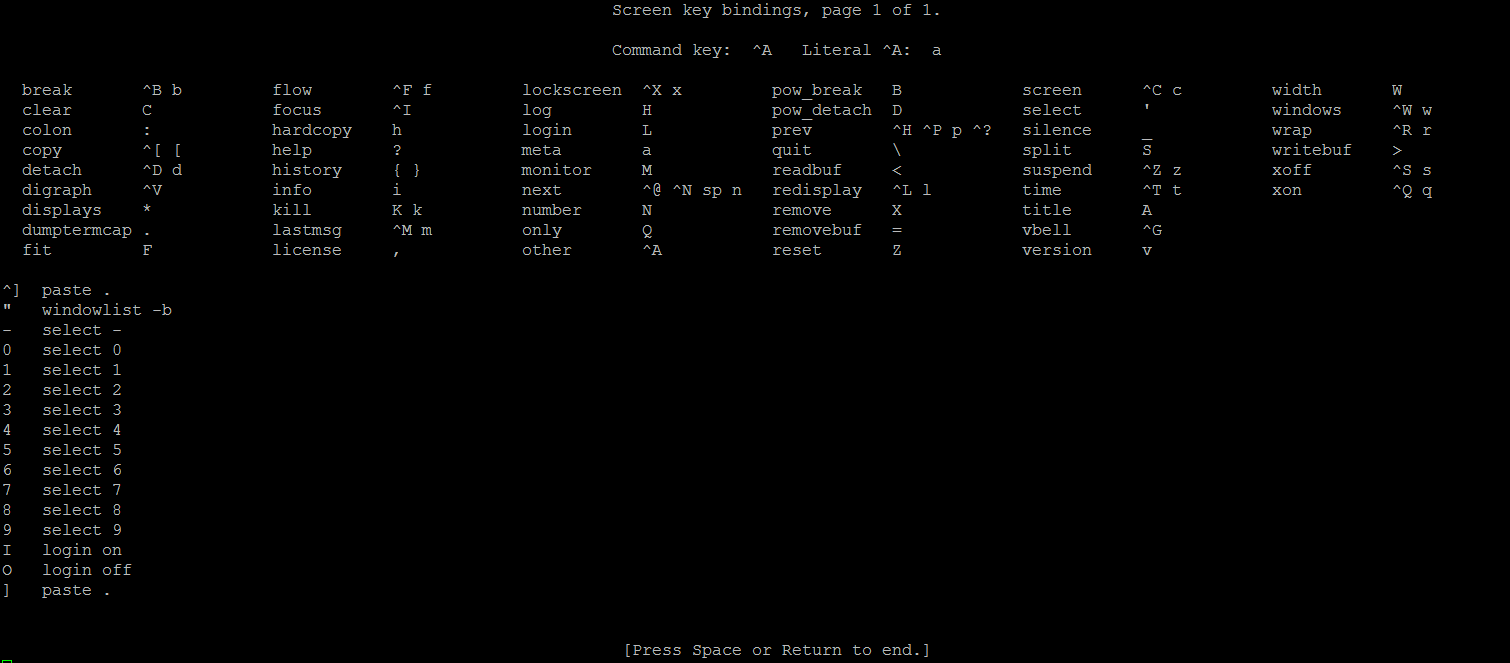
Если не получается нажать указанную выше комбинацию, можно поступить проще: нажмите отдельно Ctrl+a , отпустите, а затем в консоль наберите ? и нажмите Enter
Сессия screen с именем
Ну очень удобная фича. Если вы делаете несколько процессов параллельно, просто обзовите их так, чтобы потом понять, что и где выполняется. Синтаксис такой:
Например, вы можете запустить ping — замер хоста с 1С и назвать сессию так:
Всегда используйте скрин именно так. Будет значительно удобнее.
Как правильно работать с окнами в Windows
Как мы уже сказали, когда вы создаете новую screen — сессию, вы создадите новое окно с shell оболочкой внутри. И что интересно — внутри скрин сессии вы можете создать множество дополнительных окон. Чтобы это сделать, воспользуйтесь командой (внутри скрина) Ctrl+a и c . Новому окну будет назначен номер от 0 до 9 (первый свободный).
Ниже мы собрали все команды, которые понадобятся вам для управления скринами:
- Ctrl+a и c — создать дополнительное окно ;
- Ctrl+a и » — показать список всех имеющихся окон;
- Ctrl+a и 0 — переключиться на окно с номером 0 (номер может быть иной);
- Ctrl+a и A — переименовать текущее окно;
- Ctrl+a и S — разделить окно по горизонтали на две области;
- Ctrl+a и | — разделить окно по вертикали на две области;
- Ctrl+a и tab — переключить рабочий фокус на следующую область разделенного окна;
- Ctrl+a и Ctrl+a — переключить рабочий фокус на предыдущую область разделенного окна;
- Ctrl+a и Q — закрыть все разделенные области кроме;
- Ctrl+a и X — закрыть текущую область;
Выход из screen сессии
Вы можете легко выйти из screen — сессии набрав:
Самое важное: запущенная вами в этот момент команда не остановится и будет продолжать свое выполнение.
Возврат к screen сессии
Чтобы вернуть к screen — сессии используйте команду:
Если у вас запущено больше чем одна screen — сессия, то после ключа r нужно указать ее ID. Узнать его просто с помощью команды:
Вывод этой команды будет выглядеть вот так:
В выводе выше мы выделили ID — сессий. Например, чтобы вернуться к сессии 32328 (pings_towards_1C), дайте команду:
Немножко кастомизации screen под вас
Когда screen запускается, он считывает свои конфигурационные параметры из /etc/screenrc и
/.screenrc , если файл присутствует. Так вот — мы можем легко перенастроить предпочтения использования screen и сделать это в файле .screenrc .
Посмотрите пример с комментариями, как мы закастомили screen для себя:
Типовой сценарий использования screen
Общий случай, так сказать. Обычно он состоит из следующих шагов:
- После SSH подключения к серверу, набираем screen ;
- Запускаем интересующую нас команду в режиме screen — сессии;
- Выполняем команду Ctrl + a и d , чтобы выйти из режима работы с экран-сессией
- Через какое-то время возвращаемся к запущенному ранее экрану командой screen -r
Выводы
Мы разобрались, как создавать screen сессии, управлять ими внутри, открывая новые окна, выходить из их режима управления (без прекращения выполнения команды), делить горизонтально и вертикально экраны.
Ах да, ещё мы научились кастомизировать screen под себя. Профит!
Мини — курс по виртуализации
Знакомство с VMware vSphere 7 и технологией виртуализации в авторском мини — курсе от Михаила Якобсена
Источник
screen command in Linux with Examples
screen command in Linux provides the ability to launch and use multiple shell sessions from a single ssh session. When a process is started with ‘screen’, the process can be detached from session & then can reattach the session at a later time. When the session is detached, the process that was originally started from the screen is still running and managed by the screen itself. The process can then re-attach the session at a later time, and the terminals are still there, the way it was left.
Syntax:
Options:
- -a: It force all capabilities into each window’s termcap.
- -A -[r|R]: It adapt all windows to the new display width & height.
- -c file: It read configuration file instead of ‘.screenrc’.
- -d (-r): It detach the elsewhere running screen (and reattach here).
- -dmS name: It start as daemon: Screen session in detached mode.
- -D (-r): It detach and logout remote (and reattach here).
- -D -RR: It do whatever is needed to get a screen session.
- -e xy: It change the command characters.
- -f: It make the flow control on, -fn = off, -fa = auto.
- -h lines: It set the size of the scrollback history buffer.
- -i: It interrupt output sooner when flow control is on.
- -l: It make the login mode on (update /var/run/utmp), -ln = off.
- -ls [match]: It display all the attached screens.
- -L: It turn on output logging.
- -m: It ignore $STY variable, do create a new screen session.
- -O: It choose optimal output rather than exact vt100 emulation.
- -p window: It preselect the named window if it exists.
- -q: It quiet startup. Exits with non-zero return code if unsuccessful.
- -Q: It commands will send the response to the stdout of the querying process.
- -r [session]: It reattach to a detached screen process.
- -R: It reattach if possible, otherwise start a new session.
- -S sockname: It name this session .sockname instead of …
- -t title: It set title. (window’s name).
- -T term: It use term as $TERM for windows, rather than “screen”.
- -U: It tell screen to use UTF-8 encoding.
- -v: It print “Screen version 4.06.02 (GNU) 23-Oct-17”.
- -x: It attach to a not detached screen. (Multi display mode).
- -X: It execute as a screen command in the specified session.
Shortcut keys Options:
- Ctrl-a + c: It create a new windows.
- Ctrl-a + w: It display the list of all the windows currently opened.
- Ctrl-a + A: It rename the current windows. The name will appear when you will list the list of windows opened with Ctrl-a + w.
- Ctrl-a + n: It go to the next windows.
- Ctrl-a + p: It go to the previous windows.
- Ctrl-a + Ctrl-a: It back to the last windows used.
- Ctrl-a + k: It close the current windows (kill).
- Ctrl-a + S: It split the current windows horizontally. To switch between the windows, do Ctrl-a + Tab.
- Ctrl-a + |: It split the current windows vertically.
- Ctrl-a + d: It detach a screen session without stopping it.
- Ctrl-a + r: It reattach a detached screen session.
- Ctrl-a + [: It start the copy mode.
- Ctrl-a + ]: It paste the copied texte.
Examples:
- Installation of screen command: To install the screen command simply go to the terminal and type the following command:
screen: It will start a new window within the screen.

-S: It will start a new window within the screen and also gives a name to the window. It creates a session which is identified by that name. The name can be used to reattach screen at a later stage.

-ls: It is used to display the currently opened screens including those running in the background. It will list all the attached as well as detached screen sessions.

-d: It is used to detach a screen session so that it can be reattached in future. It can also be done with the help of shortcut key Ctrl-a + d
Here 1643 is the screen id we want to detach.

-r: It is used to reattach a screen session which was detached in past.

Note:
- To check for the manual page of screen command, use the following command:
- To check the help page of screen command, use the following command:
Источник
15 Linux Screen Command for Dealing Terminal Sessions

The screen or GNU screen is a terminal multiplexer. Using this, you can run any number of console-based-applications, interactive command shells, course-based applications, etc. You can use screen to keep running the program after you accidentally close the terminal, or even after you log out and later resume right wherever you are.
A practical example is where you are running a task on a remote Linux machine into which you have an ssh session. Many times you have seen this ssh session getting terminated and you can not work anymore. Here comes screen utility to help resume the sessions.
How does screen work?
When screen is called, it creates a single window with a shell in it (or the specified command) and then gets out of your way so that you can use the program as you normally would. Then, at any time, you can create new (full-screen) windows with other programs in them (including more shells), kill the current window, view a list of the active windows, copy text between windows, switch between windows, etc.
Screen manages a session consisting of one or more windows each containing a shell or other program. Furthermore, screen can divide a terminal display into multiple regions, each displaying the contents of a window. All windows run their programs completely independent of each other. Programs continue to run when their window is currently not visible and even when the whole screen session is detached from the user’s terminal. This is practical to prevent involuntary ssh timeout session.
Now let’s check how to use this utility in Linux.
1) Invoke new windows
If the screen command is not already present on your system, you can install it with the command below.
You can start screen just by typing screen at the command prompt. This screen command will start a new window within the screen.
You can start a new window within the screen and also gives a name to the window, for example aloft. It creates a session with identified by that name. The name can be used to reattach at a later stage.
Note that you can do all your work as you are in the normal CLI environment.
2) List all the screen processes
As we are able to start new windows within the screen, it is possible to display the currently opened screens including those running in the background. It will list all the existing screen sessions.
3) Main command of screen
It is possible to operate with screen by using some commands. We will list below the main commands more useful.
- Ctrl-a followed by c : create a new windows
- Ctrl-a followed by w : display the list of all the windows currently opened
- Ctrl-a followed by A : rename the current windows. The name will appear when you will list the list of windows opened with Ctrl-a followed by w .
- Ctrl-a followed by n : go to the next windows
- Ctrl-a followed by p : go to the previous windows
- Ctrl-a followed by Ctrl-a: back to the last windows used.
- Ctrl-a followed by a number from 0 to X: go the windows n° X.
- Ctrl-a followed by » : choose the windows into which to move on.
- Ctrl-a followed by k : close the current windows (kill)
- Ctrl-a followed by S : split the current windows horizontally. To switch between the windows, do Ctrl-a followed by Tab .
- Ctrl-a followed by | : split the current windows vertically
- Ctrl-a followed by d : detach a screen session without stopping it
- Ctrl-a followed by r : reattach a detached screen session
- Ctrl-a followed by [ : start the copy mode
- Ctrl-a followed by ] : paste the copied texte
4) Show screen parameter
You can list all screen’s parameters for help. To do this, type Ctrl-a followed by the character ? . It will display a list of all the commands.

5) Detaching session
The best advantage of the screen command is the possibility to detach a screen session. You can start a screen session on one computer at the office, detach the session from the local terminal, go home, log into our office computer remotely and reattach the screen session to our home computer’s terminal. During the intervening time, all jobs on your office computer have continued to execute. This function is used to prevent the lost of data which occur suddenly during dropped ssh connection.
To good understand what we are talking about, let us take an example. We launch an installation process.

Now we will detach the screen with Ctrl-a followed by d . We can check with the command below.
It is possible to detach screen with screen -d command followed by the screen id or its name. It means that you will need to open another windows or console to detach the session if the current console have a process in progress. You first need to list current attached screen.
Now on a new terminal, enter the command below.
or you can use the name
You will have an output as below which indicates that the screen was detached.
6) Reattach a session
After you detach the screen, it is possible to reattach it with the command. Normally your screen session is still working so all your processes are not stopped. Before reattaching a session, you need to list the session as above, then choose the session to reattach.

You can see that after reattaching the session, the windows show the end of the process which is completed. It means that you can work on ssh and detach a session which you will reattach at your home to continue your work process without losing anything.
7) Create a new interactive shell
If you have some jobs to do and you don’t want to lose your work, it is possible to create a new interactive shell. You can easily have some interactive shells (numbered from 0 to X) open in one terminal window. When you start a new session, you’ll be in shell 0.
To do this, you need to create new windows within existing windows with Ctrl-a followed by c . You will have something like below.

You can see screen 3 at the top of the screenshot which indicates that we are on the third screen. At the bottom we can also see 3
8) Switch between screen windows
When you have opened more than one screen windows, to switch between each window, press Control-a followed by space or the number of the shell. For example, to switch to shell number 1, press Control-a then 1 . For example, we will move on the first screen.

The top and the bottom of the screenshot shows that we are on the first screen.
9) Split windows
To have a global view of your work, you can need to split your windows instead of having multiple windows. Ctrl-a followed by S or | split your screen horizontally or vertically. It is possible to repeat the operation with no limit. To move another windows, use Ctrl-a followed by Tab .

When the cursor is on the bottom windows, you can create a new window ( Ctrl-a followed by c ) or call an existing window ( Ctrl-a followed by a number).

To close a splitted windows, use Ctrl-a followed by X (Note that it is the uppercase character).
10) Reconnect to a disconnected ssh session
When you first log in,
- run screen to start a screen session. You get another shell, run commands in that.
- When you have finished, detach the screen session then logout to the ssh
- You can list all the screen session first
- Reconnect to your screen session and continue your work
The screen command is most used for ssh session because it helps to continue your work after a disconnection without losing the current processes in progress.
11) Scroll up in screen windows
Since screen takes over managing your remote programs, you can’t use your terminal emulator’s scroll features while running screen. You must use the Screen commands to access the scrollback buffer.
- Use Ctrl-a followed by escape
- Press the Up and Down arrow keys or the PgUp and PgDn keys to scroll through previous output.

You can see where is my cursor on the screenshot. Each virtual terminal has its own scrollback buffer.
12) See the owner of each screen session
The screen -ls or screen -list commands only show you your own screen sessions even for root. As far as I know that’s as good as it gets for screen itself.
If you want to see which screen sessions have been started by which users look in each users directory in /var/run/screen/ .
13) Sharing a screen session with one account
You can have two people logged into the same account from remote locations. They can easily share a screen session (so what one types the other sees and vice versa). To do this:
- Create a named screen session:
- Attach to the screen session in your terminal window
- Have the other person (logged into the same account) also attach to the screen session
you will have exactly the same output displayed on the other location. Everything which will appear on your terminal will also appear on the terminal of the other user.
14) Lock screen session
It is possible to lock screen session without locking you normal session user. It means that you can leave your computer and be sure that nobody will come to unauthorized operations. To do this, use the command Ctrl-a followed by x (Note that it is the lowercase character).
15) Terminate screen session
When you have finished and you want to quit screen session, you can use the command Ctrl-a followed by k . You will be prompted for a confirmation.

You can also use the exit command. If you want to save your process in progress, You can just detach your screen session before terminating the session.
Conclusion
The screen utility can monitor a window for activity or inactivity. This is great if you are downloading large files, compiling, or waiting for output. At that time, if needed, you can even start some process from a computer using screen command and detach it when you are done.
Источник


