- ИТ База знаний
- Полезно
- Навигация
- Серверные решения
- Телефония
- Корпоративные сети
- Как пользоваться утилитой screen в Linux?
- Немножко теории
- Установка screen в Linux
- Установка screen в Ubuntu и Debian
- Установка screen в CentOS и Fedora
- Запуск screen в Linux
- Сессия screen с именем
- Как правильно работать с окнами в Windows
- Выход из screen сессии
- Возврат к screen сессии
- Немножко кастомизации screen под вас
- Типовой сценарий использования screen
- Выводы
- 10 Screen Command Examples to Manage Linux Terminals
- Start Screen for the First Time
- Show Screen Parameter
- Detach the Terminal Session with Screen
- Re-attach the Terminal Session with Screen
- Using Multiple Screen Terminal Windows
- Switching Between Screen Terminal Windows
- Enable Screen Logging in Linux
- Lock Linux Terminal Screen
- Add password to Lock Screen
- Leaving Screen Terminal Session
- If You Appreciate What We Do Here On TecMint, You Should Consider:
ИТ База знаний
Курс по Asterisk
Полезно
— Узнать IP — адрес компьютера в интернете
— Онлайн генератор устойчивых паролей
— Онлайн калькулятор подсетей
— Калькулятор инсталляции IP — АТС Asterisk
— Руководство администратора FreePBX на русском языке
— Руководство администратора Cisco UCM/CME на русском языке
— Руководство администратора по Linux/Unix
Навигация
Серверные решения
Телефония
FreePBX и Asterisk
Настройка программных телефонов
Корпоративные сети
Протоколы и стандарты
Как пользоваться утилитой screen в Linux?
Окно в «новую жизнь»
Сейчас вы точно прочувствуете важное команды screen . Бывало ли у вас такое, что вы выполняете (очень долго) команду в консоли — CLI на удаленной машине, будучи подключенным через SSH? Команда долго выполняется и близится к завершению как вдруг пропадает подключение, рвется SSH подключение и все, что вы делали — пропало?
Онлайн курс по Linux
Мы собрали концентрат самых востребованных знаний, которые позволят тебе начать карьеру администратора Linux, расширить текущие знания и сделать уверенный шаг к DevOps

Прости, что напомнили. Знаем, это болезненно. Что же, вытрем слезы. Для этих ситуаций есть команда screen о которой мы и поговорим.
Немножко теории
Так называемый screen это терминальный мультиплексор (нас тоже пугает это слово). Другими словами, оно дает нам возможность внутри действующей сессии открыть сколько угодно много виртуальных окон/терминалов. Что важно — процесс, запущенный внутри сессии через screen, будет продолжаться даже тогда, когда вы отключитесь от самой первой сессии.
Установка screen в Linux
Вообще, пакет screen предустановлен на большинстве современных Linux — дистров. Проверить можно командой:

Если случилось так, что у вас его нет — это можно быстро исправить простой установкой.
Установка screen в Ubuntu и Debian
Установка screen в CentOS и Fedora
Запуск screen в Linux
Чтобы запустить screen в консоли, просто наберите screen . Что может быть проще, не правда ли?
У вас откроется новая сессия в новом окне. Уже здесь вы можете вводить все нужные shell команды. Находясь в режиме скрина (screen) вы можете посмотреть список доступных вам команд управления этим режимом. Вот так:
Если не получается нажать указанную выше комбинацию, можно поступить проще: нажмите отдельно Ctrl+a , отпустите, а затем в консоль наберите ? и нажмите Enter
Сессия screen с именем
Ну очень удобная фича. Если вы делаете несколько процессов параллельно, просто обзовите их так, чтобы потом понять, что и где выполняется. Синтаксис такой:
Например, вы можете запустить ping — замер хоста с 1С и назвать сессию так:
Всегда используйте скрин именно так. Будет значительно удобнее.
Как правильно работать с окнами в Windows
Как мы уже сказали, когда вы создаете новую screen — сессию, вы создадите новое окно с shell оболочкой внутри. И что интересно — внутри скрин сессии вы можете создать множество дополнительных окон. Чтобы это сделать, воспользуйтесь командой (внутри скрина) Ctrl+a и c . Новому окну будет назначен номер от 0 до 9 (первый свободный).
Ниже мы собрали все команды, которые понадобятся вам для управления скринами:
- Ctrl+a и c — создать дополнительное окно ;
- Ctrl+a и » — показать список всех имеющихся окон;
- Ctrl+a и 0 — переключиться на окно с номером 0 (номер может быть иной);
- Ctrl+a и A — переименовать текущее окно;
- Ctrl+a и S — разделить окно по горизонтали на две области;
- Ctrl+a и | — разделить окно по вертикали на две области;
- Ctrl+a и tab — переключить рабочий фокус на следующую область разделенного окна;
- Ctrl+a и Ctrl+a — переключить рабочий фокус на предыдущую область разделенного окна;
- Ctrl+a и Q — закрыть все разделенные области кроме;
- Ctrl+a и X — закрыть текущую область;
Выход из screen сессии
Вы можете легко выйти из screen — сессии набрав:
Самое важное: запущенная вами в этот момент команда не остановится и будет продолжать свое выполнение.
Возврат к screen сессии
Чтобы вернуть к screen — сессии используйте команду:
Если у вас запущено больше чем одна screen — сессия, то после ключа r нужно указать ее ID. Узнать его просто с помощью команды:
Вывод этой команды будет выглядеть вот так:
В выводе выше мы выделили ID — сессий. Например, чтобы вернуться к сессии 32328 (pings_towards_1C), дайте команду:
Немножко кастомизации screen под вас
Когда screen запускается, он считывает свои конфигурационные параметры из /etc/screenrc и
/.screenrc , если файл присутствует. Так вот — мы можем легко перенастроить предпочтения использования screen и сделать это в файле .screenrc .
Посмотрите пример с комментариями, как мы закастомили screen для себя:
Типовой сценарий использования screen
Общий случай, так сказать. Обычно он состоит из следующих шагов:
- После SSH подключения к серверу, набираем screen ;
- Запускаем интересующую нас команду в режиме screen — сессии;
- Выполняем команду Ctrl + a и d , чтобы выйти из режима работы с экран-сессией
- Через какое-то время возвращаемся к запущенному ранее экрану командой screen -r
Выводы
Мы разобрались, как создавать screen сессии, управлять ими внутри, открывая новые окна, выходить из их режима управления (без прекращения выполнения команды), делить горизонтально и вертикально экраны.
Ах да, ещё мы научились кастомизировать screen под себя. Профит!
Онлайн курс по Linux
Мы собрали концентрат самых востребованных знаний, которые позволят тебе начать карьеру администратора Linux, расширить текущие знания и сделать уверенный шаг к DevOps
Источник
10 Screen Command Examples to Manage Linux Terminals
The screen is a full-screen software program that can be used to multiplexes a physical console between several processes (typically interactive shells). It offers a user to open several separate terminal instances inside a single terminal window manager.
The screen application is very useful if you are dealing with multiple programs from a command-line interface and for separating programs from the terminal shell. It also allows you to share your sessions with others users and detach/attach terminal sessions.
![]() Screen Command Examples
Screen Command Examples
On my Ubuntu Server Edition, Screen has been installed by default. But, in Linux Mint does not have a screen installed by default, I need to install it first using the apt-get command before using it.
Please follow your distribution installation procedure to install the screen.
Actually, the screen is a very good terminal multiplexer program in Linux which is hidden inside hundreds of Linux commands.
Let’s start to see the usage of the screen command in Linux with the following examples.
Start Screen for the First Time
Just type the screen at the command prompt. Then the screen will show an interface exactly as the command prompt.
![]() Screen Terminal Program
Screen Terminal Program
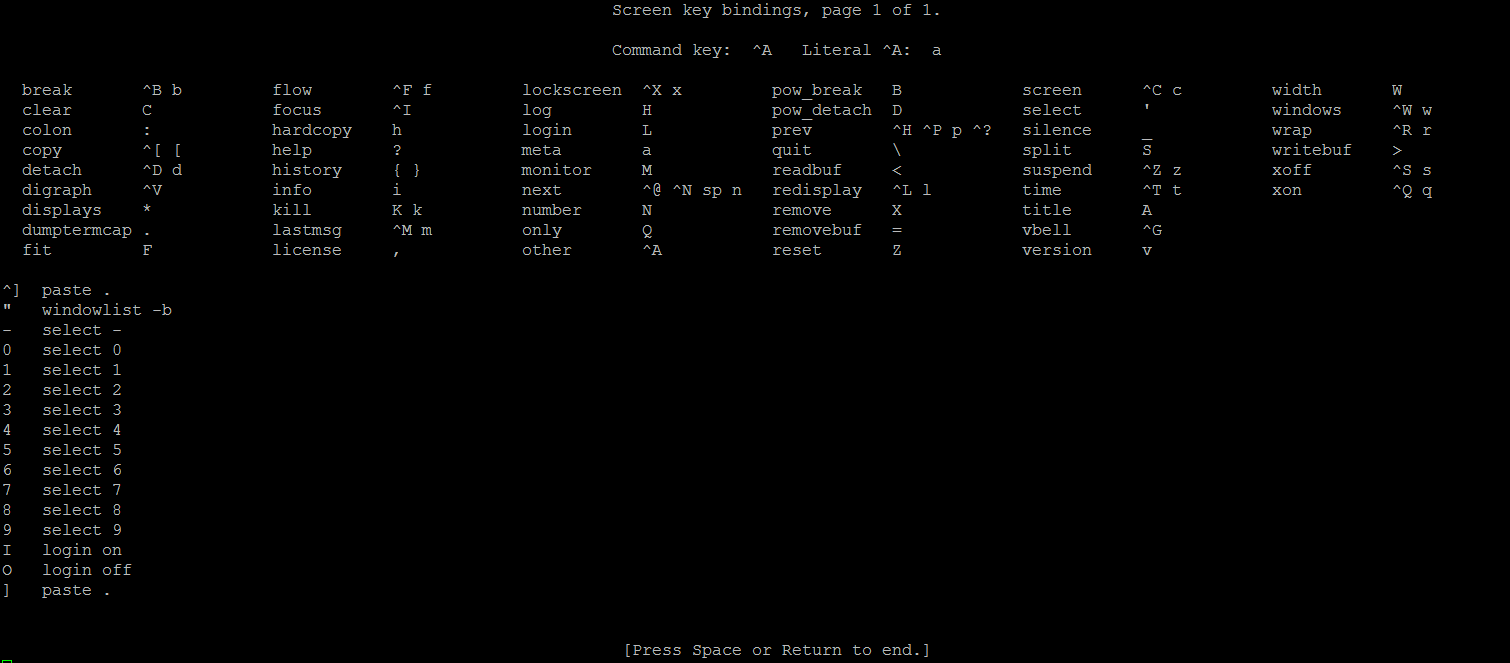
Show Screen Parameter
When you enter the screen, you can do all your work as you are in the normal command-line environment. But since the screen is an application, so it has commands or parameters.
Type “Ctrl-A” and “?” without quotes. Then you will see all commands or parameters on the screen.
![]() Screen Terminal Key Bindings
Screen Terminal Key Bindings
To get out of the help screen, you can press the “space-bar” button or “Enter“. (Please note that all shortcuts which use “Ctrl-A” are done without quotes).
Detach the Terminal Session with Screen
One of the advantages of a screen that is you can detach it. Then, you can restore it without losing anything you have done on the screen. Here’s the sample scenario:
You are in the middle of SSH on your server. Let’s say that you are downloading a 400MB patch for your system using the wget command.
The download process is estimated to take 2 hours long. If you disconnect the SSH session, or suddenly the connection is lost by accident, then the download process will stop. You have to start from the beginning again. To avoid that, we can use a screen and detach it.
Take a look at this command. First, you have to enter the screen.
Then you can do the download process. For example on my Linux Mint, I am upgrading my dpkg package using the apt-get command.
Sample Output
While downloading in progress, you can press “Ctrl-A” and “d“. You will not see anything when you press those buttons. The output will be like this:
Re-attach the Terminal Session with Screen
After you detach the screen, let say you are disconnecting your SSH session and going home. In your home, you start to SSH again to your server and you want to see the progress of your download process. To do that, you need to restore the screen. You can run this command:
And you will see that the process you left is still running.
When you have more than 1 screen session, you need to type the screen session ID. Use screen -ls to see how many screens are available.
Sample Output
If you want to restore screen 7849.pts-0.mint, then type this command.
Using Multiple Screen Terminal Windows
When you need more than 1 screen to do your job, is it possible? Yes, it is. You can run multiple screen windows at the same time. There are 2 (two) ways to do it.
First, you can detach the first screen and run another screen on the real terminal. Second, you do a nested screen.
Switching Between Screen Terminal Windows
When you do a nested screen, you can switch between screens using keys “Ctrl-A” and “n“. It will move to the next screen. When you need to go to the previous screen, just press “Ctrl-A” and “p“.
To create a new screen window, just press “Ctrl-A” and “c“.
Enable Screen Logging in Linux
Sometimes it is important to record what you have done while you are in the console. Let say you are a Linux Administrator who manages a lot of Linux servers.
With this screen logging, you don’t need to write down every single command that you have done. To activate the screen logging function, just press “Ctrl-A” and “H“. (Please be careful, we use capital ‘H’ letters. Using non-capital ‘h’, will only create a screenshot of the screen in another file named hardcopy).
At the bottom left of the screen, there will be a notification that tells you to like: Creating logfile “screenlog.0“. You will find screenlog.0 file in your home directory.
This feature will append everything you do while you are in the screen window. To close the screen to log running activity, press “Ctrl-A” and “H” again.
Another way to activate the logging feature, you can add the parameter “-L” when the first time running the screen. The command will be like this.
Lock Linux Terminal Screen
The screen also has a shortcut to lock the screen. You can press the “Ctrl-A” and “x” shortcuts to lock the screen. This is handy if you want to lock your screen quickly. Here’s a sample output of the lock screen after you press the shortcut.
You can use your Linux password to unlock it.
Add password to Lock Screen
For security reasons, you may want to put the password to your screen session. A Password will be asked whenever you want to re-attach the screen. This password is different from the Lock Screen mechanism above.
To make your screen password protected, you can edit the “$HOME/.screenrc” file. If the file doesn’t exist, you can create it manually. The syntax will be like this.
To create “crypt_password” above, you can use the “mkpasswd” command on Linux. Here’s the command with the password “pungki123“.
mkpasswd will generate a hash password as shown above. Once you get the hash password, you can copy it into your “.screenrc” file and save it. So the “.screenrc” file will be like this.
Next time you run the screen and detach it, a password will be asked when you try to re-attach it, as shown below:
Type your password, which is “pungki123” and the screen will re-attach again.
After you implement this screen password and you press “Ctrl-A” and “x“, then the output will be like this.
A Password will be asked to you twice. The first password is your Linux password, and the second password is the password that you put in your .screenrc file.
Leaving Screen Terminal Session
There are 2 (two) ways to leaving the screen. First, we are using “Ctrl-A” and “d” to detach the screen. Second, we can use the exit command to terminating the screen. You also can use “Ctrl-A” and “K” to kill the screen.
That’s some of the screen usages on daily basis. There are still a lot of features inside the screen command. You may see the screen man page for more detail.
If You Appreciate What We Do Here On TecMint, You Should Consider:
TecMint is the fastest growing and most trusted community site for any kind of Linux Articles, Guides and Books on the web. Millions of people visit TecMint! to search or browse the thousands of published articles available FREELY to all.
If you like what you are reading, please consider buying us a coffee ( or 2 ) as a token of appreciation.

We are thankful for your never ending support.
Источник


