- Ubuntu как Miracast Отправитель / получатель
- 7 ответов
- отправитель
- Получатель
- Linux screen mirroring wifi
- About
- How to Mirror & Control Your Android Phone from the Ubuntu Desktop
- Scrcpy: See Your Phone Screen on a PC
- Display & Control Android over USB
- Scrcpy System Requirements
- Benefits of Scrcpy
- Scrcpy Features at a glance:
- How to Install Scrcpy on Ubuntu
- Screen Mirror/Wireless Casting.
- jbar2016
- wizardfromoz
- atanere
- JasKinasis
Ubuntu как Miracast Отправитель / получатель
Я ничего не мог найти в Ubuntu, действующем как получатель или отправитель Miracast.
- Это может работать вообще?
- Есть ли аппаратные предпосылки?
- Требуется ли WiFi или он может работать через локальную сеть или другое сетевое соединение?
- Wi-Fi Direct, кажется, является необходимым требованием, достаточно ли это? (т.е. если система поддерживает WiFi direct, значит ли это, что она поддерживает Miracast?)
- Есть ли различия в поддержке между получением / отправкой?
- Как задержка? (по сравнению с конкурентами, то есть VNC, коммерческими устройствами Miracast и т. д.)
- Как мне на самом деле использовать это, если это сложно?
В частности, я планирую использовать его вместе с телефоном Android (4.x Jelly Bean).
7 ответов
OpenWFD мертв и теперь заменен MiracleCast:
MiracleCast — это реализация технологии Miracast с открытым исходным кодом (также: Wifi-Display (WFD)). Он основан на исследовательском проекте OpenWFD и заменит его. Мы ориентируемся на правильную и тесную интеграцию в существующие системы Linux-Desktop по сравнению с OpenWFD, который задумывался как площадка для быстрого прототипирования.
Несмотря на свое название и происхождение, сам проект не ограничивается Miracast. Мы можем поддерживать любой вид потоковой передачи с минимальным объемом дополнительной работы. Тем не менее, Miracast останется главной целью развития благодаря уровню осведомленности.
Это все еще в начале своего цикла разработки. В настоящее время кажется, что он может выполнять связывание, но не выполняет реальное потоковое видео.
Демонстрация OpenWFD на FOSDEM 2014 также выполнила потоковую передачу, но, насколько я понимаю, MiracleCast — это проект » сделай все правильно «, тогда как код, который он показал в FOSDEM, «вероятно, будет работать только на этой машине».
Miracast основан на WiFi Direct, который, насколько я могу судить, требует беспроводной карты с аппаратной поддержкой стандарта.
отправитель
Я думаю, что Intel Wireless Display — это способ отправить экран ноутбука на приемник Miracast.
Однако, насколько я могу судить, Ubuntu в настоящее время не поддерживает карты Wireless Display.
Получатель
Для получения контента от передатчика Miracast (например, от вашего телефона) вы можете приобрести адаптеры приемника Miracast, которые будут выводиться на любой вход HDMI: Rocketfish ™ — видеоприемник Miracast
Я не знаю, есть ли на любом устройстве драйверы Ubuntu. Если кто-то может подтвердить или предложить другое устройство с драйверами Ubuntu, это было бы здорово.
Источник
Linux screen mirroring wifi
MiracleCast — Wifi-Display/Miracast Implementation


![]()
The MiracleCast project provides software to connect external monitors to your system via Wi-Fi. It is compatible to the Wifi-Display specification also known as Miracast. MiracleCast implements the Display-Source as well as Display-Sink side.
The Display-Source side allows you to connect external displays to your system and stream local content to the device. A lot of effort is put into making this as easy as connecting external displays via HDMI. Note: This is not implemented yet. Please see #4
On the other hand, the Display-Sink side allows you to create wifi-capable external displays yourself. You can use it on your embedded devices or even on full desktops to allow other systems to use your device as external display.
The MiracleCast projects requires the following software to be installed:
systemd: A system management daemon. It is used for device-management (udev), dbus management (sd-bus) and service management. Systemd >= 221 will work out of the box. For earlier versions systemd must be compiled with —enable-kdbus, even though kdbus isn’t used, but only the independent, experimental sd-libraries. required: >=systemd-213
glib: A utility library. Used by the current DHCP implementation. Will be removed once sd-dns gains DHCP-server capabilities. required:
=glib2-2.38 (might work with older releases, untested..)
check: Test-suite for C programs. Used for optional tests of the MiracleCast code base. optional:
=check-0.9.11 (might work with older releases, untested..)
gstreamer: MiracleCast rely on gstreamer to show cast its output. You can test if all needed is installed launching res/test-viewer.sh
P2P Wi-Fi device Although widespread these days, there are some devices not compatible with Wi-Fi Direct (prior know as Wi-Fi P2P). Test yours with res/test-hardware-capabilities.sh
copy the dbus policy res/org.freedesktop.miracle.conf to /etc/dbus-1/system.d/
Build and install
To compile MiracleCast, you can choose from:
See more info on wiki Building
Automatic interface selection with udev
If you want to select the interface to start miraclecast with, add a udev rule with the script res/write-udev-rule.sh and configure miraclecast with
You can also choose the interface with —interface option for miracle-wifid.
Linux Flavours and general compilation instructions
Check your systemd version with:
If you are on 221 or above your systemd has kdbus enabled.
If you are below 221, an alternative repo was created to install systemd with dbus
See there was interface changes on systemd 219, if you are below that version, use branch systemd-219 to compile miraclecast
See specific instructions on that repo
Use existing AUR package. Remember to enable kdus to systemd-git dependency if you are below 221 systemd.
You can achieve installation using yaourt
If you feel confidence enough (since systemd is the entrypoint for an OS) extract instructions from arch linux AUR PKGBUILD:
Steps to use it as sink
shutdown wpa_supplicant and NetworkManager
launch wifi daemon
launch sink control (your network card will be detected. here 3)
run WiFi Display on link:
Pair your machine with other miracast device (mirroring)
See your screen device on this machine
Steps to use it as peer
Repeat steps 1 and 2 from «use as sink»
launch wifi control
Enable visibility for other devices
Locate them using scanning
Apart from list, or show info with peer there’s nothing useful here by now. For a Q&D see Using as peer
The User Input Back Channel (UIBC) is an optional WFD feature that when implemented facilitates communication of user inputs to a User Interface, present at the WFD Sink, to the WFD Source.
To use it just add —uibc on miracle-sinkctl startup. Single mouse events and key events are implemented.
This software is licensed under the terms of the GNU-LGPL license. Please see ./COPYING for further information.
This software is originally maintained by: David Herrmann dh.herrmann@gmail.com
This fork is maintained by: Alberto Fanjul albertofanjul@gmail.com
If you have any questions, do not hesitate to contact one of the maintainers.
- Website: http://www.freedesktop.org/wiki/Software/miracle
- Original repo: git://people.freedesktop.org/
About
Connect external monitors to your system via Wifi-Display specification also known as Miracast
Источник
How to Mirror & Control Your Android Phone from the Ubuntu Desktop
I wanted to mirror my Android phone on my desktop using USB, but I didn’t want to install an app on my phone or subscribe to a service to do it.
And I succeeded!
There’s a free, open-source tool designed precisely for the purpose of viewing your phone screen on your laptop or desktop PC.
In this post I tell you more about the app, where you can download it, and how to use it on Ubuntu & Linux Mint.
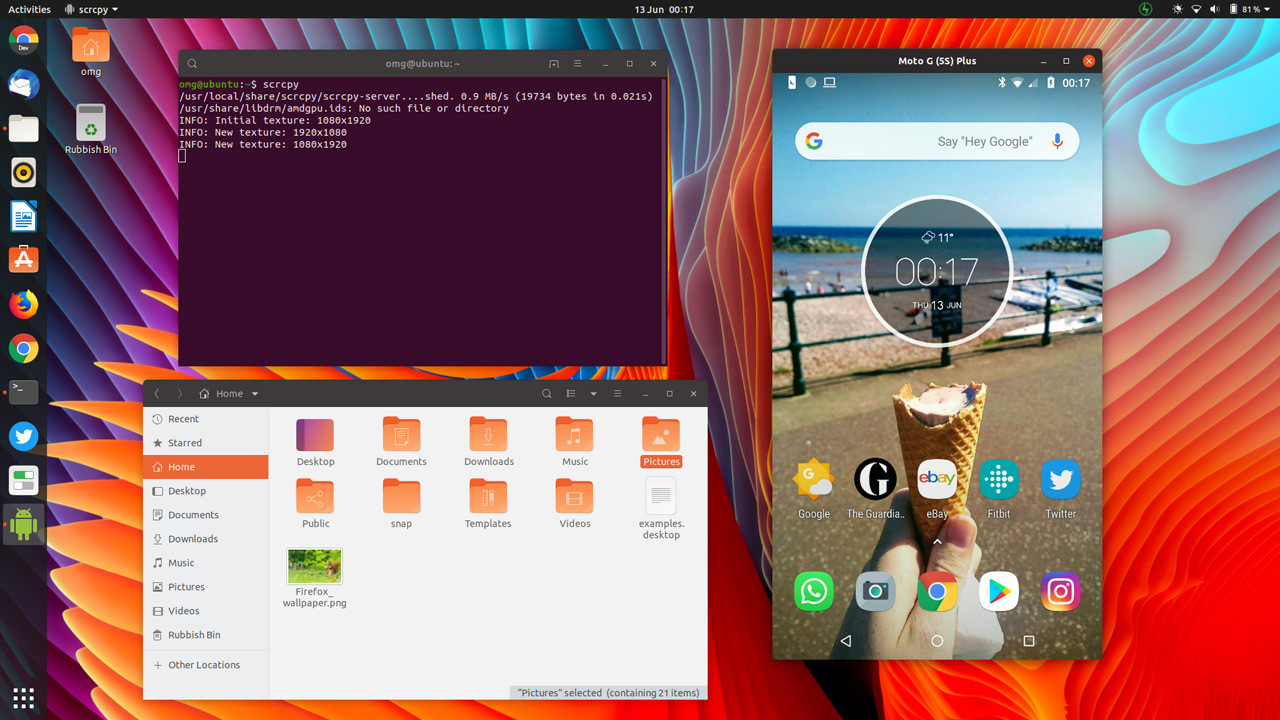
Scrcpy: See Your Phone Screen on a PC
Do more than just see your Android phone’s screen on your PC: interact with it using a keyboard and mouse
‘Scrcpy‘ is the tool in question. It lets you mirror an Android device to a PC desktop (in my case a Linux PC). We’re talking a free-floating window on a Windows, macOS or Linux computer here, and all entirely for free!
But what if you want to do more than just see your phone’s screen on your PC. Can it do that too?
‘Scrcpy’ lets you interact with your phone using your computer’s keyboard and mouse (or, if you’ve got one, a touchpad or touchscreen).
It’s kinda crazy the opportunities this opens up.
For example, you can use Scrcpy and a full-sized physical keyboard to tap out a ranty/witty Instagram comment or email; use your mouse to swipe, sift and sort through Snapchat’s terrible interface; record yourself beating a difficult level in a popular game; and much more.
Scrcpy is especially useful for Android app developers who want to test, debug or screencast their software. The app even let you to to drag and drop .apk files from your desktop on to the app window to install it on your phone.
Versatility is what makes Scrcpy a utility that developers will want to add to their software toolbox, and keep coming back to. Regular users will want to play around with it too.
And the fact that it is free, open-source software?
Well, that just adds to its appeal.
Display & Control Android over USB
Scrcpy is created by the team behind Genymotion, a popular Android emulator but it is not an Android emulator itself. It doesn’t not “install” Android on your desktop PC, or make a copy of it, or anything else.
As the Github project page explains, the app is designed to: “…display and control of Android devices connected on USB (or over TCP/IP). It does not require any root access. It works on GNU/Linux, Windows and MacOS.”
Now, this sort of functionality isn’t new. Apps like Vysor and AirDroid also offer Android screen mirroring on a PC, albeit (often) at a cost.
Scrcpy is 100% free. It gives you a high-resolution “mirror” of your phone’s screen in a floating window. You can freely resize and fullscreen this window and you can chang or lock the orientation if needed.
Interaction happens in “real time”. There’s is not, in my testing, any perceptible delay or stuttering while using it.
Does Scrcpy do everything rival apps can? No, but it does enough. That makes it a viable, reliable, and free alternative to Vysor et al.
And while tech like Chromecast and Miracast mean that it’s never been easier to cast the content of your smartphone to a nearby screen it’s useful being able to interact with what you see without needing to paw a touchscreen!
Scrcpy System Requirements
To see your Android screen on the Linux desktop to interact with apps or content, record your phone screen, or perform other basic tasks, you can — and you already have everything you need to do it!
First thing: Android.
To use Scrcpy your smartphone or tablet must be running Android 5.0 or later. You must have developer options > USB debugging enabled.
To enable developer options in Android just go to Settings > System > About Phone and continually tap the build/version number listed until a notification appears.
And that is pretty much only hard requirement, provided you’re happy to attach your smartphone to your Linux machine using USB.
To use the Scrcpy wireless display feature requires the android-tools-adb package on your Linux desktop. You’ll connect to your phone over adb (which involves entering IP addresses; see Scrcpy docs for more).
Since whole thing “just works” over USB, it’s what I choose to use.
Benefits of Scrcpy
Scrcpy’s focus is on being lightweight and performant. It touts high frame rates and low latency.
The tool is also non-intrusive; you don’t need to be root, there are no apps to install on your phone, and no extraneous extensions to install on your desktop.
Plus, as noted by XDA Developers, the latest version of Scrcpy even lets you mirror your phone’s screen when the display is off! Earlier versions couldn’t do this.
Scrcpy works by running a server on your Android device, which the desktop app communicates with using USB (or wirelessly using an ADB tunnel).
In short, Scrcpy is a terrific way to view your Android screen on your computer without almost zero-effort, and interact with it in real time.
Scrcpy Features at a glance:
- Does not require root
- Available for Windows, macOS & Linux
- No app required required on phone.
- High resolution mirror
- Type using your computer keyboard
- Clipboard sync
- Interact using your mouse
How to Install Scrcpy on Ubuntu
Scrcpy is free, open-source software available for Windows, macOS and Linux. You can find a variety of downloads on the ‘releases’ page of the Scrcpy GitHub:
You can install Scrcpy on Ubuntu as a Snap app from the Snap Store:
You can install Scrcpy on Ubuntu as a Snap app using snapd and the following command:
Ensure your Android device has USB debugging enabled (see ‘requirements’ section above for details on how to do that), attatch to your Linux PC or laptop using a USB cable, and then launch Scrcpy from the command line:
Home » News » How to Mirror & Control Your Android Phone from the Ubuntu Desktop
Источник
Screen Mirror/Wireless Casting.
jbar2016
New Member
i am new to linux, starting to get used to the OS, i am using kubuntu.
i am wondering what i can use to screen mirror from kubuntu?

wizardfromoz
Administrator
Hi @jbar2016 and welcome to linux.org
Have you tried Google with «wireless casting kubuntu», and were there any useful leads there?
Chris Turner
wizardfromoz


atanere
Well-Known Member
I don’t use much «screen mirroring». but I think of it as a way to bluetooth connect between my phone and my smart TV. Maybe there are other applications too, but I just don’t do much of this sort of thing.
What you may be asking about, instead, is «remote desktop.» This is a very similar thing (in my mind). so that you could control your Kubuntu Linux from another computer (or even from your phone). The app I use for this is TeamViewer. but I have never used it with a phone. Personally, I don’t trust phones too much, and anything with remote connection capability to your home computer should be thoughtfully considered for the risk it presents.
Remote desktop is a great troubleshooting tool for helping people who live too far away, and there are other ways of doing remote desktop besides TeamViewer. but TeamViewer makes it very easy. If you decide to test it, you need to use the same version on each device that you will connect. I am still using version 12 and have never upgraded to v13, so I don’t know about it specifically.

JasKinasis
Well-Known Member
You could stream your linux desktop to your TV using something like a chromecast stick.
I’ve never tried using chromecast, but that would offer the most portable and wireless option at relatively low cost. The only tricky bit might be getting it working — with any luck the following link has that covered:
https://www.linux.com/learn/how-stream-content-linux-system-chromecast
There are also screencasting programs like OBS Studio that will allow you to create a video stream of your desktop — but I think the streaming functionality requires a connection to some kind of web-based streaming service (e.g. twitch.tv, facebook live etc).
OBS should be available in the *buntu repos.
Offhand, I’m not sure whether OBS Studio allows you to create a localised stream on your local wifi network or not. So the downside to this approach is that your stream could be broadcast to anybody listening on the internet! :/
Another option (albeit a much more expensive option) might be to consider using something like wireless HDMI Extenders.
These things are quite expensive and aren’t completely wireless, because they require two short HDMI cables (one to connect your TV to one of the extenders and the other to connect your laptop to the other extender). I think the extenders each have a power supply too — so there would also be a power cable required for each extender.
Although not a completely wireless solution — it at least means that you could use your TV as a second monitor on your Linux PC and you can have your PC further away than you could with a direct, cabled HDMI connection. (Typically HDMI cables are no longer than 2 or 3 metres — So with a cable your PC would have to be pretty close to the TV.)
By using a wireless HDMI extender, you could have your PC virtually anywhere in the house. It wouldn’t be a particularly portable setup, but wireless HDMI extenders might be worth the expense if the setup will be a permanent thing — e.g. the PC in question is always going to be situated in exactly the same place.
So there are advantages and disadvantages to each option.
Personally, whenever I want to connect my Linux laptop to the TV in the living room, I just use a 2 metre long HDMI cable. Not at all wireless, but it’s the simplest, cheapest and most direct solution for me!
After connecting my laptop to the TV, it’s just a case of opening the KDE settings dialog and enabling the TV in the monitor settings page.
Also in the «audio hardware» settings tab of the audio settings page — change «full stereo duplex» to «HDMI output» to route all sound from your laptop to your TV.
Источник


