- How do I Use Multiple Screens on One Terminal over ssh session?
- Install screen if it is not installed under Debian Linux
- FreeBSD user can use ports to install screen
- Login to remote server over ssh
- (E) But how do I switch between these two tasks?
- Common screen commands
- Suggested readings:
- 10 Screen Command Examples to Manage Linux Terminals
- Start Screen for the First Time
- Show Screen Parameter
- Detach the Terminal Session with Screen
- Re-attach the Terminal Session with Screen
- Using Multiple Screen Terminal Windows
- Switching Between Screen Terminal Windows
- Enable Screen Logging in Linux
- Lock Linux Terminal Screen
- Add password to Lock Screen
- Leaving Screen Terminal Session
- If You Appreciate What We Do Here On TecMint, You Should Consider:
- How to Use Linux Screen Command [Essential Guide]
- Install Screen on your Linux distribution
- Keybindings in screen
- How to use Screen in Linux
- Start and name a session
- Quick re-attach
- List all sessions in screen
- Use PID for re-attachment
- Closing screens
- View multiple terminal windows at once
How do I Use Multiple Screens on One Terminal over ssh session?
Most of the time GUI is not available on remote Linux system, you login over ssh and start to work, if you need to run two or three task at a time, you login over ssh two or three times. However, with screen windows manager utility you can run multiple terminals at the same time from single console login over ssh session (UNIX guru uses the term called multiplexing for this concept). Any seasoned Linux admin should be aware of this nifty tool 🙂
Install screen if it is not installed under Debian Linux
Type the following command:
# apt-get install screen
FreeBSD user can use ports to install screen
# cd /usr/ports/misc/screen
# make install clean
Login to remote server over ssh
(C) Start screen session. You can name your window/session (1 is name of session):
$ screen -S 1
- No ads and tracking
- In-depth guides for developers and sysadmins at Opensourceflare✨
- Join my Patreon to support independent content creators and start reading latest guides:
- How to set up Redis sentinel cluster on Ubuntu or Debian Linux
- How To Set Up SSH Keys With YubiKey as two-factor authentication (U2F/FIDO2)
- How to set up Mariadb Galera cluster on Ubuntu or Debian Linux
- A podman tutorial for beginners – part I (run Linux containers without Docker and in daemonless mode)
- How to protect Linux against rogue USB devices using USBGuard
Join Patreon ➔
Let us start pine mail reader on first session or window.
$ pine
(D) Next you would like to download something from ftp/http site while you are reading emails. You need to create another screen window by pressing special key combination. Press CTRL + a followed by c key (first hit CTRL+a, releases both keys and press c). As soon as you hit ‘c’ you will get new shell prompt at console. Now use wget to download belenix.iso.bz2 (Solaris live CD) from net:
$ wget http://www.genunix.org/distributions/belenix_site/binfiles/belenix.iso.bz2
(E) But how do I switch between these two tasks?
- Switching between windows is the specialty of screen utility. So to switch between pine and wget window (or session) press CTRL+a followed by n key (first hit CTRL+a, releases both keys and press n).
- To list all windows use the command CTRL+a followed by ” key (first hit CTRL+a, releases both keys and press ” ).
- To switch to window by number use the command CTRL+a followed by ‘ (first hit CTRL+a, releases both keys and press ‘ it will prompt for window number).
Common screen commands
| screen command | Task |
| Ctrl+a c | Create new window |
| Ctrl+a k | Kill the current window / session |
| Ctrl+a w | List all windows |
| Ctrl+a 0-9 | Go to a window numbered 0 9, use Ctrl+a w to see number |
| Ctrl+a Ctrl+a | Toggle / switch between the current and previous window |
| Ctrl+a S | Split terminal horizontally into regions and press Ctrl+a c to create new window there |
| Ctrl+a :resize | Resize region |
| Ctrl+a :fit | Fit screen size to new terminal size. You can also hit Ctrl+a F for the the same task |
| Ctrl+a :remove | Remove / delete region. You can also hit Ctrl+a X for the same taks |
| Ctrl+a tab | Move to next region |
| Ctrl+a D (Shift-d) | Power detach and logout |
| Ctrl+a d | Detach but keep shell window open |
| Ctrl-a Ctrl-\ | Quit screen |
| Ctrl-a ? | Display help screen i.e. display a list of commands |
Suggested readings:
See screen command man page for further details:
man screen
Источник
10 Screen Command Examples to Manage Linux Terminals
The screen is a full-screen software program that can be used to multiplexes a physical console between several processes (typically interactive shells). It offers a user to open several separate terminal instances inside a single terminal window manager.
The screen application is very useful if you are dealing with multiple programs from a command-line interface and for separating programs from the terminal shell. It also allows you to share your sessions with others users and detach/attach terminal sessions.
![]() Screen Command Examples
Screen Command Examples
On my Ubuntu Server Edition, Screen has been installed by default. But, in Linux Mint does not have a screen installed by default, I need to install it first using the apt-get command before using it.
Please follow your distribution installation procedure to install the screen.
Actually, the screen is a very good terminal multiplexer program in Linux which is hidden inside hundreds of Linux commands.
Let’s start to see the usage of the screen command in Linux with the following examples.
Start Screen for the First Time
Just type the screen at the command prompt. Then the screen will show an interface exactly as the command prompt.
![]() Screen Terminal Program
Screen Terminal Program
Show Screen Parameter
When you enter the screen, you can do all your work as you are in the normal command-line environment. But since the screen is an application, so it has commands or parameters.
Type “Ctrl-A” and “?” without quotes. Then you will see all commands or parameters on the screen.
![]() Screen Terminal Key Bindings
Screen Terminal Key Bindings
To get out of the help screen, you can press the “space-bar” button or “Enter“. (Please note that all shortcuts which use “Ctrl-A” are done without quotes).
Detach the Terminal Session with Screen
One of the advantages of a screen that is you can detach it. Then, you can restore it without losing anything you have done on the screen. Here’s the sample scenario:
You are in the middle of SSH on your server. Let’s say that you are downloading a 400MB patch for your system using the wget command.
The download process is estimated to take 2 hours long. If you disconnect the SSH session, or suddenly the connection is lost by accident, then the download process will stop. You have to start from the beginning again. To avoid that, we can use a screen and detach it.
Take a look at this command. First, you have to enter the screen.
Then you can do the download process. For example on my Linux Mint, I am upgrading my dpkg package using the apt-get command.
Sample Output
While downloading in progress, you can press “Ctrl-A” and “d“. You will not see anything when you press those buttons. The output will be like this:
Re-attach the Terminal Session with Screen
After you detach the screen, let say you are disconnecting your SSH session and going home. In your home, you start to SSH again to your server and you want to see the progress of your download process. To do that, you need to restore the screen. You can run this command:
And you will see that the process you left is still running.
When you have more than 1 screen session, you need to type the screen session ID. Use screen -ls to see how many screens are available.
Sample Output
If you want to restore screen 7849.pts-0.mint, then type this command.
Using Multiple Screen Terminal Windows
When you need more than 1 screen to do your job, is it possible? Yes, it is. You can run multiple screen windows at the same time. There are 2 (two) ways to do it.
First, you can detach the first screen and run another screen on the real terminal. Second, you do a nested screen.
Switching Between Screen Terminal Windows
When you do a nested screen, you can switch between screens using keys “Ctrl-A” and “n“. It will move to the next screen. When you need to go to the previous screen, just press “Ctrl-A” and “p“.
To create a new screen window, just press “Ctrl-A” and “c“.
Enable Screen Logging in Linux
Sometimes it is important to record what you have done while you are in the console. Let say you are a Linux Administrator who manages a lot of Linux servers.
With this screen logging, you don’t need to write down every single command that you have done. To activate the screen logging function, just press “Ctrl-A” and “H“. (Please be careful, we use capital ‘H’ letters. Using non-capital ‘h’, will only create a screenshot of the screen in another file named hardcopy).
At the bottom left of the screen, there will be a notification that tells you to like: Creating logfile “screenlog.0“. You will find screenlog.0 file in your home directory.
This feature will append everything you do while you are in the screen window. To close the screen to log running activity, press “Ctrl-A” and “H” again.
Another way to activate the logging feature, you can add the parameter “-L” when the first time running the screen. The command will be like this.
Lock Linux Terminal Screen
The screen also has a shortcut to lock the screen. You can press the “Ctrl-A” and “x” shortcuts to lock the screen. This is handy if you want to lock your screen quickly. Here’s a sample output of the lock screen after you press the shortcut.
You can use your Linux password to unlock it.
Add password to Lock Screen
For security reasons, you may want to put the password to your screen session. A Password will be asked whenever you want to re-attach the screen. This password is different from the Lock Screen mechanism above.
To make your screen password protected, you can edit the “$HOME/.screenrc” file. If the file doesn’t exist, you can create it manually. The syntax will be like this.
To create “crypt_password” above, you can use the “mkpasswd” command on Linux. Here’s the command with the password “pungki123“.
mkpasswd will generate a hash password as shown above. Once you get the hash password, you can copy it into your “.screenrc” file and save it. So the “.screenrc” file will be like this.
Next time you run the screen and detach it, a password will be asked when you try to re-attach it, as shown below:
Type your password, which is “pungki123” and the screen will re-attach again.
After you implement this screen password and you press “Ctrl-A” and “x“, then the output will be like this.
A Password will be asked to you twice. The first password is your Linux password, and the second password is the password that you put in your .screenrc file.
Leaving Screen Terminal Session
There are 2 (two) ways to leaving the screen. First, we are using “Ctrl-A” and “d” to detach the screen. Second, we can use the exit command to terminating the screen. You also can use “Ctrl-A” and “K” to kill the screen.
That’s some of the screen usages on daily basis. There are still a lot of features inside the screen command. You may see the screen man page for more detail.
If You Appreciate What We Do Here On TecMint, You Should Consider:
TecMint is the fastest growing and most trusted community site for any kind of Linux Articles, Guides and Books on the web. Millions of people visit TecMint! to search or browse the thousands of published articles available FREELY to all.
If you like what you are reading, please consider buying us a coffee ( or 2 ) as a token of appreciation.

We are thankful for your never ending support.
Источник
How to Use Linux Screen Command [Essential Guide]
The Screen command in Linux allows the user to create multiple virtual terminals that can be saved by name and reopened using keyboard shortcuts.
Should you consider using screen to improve your workflow? Let’s look at some of the reasons you might want to try it out.
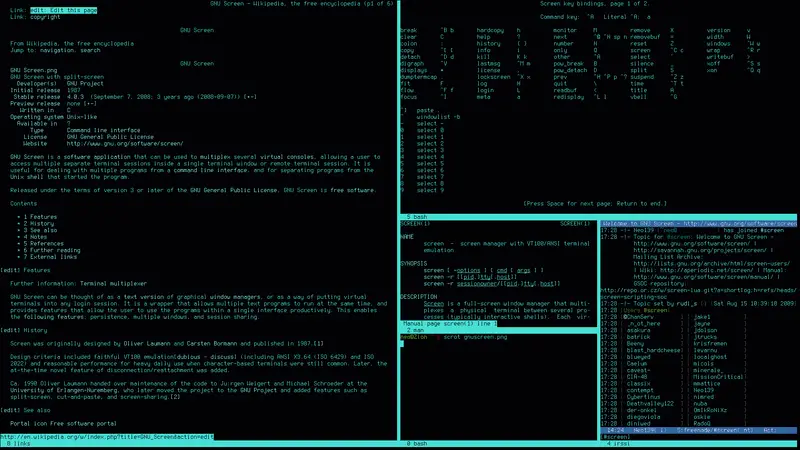 Screenshot of multiple terminals opened in one terminal window
If you spend a lot of time in the terminal, you may find yourself using several terminals at once to perform different tasks.
For example, you may log in via SSH to a remote server and perform some tasks there. At the same time, you may want to keep a tab on the RAM and CPU utilization on the server while doing work on the local system.
With Screen, you can do all of it from one single ‘screen’. You can send running processes and sessions to background without interrupting your current workflow.
Sounds good? Let’s see more about Screen.
Install Screen on your Linux distribution
First, you’ll want to see if this software is already included with your Linux distribution. Many modern distributions include it, but it’s usually easy to install otherwise.
You can check to see if it’s installed by running the following:
I am using Pop OS which is a Debian derivative distribution that uses the apt package manager. Screen is not installed by default, so I will type:
If you are using a different package manager, obviously this command may be different.
Keybindings in screen
Screen is fairly easy to use, but it can still be a little confusing for new users specially because it relies completely on keyboard shortcuts in the terminal.
I’ve created a table to explain some basic functions. You can also access the keybindings screen for a full list.
| Function | Shortcut |
|---|---|
| Detach Screen | [ctrl + a] + d |
| Quit/Kill Screen | [ ctrl + a ] + k |
| Switch to Next | [ ctrl + a ] + n |
| Switch to Previous | [ ctrl + a ] + p |
| All Keybindings | [ ctrl + a ] + ? |
You do not hit all the keys at once. Instead, you will hit [ ctrl + a ] and then the specified key .
It’s important to note that these shortcuts are case-sensitive. Like most things on linux, they can also be customized. This can be achieved by editing the .screenrc file which can usually be found in /etc/screenrc .
How to use Screen in Linux
I will look at these common management tasks in an easy to follow linear method. This will effectively put you in the driver seat as you demo the functionality.
Start and name a session
You can start screen and apply a memorable name.
For this instance, I’ve created one called top (don’t confuse it with the command top, it could be named anything). It automatically launches the named session and I can accomplish whatever task I need to.
I will start an instance of the top command. I will then use the [ctrl + a] + d keyboard shortcut to detach it. Top will continue to run in the background, but I am taken back to the screen application.
From here, I can start another session. Let’s call it ‘free’ (because I’ll use free command here but it can be named anything like session2 etc) and enter:
Combining watch command with free lets you constantly monitor RAM usage.
Detach once again using the [ctrl + a] + d keyboard shortcut. So, you have two processes running now in the background.
How do you get back to your processes to check on them? I’ll explain that to you.
Quick re-attach
You can use the session name to easily re-attach a screen with option -r.
You can see this in action above. If you’re not getting the same results, you may have made a mistake when naming the session (or forgotten all together). This is nothing to panic about.
List all sessions in screen
You can use the following command to list all your open screen sessions.
Since I detached my free session again to enter this, I get the following output:
Use PID for re-attachment
If you didn’t name your sessions, they will be identifiable by an assigned PID and a computer ID. You can use the process ID (PID) to access the desired screen just like you would for a named session.
This is the PID associated with the screen I’ve named “free”.
Closing screens
Okay, if you’re following along you should have the ‘free session’ open. Let’s get rid of it and stop it from running.
You use [ctrl + a]+ k to kill the active screen. A message will appear in the bottom left with a confirmation prompt. Enter y to exit the session. After a moment you will be left with something like this:
You can confirm by listing all the sessions with -ls again.
As you can see, the ‘free screen session’ is no longer active.
View multiple terminal windows at once
What truly makes screen indispensable is the ability to split the terminal into multiple windows within one session arranged horizontally or vertically.
Screen will use the active area to perform the split functions and create screen functions. Once a split is created, it will become the active area. However, you may find that you cannot input anything on the active window. You will need to create a screen in order to do that. You can initialize the shell by using [ctrl + a] + c .
There are more keyboard shortcuts essential for managing and navigating terminal windows:
| Function | Shortcut |
|---|---|
| Split Horizontal (Left/Right) | [ctrl+a]+S |
| Split Vertical (Top/Bottom) | [ctrl+a]+| |
| Create Screen/Start Shell | [ctrl+a]+c |
| Switch by Window ID | [ctrl+a]+0,1,etc. |
| Rename Window | [ctrl+a]+A |
| Close Active Window | [ctrl+a]+X |
| Close All Inactive Windows | [ctrl+a]+Q |
| Switch to Next Window | [ctrl+a]+[tab] |
Feel free to create your own arrangement and explore. You can split into many sessions, but I find that, for me personally, anything beyond a quadrant makes text difficult to read.
In the table, you can see the option to rename windows. This is different than the naming of screens you performed earlier with screen -S [name] . You will notice the window name in the bottom left corner. You can get a list of windows with their corresponding names and ID’s by entering [ ctrl + a ] + [«] .
Remember, you can use all the functions you explored earlier within the new windows also. There are a ton of possibilities to explore.
Do you like screen?
There are so many ways to customize your terminal using GNU Screen. It’s a really great way to improve your productivity and make your workflow a little simpler when you’re doing administration tasks via the command line. Especially, if you’re working on a remote machine.
If you are new to this, leave us a comment and let us know if you enjoyed the tutorial. If you’re more experienced, feel free to share some of your go-to setups with other readers. We love feedback from our readers.
Источник


