- Linux Bash Scripting Part3 – Parameters and Options
- Read parameters
- Check parameters
- Counting parameters
- Iterate over parameters
- Shifting parameter variable
- Bash scripting options
- Separate options from parameters
- Process options with values
- Standard options
- Getting user input using the read command
- Reading password
- Read files
- Bash parameters and parameter expansions
- Passing and analyzing parameters in scripts
- Passed parameters
- Options and getopts
- Parameter expansions
- Subsets and substrings
- Lengths
- Pattern matching
- Putting it together
- Default values
- Passing parameters
- Learn more
Linux Bash Scripting Part3 – Parameters and Options
So far, you’ve seen how to write Linux bash scripts that do the job without user inputs. Today we will continue our series about Linux bash scripting.
I recommend you review the previous posts if you want to know what we are talking about.
Today we will know how to retrieve input from the user and deal with that input, so our script becomes more interactive.
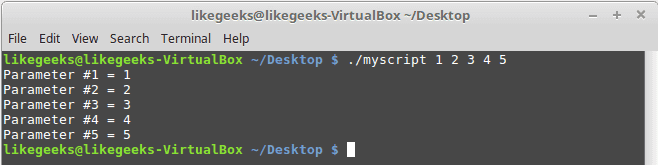
To pass data to your shell script, you should use command line parameters.
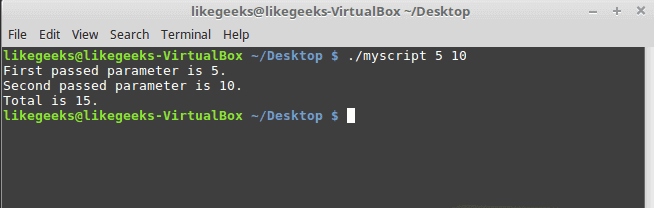
Here we send two parameters (3 and 5) to the script. So how to read these parameters in our bash script?
Table of Contents
Read parameters
The shell gives you some easy to use variables to process input parameters:
- $0 is the script’s name.
- $1 is the 1st parameter.
- $2 is the 2nd parameter.
The shell can read the 9th parameter, which is $9.
Let’s see those variables in action:
Check the results of the following command:

Here is another example of how we can use two parameters and calculate the sum of them.
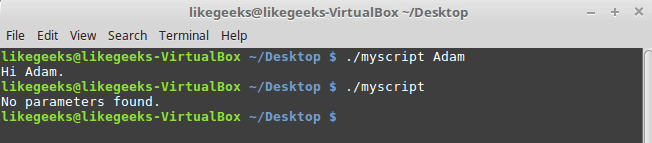
The parameters are not restricted to numbers; they could be strings like this:
And the result is as expected.

What if our parameter contains a space, and we want to pass it as one value? I guess you know the answer from the previous posts. The answer is to use quotations.
If your script requires over nine parameters, you should use braces like this $<10>.
Check parameters
If you don’t pass parameters and your code is expecting it, your script will exit with an error.
That’s why we should use a Linux if statement to make sure that they exist.
Counting parameters
To get how many parameters passed, you can use this variable ($#).
How excellent is Linux bash scripting? This variable also provides a geeky way to get the last parameter. Look at this trick:

Iterate over parameters
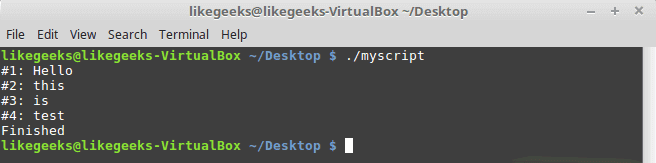
The $* variable holds all the parameters as one value.
The [email protected] variable holds all the parameters as separate values so that you can iterate over them.
This code shows how to use them:
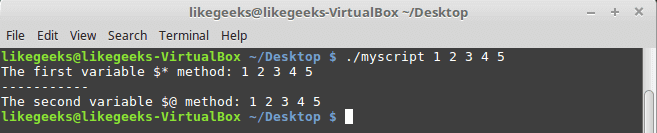
The same result, but if you want to know the difference look at the following example:
Check the result to see the difference:
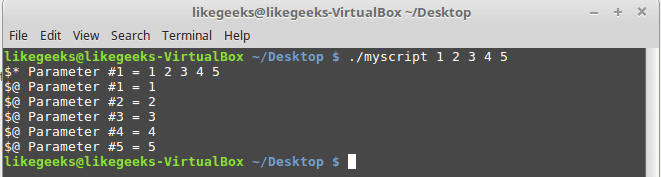
The result is pretty clear. You can use any method according to your needs.
Shifting parameter variable
The shift command moves every parameter variable to the left:
variable $3 ==> variable $2.
variable $2 ==> variable $1.
variable $1 ==> dropped.
variable $0 ==> (the script name) as it is.
You can use the shift command to iterate over parameters like this:
Here, we have a while loop checking $1 length. If $1 becomes zero, the loop stops. And the shift command is shifting all passed parameters to the left.
Careful when using the shift command, since you can’t recover the shifted parameter.
Bash scripting options
Options are single letters with a dash before it.
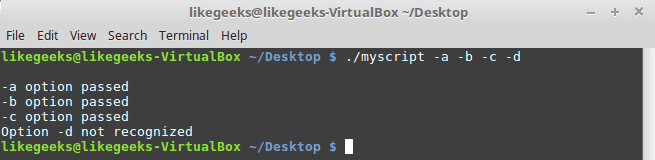
The above code checks for one of the correct options. If you typed one of them, the suitable commands would run.
Separate options from parameters
Sometimes you need to use options and parameters in the same script. You have to separate them. By doing this, you are telling the bash where the parameters are and where the options are.
We use the double dash (–) at the end of the options list. After the shell sees the double dash, it treats the remaining inputs as parameters and not as options.
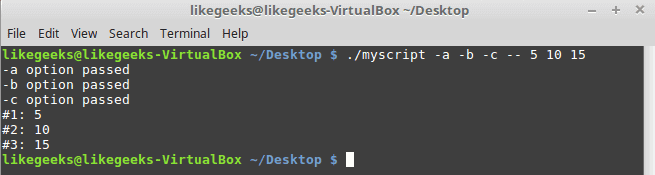
As you can see from the result, all the parameters after the double dash treated as parameters and not options.
Process options with values
When you dig deep into Linux bash scripting, sometimes you need options with additional parameter values like this:
There should be a way to identify any additional parameter for the options and be able to process it.
And if we run it with these options:

From the results, you can see that we get the parameter for the -b option using the $2 variable.
Standard options
When you start your Linux bash scripting, you are free to choose which letter is suitable for your option.
However, some letters are commonly used in Linux programs.
And here is the list of the common options:
| -a | List all items. |
| -c | Get the count of items. |
| -d | Output directory. |
| -e | Expand items. |
| -f | To specify a file. |
| -h | To show the help page. |
| -i | To ignore character case. |
| -l | To list a text. |
| -n | To say no for a question. |
| -o | To send output to a file or so. |
| -q | Keep silent; don’t ask the user. |
| -r | To process something recursively. |
| -s | Stealth mode. |
| -v | Verbose mode. |
| -x | Specify executable. |
| -y | To say yes without prompting the user. |
It’s good to follow standards. If you work with Linux, many of these options may look familiar to you.
Getting user input using the read command
Sometimes you need data from the user while the bash scripting is running.
The bash shell uses the read command for this purpose.
The read command reads input from standard input (the keyboard) or a file descriptor and stores it in a variable:
We use the -n option to disable the newline so that you can type your text in the same line.

You can specify multiple inputs like this:

If you don’t specify variables for the read command, it will save all incoming inputs in the REPLY variable.

You can use the -t option to specify a timeout for input in seconds.
If you do not enter data for five seconds, the script will execute the else clause and print a sorry message.

Reading password
In Linux bash scripting, sometimes, you don’t want the user input to be displayed on the screen, like entering a password.
The -s option suppresses the output from appearing on the screen.

Read files
The read command can read files one line on each call.
Now, if you want to get all file data, you can get the content using the cat command, then send it to the read command using while loop like this:
Or we can make it simpler by redirecting the file content to the while loop like this:
We just pass the file content to the while loop and iterate over every line and print the line number and the content, and each time you increase the count by one.
I hope you find this post interesting. Keep coming back.
Источник
Bash parameters and parameter expansions
Passing and analyzing parameters in scripts
By Ian Shields
Published May 16, 2007
The bash shell is available on many Linux® and UNIX® systems today, and is a common default shell on Linux. In this tip you will learn how to handle parameters and options in your bash scripts and how to use the shell’s parameter expansions to check or modify parameters. This article focuses on bash, and the examples were all run on Linux systems with bash as the shell. However, the same expansions are available in many other shells, such as ksh, ash, or dash, and you may use them with these shells on other UNIX systems or even environments such as Cygwin. Some of the material in this article is excerpted from the IBM Developer tutorial LPI exam 102 prep: Shells, scripting, programming, and compiling, which covers many basic scripting techniques.
Passed parameters
Part of the beauty of functions and shell scripts is the ability to make a single function or script behave differently by passing parameters to it. In this section you will learn how to identify and use the parameters that are passed.
Inside a function or script, you can refer to the parameters using the bash special variables in Table 1. You prefix these with a $ symbol to reference them as with other shell variables.
| Parameter | Purpose |
|---|---|
| 0, 1, 2, … | The positional parameters starting from parameter 0. Parameter 0 refers to the name of the program that started bash, or the name of the shell script if the function is running within a shell script. See the bash man pages for information on other possibilities, such as when bash is started with the -c parameter. A string enclosed in single or double quotes will be passed as a single parameter, and the quotes will be stripped. In the case of double quotes, any shell variables such as $HOME will be expanded before the function is called. You will need to use single or double quotes to pass parameters that contain embedded blanks or other characters that might have special meaning to the shell. |
| * | The positional parameters starting from parameter 1. If the expansion is done within double quotes, then the expansion is a single word with the first character of the IFS special variable separating the parameters, or no intervening space if IFS is null. The default IFS value is a blank, tab, and newline. If IFS is unset, then the separator used is a blank, just as for the default IFS. |
| @ | The positional parameters starting from parameter 1. If the expansion is done within double quotes, then each parameter becomes a single word, so that “$@” is equivalent to “$1” “$2” … If your parameters are likely to contain embedded blanks, you will want to use this form. |
| # | The number of parameters, not including parameter 0. |
Table 1. Shell parameters for functions
Note: If you have more than 9 parameters, you cannot use $10 to refer to the tenth one. You must first either process or save the first parameter ($1), then use the shift command to drop parameter 1 and move all remaining parameters down 1, so that $10 becomes $9 and so on. The value of $# will be updated to reflect the remaining number of parameters. In practice, you will most often want to iterate over the parameters to a function or shell script, or a list created by command substitution using a for statement, so this constraint is seldom a problem.
Now you can define a simple function to do nothing more than tell you how many parameters it has and display them as shown in Listing 1.
Listing 1. Function parameters
Shell scripts handle parameters in the same way as functions. Indeed, you will frequently find yourself assembling scripts out of many small functions. Listing 2 shows a shell script, testfunc.sh, for the same simple task and the result of running it with one of the above inputs. Remember to mark your script executable using chmod +x .
Listing 2. Shell script parameters
In Table 1 you discovered that the shell may refer to the list of passed parameters as $ or $@ and that whether you quote these expressions or not affects how they are interpreted. Whether you use $, “$“, $@, or “$@”, you won’t see much difference in the output of the above function, but rest assured that when things become more complex, the distinctions will matter very much, as you wish to analyze parameters or perhaps pass some to other functions or scripts. Listing 3 shows a function that prints out the number of parameters and then prints the parameters according to these four alternatives. Listing 4 shows the function in action. The default IFS variable uses a space as its first character, so Listing 4 adds a vertical bar as the first character of the IFS variable to show more clearly where this character is being used in the expansion of “$“.
Listing 3. A function to explore parameter handling differences
Listing 4. Printing parameter information with testfunc2
Study the differences carefully, particularly for the quoted forms and the parameters that include white space such as blanks or newline characters. From the single pair of [] characters, note that the expansion of “$*” is indeed a single word.
Options and getopts
Traditional UNIX and Linux commands consider some of the passed arguments to be options. Historically, these were single character switches distinguished from other parameters by having a leading hyphen or minus sign. For convenience several options can be combined as in the command ls -lrt , which provides a long (option -l ) directory listing in reverse order (option -r ) sorted by modification time (option -t ).
You can use the same technique with shell scripts and the getopts builtin command eases your task. To see how this works, consider the example script, testopt.sh, shown in Listing 5.
Listing 5. The testopt.sh script
The getopts command uses a couple of predetermined variables. The OPTIND variable is initially set to 1. Thereafter it contains the index of the next parameter to be processed. The getopts command returns true if an option is found, so a common option processing paradigm uses a while loop with a case statement as in this example. The first argument to getopts is a list of option letters to be recognized, in this case, p and r . A colon (:) after an option letter indicates that the option requires a value; for example, a -f option might be used to indicate a file name, as in the tar command. The leading colon in this example tells getopts to be silent and suppress the normal error messages, as this script will provide its own error handling.
The second parameter, optname in this example, is the name of a variable which will receive the name of the option found. If an option is expected to have a value, the value, if present, will be placed in the variable OPTARG. In silent mode, either of the following two error conditions may occur.
- If an unrecognized option is found, then optname will contain a ? and OPTARG will contain the unknown option.
- If an options that requires a value is found but the value is not, then optname will contain a : and OPTARG will contain the name of the option whose argument is missing.
If not in silent mode, these errors cause a diagnostic error message and OPTARG is unset. The script may use the values of ? or : in optname to detect and possibly handle the error.
Listing 6 shows two examples of running this simple script.
Listing 6. Running the testopt.sh script
If you need to do so, you may pass a set of arguments to getopts for evaluation. You will need to reset OPTIND to 1 yourself if you call getopts for a new set of arguments in a script where you have already used it with other arguments. See the man or info pages for bash for additional details.
Parameter expansions
So now you have looked at how parameters are passed into a function or script and how to identify options. Now to start processing the options and parameters. It would be nice to know what arguments are left after processing the options. Perhaps then you will need to validate parameter values, or assign defaults to missing parameters. This section will introduce some of the parameter expansions that are available in bash. Of course, you also have the full power of the Linux or UNIX commands such as sed or awk for more complex jobs, but you should also know how to use shell expansions.
Let’s start off by building a script from the option analysis and parameter analysis functions that you saw above. Our testargs.sh script is shown in Listing 7.
Listing 7. The testargs.sh script
Try running this script a few times to see how it works, then we’ll examine it in more detail. Listing 8 shows some sample output.
Listing 8. Running the testargs.sh script
Notice how the arguments are separated from the options. The showopts function analyzes the options as before, but uses the return statement to return the value of the OPTIND variable to the calling statement. The calling process assigns this value to a variable, argstart. This value is then used to select a subset of the original parameters, consisting of those parameters that were not processed as options. This is done using the parameter expansion
Remember to use quotes around this expression to keep parameters with embedded spaces together as you saw back in Listing 2.
If you’re new to scripts and functions, note the following:
- The return statement returns an exit value from the showopts function which is accessed from the caller using $?. You might also use return values from functions with command such as test or while to control branching or looping.
Bash functions can include the optional word “function”, for example:
This is not part of the POSIX standard and is not supported on shells such as dash, so if you use it, don’t make your shebang line
as this will give you the system’s default shell which might not work as you wish.
Subsets and substrings
The general form of this expansion is $
You can use this expansion with individual parameters as well as the whole parameter set represented by $* or $@. In this case, the parameter is treated as a string and the number refer to offset and length. For example, if the variable x has the value “some value” then
would have the value “e val”, as shown in Listing 9.
Listing 9. Substrings of shell parameter values
Lengths
You have already seen that $# refers to the number of parameters and that the $
Listing 10. Parameter lengths
Pattern matching
Parameter expansion also includes some pattern matching capabilities with the same wild card capabilities as used in filename expansion or globbing. Note that this is not regular expression matching as used by grep .
| Expansion | Purpose |
|---|---|
| $ | The shell expands WORD as in filename expansion and removes the shortest matching pattern, if any, from the beginning of the expanded value of PARAMETER. Using ‘@’ or ‘$’ results in the pattern removal for each parameter in the list. |
| $ | Results in removal of the longest matching pattern from the beginning rather than the shortest. |
| $ | The shell expands WORD as in filename expansion and removes the shortest matching pattern, if any, from the end of the expanded value of PARAMETER. Using ‘@’ or ‘$’ results in the pattern removal for each parameter in the list. |
| $ | Results in removal of the longest matching pattern from the end rather than the shortest. |
| $ | The shell expands PATTERN as in filename expansion and replaces the longest matching pattern, if any, in the expanded value of PARAMETER. To match patterns at the beginning of the expanded value of PARAMETER, prefix PATTERN with # or prefix it with % if the match should be done at the end. If STRING is empty, the trailing / may be omitted and the matches are deleted. Using ‘@’ or ‘$’ results in the pattern substitution for each parameter in the list. |
| $ | Performs the substitution for all matches instead of just the first. |
Table 2. Shell expansion pattern matching
Listing 11 shows some basic usage of the pattern matching expansions.
Listing 11. Pattern matching examples
Putting it together
Before we cover a few remaining points, let’s look at a real world example of parameter handling. I build the developerWorks author package on a Linux system using a bash script. We store the various files I need in subdirectories of a library we’ll call developerworks/library. The most recent release was version 5.7, so the schema files are found in developerworks/library/schema/5.7, the XSL files are found in developerworks/library/xsl/5.7, and the sample templates are in developerworks/library/schema/5.7/templates. Clearly, a single parameter providing the version, 5.7 in this case, would be sufficient for the script to build paths to all these files. So the script takes a -v parameter which must have a value. Validation of this parameter is performed later by constructing the path and then checking that it exists using [ -d «$pathname» ]
This works fine for production builds, but during development, the files are stored in different directories:
- developerworks/library/schema/5.8/archive/test-5.8/merge-0430
- developerworks/library/xsl/5.8/archive/test-5.8/merge-0430 and
- developerworks/library/schema/5.8/archive/test-5.8/merge-0430/templates-0430
where the version is now 5.8, and the 0430 represents month and day of the latest test version.
To handle this, I added a parameter, -p , which contains the supplemental piece of path information — archive/test-5.8/merge-0430. Now I, or someone else might forget the leading or trailing slash and some Windows user might use back slashes instead of regular slashes, so I decided to just handle that in the script. Also, you’ll notice that the path to the template directory contains the date twice, so I needed to somehow pick off the date, -0430 in this run.
Listing 12 shows the code I used to handle the two parameters and cleanse the partial path according to these requirements. The value of the -v option is stored in the ssversion variable while the cleansed version of the -p variable is stored in pathsuffix and the date, complete with leading hyphen is stored in datesuffix. The comments explain what is happening at each step. You’ll recognize several parameter expansions, including length, substring, pattern matching, and pattern replacement in even this short piece of script.
Listing 12. Analyzing parameters for the developerWorks author package build
As with most things in Linux, and perhaps programming in general, this is not the only solution for this problem, but it does illustrate a more practical use of the expansions you have learned about.
Default values
In the last section you saw how to assign option values to variables such as ssversion or pathsuffix. In this case, an empty version will be detected later and an empty path suffix is what happens for production builds, so that’s acceptable. What if you need to assign default values for parameters that aren’t specified? The shell expansions shown in Table 3 will help you with this task.
| Expansion | Purpose |
|---|---|
| $ | If PARAMETER is unset or null, the shell expands WORD and substitutes the result. The value of PARAMETER is not changed. |
| $ | If PARAMETER is unset or null, the shell expands WORD and assigns the result to PARAMETER. This value is then substituted. You cannot assign values to positional parameters or special parameters this way. |
| $ | If PARAMETER is unset or null, the shell expands WORD and writes the result to standard error. If WORD is not present a message is written instead. If the shell is not interactive, it exits. |
| $ | If PARAMETER is unset or null, nothing is substituted. Otherwise the shell expands WORD and substitutes the result. |
Table 3. Shell expansion related to default values
Listing 13 illustrates these expansions and the differences between them.
Listing 13. Substituting for null or unset variables
Passing parameters
There are some subtleties to parameter passing that can trip you if you are not careful. You already know about the importance of quoting and how quoting affects use of $* and $@, but consider the following case. Suppose you want a script or function that operates on all files or perhaps directories in the current working directory. For this illustration, consider the ll-1.sh and ll-2.sh scripts shown in Listing 14.
Listing 14. Two simple scripts
The script ll-1.sh simply passes each of its parameters in turn to the script ll-2.sh and ll-2.sh does a long directory listing of the passed parameter. My test directory contains a pair of empty files, “file1” and “file 2”. Listing 15 shows the output of the scripts.
Listing 15. Running the scripts – 1
So far, so good. But if you forget to use the * parameter, the script doesn’t do anything. It doesn’t automatically work on the contents of the current working directory as, for example, the ls command does. A simple fix might be to add a check for this condition in ll-1.sh and use the output of the ls command to generate the input for ll-2.sh when nothing is provided to ll1-sh. A possible solution is shown in Listing 16.
Listing 16. Revised version of ll-1.sh
Note that we carefully quoted the output of the ls command to make sure that we handled “file 2” correctly. Listing 17 shows the result of running the new ll-1.sh with the * and without.
Listing 17. Running the scripts – 2
Are you surprised? When you are passing parameters, particularly if they are the result of command output, things can be tricky. The clue here is in the error message which shows that the filenames are separated by newline characters. There are many ways of handling this problem, but one simple way is to use the read builtin as shown in Listing 18. Try it for yourself.
Listing 17. Running the scripts – 2
The moral of the story is that attention to detail and testing with odd inputs will make your scripts more reliable. Good luck!
Learn more
If you’d like to know more about bash scripting in Linux, read the tutorial “LPI exam 102 prep: Shells, scripting, programming, and compiling,” from which part of this article was excerpted.
Источник


