- Поиск в Linux с помощью команды find
- Общий синтаксис
- Описание опций
- Примеры использования find
- Поиск файла по имени
- Поиск по дате
- По типу
- Поиск по правам доступа
- Поиск файла по содержимому
- С сортировкой по дате модификации
- Лимит на количество выводимых результатов
- Поиск с действием (exec)
- Чистка по расписанию
- Find Files Containing Specific Text in Linux
- Find files containing specific text with mc
- About Sergey Tkachenko
- 6 thoughts on “ Find Files Containing Specific Text in Linux ”
- How To Find Files by Content Under UNIX / Linux
- Using grep Command To Find Files By Content on Unix or Linux
- Highlighting searched patterns
- Displaying file names and line number for searched patterns
- Using find command to search files by words or string
- Conclusion
Поиск в Linux с помощью команды find
Утилита find представляет универсальный и функциональный способ для поиска в Linux. Данная статья является шпаргалкой с описанием и примерами ее использования.
Общий синтаксис
— путь к корневому каталогу, откуда начинать поиск. Например, find /home/user — искать в соответствующем каталоге. Для текущего каталога нужно использовать точку «.».
— набор правил, по которым выполнять поиск.
* по умолчанию, поиск рекурсивный. Для поиска в конкретном каталоге можно использовать опцию maxdepth.
Описание опций
| Опция | Описание |
|---|---|
| -name | Поиск по имени. |
| -iname | Регистронезависимый поиск по имени. |
| -type | |
| -size | Размер объекта. Задается в блоках по 512 байт или просто в байтах (с символом «c»). |
| -mtime | Время изменения файла. Указывается в днях. |
| -mmin | Время изменения в минутах. |
| -atime | Время последнего обращения к объекту в днях. |
| -amin | Время последнего обращения в минутах. |
| -ctime | Последнее изменение владельца или прав на объект в днях. |
| -cmin | Последнее изменение владельца или прав в минутах. |
| -user | Поиск по владельцу. |
| -group | По группе. |
| -perm | С определенными правами доступа. |
| -depth | Поиск должен начаться не с корня, а с самого глубоко вложенного каталога. |
| -maxdepth | Максимальная глубина поиска по каталогам. -maxdepth 0 — поиск только в текущем каталоге. По умолчанию, поиск рекурсивный. |
| -prune | Исключение перечисленных каталогов. |
| -mount | Не переходить в другие файловые системы. |
| -regex | По имени с регулярным выражением. |
| -regextype | Тип регулярного выражения. |
| -L или -follow | Показывает содержимое символьных ссылок (симлинк). |
| -empty | Искать пустые каталоги. |
| -delete | Удалить найденное. |
| -ls | Вывод как ls -dgils |
| Показать найденное. | |
| -print0 | Путь к найденным объектам. |
| -exec <> \; | Выполнить команду над найденным. |
| -ok | Выдать запрос перед выполнением -exec. |
Также доступны логические операторы:
| Оператор | Описание |
|---|---|
| -a | Логическое И. Объединяем несколько критериев поиска. |
| -o | Логическое ИЛИ. Позволяем команде find выполнить поиск на основе одного из критериев поиска. |
| -not или ! | Логическое НЕ. Инвертирует критерий поиска. |
Полный набор актуальных опций можно получить командой man find.
Примеры использования find
Поиск файла по имени
1. Простой поиск по имени:
find / -name «file.txt»
* в данном примере будет выполнен поиск файла с именем file.txt по всей файловой системе, начинающейся с корня /.
2. Поиск файла по части имени:
* данной командой будет выполнен поиск всех папок или файлов в корневой директории /, заканчивающихся на .tmp
3. Несколько условий.
а) Логическое И. Например, файлы, которые начинаются на sess_ и заканчиваются на cd:
find . -name «sess_*» -a -name «*cd»
б) Логическое ИЛИ. Например, файлы, которые начинаются на sess_ или заканчиваются на cd:
find . -name «sess_*» -o -name «*cd»
в) Более компактный вид имеют регулярные выражения, например:
find . -regex ‘.*/\(sess_.*cd\)’
* где в первом поиске применяется выражение, аналогичное примеру а), а во втором — б).
4. Найти все файлы, кроме .log:
find . ! -name «*.log»
* в данном примере мы воспользовались логическим оператором !.
Поиск по дате
1. Поиск файлов, которые менялись определенное количество дней назад:
find . -type f -mtime +60
* данная команда найдет файлы, которые менялись более 60 дней назад.
2. Поиск файлов с помощью newer. Данная опция доступна с версии 4.3.3 (посмотреть можно командой find —version).
а) дате изменения:
find . -type f -newermt «2019-11-02 00:00»
* покажет все файлы, которые менялись, начиная с 02.11.2019 00:00.
find . -type f -newermt 2019-10-31 ! -newermt 2019-11-02
* найдет все файлы, которые менялись в промежутке между 31.10.2019 и 01.11.2019 (включительно).
б) дате обращения:
find . -type f -newerat 2019-10-08
* все файлы, к которым обращались с 08.10.2019.
find . -type f -newerat 2019-10-01 ! -newerat 2019-11-01
* все файлы, к которым обращались в октябре.
в) дате создания:
find . -type f -newerct 2019-09-07
* все файлы, созданные с 07 сентября 2019 года.
find . -type f -newerct 2019-09-07 ! -newerct «2019-09-09 07:50:00»
* файлы, созданные с 07.09.2019 00:00:00 по 09.09.2019 07:50
По типу
Искать в текущей директории и всех ее подпапках только файлы:
* f — искать только файлы.
Поиск по правам доступа
1. Ищем все справами на чтение и запись:
find / -perm 0666
2. Находим файлы, доступ к которым имеет только владелец:
find / -perm 0600
Поиск файла по содержимому
find / -type f -exec grep -i -H «content» <> \;
* в данном примере выполнен рекурсивный поиск всех файлов в директории / и выведен список тех, в которых содержится строка content.
С сортировкой по дате модификации
find /data -type f -printf ‘%TY-%Tm-%Td %TT %p\n’ | sort -r
* команда найдет все файлы в каталоге /data, добавит к имени дату модификации и отсортирует данные по имени. В итоге получаем, что файлы будут идти в порядке их изменения.
Лимит на количество выводимых результатов
Самый распространенный пример — вывести один файл, который последний раз был модифицирован. Берем пример с сортировкой и добавляем следующее:
find /data -type f -printf ‘%TY-%Tm-%Td %TT %p\n’ | sort -r | head -n 1
Поиск с действием (exec)
1. Найти только файлы, которые начинаются на sess_ и удалить их:
find . -name «sess_*» -type f -print -exec rm <> \;
* -print использовать не обязательно, но он покажет все, что будет удаляться, поэтому данную опцию удобно использовать, когда команда выполняется вручную.
2. Переименовать найденные файлы:
find . -name «sess_*» -type f -exec mv <> new_name \;
find . -name «sess_*» -type f | xargs -I ‘<>‘ mv <> new_name
3. Вывести на экран количество найденных файлов и папок, которые заканчиваются на .tmp:
find . -name «*.tmp» | wc -l
4. Изменить права:
find /home/user/* -type d -exec chmod 2700 <> \;
* в данном примере мы ищем все каталоги (type d) в директории /home/user и ставим для них права 2700.
5. Передать найденные файлы конвееру (pipe):
find /etc -name ‘*.conf’ -follow -type f -exec cat <> \; | grep ‘test’
* в данном примере мы использовали find для поиска строки test в файлах, которые находятся в каталоге /etc, и название которых заканчивается на .conf. Для этого мы передали список найденных файлов команде grep, которая уже и выполнила поиск по содержимому данных файлов.
6. Произвести замену в файлах с помощью команды sed:
find /opt/project -type f -exec sed -i -e «s/test/production/g» <> \;
* находим все файлы в каталоге /opt/project и меняем их содержимое с test на production.
Чистка по расписанию
Команду find удобно использовать для автоматического удаления устаревших файлов.
Открываем на редактирование задания cron:
0 0 * * * /bin/find /tmp -mtime +14 -exec rm <> \;
* в данном примере мы удаляем все файлы и папки из каталога /tmp, которые старше 14 дней. Задание запускается каждый день в 00:00.
* полный путь к исполняемому файлу find смотрим командой which find — в разных UNIX системах он может располагаться в разных местах.
Источник
Find Files Containing Specific Text in Linux
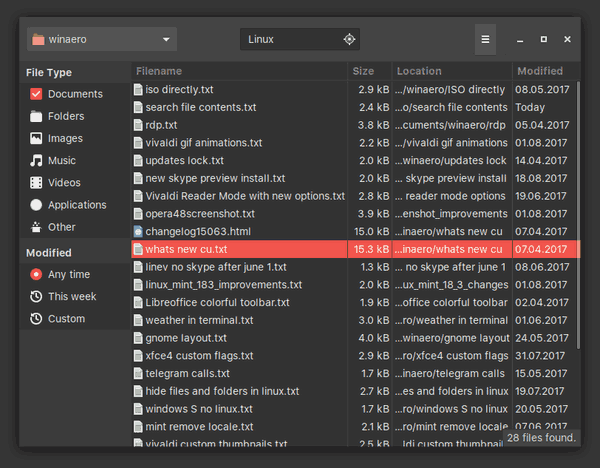
Linux, regardless of the distro you use, comes with a number of GUI tools which allow searching for files. Many modern file managers support file searching right in the file list. However, most of them do not allow you to search inside a file’s contents. Here are two methods you can use to search for file contents in Linux.
I would like to share the methods I use myself.
The first method involves the grep utility, which exists in any distro, even in embedded systems built on busybox.
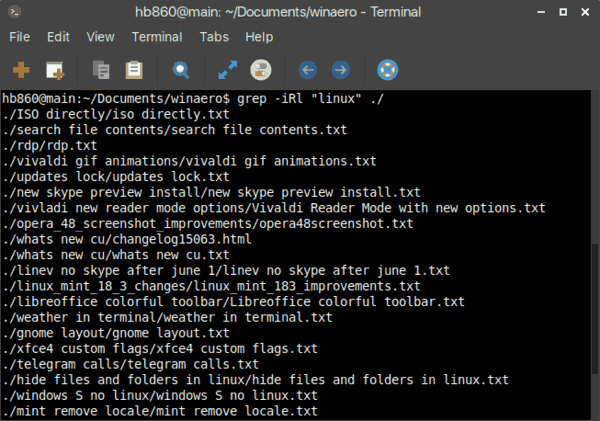
To find files containing specific text in Linux, do the following.
- Open your favorite terminal app. XFCE4 terminal is my personal preference.
- Navigate (if required) to the folder in which you are going to search files with some specific text.
- Type the following command:
Here are the switches:
-i — ignore text case
-R — recursively search files in subdirectories.
-l — show file names instead of file contents portions.
./ — the last parameter is the path to the folder containing files you need to search for your text. In our case, it is the current folder with the file mask. You can change it to the full path of the folder. For example, here is my command
Note: Other useful switches you might want to use with grep:
-n — show the line number.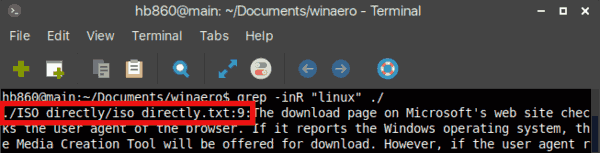
-w — match the whole word.
Another method I use is Midnight Commander (mc), the console file manager app. Unlike grep, mc is not included by default in all Linux distros I’ve tried. You may need to install it yourself.
Find files containing specific text with mc
To find files containing some specific text using Midnight Commander, start the app and press the following sequence on the keyboard:
Alt + Shift + ?
This will open the search dialog.
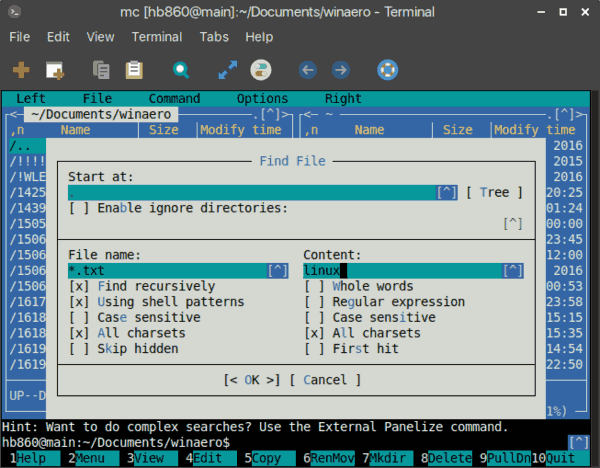
Fill in the «Content:» section and press the Enter key. It will find all files with the required text.
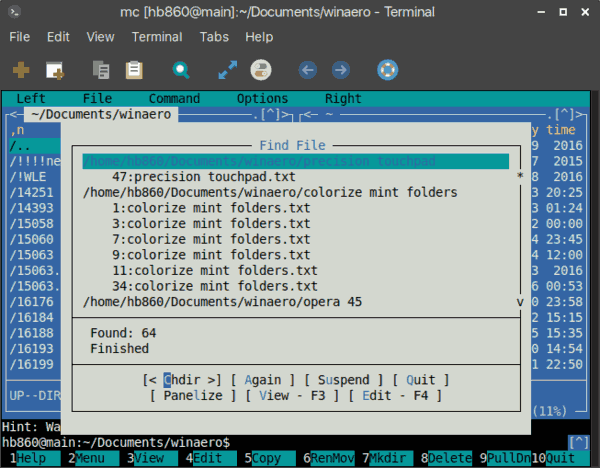
You can place these files in the left or right panel using the Panelize option and copy/move/delete/view/do whatever you want them.
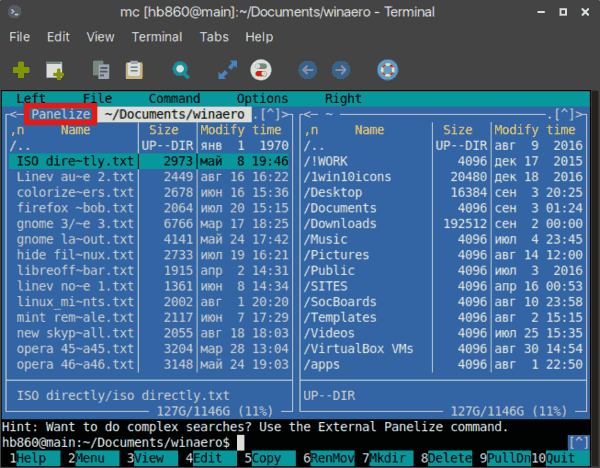
Midnight Commander is a very time-saving tool when it comes to search.
Winaero greatly relies on your support. You can help the site keep bringing you interesting and useful content and software by using these options:
Share this post
About Sergey Tkachenko
Sergey Tkachenko is a software developer from Russia who started Winaero back in 2011. On this blog, Sergey is writing about everything connected to Microsoft, Windows and popular software. Follow him on Telegram, Twitter, and YouTube.
6 thoughts on “ Find Files Containing Specific Text in Linux ”
The code that you provided helped me. There are also another commands which I cannot remember to find text in files but this one is made it quickly. I have bookmarked this post for further usage. Thank you.
WHAT ABOUT WINDOWS?!
I use Total Commander for that.
Midnight Commander reminds me of XTree for DOS way, evidently, way way, back in the day!! 🙂 Anyone else remember!?
It reminds me of Norton Commander. Good days.
Источник
How To Find Files by Content Under UNIX / Linux
Using grep Command To Find Files By Content on Unix or Linux
Type the command as follows:
- -i : Ignore case distinctions in both the PATTERN (match valid, VALID, ValID string) and the input files (math file.c FILE.c FILE.C filename).
- -R (or -r ): Read all files under each directory, recursively.
Highlighting searched patterns
You can highlight patterns easily while searching large number of files:
$ grep —color=auto -iR ‘getChar();’ *.c
Displaying file names and line number for searched patterns
You may also need to display filenames and numbers:
$ grep —color=auto -iRnH ‘getChar();’ *.c
Where,
- No ads and tracking
- In-depth guides for developers and sysadmins at Opensourceflare✨
- Join my Patreon to support independent content creators and start reading latest guides:
- How to set up Redis sentinel cluster on Ubuntu or Debian Linux
- How To Set Up SSH Keys With YubiKey as two-factor authentication (U2F/FIDO2)
- How to set up Mariadb Galera cluster on Ubuntu or Debian Linux
- A podman tutorial for beginners – part I (run Linux containers without Docker and in daemonless mode)
- How to protect Linux against rogue USB devices using USBGuard
Join Patreon ➔
- -n : Prefix each line of output with the 1-based line number within its input file.
- -H Print the file name for each match. This is the default when there is more than one file to search.
Hence, type the following command:
$ grep —color=auto -nH ‘DIR’ *
Fig.01: grep command displaying searched pattern
Using find command to search files by words or string
We can also use the find command. The syntax is as follows:
find /dir/to/search -name «file-pattern» -print | xargs grep «word-to-search»
## OR ##
find /dir/to/search -iname «file-pattern» -print0 | xargs -I <> -0 grep «string-to-search» «<>»
For example, search all c program files (*.c) and look for “ main( ” and print it on the screen when matched in the current directory:
$ find . -name «*.c» -print | xargs grep «main(»
OR
$ find /projects/ -iname «*.c» -print0 | xargs -I <> -0 grep «main(» «<>»
Where find command options are:
- -name : Base of file name. For instance, look for all Perl files ( *.pl )
- -iname : Same as above ( -name
- -print : Print the full file name on the standard output.
- -print0 : Display the full file name on the standard output, followed by a null character (instead of the newline character that -print uses). This allows file names that contain newlines or other types of white space to be correctly interpreted by programs that process the find output. This option corresponds to the -0 option of xargs.
And, the xargs command are:
- -I <> : Replace occurrences of <> in the initial-arguments with names read from standard input. In other words, pass <> as input to the grep command.
- -0 : Input items are terminated by a null character instead of by whitespace, and the quotes and backslash are not special (every character is taken literally). Disables the end of file string, which is treated like any other argument. Useful when input items might contain white space, quote marks, or backslashes. The GNU find -print0 option produces input suitable for this mode.
- grep «main(» «<>« : Search for » main( » string using the grep in a file found by find command.
Conclusion
You learned how to find files by content under UNIX and Linux using various commands. See the following resources:
🐧 Get the latest tutorials on Linux, Open Source & DevOps via
Источник


