- Два Ip адреса на сетевой карте в Linux
- Первый способ как добавить дополнительный второй IP адрес сетевой карте в Linux
- Второй способ настройки дополнительного IP адреса на сетевой карте в Linux
- Третий способ как назначить дополнительный адрес сетевой карте
- Несколько IP-адресов на одном сетевом адаптере в CentOS
- Принцип настройки
- Разовая настройка (командой)
- Постоянная настройка
- Настройка отвечающего интерфейса
- How can I make my secondary network interface work in my Ubuntu EC2 instance?
- Short description
- Resolution
- Configuring Ubuntu 14.04 or 16.04
- How to add additional IP (Secondary IP) in Ubuntu
- 1) How to add secondary IP address permanently via Netplan in Ubuntu 20.04 LTS
- 1.a) Adding secondary IP address temporarily via Netplan in Ubuntu
- 2) How to add secondary IP address permanently in Ubuntu 16.04 LTS
- 2.a) Adding secondary IP address temporarily in Ubuntu
- 3) How to add secondary IP address permanently in Ubuntu 14.04 LTS
- 3.a) Configuring Additional IP address temporarily in Ubuntu
- Conclusion
Два Ip адреса на сетевой карте в Linux
Иногда возникает необходимость привязать несколько IP адресов к одному сетевому адаптеру. Как оказалось в Linux сделать это очень просто.
В предыдущей статье я писал как настроить сетевую карту используя только консоль в линукс, а конкретно в CentOS. Так вот, настройка дополнительных IP адресов производится теме же командами и способами. С той лишь разницей, что настраивать мы будем уже не саму сетевую карту, а ее подинтерфейс(ы). Иными словами у сетевой карты будет основной адрес и один или несколько дополнительных.
Первый способ как добавить дополнительный второй IP адрес сетевой карте в Linux
Чтобы добавить второй адрес сетевому адаптеру достаточно выполнить команду:
где YYY.YYY.YYY.YYY — маска сети
XXX.XXX.XXX.XXX — дополнительный IP адрес
а eth0:0 — имя подинтерфейса. Которое состоит из имени сетевого адаптера и номера дополнительного подинтерфейса.
К примеру если мы введем команды:
то есть настроим основной адрес и второй дополнительный, то получим примерно следующий результат:
Естественно, что подинтерфейсов может быть несколько, соответственно может быть несколько дополнительных IP адресов на одной сетевой карте.
Второй способ настройки дополнительного IP адреса на сетевой карте в Linux
Второй способ — это редактирование конфигурационных файлов. Но теперь уже не для сетевого адаптера, а для его подинтерфейсов. Система имен которых строится по тем же принципам. То есть для подинтерфейса eth0:0 имя файла будет /etc/sysconfig/network-scripts/igcfg-eth0:0
И в моем случае будет иметь следующее содержание:
При необходимости его нужно отредактировать, к примеру так:
После чего перезапустите сетевые службы:
и убедитесь, что все работает:
Третий способ как назначить дополнительный адрес сетевой карте
Воспользуемся уже знакомой нам утилитой system-config-network-tui
Выбираем пункт настройки адаптеров: 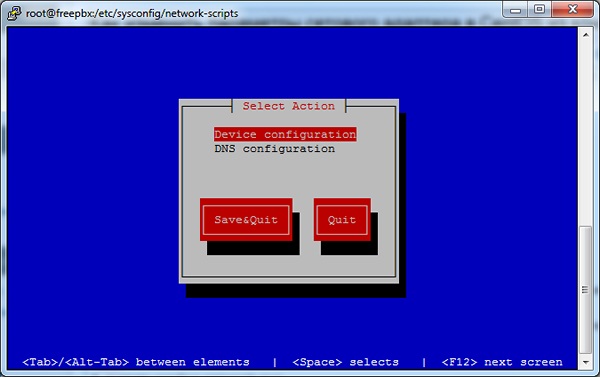
Выбираем необходимый нам подинтерфейс либо выбираем пункт New Device при создании нового: 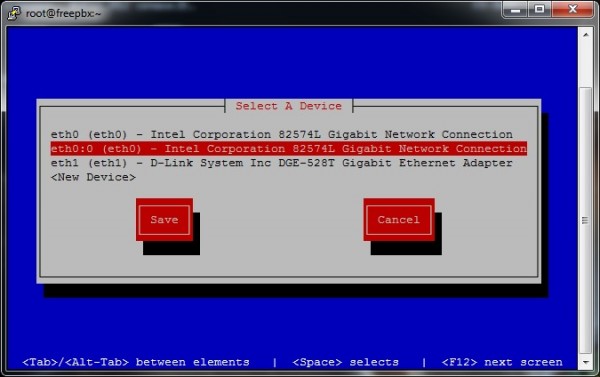
И настраиваем его по своему усмотрению: 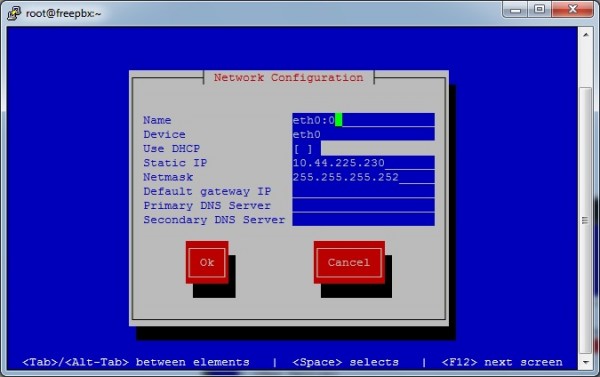
Незабываем сохраняться, после чего перезагружаем сетевую службу:
Источник
Несколько IP-адресов на одном сетевом адаптере в CentOS
Назначение 2-х и более адресов на один физический сетевой интерфейс позволяет запуск приложений и служб, которые используют несколько IP или работают на разных сетевых адресах.
Принцип настройки
Для назначения вторичного IP-адреса создается псевдоним (alias) сетевого интерфейса. Название для алиаса задается по принципу : , например, eth0:0 или eth0:1.
Псевдониму можно назначить только статический ip-адрес, нельзя присвоить адрес с помощью DHCP.
Разовая настройка (командой)
Добавить дополнительный адрес можно одной командой:
ip a add 192.168.1.11/24 dev enp2s0:1
* в данном примере мы назначили адрес 192.168.1.11 с маской 255.255.255.0 (/24) для сетевого интерфейса enp2s0. Данный алиас назван enp2s0:1.
Если для управления сетевыми интерфейсами используем утилиту ifconfig:
ifconfig enp2s0:1 192.168.1.11 up
Проверить настройку можно одной из команд:
* обе команды позволяют посмотреть сетевые интерфейсы и узнать IP-адреса, назначенные им.
Необходимо помнить, что данная настройка будет сброшена после перезагрузки сетевой службы или системы.
Постоянная настройка
Чтобы дополнительный адрес назначался при перезагрузках, создаем новый виртуальный адаптер:
DEVICE=enp2s0:1
BOOTPROTO=static
IPADDR=192.168.1.11
NETMASK=255.255.255.0
GATEWAY=192.168.1.1
ONBOOT=yes
Для применения настроек, перезапускаем сетевую службу:
systemctl restart network
Настройка отвечающего интерфейса
Некоторые приложения, которые отвечают на сетевые запросы с интерфейсов-алиасов могут работать некорректно. Это связано с тем, что ответ выполняется не с вторичного IP-адреса, на который пришел запрос, а первичного.
Для настройки сетевых ответов с IP, на который пришел запрос, вносим изменения в таблицу маршрутизации.
Для начала нужно найти незанятую таблицу (по умолчанию, они все пусты, кроме основной):
ip route show table 100
* в данном примете мы посмотрим на маршруты таблицы с номером 100.
Если маршрутов нет, то добавляем следующие:
ip route add default via 192.168.1.1 src 192.168.1.11 table 100
ip rule add from 192.168.1.0/24 table 100
ip rule add to 192.168.1.0/24 table 100
* в данном примере добавлены маршруты для подсети 192.168.1.0/24
Для постоянного добавления маршрута, создаем файл:
default via 192.168.1.1 src 192.168.1.11 table 100
Источник
How can I make my secondary network interface work in my Ubuntu EC2 instance?
Last updated: 2021-01-19
How can I make my secondary network interface work in my Ubuntu Amazon Elastic Compute Cloud (Amazon EC2) instance?
Short description
Warning: The use of a second elastic network interface is intended for advanced users. Use a second elastic network interface only if you can’t use a single network interface and you must attach two network interfaces belonging to the same subnet to a single instance. To avoid asymmetric routing issues, use a single elastic network interface, or place duplicate elastic network interfaces into non-overlapping subnets.
Adding a secondary network interface to a non-Amazon Linux EC2 instance causes traffic flow issues. These issues occur because the primary and secondary network interfaces are in the same subnet, and there is one routing table with one gateway. Traffic that comes into the secondary network interface leaves the instance using the primary network interface. But this isn’t allowed, because the secondary IP address doesn’t belong to the MAC address of the primary network interface.
To make the secondary interface work after creating it, do the following:
- Configure the routing table.
- Set up rules in the custom routing table policy database so that traffic for the secondary interface uses the new routing table.
Before you start, understand Amazon EC2 instances are in the AWS Cloud, and as such, not all use-cases benefit from having multiple interfaces. The following are examples when you might not need to use a secondary network interface:
- Increasing network throughput. Network throughput won’t increase, as limits are set based on the instance type and size. For more information, see Amazon EC2 instance types.
- Increasing Elastic IP addresses. If you’re running out of Elastic IP addresses per interface, you might not need to add more interfaces to get more Elastic IP addresses. Most applications work well with the domain name system. For example, Apache can use name-based virtual hosts.
Note: The steps for adding a secondary network interface are different for each of the following Ubuntu versions:
- Ubuntu 14.04
- Ubuntu 16.04
- Ubuntu 18.04
- Ubuntu 20.04
Resolution
Note: Although the steps in the following resolution were tested on the listed Linux versions, slight modifications might be needed due to custom settings on your configuration.
Configuring Ubuntu 14.04 or 16.04
Creating the secondary interface configuration file, configuring the routing table, and setting routing policy rules for Ubuntu can be done using a single file.
All procedures must be run with root user privileges. Either become the root user with sudo -i or run all commands with sudo.
1. Run the following command to get the name of the primary network interface:
The output is similar to the following:
Important: In the previous example, the primary interfaces are named eth0, eth1, and so on. However, for instances that support enhanced networking, such as the m4 and m5 family type, you might see a naming inconsistency. For example, the primary might be named ens3 if the secondary is named eth0. This naming inconsistency happens when the secondary interface is added when the instance is running.
You can avoid a naming inconsistency by adding the interface at launch time, or rebooting the instance. Or, if the interface is running, you can change the name using the following command:
2. Create a configuration file for the secondary interface. This example uses a secondary interface of ‘eth1’. Be sure to change ‘eth1’ to match your secondary interface name as found in step 1.
The following is an example for a single IP address of 172.31.21.115, and with a gateway of 172.31.16.1 on the secondary interface. Be sure to change the IP address and gateway to your scenario. Also note that your gateway must be the first valid IP address in your subnet.
The following is an example for multiple IP addresses. In this example the IP addresses are 172.31.21.115 and 172.31.18.46, and with a gateway of 172.31.16.1. Be sure to update the IP addresses and gateway to your scenario.
3. Create the restrict-default-gw file to prevent the default gateway from being overwritten on the main table:
4. Add the following lines to the restrict-default-gw file. Be sure to change ‘eth0’ to your primary interface name as found in step 1.
Источник
How to add additional IP (Secondary IP) in Ubuntu
Adding an additional or secondary IP is routine task for Linux system administrator. When we setup a new server, ideally it will have an IP address, which is the server main IP address linked with the server hostname.
You may be wondering why do we need to add more than one IP address in server? why do we need to add this to a single network card? We will answer these questions in the this article.
Additional IPs are required for several reasons, some of them are listed below, which are best practices in the industry:
- To host application in a separate IP
- To install SSL certificate on website
- To configure name servers
Linux systems allow users to add multiple virtual IP addresses on a single network interface card without adding an additional network adapter.
Suggested Read:
We can add IP address in the same interface or create sub interface on the same device, followed by adding an IP to that. By default interface name comes in the format: ethX (eth0) till Ubuntu 14.04 LTS. But from Ubuntu 15.10 onwards, network interfaces names have been changed from ethX to enXXXXX (For server ens33 & For desktop enp0s3).
In this article we will teach you how to add additional IP address in Ubuntu and it’s derivative.
1) How to add secondary IP address permanently via Netplan in Ubuntu 20.04 LTS
Configuring an IP address on an Ubuntu 20.04 system is different than the older version of Ubuntu because Ubuntu 17.10 and later uses ‘Netplan’ as the default network management tool.
Additional IP address can be permanently added to your system by editing the file ‘/etc/netplan/50-cloud-init.yaml‘ or ‘/etc/netplan/01-netcfg.yaml‘.
Configured existing IP address can be viewed by IP command as shown below:
Similaraly, you can also see your existing network configuration details from the following file:
To add a new IP address, open Netplan configuration file ‘/etc/netplan/50-cloud-init.yaml‘ in your preferred text editor, and add a new IP address in the IP address column as shown below:
Once changes are made, save and close the file.
Execute the following command to enable the new configuration.
Run the below command to check whether the new IP is reflecting:
1.a) Adding secondary IP address temporarily via Netplan in Ubuntu
Run the following IP command to add an additional IP address temporarily to your system:
2) How to add secondary IP address permanently in Ubuntu 16.04 LTS
As discussed in the beginning of this article, network interface names have been changed
from ‘ethX’ to ‘enXXXX’ (enp0s3) for Ubuntu version 15.10 onwards. While trying out the below exercise make sure to replace the interface name with yours.
Let me check the IP information on my system before performing this. See below:
To add secondary IP address permanently on Ubuntu system, edit ‘/etc/network/interfaces’ file and add the required details.
We should not add secondary IP address after ‘dns-nameservers’ because it wont work and add the IP details in format specified below.
Moreover we don’t need to add sub interface, which were done in Ubuntu 14.04 LTS.
Save and close the file then restart the network interface:
Run the below command to check if the new IP has been assigned:
let me double check this by pinging the new IP address:
2.a) Adding secondary IP address temporarily in Ubuntu
Run the following IP command to add an additional IP address temporarily to your Ubuntu 16.04 LTS system:
Run the below command to check if the new IP is assigned. This will go off when you reboot the machine.
3) How to add secondary IP address permanently in Ubuntu 14.04 LTS
Before adding IP address in the system, just verify the main IP address of the server by running any of the below commands:
From the above output, we can see that the server main IP address is 192.168.56.150 and we will be going to assign next IP address 192.168.56.151 as a secondary IP.
To add secondary IP address permanently on Ubuntu system, edit the /etc/network/interfaces file and add the required IP details.
Save and close the file, then restart the network interface:
Verify the newly added IP address:
3.a) Configuring Additional IP address temporarily in Ubuntu
Run the following IP command to add an additional IP address temporarily to your Ubuntu 14.04 LTS system:
Use the IP command to check the newly added IP address. If you reboot the system then the newly added IP address is lost as it was added temporarily.
Conclusion
In this guide, you have learnt how to add additional IP or Secondary IP on a single network interface in Ubuntu system, from Ubuntu 14.04 LTS to Ubuntu 20.04 LTS.
If you have any questions or feedback, feel free to comment below and we will get back to you as soon as we can.
Источник


