- Как загрузить и установить Linux на компьютер с UEFI и Secure Boot
- Как работает режим Secure Boot
- Варианты установки Linux
- Как отключить режим Secure Boot
- Загрузка со сменного носителя
- Unified Extensible Firmware Interface/Secure Boot
- Contents
- Checking Secure Boot status
- Before booting the OS
- After booting the OS
- Booting an installation medium
- Disabling Secure Boot
- Remastering the installation image
- Implementing Secure Boot
- Using your own keys
- Install efitools
- Backing up current variables
- Creating keys
- Signing EFI binaries
- Putting firmware in «Setup Mode»
- Enrolling keys in firmware
- Dual booting with other operating systems
- Using a signed boot loader
- PreLoader
- Protecting Secure Boot
Как загрузить и установить Linux на компьютер с UEFI и Secure Boot
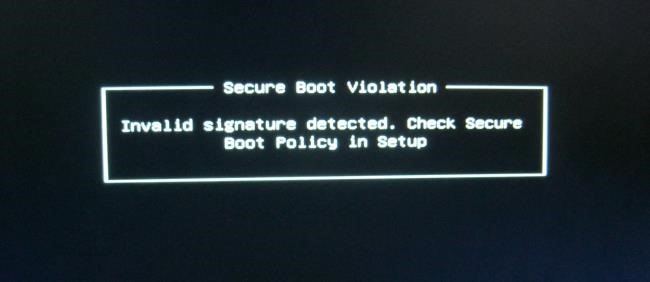
Новые компьютеры с системой Windows поставляются с прошивкой UEFI и с включенной загрузкой Secure Boot. Режим Secure Boot предотвращает загрузку операционных систем, если они не подписаны ключом, загруженным в UEFI; сразу «из коробки» можно загрузить только программное обеспечение, подписанное фирмой Microsoft.
Фирма Microsoft требует, чтобы производители компьютеров позволяли пользователям отключить режим Secure Boot, поэтому вы можете отключить режим Secure Boot или добавить свой собственный ключ для того, чтобы обойти это ограничение. Режим Secure Boot нельзя отключить на устройствах ARM под управлением Windows RT.
Как работает режим Secure Boot
Компьютеры, которые поставляются с системами Windows 8 и Windows 8.1 имеют прошивку UEFI вместо традиционного BIOS. По умолчанию прошивка UEFI машины будет загружать только загрузчики, подписанные ключом, встроенным в прошивку UEFI. Эта особенность известна как «Secure Boot» (безопасная загрузка) или «Trusted Boot» (проверенная загрузка). На традиционных компьютерах без этой функции безопасности, руткит может установить себя и стать загрузчиком boot loader. После этого BIOS компьютера будет загружать руткит в процессе загрузки, во время которой происходит загрузка самого загрузчика и загрузка Windows, скрывая себя от операционной системы и внедряя себя глубоко в систему.
Режим Secure Boot блокирует это — компьютер будет загружать только проверенное программное обеспечение, поэтому вредоносные начальные загрузчики не смогут заразить систему.
На компьютерах Intel x86 (а не на компьютерах ARM) у вас есть возможность управлять режимом Secure Boot. Вы можете выбрать вариант отключения этого режима или даже добавить ключ со своей собственной подписью. Организации могут использовать свои собственные ключи для того, чтобы обеспечить, чтобы могли загружаться только одобренные операционные системы Linux, например
Варианты установки Linux
У вас есть несколько вариантов установки Linux на компьютер с режимом Secure Boot:
- Выберите дистрибутив, в котором поддерживается режим Secure Boot: современные версии Ubuntu, начиная с Ubuntu 12.04.2 LTS и 12.10, будет загружаться и нормально устанавливаться на большинстве ПК с включенным режимом Secure Boot. Это объясняется тем, что загрузчик EFI первоначального этапа загрузки в Ubuntu подписан фирмой Microsoft. Впрочем, один из разработчиков Ubuntu отмечает , что загрузчик в Ubuntu не подписан ключом, который необходим согласно процессу сертификации Microsoft, а просто одним из ключей, о которых говорят, что он «рекомендован» фирмой Microsoft. Это означает, что Ubuntu не обязана загружаться на всех компьютерах с UEFI. Для того, чтобы использовать Ubuntu на некоторых компьютерах, пользователям, возможно, придется отключить режим Secure Boot.
- Отключение режима Secure Boot: Режим Secure Boot можно отключить, что позволит позволить превратить преимущество безопасной загрузки в возможность иметь что-нибудь свое для загрузки компьютера точно также, как это делается на старых компьютерах с традиционным BIOS. Это также потребуется сделать, если вы хотите установить старую версию Windows, которая не разрабатывалась с врозможностью использовать режим Secure Boot, например, Windows 7.
- Добавить в прошивку UEFI подписанный ключ: Некоторые дистрибутивы Linux позволяют подписывать свои загрузчики с помощью их собственного ключа, который вы можете добавить в свою прошивку UEFI. На данный момент, это, кажется, не является обычной практикой.
Вы должны проверить, какой из этих вариантов рекомендуется использовать для вашего дистрибутива Linux. Если вам нужно загрузить старый дистрибутив Linux, в котором нет никакой информации об этом, вы нужно будет просто отключить режим Secure Boot.
На большинстве новых компьютеров у вас должна иметься возможность устанавливать без каких-либо проблем текущие версии Ubuntu — либо релиз LTS, либо последний релиз. Инструкции о том, как загружаться со сменного носителя, смотрите в последнем разделе.
Как отключить режим Secure Boot
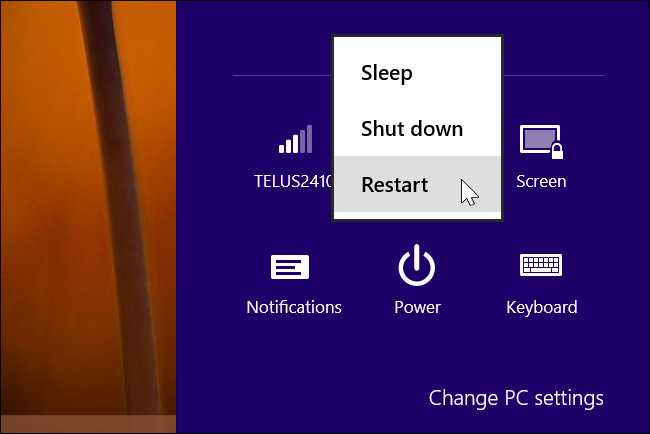
Вы можете управлять режимом Secure Boot из вашего экрана настройки прошивки UEFI — UEFI Firmware Settings. Для доступа к этому экрану, вам нужно будет в Windows 8 получить доступ к меню параметров загрузки. Чтобы сделать это, откройте страницу Settings (Настройки) — чтобы попасть на эту страницу, нажмите клавишу Windows Key + I, затем нажмите кнопку питания, а затем нажмите и удерживайте клавишу Shift и одновременно щелкните мышкой по кнопке Restart (Перезагрузка).
Ваш компьютер будет перезагружен в экран расширенных параметров загрузки. Выберите вариант Troubleshoot (Диагностика), выберите вариант Advanced options (Дополнительные параметры), а затем выберите пункт UEFI Settings (Настройки UEFI). На некоторых компьютерах с системой Windows 8 вы можете не увидеть пункт UEFI Settings, даже если эти компьютеры поставляются с UEFI — в этом случае для того, чтобы получить информацию о том, как добраться до его экрана настроек UEFI, обратитесь к документации разработчика.
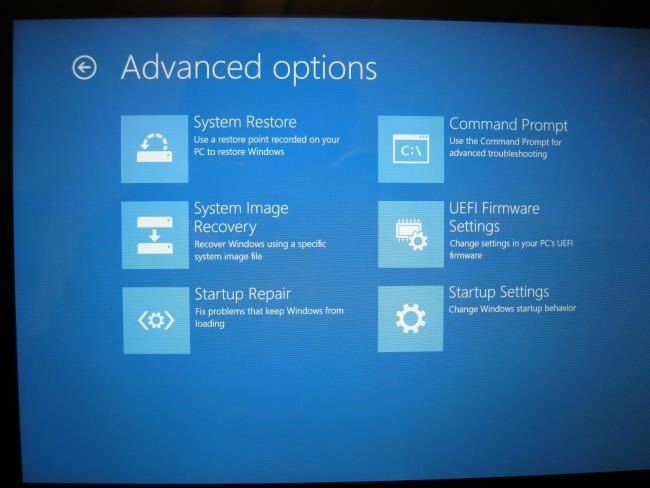
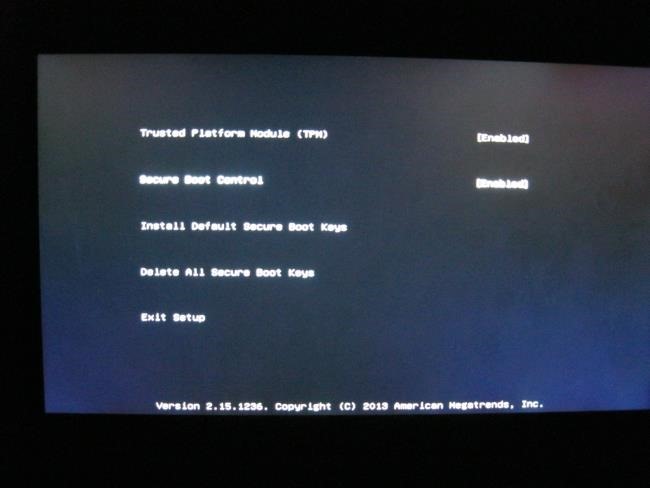
Вы попадете на экран настроек UEFI, где вы можете выбрать отключение режима Secure Boot или добавление своего собственного ключа.
Загрузка со сменного носителя
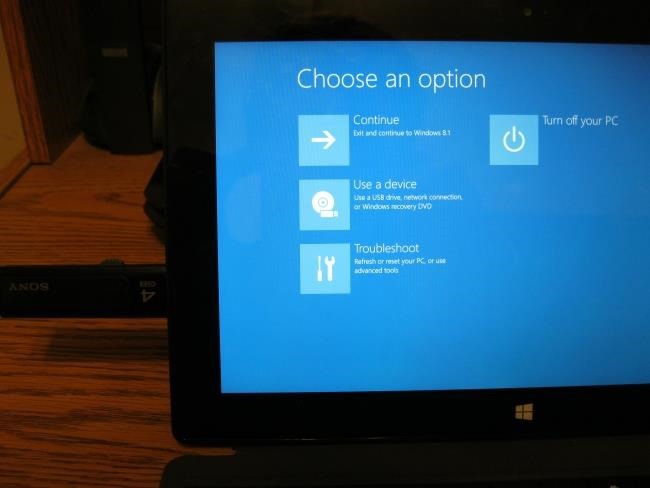
Вы можете загрузиться со сменного носителя при помощи точно такого же доступа к меню параметров загрузки — удерживайте нажатой клавишу Shift и щелкните мышкой по кнопке Restart (Перезагрузка). Подключите загрузочное устройство, выберите вариант Use a device (Использовать устройство), и выберите устройство, с которого необходимо загрузиться.
После загрузки со сменного носителя вы можете установить Linux точно также, как и обычно, или просто можете использовать живую среду сменного носителя (устройство live), не устанавливая его.
Имейте в виду, что режим Secure Boot является полезной функцией безопасности. Вы должны оставить эту возможность включенной в случае, если вам не требуется запускать операционные системы, которые не будут загружаться с включенным режимом Secure Boot.
Источник
Unified Extensible Firmware Interface/Secure Boot
Secure Boot is a security feature found in the UEFI standard, designed to add a layer of protection to the pre-boot process: by maintaining a cryptographically signed list of binaries authorized or forbidden to run at boot, it helps in improving the confidence that the machine core boot components (boot manager, kernel, initramfs) haven’t been tampered with.
As such it can be seen as a continuation or complement to the efforts in securing one’s computing environment, reducing the attack surface that other software security solutions such as system encryption cannot easily cover, while being totally distinct and not dependent on them. Secure Boot just stands on its own as a component of current security practices, with its own set of pros and cons.
Contents
Checking Secure Boot status
Before booting the OS
At this point, one has to look at the firmware setup. If the machine was booted and is running, in most cases it will have to be rebooted.
You may access the firmware configuration by pressing a special key during the boot process. The key to use depends on the firmware. It is usually one of Esc , F2 , Del or possibly another Fn key. Sometimes the right key is displayed for a short while at the beginning of the boot process. The motherboard manual usually records it. You might want to press the key, and keep pressing it, immediately following powering on the machine, even before the screen actually displays anything.
After entering the firmware setup, be careful not to change any settings without prior intention. Usually there are navigation instructions, and short help for the settings, at the bottom of each setup screen. The setup itself might be composed of several pages. You will have to navigate to the correct place. The interesting setting might be simply denoted by secure boot, which can be set on or off.
After booting the OS
An easy way to check Secure Boot status on systems using systemd is to use systemd-boot:
Here we see that Secure Boot is enabled and enforced; other values are disabled for Secure Boot and setup for Setup Mode[1].
 The factual accuracy of this article or section is disputed.
Another way to check whether the machine was booted with Secure Boot is to use this command:
If Secure Boot is enabled, this command returns 1 as the final integer in a list of five, for example:
Note, however, that the kernel may be unaware of Secure Boot (even if it is enabled in the firmware) if an insufficiently capable boot loader is used. This can be verified by checking the kernel messages shortly after the system starts up:
The kernel messages will otherwise read Secure boot enabled .
Booting an installation medium
Secure Boot support was initially added in archlinux-2013.07.01-dual.iso and later removed in archlinux-2016.06.01-dual.iso . At that time prebootloader was replaced with efitools , even though the latter uses unsigned EFI binaries. There has been no support for Secure Boot in the official installation medium ever since.
Disabling Secure Boot
The Secure Boot feature can be disabled via the UEFI firmware interface. How to access the firmware configuration is described in #Before booting the OS.
If using a hotkey did not work and you can boot Windows, you can force a reboot into the firmware configuration in the following way (for Windows 10): Settings > Update & Security > Recovery > Advanced startup (Restart now) > Troubleshoot > Advanced options > UEFI Firmware settings > restart.
Note that some motherboards (this is the case in a Packard Bell laptop) only allow to disable secure boot if you have set an administrator password (that can be removed afterwards). See also Rod Smith’s Disabling Secure Boot.
Remastering the installation image
 This article or section needs expansion.
One might want to remaster the Install ISO in a way described by previous topics of this article. For example, the signed EFI applications PreLoader.efi and HashTool.efi from #PreLoader can be adopted to here. Another option would be to borrow the BOOTx64.EFI (shim) and grubx64.efi from installation media of another GNU+Linux distribution that supports Secure Boot and modify the GRUB configuration to one’s needs. In this case, the authentication chain of Secure Boot in said distribution’s installation media should end to the grubx64.efi ( for example Ubuntu) so that GRUB would boot the unsigned kernel and initramfs from archiso. Note that up to this point, the article assumed one can access the ESP of the machine. But when installing a machine that never had an OS before, there is no ESP present. You should explore other articles, for example Unified Extensible Firmware Interface#Create UEFI bootable USB from ISO, to learn how this situation should be handled.
Implementing Secure Boot
There are certain conditions making for an ideal setup of Secure boot:
- UEFI considered mostly trusted (despite having some well known criticisms and vulnerabilities[2]) and necessarily protected by a strong password
- Default manufacturer/third party keys aren’t in use, as they have been shown to weaken the security model of Secure Boot by a great margin[3]
- UEFI directly loads a user-signed EFISTUB combined kernel image (no boot manager), including microcode (if applicable) and initramfs so as to maintain throughout the boot process the chain of trust established by Secure Boot and reduce the attack surface
- Use of full drive encryption, so that the tools and files involved in the kernel image creation and signing process cannot be accessed and tampered with by someone having physical access to the machine.
- Some further improvements may be obtained by using a TPM, although tooling and support makes this harder to implement.
A simple and fully self-reliant setup is described in #Using your own keys, while #Using a signed boot loader makes use of intermediate tools signed by a third-party.
Using your own keys
Secure Boot implementations use these keys:
Platform Key (PK) Top-level key. Key Exchange Key (KEK) Keys used to sign Signatures Database and Forbidden Signatures Database updates. Signature Database (db) Contains keys and/or hashes of allowed EFI binaries. Forbidden Signatures Database (dbx) Contains keys and/or hashes of denylisted EFI binaries.
See The Meaning of all the UEFI Keys for a more detailed explanation.
To use Secure Boot you need at least PK, KEK and db keys. While you can add multiple KEK, db and dbx certificates, only one Platform Key is allowed.
Once Secure Boot is in «User Mode» keys can only be updated by signing the update (using sign-efi-sig-list) with a higher level key. Platform key can be signed by itself.
Install efitools
Nearly all of the following sections require you to install the efitools package.
Backing up current variables
Before creating new keys and modifying EFI variables, it is advisable to backup the current variables, so that they may be restored in case of error.
Run the following commands to backup all four of the principal Secure Boot variables:
If you perform these commands on a new computer or motherboard, the variables you extract will most likely be the ones provided by Microsoft.
Creating keys
Manual process
To generate keys, perform the following steps.
You will need private keys and certificates in multiple formats:
.key PEM format private keys for EFI binary and EFI signature list signing. .crt PEM format certificates for sbsign(1) , sbvarsign(1) and sign-efi-sig-list(1) . .cer DER format certificates for firmware. .esl Certificates in an EFI Signature List for sbvarsign(1) , efi-updatevar(1) , KeyTool and firmware. .auth Certificates in an EFI Signature List with an authentication header (i.e. a signed certificate update file) for efi-updatevar(1) , sbkeysync, KeyTool and firmware.
Create a GUID for owner identification:
Sign an empty file to allow removing Platform Key when in «User Mode»:
Key Exchange Key:
Signature Database key:
Helper scripts
A helper/convenience script is offered by the author of the reference page on this topic[4] (requires python). A mildly edited version is also packaged as sbkeys AUR .
In order to use it, simply create a folder in a secure location (e.g. /etc/efi-keys/ if later use of sbupdate-git AUR to automate unified kernel image creation and signing is planned) and run it:
This will produce the required files in different formats.
Updating keys
Once Secure Boot is in «User Mode» any changes to KEK, db and dbx need to be signed with a higher level key.
For example, if you wanted to replace your db key with a new one:
- Create the new key,
- Convert it to EFI Signature List,
- Sign the EFI Signature List,
- Enroll the signed certificate update file.
If instead of replacing your db key, you want to add another one to the Signature Database, you need to use the option -a (see sign-efi-sig-list(1) ):
When new_db.auth is created, enroll it.
Signing EFI binaries
When Secure Boot is active (i.e. in «User Mode»), only signed EFI binaries (e.g. applications, drivers, unified kernel images) can be launched.
Manually with sbsigntools
Install sbsigntools to sign EFI binaries with sbsign(1) .
To sign your kernel and boot manager use sbsign, e.g.:
Signing the kernel with a pacman hook
You can also use mkinitcpio’s pacman hook to sign the kernel on install and updates.
Copy /usr/share/libalpm/hooks/90-mkinitcpio-install.hook to /etc/pacman.d/hooks/90-mkinitcpio-install.hook and /usr/share/libalpm/scripts/mkinitcpio-install to /usr/local/share/libalpm/scripts/mkinitcpio-install .
In /etc/pacman.d/hooks/90-mkinitcpio-install.hook , replace:
In /usr/local/share/libalpm/scripts/mkinitcpio-install , replace:
If you are using systemd-boot, there is a dedicated pacman hook doing this task semi-automatically.
Fully automated unified kernel generation and signing with sbupdate
sbupdate is a tool made specifically to automate unified kernel image generation and signing on Arch Linux. It handles installation, removal and updates of kernels through pacman hooks.
Install sbupdate-git AUR and configure it following the instructions given on the project’s homepage.[5]
Once configured, simply run sbupdate as root for first-time image generation.
Putting firmware in «Setup Mode»
Secure Boot is in Setup Mode when the Platform Key is removed. To put firmware in Setup Mode, enter firmware setup utility and find an option to delete or clear certificates. How to enter the setup utility is described in #Before booting the OS.
Enrolling keys in firmware
Use one of the following methods to enroll db, KEK and PK certificates.
Using sbkeysync
Install sbsigntools . Create a directory /etc/secureboot/keys with the following directory structure —
For example using:
Then copy each of the .auth files that were generated earlier into their respective locations (for example, PK.auth into /etc/secureboot/keys/PK and so on).
See what changes will sbkeysync shall do to your system’s UEFI keystore.
Finally, use sbkeysync to enroll your keys.
On next boot the UEFI should be back in User Mode and enforcing Secure Boot policy.
Using firmware setup utility
Copy all *.cer , *.esl , *.auth to a FAT formatted file system (you can use EFI system partition).
Launch firmware setup utility and enroll db, KEK and PK certificates. Firmwares have various different interfaces, see Replacing Keys Using Your Firmware’s Setup Utility for example how to enroll keys.
If the used tool supports it prefer using .auth and .esl over .cer.
Using KeyTool
KeyTool.efi is in efitools package, copy it to ESP. To use it after enrolling keys, sign it with sbsign .
Launch KeyTool-signed.efi using firmware setup utility, boot loader or UEFI Shell and enroll keys.
See Replacing Keys Using KeyTool for explanation of KeyTool menu options.
Dual booting with other operating systems
Microsoft Windows
This article or section needs expansion.
To dual boot with Windows, you would need to add Microsoft’s certificates to the Signature Database. Microsoft has two db certificates:
Create EFI Signature Lists from Microsoft’s DER format certificates using Microsoft’s GUID ( 77fa9abd-0359-4d32-bd60-28f4e78f784b ) and combine them in one file for simplicity:
Sign a db update with your KEK. Use sign-efi-sig-list with option -a to add not replace a db certificate:
Follow #Enrolling keys in firmware to add add_MS_db.auth to Signature Database.
Using a signed boot loader
Using a signed boot loader means using a boot loader signed with Microsoft’s key. There are two known signed boot loaders: PreLoader and shim. Their purpose is to chainload other EFI binaries (usually boot loaders). Since Microsoft would never sign a boot loader that automatically launches any unsigned binary, PreLoader and shim use an allowlist called Machine Owner Key list, abbreviated MokList. If the SHA256 hash of the binary (Preloader and shim) or key the binary is signed with (shim) is in the MokList they execute it, if not they launch a key management utility which allows enrolling the hash or key.
PreLoader
When run, PreLoader tries to launch loader.efi . If the hash of loader.efi is not in MokList, PreLoader will launch HashTool.efi . In HashTool you must enroll the hash of the EFI binaries you want to launch, that means your boot loader ( loader.efi ) and kernel.
Set up PreLoader
Install preloader-signed AUR and copy PreLoader.efi and HashTool.efi to the boot loader directory; for systemd-boot use:
Now copy over the boot loader binary and rename it to loader.efi ; for systemd-boot use:
Finally, create a new NVRAM entry to boot PreLoader.efi :
Replace X with the drive letter and replace Y with the partition number of the EFI system partition.
This entry should be added to the list as the first to boot; check with the efibootmgr command and adjust the boot-order if necessary.
Fallback
If there are problems booting the custom NVRAM entry, copy HashTool.efi and loader.efi to the default loader location booted automatically by UEFI systems:
Copy over PreLoader.efi and rename it:
For particularly intransigent UEFI implementations, copy PreLoader.efi to the default loader location used by Windows systems:
As before, copy HashTool.efi and loader.efi to esp/EFI/Microsoft/Boot/ .
When the system starts with Secure Boot enabled, follow the steps above to enroll loader.efi and /vmlinuz-linux (or whichever kernel image is being used).
How to use while booting?
A message will show up that says Failed to Start loader. I will now execute HashTool. To use HashTool for enrolling the hash of loader.efi and vmlinuz.efi , follow these steps. These steps assume titles for a remastered archiso installation media. The exact titles you will get depends on your boot loader setup.
- Select OK
- In the HashTool main menu, select Enroll Hash, choose \loader.efi and confirm with Yes. Again, select Enroll Hash and archiso to enter the archiso directory, then select vmlinuz.efi and confirm with Yes. Then choose Exit to return to the boot device selection menu.
- In the boot device selection menu choose Arch Linux archiso x86_64 UEFI CD
Remove PreLoader
Uninstall preloader-signed AUR and simply remove the copied files and revert configuration; for systemd-boot use:
Where N is the NVRAM boot entry created for booting PreLoader.efi . Check with the efibootmgr command and adjust the boot-order if necessary.
This article or section needs expansion.
When run, shim tries to launch grubx64.efi . If MokList does not contain the hash of grubx64.efi or the key it is signed with, shim will launch MokManager ( mmx64.efi ). In MokManager you must enroll the hash of the EFI binaries you want to launch (your boot loader ( grubx64.efi ) and kernel) or enroll the key they are signed with.
Set up shim
Rename your current boot loader to grubx64.efi
Copy shim and MokManager to your boot loader directory on ESP; use previous filename of your boot loader as as the filename for shimx64.efi :
Finally, create a new NVRAM entry to boot BOOTx64.EFI :
shim can authenticate binaries by Machine Owner Key or hash stored in MokList.
Machine Owner Key (MOK) A key that a user generates and uses to sign EFI binaries. hash A SHA256 hash of an EFI binary.
Using hash is simpler, but each time you update your boot loader or kernel you will need to add their hashes in MokManager. With MOK you only need to add the key once, but you will have to sign the boot loader and kernel each time it updates.
shim with hash
If shim does not find the SHA256 hash of grubx64.efi in MokList it will launch MokManager ( mmx64.efi ).
In MokManager select Enroll hash from disk, find grubx64.efi and add it to MokList. Repeat the steps and add your kernel vmlinuz-linux . When done select Continue boot and your boot loader will launch and it will be capable launching the kernel.
shim with key
.key PEM format private key for EFI binary signing. .crt PEM format certificate for sbsign. .cer DER format certificate for MokManager.
Create a Machine Owner Key:
Sign your boot loader (named grubx64.efi ) and kernel:
You will need to do this each time they are updated. You can automate the kernel signing with a pacman hook, e.g.:
Copy MOK.cer to a FAT formatted file system (you can use EFI system partition).
Reboot and enable Secure Boot. If shim does not find the certificate grubx64.efi is signed with in MokList it will launch MokManager ( mmx64.efi ).
In MokManager select Enroll key from disk, find MOK.cer and add it to MokList. When done select Continue boot and your boot loader will launch and it will be capable launching any binary signed with your Machine Owner Key.
shim with key and GRUB
![]() This article or section needs language, wiki syntax or style improvements. See Help:Style for reference.
This article or section needs language, wiki syntax or style improvements. See Help:Style for reference.![]()
For signing you can for example use the grub2-signing extension.
There is also a package in the AUR: grub2-signing-extension AUR .
Run gpg —gen-key as root to create a keypair.
If you get a permission denied error try:
Activate the gpg-agent:
Export your public key:
Mount your boot partition. (Re)install GRUB2:
Copy your publickey to your boot partiton:
Edit your GRUB custom configuration and add:
Rebuild your GRUB configuration:
Ensure that you created MOK.key and signed your kernel and grubx64.efi like described in shim with key.
Sign the GRUB files with grub-sign .
Run grub-verify and check if there are errors.
Here is a simple unsign hook:
And a bash script you can use to sign again after the update:
Remove shim
Uninstall shim-signed AUR , remove the copied shim and MokManager files and rename back your boot loader.
Protecting Secure Boot
The only way to prevent anyone with physical access to disable Secure Boot is to set a user/administrator password in the firmware.
Most UEFI provide such feature, usually listed under the «Security» section.
Источник


