- How to Send a Message to Logged Users in Linux Terminal
- If You Appreciate What We Do Here On TecMint, You Should Consider:
- How to Send a Message to Logged Users in Linux Terminal?
- Checking Active Users on Terminal
- Sending Messages to Currently Logged-in Users
- Sending Messages to Logged-in Users
- linux-notes.org
- Отправить сообщение другому пользователю на сервере в Unix/Linux
- -=== СПОСОБ 1 — Используем echo команду ==-
- -=== СПОСОБ 2 — Используем write команду ==-
- -=== СПОСОБ 3 — Используем wall команду ==-
- Добавить комментарий Отменить ответ
- write(1) — Linux man page
- Synopsis
- Description
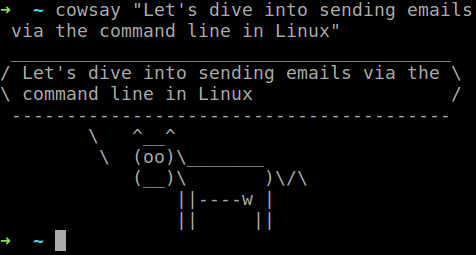
- 16 Command Examples to Send Email From The Linux Command Line
- Setting Up Command Line Mailer Packages
- Setting Up Sendmail with SSMTP Package
- Sending Email Using the SSMTP Command
- Sending Email Using the Sendmail Command
- Sending Email Using CURL Command
- Sending Email Using Swaks command
- Sending Email Using the Mutt Command
- Sending Email Using the Mailx Command
- Using Telnet Alternative Openssl Command
- Troubleshooting Mail Problems
- Running All Command in a Sequence
- Summary
How to Send a Message to Logged Users in Linux Terminal
How can I send a messages to logged on users in a Linux server? If you are asking this question, then this guide will help you learn how to do that. We will demonstrate how to send a message to all or a specific logged on user, on the terminal in Linux.
Linux offers a variety of means for sending messages to users logged on to a server as explained in the two methods below.
In the first method, we will use wall command – write a message to all currently logged in users on the terminal as shown.
![]() Send Message to Logged Users
Send Message to Logged Users
To disable the normal banner printed by wall, for example:
Add the -n (Suppress the banner) flag, this however, can only be used by the root user.
In the second method, we will use write command, which comes pre-installed on all if not most Linux distributions. It allows you to send a message to another user in the terminal using tty.
First check the all logged on users with the who command as shown.
![]() Find Logged in Users
Find Logged in Users
There are currently two users are active on the system (tecmint and root), now the user aaronkilik is sending a message to the root user.
![]() Send Message to User
Send Message to User
Read Also:
That’s all! Do share with us other methods or commands for sending messages to all logged on users through the terminal in Linux. If you have any queries, please use the feedback form below.
If You Appreciate What We Do Here On TecMint, You Should Consider:
TecMint is the fastest growing and most trusted community site for any kind of Linux Articles, Guides and Books on the web. Millions of people visit TecMint! to search or browse the thousands of published articles available FREELY to all.
If you like what you are reading, please consider buying us a coffee ( or 2 ) as a token of appreciation.

We are thankful for your never ending support.
Источник
How to Send a Message to Logged Users in Linux Terminal?
Linux is a solution to the data center. It is flexible, stable, secure, and reliable. There are many users logged into servers for development purposes, testing, usage. There are various tools to send messages to other users, but they do not allow widespread sending or sending to specific users due to security issues, so we’re limited to sending messages via terminals.
Checking Active Users on Terminal
To view the active users on the system use cat utility to get a list of users who are active or the users who are on the system.

Sending Messages to Currently Logged-in Users
To check who is currently logged in and on which terminal the user is logged in will be displayed when w command is executed. w command will display who has logged into the terminal and the actions they are performing.
It displays information about current users on the machine by reading the file /var/run/utmp and their processes /proc. This command comes with a header that displays system activity like current time, system uptime, number of users logged on,
W command invokes without any option and provides information in the following format,
- 10:29:40: The current system time
- up 39 min: Length of time the system has been up
- 1 user: Number of logged-in users
- load average: 2.04, 2.16, 1.49: System load average for the past 1, 16, and 49 minutes. System Load Average is the measurement of the number of jobs that are currently running or waiting for disk I/O.
The Second line includes
- USER: Name of the logged user.
- TTY: Name of the terminal used by the useR
- FROM: Host name or IP address from where the user is logged in
- LOGIN@: Time when the user logged in
- IDLE: Time since the user last interacted with the terminal
- JCPU: Time used by all processes attached to the tty
- PCPU: Time used by the user’s current process. The one displayed in the WHAT field
- WHAT: User’s current process and options/arguments

If you want to view all the users logged into the system and remove the header part then use, who command

who command gives output with a formatted list of users currently logged into the system. The line has four fields to display,
- NAME of the user logged in
- USER’S Terminal
- The TIME user logged in
- HOSTNAME or IP ADDRESS from where the user logged in
Now to send messages to all users, use the wall command, it comes pre-installed in all Linux Distributions which will allow us to send messages to another user in the terminal using tty2. You can use any symbol, character, or white space in the message. After typing the message use CTRL + D to send the message to all users.

Sending Messages to Logged-in Users
To send messages to users logged in even though they are not active. write command is pre-installed in all the Linux Distributions and allows us to send messages to another user in the terminal using tty2. After entering text click CTRL+D to exit when done, it’ll then send the text, but it isn’t a two-way conversation

While executing to write the command if it doesn’t operate or if it is disabled, then use mesg command to turn it on. After which write command will be executed.

To give permission to the write command execute mesg y statement to enable write. The command mesg can also be used if the user doesn’t want to receive any messages or turning off the incoming messages.

If the message or text is stored in a text file then use the cat utility function with the write command to send the text file to the user in order to send the message. The text file will be sent to all the users logged in irrespective of being active at that particular time. The user can view the message whenever they are active on the Terminal.
Make use of these commands and methods to send messages to currently logged-in users or users who are logged in but not active in the terminal.
Источник
linux-notes.org

Отправить сообщение другому пользователю на сервере в Unix/Linux
Так бывает, что на сервере работают и другие пользователи одновременно с вами. Допустим вам, необходимо выполнить перезагрузку ОС так,чтобы другие юзеры не пострадали и успели сохранить свои данные до ребута. Сейчас я расскажу как можно это сделать несколькими способами.
Для начала, посмотрим кто находится в системе:
Так же, можно использовать:
Для примера, я залогинился на сервер дважды от одного и того же юзера.
-=== СПОСОБ 1 — Используем echo команду ==-
Можно отправить сообщение другому пользователю следующим образом:
- echo -e «\033[0;31m Can I reboot this server… OK? \033[0m» — Команда.
- /dev/pts/1 — Это открытая сессия пользователя.
PS: Я использую в данном примере подсветку, чтобы можно было сразу ее увидеть и другому пользователю все было понятно.
-=== СПОСОБ 2 — Используем write команду ==-
Так же, можно использовать следующий пример:
- captain — Юзер которому нужно отправить сообщение.
- pts/1 — Сессия данного юзера.
Напишите сообщение и отправьте его через нажатие ‘Enter’, и оно будет отправлено в терминал юзера. Используйте Ctrl+D чтобы прервать утилиту write.
Можно написать сообщение в файл (предположим — send_to_user.txt):
И потом, чтобы отправить данное послание, используйте:
Очень простая и полезная тулза.
-=== СПОСОБ 3 — Используем wall команду ==-
Для отправки широковещательного сообщения всем подключенным пользователям, используется команда wall (wall = write to all):
Но данное сообщение будет отправлено только после того, как вы нажмете — Ctrl+D
Можно написать сообщение в файл (предположим — send_to_user.txt):
И потом, чтобы отправить данное послание, используйте:
Вот и все, статья «Отправить сообщение другому пользователю в Unix/Linux» завершена.
Добавить комментарий Отменить ответ
Этот сайт использует Akismet для борьбы со спамом. Узнайте, как обрабатываются ваши данные комментариев.
Источник
write(1) — Linux man page
Synopsis
Description
When you run the write command, the user you are writing to gets a message of the form:
Message from yourname@yourhost on yourtty at hh:mm .
Any further lines you enter will be copied to the specified user’s terminal. If the other user wants to reply, they must run write as well.
When you are done, type an end-of-file or interrupt character. The other user will see the message EOF indicating that the conversation is over.
You can prevent people (other than the super-user) from writing to you with the mesg(1) command. Some commands, for example nroff(1) and pr(1), may disallow writing automatically, so that your output isn’t overwritten.
If the user you want to write to is logged in on more than one terminal, you can specify which terminal to write to by specifying the terminal name as the second operand to the write command. Alternatively, you can let write select one of the terminals — it will pick the one with the shortest idle time. This is so that if the user is logged in at work and also dialed up from home, the message will go to the right place.
The traditional protocol for writing to someone is that the string ‘-o’, either at the end of a line or on a line by itself, means that it’s the other person’s turn to talk. The string ‘oo’ means that the person believes the conversation to be over.
Источник
16 Command Examples to Send Email From The Linux Command Line
In this post you’ll learn how to send emails from the Linux command line. I’ll show the most often used commands, SMTP configuration and terminal options.
Whether you are a developer working non-stop in the Linux command line or a server administrator wanting logs or other data extracted from administered systems, knowing how to send email from the command line is greatly useful.
In this post, you’ll find examples of how to send email from the terminal. We’ll look at custom configurations and touch on how to set up SMTP connections to email accounts or email service providers. I’ll show you how to install the necessary console mailer packages and provide background for command line options based on the package’s manuals.
Setting Up Command Line Mailer Packages
All the mailer packages throughout the tutorial are available through Debian’s Advanced Package Manager so the installation steps in the example below may be used for all the showcased packages.
Please note that these pieces of software may be installed by other default package managers such as yum or dnf depending on your Linux system distribution.
In most cases, either sendmail or postfix is available in each Linux distribution out-of-the-box or at least that’s what similar blog posts say. Either I’m unlucky or the others were wrong, but I had to install one manually. However, you definitely need one of them for email delivery.
Setting Up Sendmail with SSMTP Package
I’ll continue with sendmail and the SSMTP package. SSMTP contains the sendmail package under the hood as you’ll see and it facilitates the configuration, which is pretty hard for sendmail otherwise.
Step 1. Check if Command Line Mailer Package is Installed
Type in the mailer package’s name just the way you would run the command, to check if it’s available:
If the package is installed, the command runs, and the prompt changes — while trying to execute the command — and you’ll see a blinking cursor followed by the message Recipient names must be specified in the case of sendmail . Conclusion: the package is installed.
If the package is NOT installed, you’ll receive a warning message and a suggestion how to install it:
In this example, I tried if the sendmail command works. After we add the SSMTP package, this command and the ssmtp command will both work and change the command prompt in the terminal. Let’s look at that!
Step 2. Installing Sendmail Command Line Mailer Package
As the terminal output suggested, we need to run the Advanced Package Manager’s install command — usually with root permission — to install the necessary package. As mentioned before, the configurations are much simpler for sendmail when you abstract away the complexity of the configuration. That can be done with SSMTP:
Step 3. Verify the Installation
After the installation completed, you can check if sendmail is able to forward messages. Type the below code in the terminal:
It should send out the email if everything works correctly. Here the «hello» string piped to the sendmail command will be the subject of the sent message, while the defined email address is naturally the recipient of the email.
You run the command. and, oops: sendmail: Cannot open mailhub:25 . The reason for this is that we didn’t provide mailhub settings at all. In order to forward messages, you need an SMTP server configured. That’s where SSMTP performs really well: you just need to edit its configuration file once, and you are good to go.
Step 4. Configuring SSMTP
Let’s locate the config file at /etc/ssmtp/ssmtp.conf . Here, you should put the code below to configure an SMTP relay:
This means that you set up an external service that will actually forward
your emails. When you provide credentials to Gmail for example, you’ll see the messages sent from the terminal in your mailbox’s ‘Sent mail’ directory. The configurations look similar with other services too.
This was the basic configuration for sendmail and the installation steps for any frequently used command line mailer package. Next, we’ll jump on installing and trying out various other packages.
Sending Email Using the SSMTP Command
This is a nice little tool we just configured for mail delivery. As its man page suggests, it’s a minimalistic emulator of sendmail . As such, SSMTP allows users to transfer emails through an SMTP server from the Linux command line. It provides the means to connect to a mailhub with a proper configuration file. If your config file was set up right, all your worries regarding command line email sending can disappear.
Basic Implementation of the SSTMP command:
If you just use SSMTP, the command should look as follows:
Following the ssmtp command, you should put the recipient address, then you can include a file that will show in the email body. Here you can define headers for the message, list further recipients and set the content type. This way you can send HTML emails. SSMTP will interpret your message and use the provided values properly. Here is an example of an HTML you might send:
You can’t really give further options with SSMTP as they are not respected by its minimalistic design.
Troubleshooting:
In case you run into the following error on the command line:
that’s likely because Gmail is not treating SSMTP as a secure application. To get rid of this error, you need to change the settings in your Gmail account – you can look up more information on potential risks there as well.
Sending Email Using the Sendmail Command
For quite some time now sendmail is the classical mail transfer agent from the world of UNIX. It was first introduced in 1979 and its highly-configurable nature and scalability made it the default go-to for server administrators.
We’ve already seen how to send basic emails by the ssmtp command, so let’s see the difference using sendmail :
I threw in the -v argument, which will make the communication between the mail server and your mail transfer agent visible.
There are plenty of configurations that you can use if you set up your own mail server and implement sendmail on it. However, that is out of the scope of this article. We will return to the topic in an upcoming one. Stay tuned.
Sending Email Using CURL Command
This tool is also tremendously common for data transfer from a server. It supports many protocols, like HTTP, FTP, POP3 or SMTP. The CURL package is used widely around the globe, one main reason is that it has native PHP implementation and PHP was the default server-side scripting language for a long time.
Installation:
Check if the package is already installed. If not run the below:
When you’re done, you can access the cheat sheet for the available options for CURL by running curl -h . The more detailed version is accessible by either man curl or curl —manual . If you want to gain in-depth knowledge using cURL, there’s this handy Ebook that contains everything you would ever want to know.
Basic implementation for email sending with CURL:
In order to send an email with CURL, you need to set up SMTP connection. Most often Google’s or Yahoo’s outgoing mail servers are used for testing email sending with SMTP. Please note that you must turn on access for less secure apps in Gmail settings and similar additional security settings may apply for Yahoo as well.
In the terminal command snippet above, the —url and —user parameters define the SMTP connection settings. The password section for —user parameter is your account’s password for the given email address. Naturally, you could also use cloud email service providers. I will show that using Mailgun in the following section.
Advanced implementation for email sending with CURL:
Working with email delivery platforms, you first need to obtain an API key. In this tutorial, I’ll show CURL email sending example using Mailgun, so if you get stuck during the registration process follow this setup guide to get on the right track.
The syntax is pretty straightforward. You may have noticed before, but you need to end each line of the command with \ characters. This is a line continuation character, the command can be run without them all in one line as well. The other thing to remember is the -F option. An excerpt from the man page:
As I encouraged before, it’s a good practice to dive into the manuals when using these command line mailer commands. As the CURL manual says, basically you’re creating a form to send. Each line is an entry given as a name=content pair. When you attach files from your local machine, you need an @ in front of the file name.
This is how the delivered email will look like: 
You could do the same using most of the other email delivery platforms, like Sendgrid for example.
Sending HTML email from the command line with CURL:
You can apply the same logic of building a form in a text file, which enables you to send HTML messages easily:
If you run the simple command from the first example.
. and direct the —upload-file parameter to the updated text file (mail.txt in our case), the received message will show the HTML content.
Troubleshooting:
You may need the —insecure switch, which allows CURL to perform «insecure» SSL connections and transfers. CURL will return an error message if the remote server is using a self-signed certificate, or if the remote server certificate is not signed by a CA listed in the CA cert file.
Sending Email Using Swaks command
As their documentation states, Swaks is a flexible, scriptable, transaction-oriented SMTP test tool. It is able to handle SMTP features and extensions such as TLS, authentication, and pipelining and multiple version of the SMTP protocols. It also supports multiple transport methods including UNIX-domain sockets, internet-domain sockets, and pipes to spawned processes.
Installation:
Basic implementation for email sending with Swaks:
In order to connect to an SMTP account you need to provide the server -s , the user -au , the password -ap and the address -t (where you want to send your mail) flags. The -tls flag is also important if you connect on port 587 .
The credentials can also be provided via command line prompts, if you only specify to authenticate -a , not filling in the user and password through command line options.
Advanced implementation for email sending with Swaks:
There are other options which we will not touch now. Let’s head to our next mailer package!
Sending Email Using the Mutt Command
Mutt is different from the previous email clients, as it is a feature-rich command line email client. You can use it for reading emails from the Linux terminal, connecting to local user mailboxes or to POP/IMAP servers. Mutt supports several mailbox formats such as mbox, MH, maildir, MMDF, full control of message headers during email composition, and multiple message tagging and colors to handle messages.
Installation:
Basic implementation for email sending with mutt:
By this time you won’t be surprised by the structure of the command. You can provide an empty message body with :
Advanced implementation for email sending with mutt:
For sending email including attachments, you need the -a flag. This way you can send useful files, like system logs, to a specified address.
You could also send HTML email if the file extension you add to the message body is in HTML format. Mutt will recognize the file type and resolve it so it won’t send your HTML as plain text:
This is it for email sending with mutt. If you have it on your machine, I’d suggest to try out how you can work with incoming configuring your mailbox and handling incoming messages. If you do so, please share your thoughts in the comment section below. I welcome any opinion about the packages shown in the tutorial.
Sending Email Using the Mailx Command
The Mailutils is a compound package for multiple use cases. It’s designed to serve regular users, system administrators, and developers. We’ll only touch on its basic functionalities regarding email forwarding. If you are interested in more features, check out its man page.
Installation:
Basic implementation for email sending with mailx:
The mailx package has 2 equal command syntax ( mail and mailx both work in the exact same way). The most simplistic command consists of the mail/mailx command and the address to send the mail to, but you would probably include the subject and at least some text-based message body. Such a command should look like this:
By using the echo command and piping the output to the mail command, you can avoid mailx’s additional prompts for Cc addresses and the message body.
Advanced implementation for email sending with mailx:
For the advanced example, we will send a full-fledged HTML email again. We need to provide the email HTML file of our choice with the character and add the «append flag» with the content type. The full code looks as follows:
You can also set a return address with —return-address= , which may be useful. Another useful option, which I couldn’t resolve to work with HTML email parallel, is to provide attachments in the same message: -A «mail.txt» . Though you can list multiple recipients, only a single attachment can be attached. You could configure external SMTP server if that fancies you.
Using Telnet Alternative Openssl Command
Telnet is an interactive communication protocol for communication with another host. It could be used to open an SMTP connection to another server and transfer email messages. However, as the protocol is not secured, most servers will reject this communication type. This is where Openssl comes into the picture as it’s built with SSL/TLS security included. It is invoked similarly to telnet with a host argument, and it performs an open command implicitly:
I indented the inputs you need to provide while the communication channel is open. These inputs are self-explanatory, but one thing I need to detail is the password hash. It can be a base64 encoded hash, which you can obtain with the following command: echo -en ‘\000username@gmail.com\000gmailpassword’ | base64 . The escape characters from the string can’t be omitted. If you don’t have the base64 package installed, it is available through package managers.
As you can see above, this means of email sending only provides an interface for text-based messages, therefore it has its limitation in use cases. On the other hand, it shows all information exchanged with the mail server, which makes debugging really easy.
Troubleshooting Mail Problems
Check the mail logs
You need to locate your log file by navigating to the corresponding folder. I prefer to use my code editor (eg. Sublime Text) for this so I can have the logs with syntax highlight:
Depending on your current Linux distribution you may need to look at different source.
The log may contain useful information about deliverability problems. At this point, when you scroll to the bottom of this:
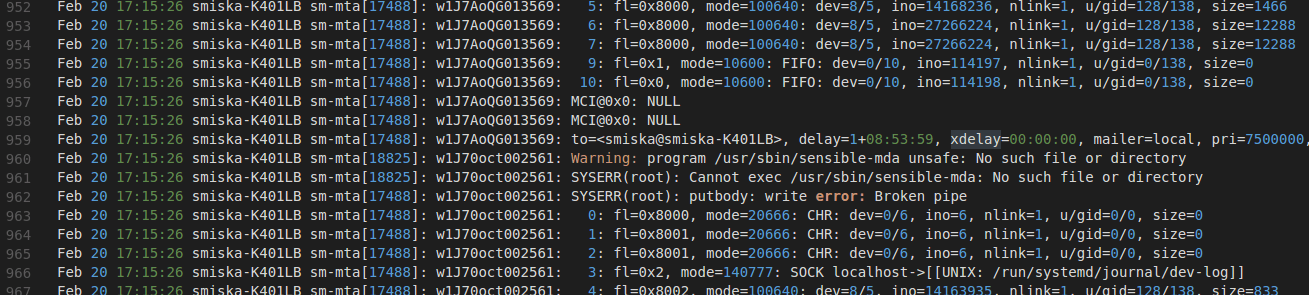
you can inspect if delivery is successful or understand why the process failed.
It can happen that your console shows no errors, but in the mail log you can see that the message was queued for delivery, so the process didn’t halt on your machine but probably was denied by the mail server you were trying to reach.
Running All Command in a Sequence
So, everything is ready for the final test. All the mailer terminal commands are gathered here in a script file. Once you downloaded the working folder with the script file in it, navigate to the containing folder and make the script executable: chmod u+x mail.sh . If you have all the files I provided ready, you can start testing the mailer commands shown in the tutorial. You just need to replace the » » to your test email address in the code and run ./mail.sh in the command line.

Once the script finishes running, your inbox will be filled with the test emails.

Summary
In this article, I showed you many ways to send email from the Linux command line. Hopefully, based on what you saw, you can install and configure these services on your machine yourself as well.
The post showed the most commonly used command line mailer packages and how to send emails with them, and in the end, I created a shell script that gathers all the commands used in the article. You can download the projects working files here, and if you install the packages introduced in the tutorial and also fill in your credentials and recipient details, you can run the script at your leisure.
Could you follow each step of the tutorial? Very well then, it makes me glad. In case you have questions or see an opportunity to improve the content further by your ideas, please head to the comment section below.
Источник


