- unakatsuo / raw_udp4.go
- Send and Receive UDP packets via Linux CLI
- Expectations:
- Netcat Command:
- General Set Up Diagram:
- Send UDP packet:
- Start Server:
- Start Client:
- Check Connection:
- Send UDP packets:
- Check packets in Wireshark:
- Other command to send UDP packets:
- Conclusion:
- Sending TCP/UDP packets using Netcat
- Syntax
- Basic parameters
- Test your Netcat understanding as a client-server
- TCP client
- UDP client
- Полезные трюки при работе с netcat
- Практические примеры
- Проверка наличия открытого TCP-порта 12345
- Сканирование TCP-портов с помощью netcat:
- Сканирование UDP-портов.
- Отправка UDP-пакета
- Прием данных на UDP-порту и вывод принятых данных
- Netcact в роли простейшего веб-сервера.
- Чат между узлами
- Реверс-шелл
unakatsuo / raw_udp4.go
| // +build linux |
| package main |
| import ( |
| «fmt» |
| «net» |
| «os» |
| «syscall» |
| «github.com/google/gopacket» |
| «github.com/google/gopacket/layers» |
| ) |
| // This example sends an UDP packet to 127.0.0.1:5000 using Linux raw socket. This program needs root priviledge or CAP_NET_RAW capability. |
| // Run «nc -ul 127.0.0.1 5000» to see the «HELLO» message in the payload. |
| // http://www.pdbuchan.com/rawsock/rawsock.html |
| func open ( ifName string ) (net. PacketConn , error ) < |
| fd , err := syscall . Socket ( syscall . AF_INET , syscall . SOCK_RAW , syscall . IPPROTO_RAW ) |
| if err != nil < |
| return nil , fmt . Errorf ( «Failed open socket(syscall.AF_INET, syscall.SOCK_RAW, syscall.IPPROTO_RAW): %s» , err ) |
| > |
| syscall . SetsockoptInt ( fd , syscall . IPPROTO_IP , syscall . IP_HDRINCL , 1 ) |
| if ifName != «» < |
| iface , err := net . InterfaceByName ( ifName ) |
| if err != nil < |
| return nil , fmt . Errorf ( «Failed to find interface: %s: %s» , ifName , err ) |
| > |
| syscall . SetsockoptString ( fd , syscall . SOL_SOCKET , syscall . SO_BINDTODEVICE , ifName ) |
| > |
| conn , err := net . FilePacketConn ( os . NewFile ( uintptr ( fd ), fmt . Sprintf ( «fd %d» , fd ))) |
| if err != nil < |
| return nil , err |
| > |
| return conn , nil |
| > |
| func buildUDPPacket ( dst , src * net. UDPAddr ) ([] byte , error ) < |
| buffer := gopacket . NewSerializeBuffer () |
| payload := gopacket . Payload ( «HELLO» ) |
| ip := & layers. IPv4 < |
| DstIP : dst . IP , |
| SrcIP : src . IP , |
| Version : 4 , |
| TTL : 64 , |
| Protocol : layers . IPProtocolUDP , |
| > |
| udp := & layers. UDP < |
| SrcPort : layers . UDPPort ( src . Port ), |
| DstPort : layers . UDPPort ( dst . Port ), |
| > |
| if err := udp . SetNetworkLayerForChecksum ( ip ); err != nil < |
| return nil , fmt . Errorf ( «Failed calc checksum: %s» , err ) |
| > |
| if err := gopacket . SerializeLayers ( buffer , gopacket. SerializeOptions < ComputeChecksums : true , FixLengths : true >, ip , udp , payload ); err != nil < |
| return nil , fmt . Errorf ( «Failed serialize packet: %s» , err ) |
| > |
| return buffer . Bytes (), nil |
| > |
| func main () < |
| conn , err := open ( «lo» ) |
| if err != nil < |
| panic ( err ) |
| > |
| dst := & net. UDPAddr < |
| IP : net . ParseIP ( «127.0.0.1» ), |
| Port : 5000 , |
| > |
| b , err := buildUDPPacket ( dst , & net. UDPAddr < IP : net . ParseIP ( "127.0.0.1" ), Port : 5001 >) |
| if err != nil < |
| panic ( err ) |
| > |
| wlen , err := conn . WriteTo ( b , & net. IPAddr < IP : dst . IP >) |
| if err != nil < |
| panic ( err ) |
| > |
| fmt . Printf ( «Sent IP packet %d bytes to %s \n » , wlen , dst ) |
| > |
You can’t perform that action at this time.
You signed in with another tab or window. Reload to refresh your session. You signed out in another tab or window. Reload to refresh your session.
Источник
Send and Receive UDP packets via Linux CLI
Expectations:
Here are the key points to learn from this article
- To understand nc command in Linux.
- Use nc command for sending and receiving UDP packets through network.
- Send some human readable sentences through nc command.
- Capture the UDP packet sent by nc command.
- Check network packet in Wireshark.
- Find out any other command other than netcat for Linux.
Netcat Command:
Netcat(nc) command is installed by default in Linux OS. Open one terminal [Shortcut Alt+Ctrl+t] and use below command to check if nc is present or not.
Here is the expected output
This is nc from the netcat-openbsd package. An alternative nc is available
in the netcat-traditional package.
usage: nc [-46bCDdhjklnrStUuvZz] [-I length] [-i interval] [-O length]
[-P proxy_username] [-p source_port] [-q seconds] [-s source]
[-T toskeyword] [-V rtable] [-w timeout] [-X proxy_protocol]
[-x proxy_address[:port]] [destination] [port]
This means nc command is already exist in Linux.
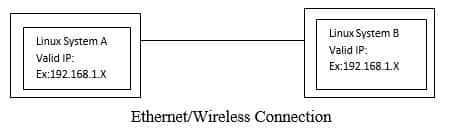
General Set Up Diagram:
Send UDP packet:
Let’s take an example like we will send UDP packet from System A to System B. So, in server-client concept, we have to run server at System B side and client at System A side.
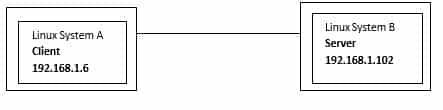
Also we have valid IP addresses.
Start Server:
To start sever using nc command use below command in System B terminal
Here is the screenshot

This command does not have any output to show as of now. This is just listening mode on port 9999.
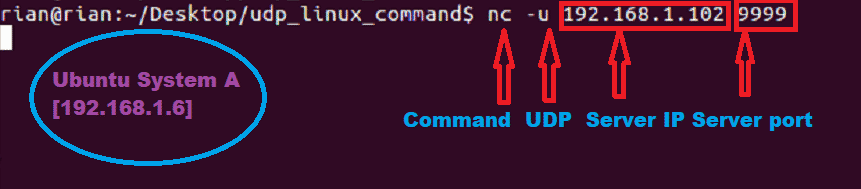
Start Client:
To connect to server using nc command use below command in System A terminal
Now system A has to connect to System B. So we have provided server IP address and port number.
Here is the screenshot
Check Connection:
We can check the below command for the confirmation about client connation to server port.
Here is the screenshot

Send UDP packets:
Now we can send udp packet from System A to B and vice versa.
Step 1:
Now go to system A and send any sentences like

Step 2:
We should able to see this in System B side. Here is the screenshot

We can also send UDP packets from System B to System A.
Step 1:
Go to System B and send sentence like
Here is the screenshot from System B

Step 2:
Here is the screenshot from System A

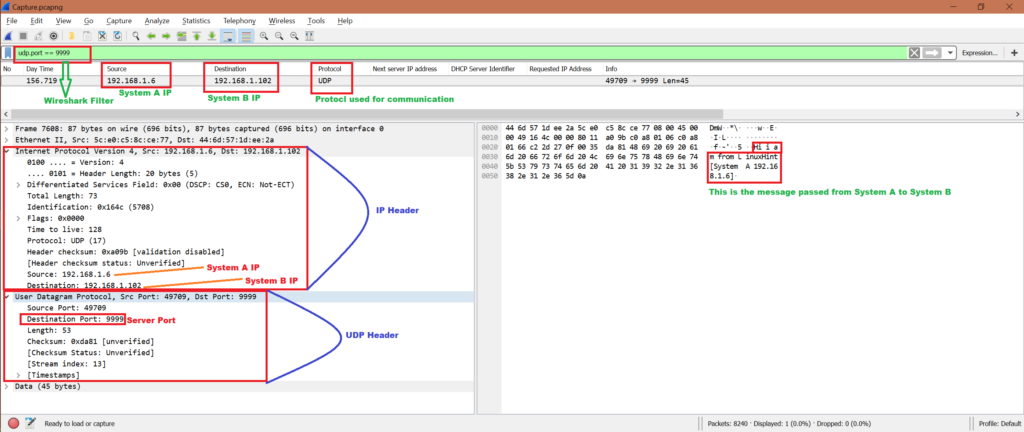
Check packets in Wireshark:
Now while we have been sending UDP packets from System A to System B and vice verse, we can start Wireshark in either System A or System B. Here we have the capture file, let’s do some analysis and confirm if this server and client communication used UDP protocol.
Note that we will only analyze the first communication:
System A has sent:
To:
We will use filter “udp.port == 9999” to get only related packets in Wireshark. Refer below screenshot for analysis from Wireshark capture:
To know how to use Wireshark refer below link
Other command to send UDP packets:
There is another method to send UDP packets
Run server at System B:
Run below command at System A:
But we are able to send only one time “hello”. If we kill server and rerun then it’s working.
Conclusion:
From the above exercise we have learned the mechanism to send some messages using UDP protocol. And the best method is to use nc command in Linux.
Источник
Sending TCP/UDP packets using Netcat

There are a number of protocols powering the Internet of Things. Choosing the right one will depend on your project’s security, bandwidth and reliability needs, or maybe just your device computing limitations. In some cases like cellular transmission, the good old TCP/UDP packet transmission will work just fine. This article will show you how to simulate a client using a useful tool called Netcat and realize the immediate connection using your own computer’s terminal.
To learn how to send data to Ubidots using these protocols, see Send Data to Ubidots over TCP or UDP.
Netcat is a featured networking utility which reads and writes data across network connections, using the TCP/IP protocol. Designed to be a reliable «back-end» tool, Netcat can be used directly with other programs and scripts to send files from a client to a server and back. At the same time, it is a feature-rich network debugging and exploration tool that can specify the network patameters while also establishing a connection to a remote host via a tunnel.
Although Netcat can do many things, its main purpose and most desirable function is to:
Create an initial socket to establish a connection from server to the client.
Once connected, Netcat will automatically generate a second socket to transmit files from the server to the client and visa versa. (This is the really cool part.)
Reference below for a diagram of the data Netcat protocol architecture.

Something so simple happens to be extraordinarily powerful and flexible as you will see below. For simplicity, local connections are used, although, of course, they can be used between different machines.
Syntax
nc [-options] hostname port[s] [ports]
nc -l -p port [-options] [hostname] [port]
Basic parameters
—l: set the «listen» mode, waits for the incoming connections.
—u: set the UDP mode
Test your Netcat understanding as a client-server
Open two computer terminals, the first will act as the server and the second will be the client.
TCP client
With Netcat your PC can be converted in a server, you want to begin as a server that listens at port 2399:
In addition, we can use the server to connect to the port (2399) recently opened, from the client side:
As you can see on the image below, the connection is established:

With the connection established you are now able to write to the server from the client:
In the terminal where the server is running, your text files will appear seamlessly.

UDP client
By default Netcat uses the TCP protocol for its communications, but it can also UDP using the -u option.
As we mentioned at the previous step, Netcat lets you convert your PC in a server. In this case we’re going to establish the connection between the server and the client but using UDP.
From the server side, run the command below. As you can see, the command establishes the UDP connection just requires the -u to be added to the command:
Once you start the server, establish the connection with the client:
Now the client and the server are using UDP protocol for their communication. You can verify commincation using the netstat command in a new (3rd) computer terminal.
$ netstat | grep 2399
udp 0 0 localhost:2399 localhost:57508 ESTABLISHED
As you can see in the images below, the message is received by the server, and the transmission is verified by the connection:

With this introduction to Netcat, you now have a better understanding of this advanced tool to send data quickly and efficiently between client and server. For additional information, check out this link.
This article was originally published on Ubidots’ Blog on June 22, 2017.
Источник
Полезные трюки при работе с netcat

В данной статье я рассмотрю популярную сетевую утилиту netcat и полезные трюки при работе с ней.
Netcat — утилита Unix, позволяющая устанавливать соединения TCP и UDP, принимать оттуда данные и передавать их. Несмотря на свою полезность и простоту, многие не знают способы ее применения и незаслуженно обходят ее стороной.
С помощью данной утилиты можно производить некоторые этапы при проведении тестирования на проникновение. Это может быть полезно, когда на атакованной машине отсутствуют (или привлекут внимание) установленные пакеты, есть ограничения (например IoT/Embedded устройства) и т.д.
Что можно сделать с помощью netcat:
- Сканировать порты;
- Перенаправлять порты;
- Производить сбор баннеров сервисов;
- Слушать порт (биндить для обратного соединения);
- Скачивать и закачивать файлы;
- Выводить содержимое raw HTTP;
- Создать мини-чат.
Вообще с помощью netcat можно заменить часть unix утилит, поэтому этот инструмент можно считать неким комбайном для выполнения тех или иных задач.
Практические примеры
Во многих случаях при необходимости проверки того или иного хоста используют телнет, либо собственные сервисные службы для выявления хоста или баннера. Как нам может помочь netcat:
Проверка наличия открытого TCP-порта 12345
nc: connect to 192.168.1.100 12345 (tcp) failed: Connection refused
Connection to 192.168.1.100 22 port [tcp/ssh] succeeded!
SSH-2.0-OpenSSH
Сканирование TCP-портов с помощью netcat:
При таком сканировании не будет соединение с портом, а только вывод успешного соединения:
nc: connectx to 192.168.1.100 port 20 (tcp) failed: Connection refused
nc: connectx to 192.168.1.100 port 21 (tcp) failed: Connection refused
found 0 associations
found 1 connections:
1: flags=82
outif en0
src 192.168.1.100 port 50168
dst 192.168.1.100 port 22
rank info not available
TCP aux info available
Connection to 192.168.1.100 port 22 [tcp/*] succeeded!
nc: connectx to 192.168.1.100 port 23 (tcp) failed: Connection refused
nc: connectx to 192.168.1.100 port 24 (tcp) failed: Connection refused
Сканирование UDP-портов.
Для сканирования UDP портов с помощью nmap необходимы root привилегии. Если их нет — в этом случае нам тоже может помочь утилита netcat:
Connection to 192.168.1.100 port 5555 [udp/*] succeeded!
Отправка UDP-пакета
Это может быть полезно при взаимодействии с сетевыми устройствами.
Прием данных на UDP-порту и вывод принятых данных
После первого сообщения вывод будет остановлен. Если необходимо принять несколько сообщений, то необходимо использовать while true:
Передача файлов. С помощью netcat можно как получать файлы, так и передавать на удаленный хост:
Netcact в роли простейшего веб-сервера.
Netcat может выполнять роль простейшего веб-сервера для отображения html странички.
C помощью браузера по адресу: http://хост netcat:8888/index.html. Для использования стандартного порта веб-сервера под номером 80 вам придется запустить nc c root привелегиями:
Чат между узлами
На первом узле (192.168.1.100):
После выполнения команд все символы, введенные в окно терминала на любом из узлов появятся в окне терминала другого узла.
Реверс-шелл
С помощью netcat можно организовать удобный реверс-шелл:
Теперь можно соединиться с удаленного узла:
Не стоит опускать руки, если нет тех или иных инструментов, зачастую довольно громоздких, иногда задачу можно решить подручными средствами.
Источник


