- Working with the serial console
- Contents
- Configure console access on the target machine
- Boot loader
- GRUB Legacy
- rEFInd
- Syslinux
- Kernel
- getty
- Making Connections
- Connect using a terminal emulator program
- Command line
- And, for Windows
- Graphical front-ends
- Installing Arch Linux using the serial console
- Debugging an unresponsive machine using a serial console
- Troubleshooting
- Ctrl+c and Minicom
- Resizing a terminal
- Missing ports on multi-port expansion cards
- Заметки о Linux, электронике, радиолюбительстве
- воскресенье, 27 июля 2014 г.
- Работа с последовательным портом из консоли Linux
- Ubuntu Documentation
- Assumptions
- Server Setup
- Configuring the console login process
- Configuring grub
- Configuring the kernel boot parameters
- Client Setup
- Alternative serial client: screen
- External links
Working with the serial console
An Arch Linux machine can be configured for connections via the serial console port, which enables administration of a machine even if it has no keyboard, mouse, monitor, or network attached to it.
Installation of Arch Linux is possible via the serial console as well.
A basic environment for this scenario is two machines connected using a serial cable (9-pin connector cable). The administering machine can be any Unix/Linux or Windows machine with a terminal emulator program (PuTTY or Minicom, for example).
The configuration instructions below will enable boot loader menu selection, boot messages, and terminal forwarding to the serial console.
Contents
Configure console access on the target machine
Boot loader
When using GRUB with a generated grub.cfg , edit /etc/default/grub and enable serial input and output support:
Next add the GRUB_SERIAL_COMMAND variable and set the options for the serial connection. For COM1 ( /dev/ttyS0 ) with baud rate of 115200 bit/s:
Read GRUB’s manual on Using GRUB via a serial line and the serial command for detailed explanation of the available options.
GRUB Legacy
Edit the GRUB Legacy configuration file /boot/grub/menu.lst and add these lines to the general area of the configuration:
rEFInd
rEFInd supports serial console only in text mode. Edit refind.conf and uncomment textonly .
Syslinux
To enable serial console in Syslinux, edit syslinux.cfg and add SERIAL as the first directive in the configuration file.
For COM1 ( /dev/ttyS0 ) with baud rate of 115200 bit/s:
The serial parameters are hardcoded to 8 bits, no parity and 1 stop bit.[1]. Read Syslinux Wiki:Config#SERIAL for the directive’s options.
Kernel
Kernel’s output can be sent to serial console by setting the console= kernel parameter. The last specified console= will be set as /dev/console .
getty
At boot, systemd-getty-generator(8) will start a getty instance for each console specified in the kernel command line.
If you have not configured console= in kernel command line start serial-getty@device.service . For /dev/ttyS0 (COM1) that would be serial-getty@ttyS0.service . Enable the service to start it at boot.
Unless specified otherwise in the kernel command line, getty will be expecting 38400 bit/s baud rate, 8 data bits, no parity and one stop bit-times.
Making Connections
Connect using a terminal emulator program
Perform these steps on the machine used to connect the remote console.
Command line
dterm
dterm AUR is a tiny serial communication program. If you invoke it without parameters, it will connect to /dev/ttyS0 at 9600 baud by default. The following example connect to /dev/ttyS0 at 115200 baud, with 8 data bits, no parity bit and 1 stop bit-times:
See its homepage[2] for more examples.
Minicom
minicom can be obtained from the official repositories. Start Minicom in setup mode:
Using the textual navigation menu, change the serial port settings to the following:
Press Enter to exit the menus (pressing Esc will not save changes). Remove the modem Init and Reset strings, as we are not connecting to a modem. To do this, under the Modem and Dialing menu, delete the Init and Reset strings. Optionally save the configuration by choosing save setup as dfl from the main menu. Restart minicom with the serial cable connected to the target machine. To end the session, press Ctrl+A followed by Ctrl+X .
picocom
picocom is a tiny dumb-terminal emulation program that is very like minicom, but instead of mini, it is pico. The following example connect to ttyS0 at 9600 bps:
See its manual for detailed usage.
Screen
GNU Screen is able to connect to a serial port. It will connect at 9600 baud by default:
A different baud rate (e.g. 115200) may be specified on the command line.
To end the session, press Ctrl+a followed by K . Alternatively, press Ctrl+a , type :quit and confirm it by pressing Enter .
Serialclient
Serialclient[3] is a CLI client for serial connection written in ruby. Install ruby package, then install it with the following:
Then, you can use like this:
And, for Windows
On Windows machines, connect to the serial port using programs like PuTTY[4] or Terminalbpp[5].
Graphical front-ends
cutecom AUR is another gui enabled serial monitor.
putty is also available for Linux.
moserial is a gtk-based serial terminal, primarily intended for technical users and hardware hackers who need to communicate with embedded systems, test equipment, and serial consoles.
Installing Arch Linux using the serial console
- Connect to the target machine using the method described above.
- Boot the target machine using the Arch Linux installation CD.
- When the bootloader appears, select Boot Arch Linux () and press Tab to edit
- Append console=ttyS0,115200 and press Enter .
- Now systemd should detect ttyS0 and spawn a serial getty on it. Login as root and start the installation as usual.
Debugging an unresponsive machine using a serial console
Even though [7] has only raw and terse instructions, it presents the full scene. It is important to note that here, the machine under test got unresponsive in a reproducible manner. And that it happened during normal operation. So it could be accessed normally before it needed debugging. However, in general, the serial console is also useful for debugging boot issues. Perhaps by configuring the boot loader by hand at machine startup time. Also note the mentioned netconsole within the P.S paragraph of the external link from this section.
Troubleshooting
Ctrl+c and Minicom
If you are having trouble sending a Ctrl+c command through minicom you need to switch off hardware flow control in the device settings ( minicom -s ), which then enables the break.
Resizing a terminal
Unlike ssh, serial connections do not have a mechanism to transfer something like SIGWINCH when a terminal is resized. This can cause weird problems with some full-screen programs (e.g. less ) when you resize your terminal emulator’s window.
Resizing the terminal via stty is a workaround:
However, this requires you to manually input the proper geometry. The following methods should be simpler.
1. There is a lesser-known utility called resize , shipped with xterm , that can solve this problem. Invoke it without parameters after you resize the terminal emulator’s window:
2. If you do not want to install xterm, it is possible to do the same work via a shell function. Put the following function into your zshrc and invoke it without parameters after resizing the terminal emulator’s window:
Missing ports on multi-port expansion cards
 This article or section needs expansion.
The number of serial ports using the generic 8250 driver on the default kernel configuration is set to 4 at runtime with a maximum of 32. This will prevent the creation of /dev/ttyS4 and above. Counting the typical built in serial port on the motherboard this prevents the use of the 4th serial port on a 4 port expansion card.
Источник
Заметки о Linux, электронике, радиолюбительстве
Личный блог Вадима Кузнецова, RA3XDH
воскресенье, 27 июля 2014 г.
Работа с последовательным портом из консоли Linux
В предыдущем посте было показано как запустить UART на отладочной плате Launchpad для MSP430. Теперь рассмотрим как общаться с платой при помощи средств командной строки Linux. Используется плата с прошивкой из предыдущего поста. Для подробностей — см. под кат
Как известно, все устройства последовательных портов представлены файлами устройств в каталоге /dev.Через эти файлы и происходит общение ОС Linux с внешним устройством на последовательном порту. Чтобы передать что-то на внешнее устройство нужно записать данные в файл устройства, а чтобы считать информацию из устройства — прочитать данные из файла устройства. Это можно делать при помощи команд cat и echo так же как для обычных файлов на диске. Или внутри программы на С при помощи вызовов ioctl(), read() и write() или библиотеки termios.
Физическим последовательным портам RS232, к которым подключались диалапные модемы на старых компьютерах, соответствуют файлы устройств /dev/ttyS*, начиная с /dev/ttyS0. Виртуальным последовательным портам, которые создаются различными конвертерами USB UART соответствуют файлы устройств /dev/ttyUSB* и /dev/ttyACM*. Ядро Linux автоматически разпознаёт подключенное устройство, загружает для него драйвер и создаёт файл устройства. Вручную устанавливать драйвер, как в ОС Windows не требуется. Например, если подключить к USB преобразователь USB UART FT232, то создаётся файл устройства /dev/ttyUSB0, с которым можно работать также как и с обычным последовательным портом. На плате Launcpad находится микросхема TUSB3410, которая тоже представляет собой конвертер USB UART. Если подключить её к USB, то создаётся файл устройства /dev/ttyACM0. Чтобы общаться с платой нужно что-либо писать/читать с этого файла.
Чтобы пользователь мог читать или писать в файл устройства последовательного порта, его нужно добавить в группу dialout. Иначе работать с последовательным портом сможет только администратор root.
Простейшим приложением с графическим интерфейсом, которое работает с последовательным портом, является CuteCOM. Он обычно уже есть в вашем дистрибутиве Linux. Его можно установить из репозиториев. При помощи CuteCOM мы работали с платой в предыдущем посте. Выглядит CuteCOM вот так:
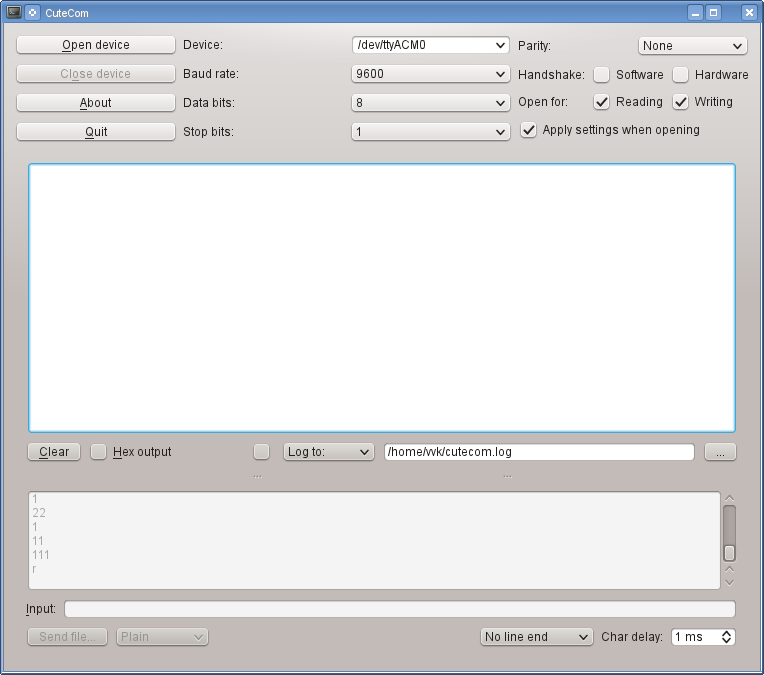
Работать с ним крайне просто. Указываем нужное устройство, если его нет в списке, то его можно впечатать вручную. Затем указываем скорость и параметры и нажимаем OpenDevice. В окне видим данные, которые пришли от устройства. В поле ввода в нижней части можем печать строку символов, которые предаются на устройство. Чтобы передать данный нажимаем Enter и смотрим ответ устройства в окне.
Теперь рассмотрим как работать с COM-портом из командной строки. Для этого служат три команды: stty, cat и echo.
Команда stty устанавливает параметры и скорость COM-порта. Её формат:
stty -F
Чтобы установить параметры для платы Launchpad для соединения на скорости 9600 нужно выполнить:
$ stty 9600 -F /dev/ttyACM0 raw -echo
Параметр raw устанавливает, что данные в компьютер передаются байт за байтом так же как приходят в порт без преобразований. Аппаратное управление потоком отключено. Подробнее о том, что включает и выключает raw — см. man stty. Если не включить raw, то скорее всего ничего работать не будет.
Теперь в той же консоли нужно набрать
$ cat /dev/ttyACM0
И можно смотреть данные, которые приходят от платы. Выход — нажать Ctrl+C.
Теперь нажимаем на плате RESET и видим, что в консоди напечатался текст.
Чтобы передать в плату данные, в другой консоли нужно использовать команду echo и перенаправление вывода в файл устройства. Наберём в другой консоли:
$ echo "1">/dev/ttyACM0
Видим, что на плате загорелся красный светодиод и в первой консоли было выдано сообщение об этом. Чтобы убрать конец строки в передаваемых данных, то нужно использовать запуск echo -n, а чтобы интерпретировать 16-ричные коды — нужно echo -e. Ключи можно комбинировать.
В итоге должно получиться так:

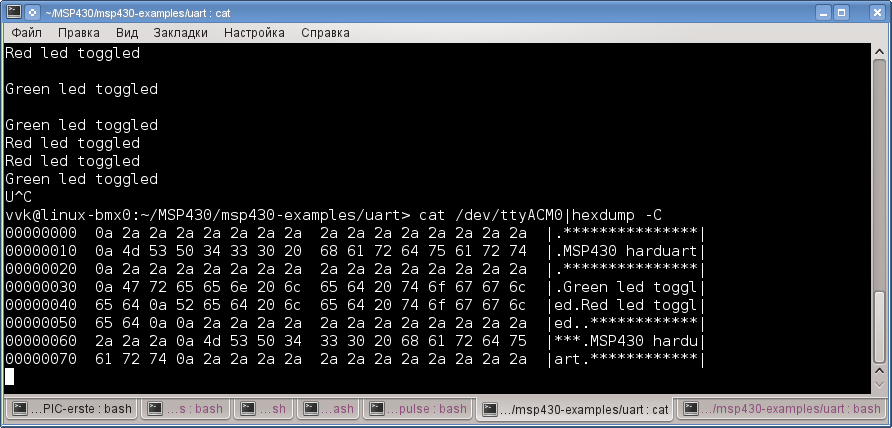
Чтобы увидеть 16-ричные коды данных, приходящих от устройства, нужно использовать команду hexdump:
$ cat /dev/ttyACM0|hexdump -C
Получится вот так:
Чтобы иметь вывод данных от устройство на экран и в текстовый файл нужно использовать tee:
Источник
Ubuntu Documentation

Content Cleanup Required
This article should be cleaned-up to follow the content standards in the Wiki Guide. More info.
This document presents (almost) the minimum amount of work required to enable a serial console login on an Ubuntu 6.06 and later versions. (Minor changes have been added to improve performance.) Both server and client settings are included.
This procedure was developed using the Remote Serial Console HOWTO (see «External links» below), and adapted to apply specifically to Ubuntu. The reader is referred to this document for any issues arising from using this HOWTO.
Assumptions
You have enabled the serial console in your BIOS. 1
If you want to use a standard Ethernet/RJ-45 cable for serial connection you can buy a couple of Serial to Cat 5 adapters or make one yourself.
Server Setup
Configuring the console login process
This section details how to configure the ‘getty’ process to enable a login via the console port. You need to configure either an Upstart system or the older inittab, depending on Ubuntu version you are using.
Configuring upstart (Karmic and newer)
1) Create a file called /etc/init/ttyS0.conf containing the following:
2) Ask upstart to start the getty
Configuring upstart (Edgy/Feisty/Jaunty)
Create a file called /etc/event.d/ttyS0 containing the following:
Configuring inittab (only Dapper and older !)
1) Edit /etc/inittab
2) Change the following line:
At this point, a new login prompt should appear on the output of the serial console.
Configuring grub
This section details how to get grub talking via the serial port.
This section is optional if the user does not want grub interaction via the serial console port.
Configuring (Karmic and newer)
1) Edit /etc/default/grub
Configuring grub (Edgy/Feisty/Jaunty)
1) Edit /boot/grub/menu.lst:
2) Add the following lines to the top of the file:
3) When you next reboot, the output from grub will go to the normal console unless input is received from the serial port. Whichever receives input first becomes the default console. This gives you the best of both worlds.
Configuring the kernel boot parameters
This section details how to configure the kernel boot parameters to get boot information through the console port.
This section is optional if the user does not want the kernel boot messages to appear on the serial console port.
The following procedure can be carried out by modifying the ‘kernel’ line in grub prior to committing the changes directly to the /boot/grub/menu.lst file.
1) Edit /boot/grub/menu.lst:
2) Modify the kernel line for the image you want to boot using the serial console on. In this case, I’m setting up the default 2.6.10-5.386 kernel to use the serial console line. Change:
Note two «console=» kernel options. You can specify this option several times. All devices, mentioned in it will receive kernel messages (those, generated by printk() and seen by dmesg). However, stdin/stdout/stderr of /sbin/init process will be set to the last device only, therefore only the last device will show startup messages and act as a console in single-user mode.
3) Reboot into this kernel. Output from the boot process should be sent via the serial console line.
Client Setup
1) Ensure you have a read/write permissions on /dev/ttyS0.
if the last command didn’t show an output add yourself to dialout group and logout/login:
Alternatively, you can always run minicom through sudo, but it’s not recommended.
2) Install minicom
3) Configure minicom.
4) Configure client serial port settings: In Serial port setup, set the following options
4b) Using 7.10 on the server, I needed to set the following on the client:
My 7.10 client and Windows’ HyperTerminal both defaulted to Yes; until I changed this client -> server communication did not work.
5) Configure Initialization string: In Modem and dialing clear the init
6) Save setup as dfl
7) You might need to press enter several times to get the connection running.
8) To log on in the future, run
and press enter several times if it does not come up on start up.
Alternative serial client: screen
GNU screen actually makes quite a capable serial terminal.
(adjust to requirements)
To end the session, use Ctrl-A,Shift-K.
External links
This is only needed if you plan to use serial console to enter BIOS configuration utility or observe early startup messages even before GRUB starts. Note, that in some cases it may interfere with GRUB settings described below. If you’re sure you’ve configured GRUB correctly, but the serial menu does not appear, try disabling serial console support in BIOS. (1)
SerialConsoleHowto (последним исправлял пользователь tj 2018-11-05 10:36:54)
The material on this wiki is available under a free license, see Copyright / License for details
You can contribute to this wiki, see Wiki Guide for details
Источник


