- 5.1 Драйвер последовательного порта в Linux
- Linux Serial Ports Using C/C++
- Overview
- Everything Is A File
- Basic Setup In C
- Configuration Setup
- Control Modes (c_cflags)
- PARENB (Parity)
- CSTOPB (Num. Stop Bits)
- Number Of Bits Per Byte
- Flow Control (CRTSCTS)
- CREAD and CLOCAL
- Local Modes (c_lflag)
- Disabling Canonical Mode
- Disable Signal Chars
- Input Modes (c_iflag)
- Software Flow Control (IXOFF, IXON, IXANY)
- Disabling Special Handling Of Bytes On Receive
- Output Modes (c_oflag)
- VMIN and VTIME (c_cc)
- Baud Rate
- Custom Baud Rates
- Saving termios
- Reading And Writing
- Writing
- Reading
- Closing
- Full Example (Standard Baud Rates)
- Issues With Getty
- Exclusive Access
- Changing Terminal Settings Are System Wide
5.1 Драйвер последовательного порта в Linux
Драйвер последовательного порта в Linux тесно связан с подсистемой TTY. Уровень TTY является отдельным классом символьного устройства. На встраиваемых системах, имеющих последовательный порт, уровень TTY используется для предоставления доступа к низкоуровневому последовательному порту. Часто встраиваемая плата может иметь больше, чем один последовательный порт; обычно другие порты могут использоваться для коммутируемого доступа с использованием таких протоколов, как PPP или SLIP. Часто задаётся вопрос, должны ли в таком случае быть предоставлены разные драйверы последовательных портов. Ответ: нет, так как TTY отделяет драйвер последовательного порта от приложения, так что может быть предоставлен один драйвер последовательного порта, вне зависимости от того, как он используется.
Пользовательский процесс не общается с драйвером последовательного порта напрямую. TTY представляет собой стек программного обеспечения над драйвером и экспортирует всю функциональность через устройства TTY. Подсистема TTY разделяется на три слоя, как показано на Рисунке 5.2. Как показывает Рисунок 5.2, каждое устройство, взаимодействующее с подсистемой TTY, связано с дисциплиной линии, которая решает, как передаваемые или принимаемые данные обрабатываются низкоуровневым драйвером. Linux предлагает дисциплину линии по умолчанию N_TTY, которая может быть использована для того, чтобы использовать в качестве стандартного терминала последовательный порт. Но дисциплины линий также могут использоваться для реализации более сложных протоколов, таких как X.25 или протокол PPP/SLIP.
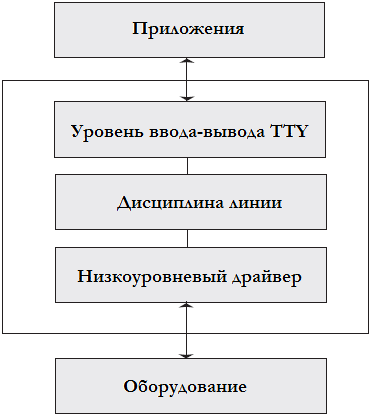
Рисунок 5.2 Подсистема TTY.
В Linux пользовательские процессы обычно имеют управляющий терминал. Управляющий терминал это то, где процесс принимает ввод, и то, где осуществляет стандартный вывод и куда перенаправляются ошибки. TTY и управление процессами автоматически заботятся о назначении и управлении управляющими терминалами. (* Процессы могут предпочесть работать без управляющего терминала. Такие процессы называются службами (daemon, демонами). Службы используются для запуска задач в фоновом режиме после отключения от управляющего терминала, чтобы они не пострадали, когда терминал закрывается.)
Существует ещё один набор устройств TTY, которые используются во встраиваемых системах. Это виртуальные или псевдо-TTY устройства (PTY). PTY являются мощным средством межпроцессного взаимодействия. Процессы, использующие псевдо-TTY получают все преимущества межпроцессного взаимодействия и подсистемы TTY. Например, подсистема Telnet на Linux использует псевдо-терминал для связи между telnetd (главной службой Telnet) и процессом, который является порождением telnetd . По умолчанию количество псевдо-терминалов TTY установлено в 256; оно может быть изменено на меньшее число из-за его ограниченного использования во встраиваемых системах.
Теперь обсудим реализацию в Linux драйвера последовательного порта. В ядре версии 2.4 структурой данных, используемой для подключения последовательного драйвера к подсистеме TTY, является tty_driver . Драйвер последовательного порта заполняет эту структуру такой информацией, как название устройства, старший/младший номера и всеми необходимыми интерфейсами, требуемыми вводом-выводом TTY и уровнем дисциплины линии для обращения к драйверу последовательного порта. В версии 2.4 функции, экспортируемые в уровень TTY от драйвера последовательного порта, содержит файл drivers/char/generic_serial.c ; он может быть использован для подключения к уровню TTY вашего низкоуровневого драйвера последовательного порта.
В ядре версии 2.6 уровень драйвера последовательного порта был очищен, так что перенос нового драйвера последовательного порта в Linux становится проще. Драйвер последовательного порта больше не должен беспокоиться о вызовах TTY; вернее, это выполняет уровень абстракции. Это делает работу по написанию драйвера последовательного порта легче. Этот раздел объясняет, как на новой платформе может быть написан драйвер последовательного порта.
Путь есть вымышленное оборудование UART MY_UART со следующими функциональными возможностями:
▪ Простая логика передачи и приёма; один регистр для передачи данных и один регистр для получения данных
▪ Допустимые настройки скорости 9600 или 19200 бод
▪ Для оповещения о конце передачи или приёма данных используется прерывание
▪ Оборудование имеет только один порт UART (то есть, оно однопортовое)
Мы предполагаем, что макрос, показанный в Распечатке 5.1, уже доступен для доступа к оборудованию. Также эти макросы предполагают, что регистры и буферы отображаются начиная с базового адреса MY_UART_BASE . Мы также предполагаем, что BSP для этой конкретной платы уже сделал это отображение, так что мы можем начать эффективно использовать адрес MY_UART_BASE . Тем не менее, мы не обсуждаем поддержку драйвером модема; это выходит за рамки данного раздела.
Сначала мы обсудим конфигурацию устройства. В файл drivers/serial/Kconfig добавляем следующие строки:
Test UART driver
Затем в drivers/serial/Makefile добавляем следующую строку:
Опция конфигурации выбирает, чтобы файл my_uart.c был скомпилирован вместе с drivers/serial/serial_core.c . Файл serial_core.c содержит общие процедуры UART, которые взаимодействуют с TTY и модулями дисциплины линии. В дальнейшем универсальный уровень UART, реализованный в serial_core.c , упоминается как ядро UART .
Источник
Linux Serial Ports Using C/C++
Article by:Geoffrey Hunter
| Date Published: | June 24, 2017 |
| Last Modified: | November 24, 2020 |
Overview
Unluckily, using serial ports in Linux is not the easiest thing in the world. When dealing with the termios.h header, there are many finicky settings buried within multiple bytes worth of bitfields. This page is an attempt to help explain these settings and show you how to configure a serial port in Linux correctly.
Everything Is A File
In typical UNIX style, serial ports are represented by files within the operating system. These files usually pop-up in /dev/ , and begin with the name tty* .
Common names are:
- /dev/ttyACM0 — ACM stands for the ACM modem on the USB bus. Arduino UNOs (and similar) will appear using this name.
- /dev/ttyPS0 — Xilinx Zynq FPGAs running a Yocto-based Linux build will use this name for the default serial port that Getty connects to.
- /dev/ttyS0 — Standard COM ports will have this name. These are less common these days with newer desktops and laptops not having actual COM ports.
- /dev/ttyUSB0 — Most USB-to-serial cables will show up using a file named like this.
- /dev/pts/0 — A pseudo terminal. These can be generated with socat .

A listing of the /dev/ directory in Linux with a connected Arduino. The Arduino serial port is present as /dev/ttyACM0.
To write to a serial port, you write to the file. To read from a serial port, you read from the file. Of course, this allows you to send/receive data, but how do you set the serial port parameters such as baud rate, parity, e.t.c? This is set by a special tty configuration struct .
Basic Setup In C
First we want to include a few things:
Then we want to open the serial port device (which appears as a file under /dev/ ), saving the file descriptor that is returned by open() :
One of the common errors you might see here is errno = 2 , and strerror(errno) returns No such file or directory . Make sure you have the right path to the device and that the device exists!
Another common error you might get here is errno = 13 , which is Permission denied . This usually happens because the current user is not part of the dialout group. Add the current user to the dialout group with:
You must log out and back in before these group changes come into effect.
At this point we could technically read and write to the serial port, but it will likely not work, because the default configuration settings are not designed for serial port use. So now we will set the configuration correctly.
When modifying any configuration value, it is best practice to only modify the bit you are interested in, and leave all other bits of the field untouched. This is why you will see below the use of &= or |= , and never = when setting bits.
Configuration Setup
We need access to the termios struct in order to configure the serial port. We will create a new termios struct, and then write the existing configuration of the serial port to it using tcgetattr() , before modifying the parameters as needed and saving the settings with tcsetattr() .
We can now change tty ’s settings as needed, as shown in the following sections. Before we get onto that, here is the definition of the termios struct if you’re interested (pulled from termbits.h ):
Control Modes (c_cflags)
The c_cflag member of the termios struct contains control parameter fields.
PARENB (Parity)
If this bit is set, generation and detection of the parity bit is enabled. Most serial communications do not use a parity bit, so if you are unsure, clear this bit.
CSTOPB (Num. Stop Bits)
If this bit is set, two stop bits are used. If this is cleared, only one stop bit is used. Most serial communications only use one stop bit.
Number Of Bits Per Byte
The CS fields set how many data bits are transmitted per byte across the serial port. The most common setting here is 8 ( CS8 ). Definitely use this if you are unsure, I have never used a serial port before which didn’t use 8 (but they do exist). You must clear all of the size bits before setting any of them with &=
Flow Control (CRTSCTS)
If the CRTSCTS field is set, hardware RTS/CTS flow control is enabled. The most common setting here is to disable it. Enabling this when it should be disabled can result in your serial port receiving no data, as the sender will buffer it indefinitely, waiting for you to be “ready”.
CREAD and CLOCAL
Setting CLOCAL disables modem-specific signal lines such as carrier detect. It also prevents the controlling process from getting sent a SIGHUP signal when a modem disconnect is detected, which is usually a good thing here. Setting CLOCAL allows us to read data (we definitely want that!).
Local Modes (c_lflag)
Disabling Canonical Mode
UNIX systems provide two basic modes of input, canonical and non-canonical mode. In canonical mode, input is processed when a new line character is received. The receiving application receives that data line-by-line. This is usually undesirable when dealing with a serial port, and so we normally want to disable canonical mode.
Canonical mode is disabled with:
Also, in canonical mode, some characters such as backspace are treated specially, and are used to edit the current line of text (erase). Again, we don’t want this feature if processing raw serial data, as it will cause particular bytes to go missing!
If this bit is set, sent characters will be echoed back. Because we disabled canonical mode, I don’t think these bits actually do anything, but it doesn’t harm to disable them just in case!
Disable Signal Chars
When the ISIG bit is set, INTR , QUIT and SUSP characters are interpreted. We don’t want this with a serial port, so clear this bit:
Input Modes (c_iflag)
The c_iflag member of the termios struct contains low-level settings for input processing. The c_iflag member is an int .
Software Flow Control (IXOFF, IXON, IXANY)
Clearing IXOFF , IXON and IXANY disables software flow control, which we don’t want:
Disabling Special Handling Of Bytes On Receive
Clearing all of the following bits disables any special handling of the bytes as they are received by the serial port, before they are passed to the application. We just want the raw data thanks!
Output Modes (c_oflag)
The c_oflag member of the termios struct contains low-level settings for output processing. When configuring a serial port, we want to disable any special handling of output chars/bytes, so do the following:
Both OXTABS and ONOEOT are not defined in Linux. Linux however does have the XTABS field which seems to be related. When compiling for Linux, I just exclude these two fields and the serial port still works fine.
VMIN and VTIME (c_cc)
VMIN and VTIME are a source of confusion for many programmers when trying to configure a serial port in Linux.
An important point to note is that VTIME means slightly different things depending on what VMIN is. When VMIN is 0, VTIME specifies a time-out from the start of the read() call. But when VMIN is > 0, VTIME specifies the time-out from the start of the first received character.
Let’s explore the different combinations:
VMIN = 0, VTIME = 0: No blocking, return immediately with what is available
VMIN > 0, VTIME = 0: This will make read() always wait for bytes (exactly how many is determined by VMIN ), so read() could block indefinitely.
VMIN = 0, VTIME > 0: This is a blocking read of any number of chars with a maximum timeout (given by VTIME ). read() will block until either any amount of data is available, or the timeout occurs. This happens to be my favourite mode (and the one I use the most).
VMIN > 0, VTIME > 0: Block until either VMIN characters have been received, or VTIME after first character has elapsed. Note that the timeout for VTIME does not begin until the first character is received.
VMIN and VTIME are both defined as the type cc_t , which I have always seen be an alias for unsigned char (1 byte). This puts an upper limit on the number of VMIN characters to be 255 and the maximum timeout of 25.5 seconds (255 deciseconds).
“Returning as soon as any data is received” does not mean you will only get 1 byte at a time. Depending on the OS latency, serial port speed, hardware buffers and many other things you have no direct control over, you may receive any number of bytes.
For example, if we wanted to wait for up to 1s, returning as soon as any data was received, we could use:
Baud Rate
Rather than use bit fields as with all the other settings, the serial port baud rate is set by calling the functions cfsetispeed() and cfsetospeed() , passing in a pointer to your tty struct and a enum :
If you want to remain UNIX compliant, the baud rate must be chosen from one of the following:
Some implementation of Linux provide a helper function cfsetspeed() which sets both the input and output speeds at the same time:
Custom Baud Rates
As you are now fully aware that configuring a Linux serial port is no trivial matter, you’re probably unfazed to learn that setting custom baud rates is just as difficult. There is no portable way of doing this, so be prepared to experiment with the following code examples to find out what works on your target system.
GNU/Linux Method
If you are compiling with the GNU C library, you can forgo the standard enumerations above just specify an integer baud rate directly to cfsetispeed() and cfsetospeed() , e.g.:
termios2 Method
This method relied on using a termios2 struct, which is like a termios struct but with sightly more functionality. I’m unsure on exactly what UNIX systems termios2 is defined on, but if it is, it is usually defined in termbits.h (it was on the Xubuntu 18.04 with GCC system I was doing these tests on):
Which is very similar to plain old termios , except with the addition of the c_ispeed and c_ospeed . We can use these to directly set a custom baud rate! We can pretty much set everything other than the baud rate in exactly the same manner as we could for termios , except for the reading/writing of the terminal attributes to and from the file descriptor — instead of using tcgetattr() and tcsetattr() we have to use ioctl() .
Let’s first update our includes, we have to remove termios.h and add the following:
Please read the comment above about BOTHER . Perhaps on your system this method will work!
Saving termios
After changing these settings, we can save the tty termios struct with tcsetattr() :
Reading And Writing
Now that we have opened and configured the serial port, we can read and write to it!
Writing
Writing to the Linux serial port is done through the write() function. We use the serial_port file descriptor which was returned from the call to open() above.
Reading
Reading is done through the read() function. You have to provide a buffer for Linux to write the data into.
Closing
This is a simple as:
Full Example (Standard Baud Rates)
Issues With Getty
Getty can cause issues with serial communication if it is trying to manage the same tty device that you are attempting to perform serial communications with.
To Stop Getty:
Getty can be hard to stop, as by default if you try and kill the process, a new process will start up immediately.
These instructions apply to older versions of Linux, and/or embedded Linux.
- Load /etc/inittab in your favourite text editor.
- Comment out any lines involving getty and your tty device.
- Save and close the file.
- Run the command
$ init q to reload the /etc/inittab file.
Exclusive Access
It can be prudent to try and prevent other processes from reading/writing to the serial port at the same time you are.
One way to accomplish this is with the flock() system call:
Changing Terminal Settings Are System Wide
Although getting and setting terminal settings are done with a file descriptor, the settings apply to the terminal device itself and will effect all other system applications that are using or going to use the terminal. This also means that terminal setting changes are persistant after the file descriptor is closed, and even after the application that changed the settings is terminated 1 .
Источник


