- Linux сервер на usb-флэшке
- Linux server from flash
- 2. Requirements
- 3. Boot from install media
- 4. Choose your language
- 5. Choose the correct keyboard layout
- 6. Choose your install
- 7. Networking
- 8. Configure storage
- 9. Select a device
- 10. Confirm partitions
- 11. Confirm changes
- 12. Set up a Profile
- 13. Install software
- 14. Installation complete
- 15. What next?
- Finding help
- Ubuntu Documentation
- Outline
- Introduction
- Prerequisites
- Dummy headlines
- Notes about speed
- Notes about size
- Notes about bootability
- The flash hardware
- Creating a bootable Ubuntu USB flash drive from Windows
- Rufus
- balenaEtcher
- Pendrivelinux’s Universal USB Installer
- UNetbootin
- Win32 Disk Imager
- Creating a bootable Ubuntu USB flash drive from Ubuntu
- Install and run Startup Disk Creator alias usb-creator
- UNetbootin
- mkusb — dd image of iso file to USB device safely
- Creating a bootable Ubuntu USB flash drive from Mac OSX
- Test if running in UEFI mode
Linux сервер на usb-флэшке
В интернете много мануалов о том, как правильно поставить линукс на флэшку, чтобы она не померла (отключить журнал, noatime, ramfs etc). Но неужели нет готового образа, где все уже настроено?
Что у меня сейчас:
- Сервер HP MicroServer Gen8.
- В нем есть один жесткий диск (btrfs).
- На флэшке стоит Rockstor.
Что не нравится:
- После перезагрузки rockstor не всегда поднимается корректно (не монтирует разделы, не запускает некоторые docker-контейнеры).
- Демо-лицензия на ilo закончилась, а если система с флэшки ip не получила, то нет ssh — приходится помучиться, чтобы все оживить.
- Простую систему, которая получает ip по dhcp поднимает ssh.
- ФС флэшки вообще можно ro монтировать, когда она в сервер воткнута, чтобы не думать о ее скорой кончине. Если нужны какие-то доп-настройки — переткнул в комп и поправил.
- Система на фэлешке монтирует btrfs разделы с основного жесткого диска и запускает docker-контейнеры (можно будет bash-скриптами запилить).
Пока писал, подумал: а CoreOS мне не подойдет. (UPD: СoreOS больше 4 гигов весит, слишком жирный).

ramfs это не то что бы против износа флешки, это прежде всего ускорение, особенно если usb 2.0. Да и так обычные флешки не особо быстро читаются.
Но в целом это какая-то дичь грузить сервер с флешки, особенно если в нём есть винт. По идее с такими требованиями вам нужно искать среди дистров для маршрутизаторов.
Но в целом это какая-то дичь грузить сервер с флешки, особенно если в нём есть винт.
Суть в том, что после того, как сервер загрузился, читать с rootfs больше не нужно же. А если произошел какой-то сбой — перезалил образ на флэшку и все снова работает. А вот поставить систему заново на винт — это уже не очень удобно (сервер в труднодоступном месте, монитора клавиатуры у него нет, ilo без лицензии не дает виртуальной консоли).
Rockstor неплохо работает, но иногда глючит. Поэтому хочется простого линукса + баш-скриптов написать под мои простые нужды (transmission и plex).
Держать в сервере флешку с каким-нибудь Линуксом для восстановления/установки основной системы это одно, ЕМНИП iLO и без лицензии позволяет выбрать порядок загрузки.
Держать же ядро, dhcp клиента и sshd это другое, их же обновлять надо. Но в общем то дело ваше, я просто рассуждаю на тему, «почему нет готового образа, где всё такое уже настроено».
Хорошо, скажу немного по другому. Я не могу установить систему на сам сервер: нет монитора и клавиатуры, а remote console в ilo без лицензии не работает. Поэтому мне нужна система на флэшке, которая загрузится и даст ssh.
Судя по тому, что вы говорите, это вполне себе обычная задача, чтобы починить основную систему. Так что такие системы должны быть готовые.

чтобы она не померла (отключить журнал, noatime, ramfs etc)
А почему и на флешку btrfs не поставишь?
У меня на ней без всяких таких жертв давно живёт домашний компьютер, ну понятно что флешка должна быть очень хорошая.
Источник
Linux server from flash
Ubuntu Server is a variant of the standard Ubuntu you already know, tailored for networks and services. It’s just as capable of running a simple file server as it is operating within a 50,000 node cloud.
Unlike the installation of Ubuntu Desktop, Ubuntu Server does not include a graphical installation program. Instead, it uses a text menu-based process. If you’d rather install the desktop version, take a look at our Install Ubuntu desktop tutorial.
This guide will provide an overview of the installation from either a DVD or a USB flash drive.
For a more detailed guide on Ubuntu Server’s capabilities and its configuration, take a look at our the Community Ubuntu Server documentation.
2. Requirements
You’ll need to consider the following before starting the installation:
- Ensure you have at least 2GB of free storage space.
- Have access to either a DVD or a USB flash drive containing the version of Ubuntu Server you want to install.
- If you’re going to install Ubuntu Server alongside data you wish to keep, ensure you have a recent backup.
See the server guide pages for more specific details on hardware requirements. We also have several tutorials that explain how to create an Ubuntu DVD or USB flash drive.
3. Boot from install media
To trigger the installation process, perform the following:
- Put the Ubuntu DVD into your DVD drive (or insert the USB stick or other install media).
- Restart your computer.
After a few moments, you should see messages like those shown below on the screen…

Most computers will automatically boot from USB or DVD, though in some cases this is disabled to improve boot times. If you don’t see the boot message and the “Welcome” screen which should appear after it, you will need to set your computer to boot from the install media.
There should be an on-screen message when the computer starts telling you what key to press for settings or a boot menu. Depending on the manufacturer, this could be Escape , F2 , F10 or F12 . Simply restart your computer and hold down this key until the boot menu appears, then select the drive with the Ubuntu install media.
4. Choose your language
After the boot messages appear, a ‘Language’ menu will be displayed.

As the message suggests, use the Up , Down and Enter keys to navigate through the menu and select the language you wish to use.
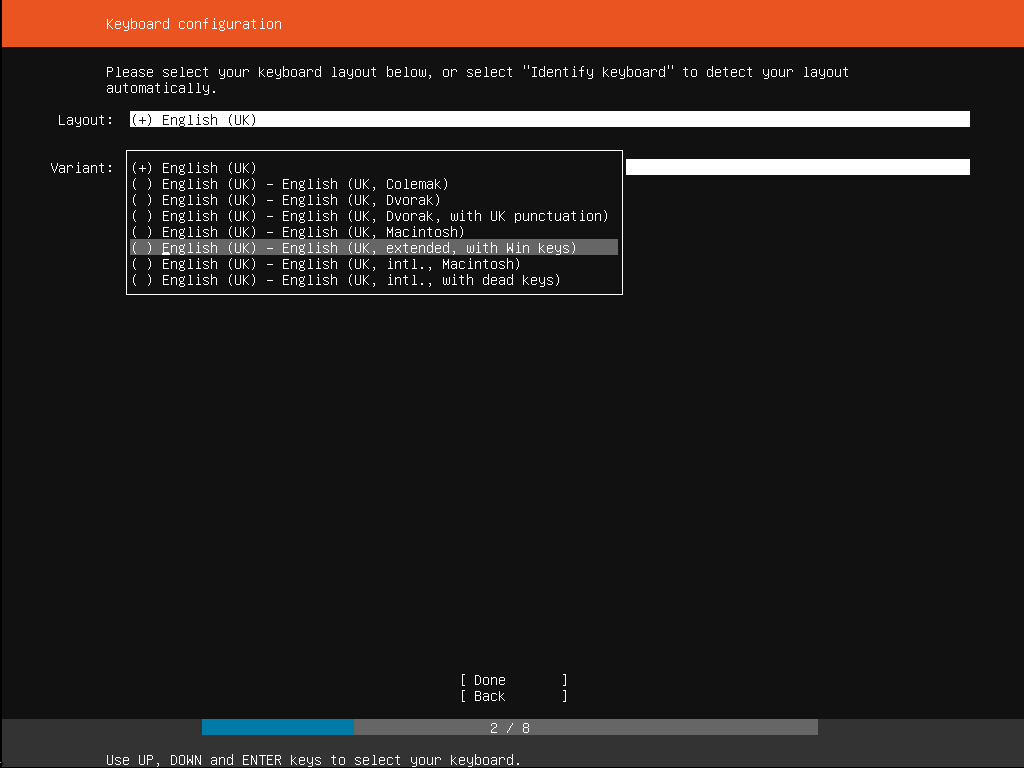
5. Choose the correct keyboard layout
Before you need to type anything in, the installer will next display a menu asking you to select your keyboard layout and, if applicable, the variant.

If you don’t know which particular variant you want, just go with the default — when Ubuntu Server has been installed you can test and change your preferences more easily if necessary.
6. Choose your install
Now we are ready to select what you want to install. There are three options in the menu:
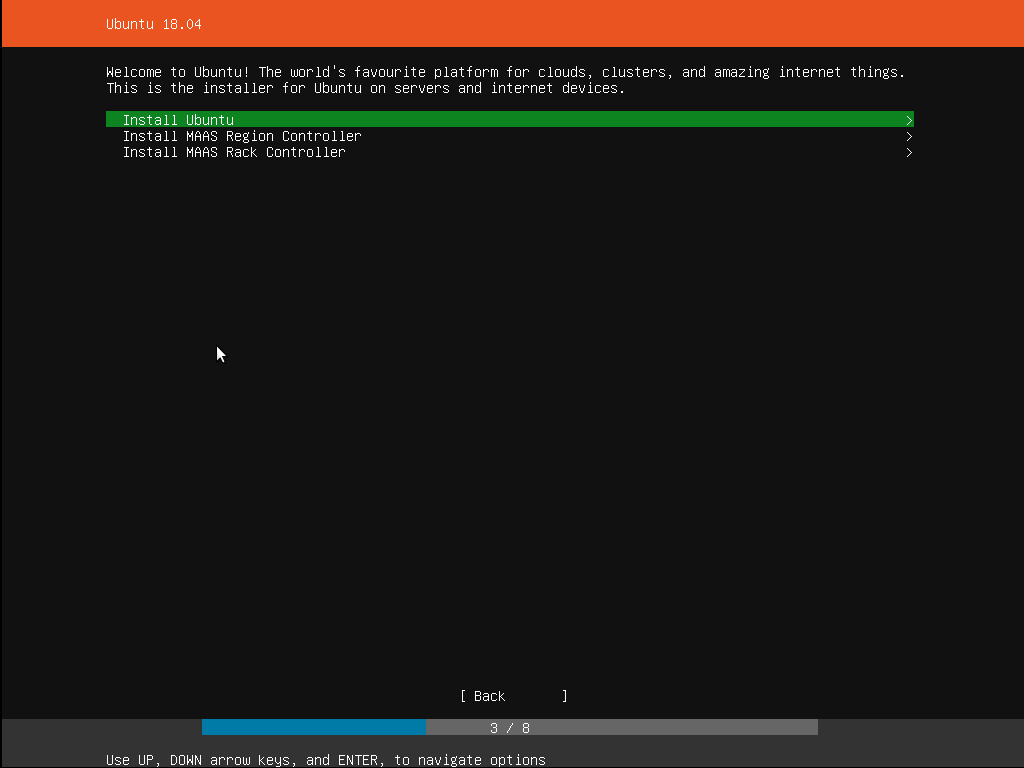
The bottom two options are used for installing specific components of a Metal As A Service (MAAS) install. If you are installing MAAS, you should check out the MAAS documentation for more information on this! The rest of this tutorial assumes you select the first option, Install Ubuntu .
7. Networking
The installer will automatically detect and try to configure any network connections via DHCP.

This is usually automatic and you will not have to enter anything on this screen, it is for information only.
If no network is found, the installer can continue anyway, it just won’t be able to check for updates. You can always configure networking after installation.
8. Configure storage
The next step is to configure storage. The recommended install is to have an entire disk or partition set aside for running Ubuntu.

If you need to set up a more complicated system, the manual option will allow you to select and reorganise partitions on any connected drives.
Note that Ubuntu no longer requires a separate partition for swap space, nor will the automated install create one.
9. Select a device
This menu will allow you to select a disk from the ones detected on the system.

To help identification, the drives will be listed using their system ID. Use the arrow keys and enter to select the disk you wish to use.
10. Confirm partitions
With the target drive selected, the installer will calculate what partitions to create and present this information…
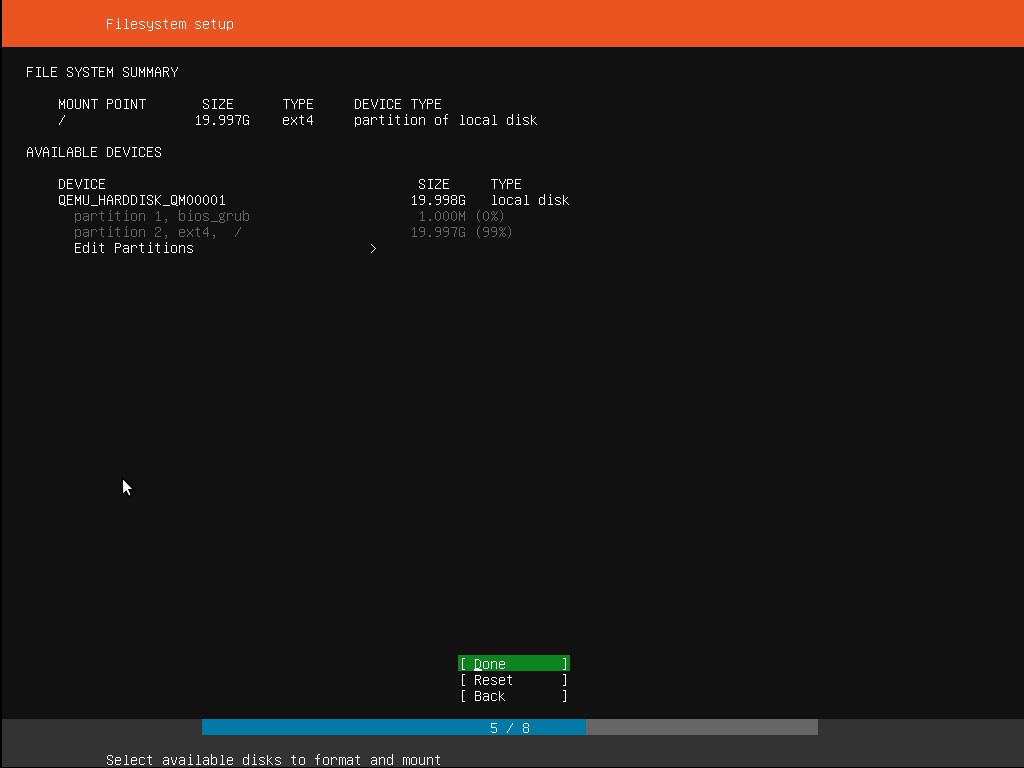
If this isn’t what you expected to see (e.g., you have selected the wrong drive), you should use the arrow keys and enter to select Back from the options at the bottom of the screen. This will take you back to the previous menu where you can select a different drive.
It is also possible to manually change the partitions here, by selecting Edit Partitions . Obviously you should only select this if you are familiar with how partitions work.
When you are happy with the disk layout displayed, select Done to continue.
11. Confirm changes
Before the installer makes any destructive changes, it will show this final confirmation step. Double check that everything looks good here and you aren’t about to reformat the wrong device!

There is no “Undo” for this step, once you confirm the changes, the indicated devices will be overwritten and any contents may be lost
12. Set up a Profile
The software is now being installed on the disk, but there is some more information the installer needs. Ubuntu Server needs to have at least one known user for the system, and a hostname. The user also needs a password.

There is also a field for importing SSH keys, either from Launchpad, Ubuntu One or Github. You simply need to enter the username and the installer will fetch the relevant keys and install them on the system ready for use (e.g. secure SSH login to the server).
13. Install software
Once you have finished entering the required information, the screen will now show the progress of the installer. Ubuntu Server now installs a concise set of useful software required for servers. This cuts down on the install and setup time dramatically. Of course, after the install is finished, you can install any additional software you may need.

14. Installation complete
When the install is complete, you will see a message like this on the screen.

Remember to remove the install media, and then press enter to reboot and start the server. Welcome to Ubuntu!
15. What next?
With Ubuntu Server installed, you can now carry on and build that file-server or multi-node cluster we mentioned!
If you are new to Ubuntu Server, we’d recommend reading the Server Guide.
You can also check out the latest on Ubuntu Server, and what others are using it for on the Ubuntu Server pages.
Finding help
The Ubuntu community, for both desktop and server, is one of the friendliest and most well populated you can find. That means if you get stuck, someone has probably already seen and solved the same problem.
Try asking for help in one of the following places:
Alternatively, if you need commercial support for your server deployments, take a look at Ubuntu Advantage.
Источник
Ubuntu Documentation
Outline
The general procedure to install Ubuntu (or Ubuntu flavour, Kubuntu, Lubuntu, Xubuntu, . ) from a USB flash drive is:
Get the correct Ubuntu installation file, ‘the iso file’, via this link or Ubuntu flavour via this link. Download the iso file into your running computer (for example into the directory Downloads in the internal drive, not into the USB flash drive that you want to make into a USB boot drive).
Check with md5sum (or another checksum tool) that the download was good.
Try Ubuntu (Kubuntu, Lubuntu, Xubuntu, . ) before installing it.
See also: Installation/FromUSBStickQuick for beginners starting from Windows.
Introduction
Ubuntu can be installed from a USB flash drive. This may be necessary for most new portable computers without DVD drives and is handy for others because a USB flash drive is so convenient. Also, you can configure Ubuntu on the USB flash drive to save changes you make, unlike a read-only CD/DVD disk.
Booting from a USB flash drive created with usb-creator alias Startup Disk Creator and mkusb will behave just as if you had booted from the install CD. It will show the language selection and then the install menu, from which you can install Ubuntu onto the computer’s hard drive or launch the LiveCD environment. Other utilities, e.g. UNetbootin, may create slightly different boot drives or if on UEFI might not work at all with Debian iso files due to a bug
Note: This article uses the term «USB flash drive» alongside USB stick, USB drive, USB device, USB pendrive and thumb drive.
Prerequisites
To create a USB installation device, you will need:
a 4 GB USB flash device/drive/stick. If the iso file is smaller than 2 GB, it is possible to use a 2 GB USB device, at least with some of the methods. Files on this USB device will be erased, so backup the files you want to keep before making the device bootable. Some of the tools require that this USB device is properly formatted and mounted while other tools will overwrite whatever is on the target device. Please follow the instructions for each tool.
an Ubuntu flavour ISO file downloaded from an official web page, ubuntu.com/download or http://releases.ubuntu.com, stored in your running computer (for example in the directory Downloads in the internal drive, not in the USB flash drive that you want to make into a USB boot drive).
Check with md5sum (or another checksum tool) that the download was good. In Linux there is the tool ‘md5sum’. In Windows you can do it with Rufus: click on the circle with a tick mark (more about Rufus here.)
Dummy headlines
After a major remake of this help page the following headlines are kept here because they may be linked to from other web sites. Several other headlines further down in the page are also kept for this reason.
Notes about speed
Notes about size
Notes about bootability
The flash hardware
There is a detailed description at the sub-page /pre
Creating a bootable Ubuntu USB flash drive from Windows
There are various methods available for Windows to create a bootable Ubuntu USB flash drive.
NEVER try to use one of your hard disk drives or partitions in this process unless you really know what you are doing, as data will get erased.
Rufus
Rufus is the tool in Windows that is recommended officially by Ubuntu. A tutorial is available from here.
balenaEtcher
Pendrivelinux’s Universal USB Installer
UNetbootin
Win32 Disk Imager
There is a detailed description at /fromWindows including Rufus, balena Etcher, Universal USB Installer, Unetbootin and Win32 Disk Imager.
Creating a bootable Ubuntu USB flash drive from Ubuntu
Install and run Startup Disk Creator alias usb-creator
The Ubuntu Startup Disk Creator is dedicated to creating USB boot drives for Ubuntu and Ubuntu family flavours (Kubuntu, Lubuntu . Xubuntu).
You can find usb-creator-gtk by typing «Startup Disk Creator» (Ubuntu Desktop) or usb-creator-kde in K-Menu—>Applications—>System—>Startup Disk Creator (Kubuntu). If it is not there, then you can install it using the Ubuntu Software Center.
- Insert and mount the USB drive. Inserting the USB drive should auto-mount it.
- Start the Startup Disk Creator
- In the top pane of the Startup Disk Creator, pick the .iso file that you downloaded.
- If the .iso file isn’t listed, click «Other» to locate and select the .iso file that you downloaded.
- In the bottom pane of the Startup Disk Creator, pick the target device, the USB flash drive. If more than one choice, please check carefully, until you are sure that you will be writing to the correct device.
- After checking that you are pointing to the correct target device, the USB flash drive, you can start the action.
You must enter a password because this is a risky operation. Use the password of the current user ID (the same as for login and running tasks with 'sudo'. Password is not required when installing from a ‘live’ system (booted from a DVD disk or another USB flash drive).
The Startup Disk Creator clones the iso file, which means that you need neither erase nor format the target drive. It will be completely overwritten anyway by the cloning process. The Startup Disk Creator looks like this in Ubuntu 18.04 LTS:
Notes
NEVER try to use one of your hard disk drives or SSDs or partitions in this process unless you really know what you are doing, as data will get erased.
There are bugs that affect the Ubuntu Startup Disk Creator, when you run it in old Ubuntu versions in BIOS mode and try to create USB boot drives with other versions. In the Ubuntu Startup Disk Creator version 0.3.2 in Ubuntu 16.04 LTS, these bugs are no longer a problem, so you can install any version of the Ubuntu flavours from 16.04 LTS and newer versions.
UNetbootin
Download UNetbootin
mkusb — dd image of iso file to USB device safely
If you want to clone from a general image file to a drive, you can use mkusb. It lets you clone to any drive that is not busy, also an internal drive, and there are very obvious warnings to prevent mistakes.
- run in Debian and many linux distros that are similar to Ubuntu and Debian,
- clone from iso files of most Linux distros to create USB boot drives,
- create persistent live drives of the Ubuntu family and Debian, using all available drive space for persistence and/or data storage,
- restore a USB boot drive to a standard storage device.
There is a detailed description at /fromUbuntu including the Startup Disk Creator, UNetbootin and mkusb.
Creating a bootable Ubuntu USB flash drive from Mac OSX
There is a good wiki page about booting with UEFI, and a good tutorial thread, UEFI Installing — Tips.
Test if running in UEFI mode
You may want to test if your Ubuntu flavour is running in [U]EFI mode. An installed system and a live system too is using the directory /sys/firmware/efi, so you can run the following command line,
The following command line is more robust and also easier to understand, so you may prefer it (if you copy & paste and are not bothered by typing a long command line),
Источник


