- Лучшие Live USB дистрибутивы Linux
- Лучшие Live USB дистрибутивы Linux
- 1. Rescatux
- 2. Batocera.linux
- 3. Slax
- 4. Porteus
- 5. MX Linux
- 6. Kali Linux
- 7. Tails
- 8. Linux Kodachi
- Выводы
- Ubuntu Documentation
- Introduction
- Reasons for Using a LiveCD Session
- Other Ways to Try Ubuntu
- How-To LiveCD Ubuntu
- Preparing your LiveCD
- To create a LiveCd
- To create a LiveUsb
- To buy an Ubuntu Cd
- Using your LiveCD
- Installing Programs or Other Packages
- Making a Customised LiveCD
- Troubles with a LiveCD
- Logging in
- Security and Updating
- Setting a Password
- Text-Mode Installation
Лучшие Live USB дистрибутивы Linux
Не секрет, что многие дистрибутивы можно запустить в Live-режиме, но есть и такие, которые подходят для полноценной работы прямо с USB-накопителя. Учитывая то, что практически все современные компьютеры имеют скоростные порты USB 3.2, а сами Flash-накопители достаточный объём, то работа с внешнего устройства не должны вызывать дискомфорт.
Мы рассмотрим лучшие Live USB дистрибутивы Linux, которые можно использовать для выполнения различных задач. Одни служат для восстановления загрузки, другие могут стать переносной системой. Причём переносные также имеют несколько сфер применения, этот аспект также не останется незамеченным.
Лучшие Live USB дистрибутивы Linux
1. Rescatux
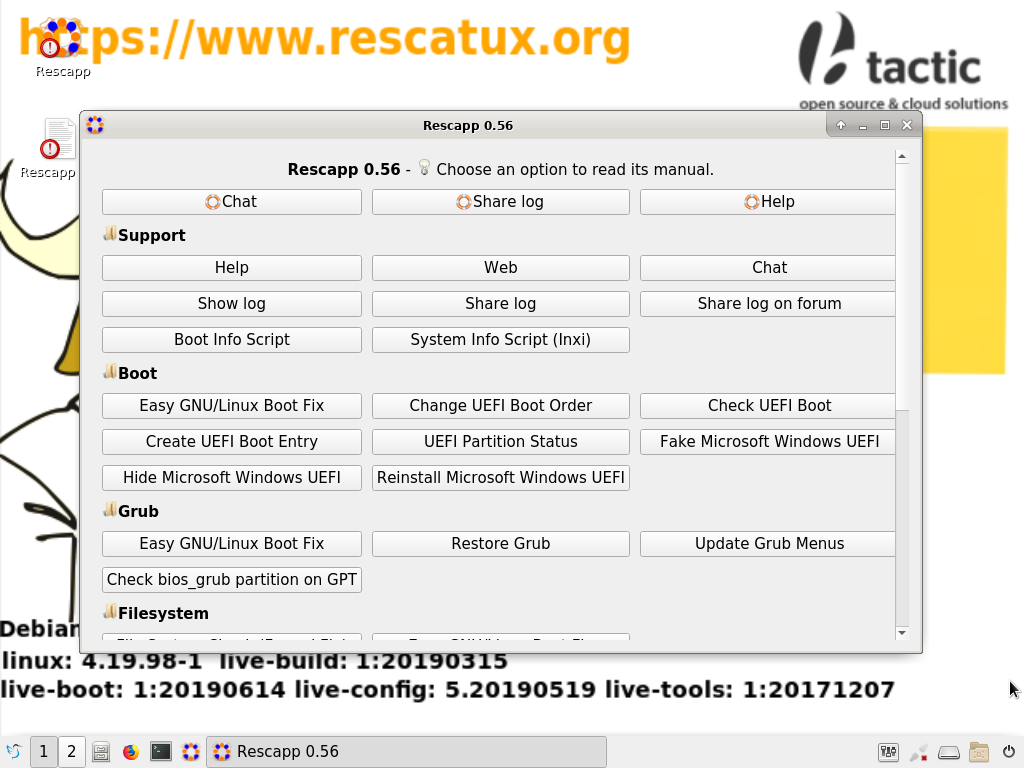
Rescatux – это дистрибутив для восстановления работоспособности системы. Запуск возможен как с UEFI, так и с BIOS. Он выгодно отличается от других систем подобного рода, вроде SystemRescue. Всё дело в фирменном приложении.
Rescapp позволяет исправить наиболее распространённые ошибки. Перед запуском проводится быстрая диагностика, позволяющая сходу определить неисправность. В самом приложении при выборе нужного пункта появится описание проблемы (на английском), а также кнопка для запуска скрипта, который выполнит большую часть работы в автоматическом режиме.
Кроме этого, приложение имеет свой чат и систему логирования. С помощью этих инструментов можно поделиться информацией о своей системе и получить помощь у сообщества. Но, к сожалению, сообщество совсем небольшое и чат большую часть времени пустует.
2. Batocera.linux
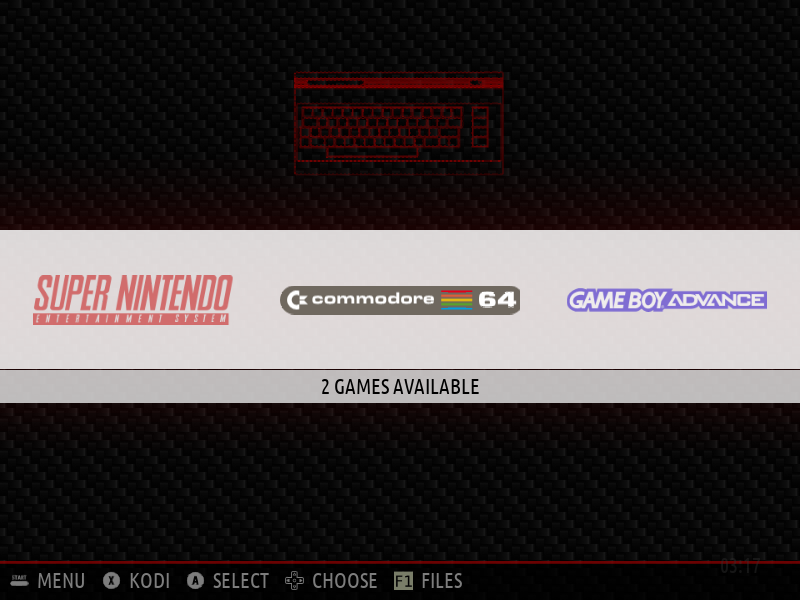
Batocera.linux – это игровая станция и по совместительству медиацентр Kodi. Дистрибутив распространяется в виде образа системы, который необходимо записать на Flash-накопитель. Имеются версии систем как для настольных компьютеров и ноутбуков, так и для мини-ПК, вроде Raspberry Pi.
Для x86_64 представлен наиболее полный перечень эмуляторов, начиная 8-битными консолями и закачивая Playstation 3 (RPCS3), Wii U (CEMU) и Windows (Wine, Proton, Lutris). Так что при желании можно записать систему на переносной жёсткий диск и запускать любимые игры не только дома, но и в гостях.
3. Slax
Slax – это компактный дистрибутив, который занимает менее 500 мегабайт на накопителе. По умолчанию запускается в persistent-режиме (с сохранением состояния системы). Он основан на Debian и не содержит ничего лишнего. Вам доступно лишь несколько приложений и терминал.
Но в этом и прелесть дистрибутива. Вы можете настроить его под себя, поменять окружение рабочего стола, настроить автозапуск, установить необходимые приложения. Изначально небольшой размер позволит развернуть систему даже на небольшом накопителе объёмом 4-8 гигабайт.
4. Porteus
Porteus займёт не намного больше места, но при этом уже будет иметь больше предустановленных приложений, вроде того же Gparted. Дистрибутив основан на Slackware и разрабатывается теми же темпами, то есть очень медленно.
Система построена по модульной системе. Приложения запакованы и монтируются при запуске, что позволяет экономить место на накопителе.
На выбор доступно несколько вариантов дистрибутива с различными оболочками: KDE, XFCE, Openbox и другими. Также имеется киоск-версия, которая подойдёт для информационных терминалов, хотя в этом случае встаёт большой вопрос с поддержкой оборудования, например, сенсорных панелей.
5. MX Linux

Два предыдущих дистрибутива сильно урезаны в плане установленных программ и драйверов. MX Linux исправляет это недостаток, в его состав входит всё необходимое для полноценной работы. Он основан на Debian и в меню загрузки позволяет выбрать persistent-режим.
Предустановлено несколько фирменных утилит, упрощающих работу с операционной системой. Минусом является система инициализации sysvinit, что не подходит для установки snap-пакетов.
Если же вам нужен дистрибутив для работы с мультимедиа: графическими, аудио- и видеоредакторами, то обратите своё внимание на AV Linux. Этот дистрибутив базируется как раз на MX Linux. Про установку MX Linux читайте здесь.
6. Kali Linux
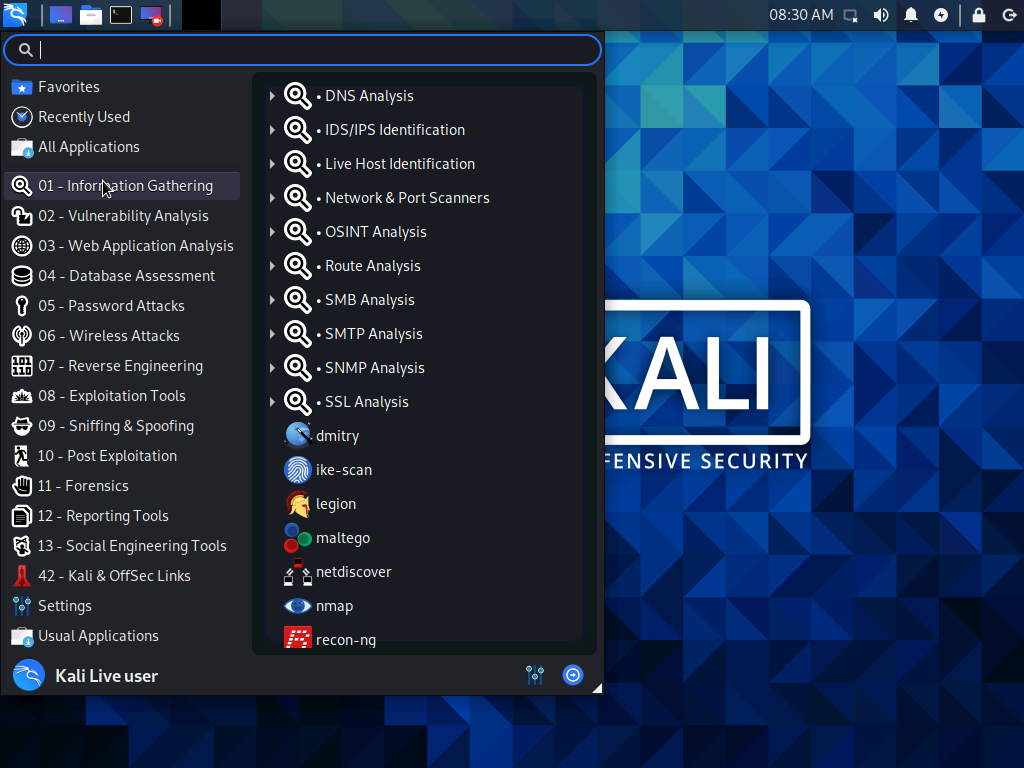
Kali Linux – это дистрибутив, предназначенный для системных администраторов. Его основная задача – это проведение тестов безопасности. Всего в дистрибутив входит более 600 инструментов для комплексного анализа сети и выявления уязвимостей.
Помимо этого, есть возможность запустить дистрибутив в режиме криминалиста. В этом случае внутренние накопители никоим образом не будут задействованы. Это важно, если перед вами стоит цель сохранить все файлы на компьютере в первозданном виде.
Из интересного также стоит упомянуть Undercover Mode, который замаскирует дистрибутив под Windows 10. Нельзя не отметить и наличие persistent-режима. Установка Kali Linux описана здесь.
7. Tails
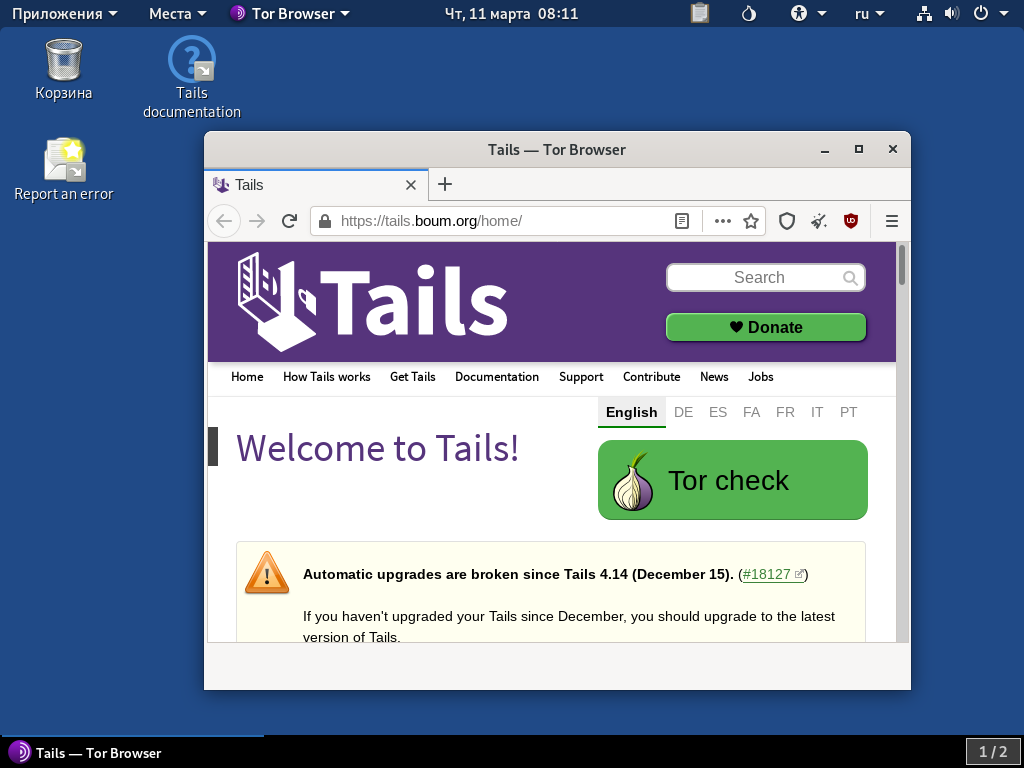
Дистрибутив Tails подойдёт в том случае, если вы хотите выйти в интернет с чужого компьютера, при этом сохранив приватность. Браузером по умолчанию выступает Tor, который шифрует соединение и не позволяет отследить пользователя сети интернет.
Фактически Tor является основным спонсором разработки дистрибутива. В комплект также входит несколько утилит для шифрования накопителей и создания цифровых подписей. Например, вы можете зашифровать раздел накопителя и хранить там важную информацию. Узнать подробнее про установку Tails можно у нас на сайте.
8. Linux Kodachi
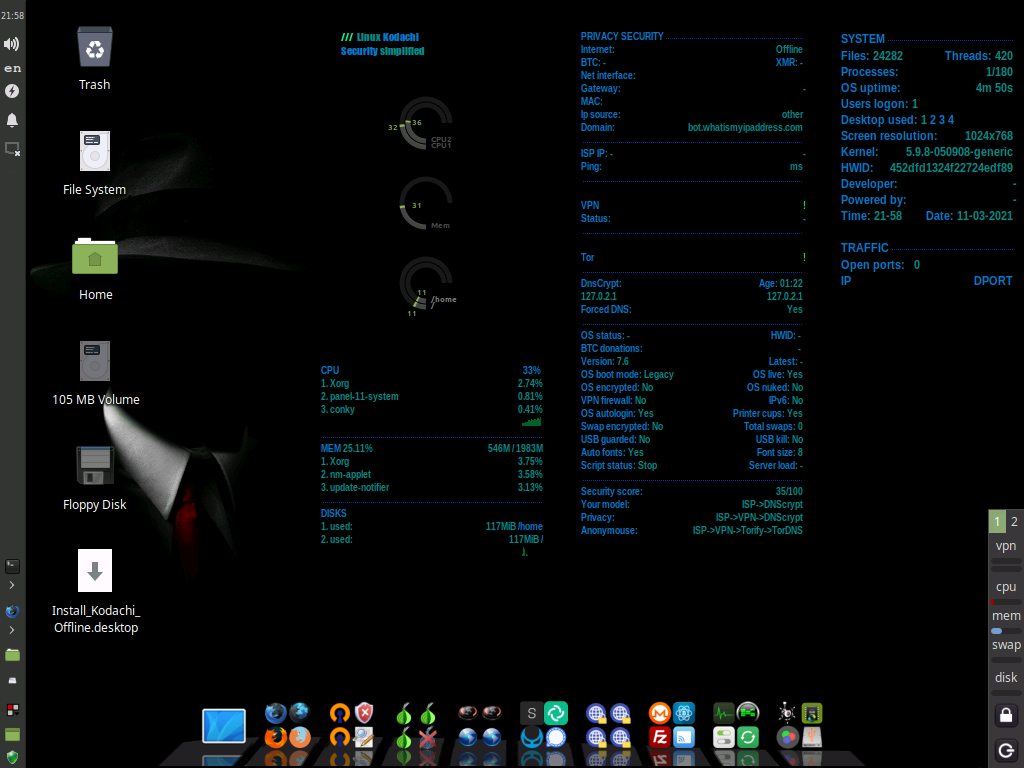
Последнем в нашем списке лучшие live дистрибутивы будет Linux Kodachi. Дистрибутив пошёл ещё дальше в плане анонимного выхода в интернет. С самого запуска системы используется подключение VPN. На рабочий стол выводится информация о состоянии системы, а также об интернет-соединении. Если возникнет необходимость, то можно экстренно перезапустить соединение, стереть данные или даже саму систему с накопителя.
Помимо этого, система имеет немало утилит для выявления уязвимостей, подобно тому, что есть в Kali Linux. Таким образом разработчики попытались объединить преимущества Kali и Tails в одном дистрибутиве. Но, как обычно бывает, если браться за всё сразу, то снижается качество. Например, возникают проблемы при использовании некоторых модулей W-Fi. Прочитать про установку Kodachi Linux можно здесь.
Выводы
Дистрибутивы Live USB можно использовать по-разному. Мы перечислили наиболее распространённые сценарии использования, которых хватит большинству пользователей. Так для восстановления системы, вы можете использовать Rescatux, выполняющий многие операции в автоматическом режиме. Хотя никто не мешает выбрать портативный дистрибутив и установить необходимые программы.
Среди persistent дистрибутивов стоит отметить несколько направлений. Лучшим компактным можно назвать Porteus, хотя со Slax работать проще, ведь он основан на Debian, а не на менее популярном Slackware. Для приватного интернет-сёрфинга используйте Tails с браузером Tor. Универсальной же системой станет MX Linux. А используете ли вы Live USB дистрибутивы Linux? Если да, то для каких целей. Делитесь своим мнением в комментариях.
Источник
Ubuntu Documentation

Needs Expansion
This article is incomplete, and needs to be expanded. More info.
Introduction
A live CD can be used for a quick demo or test of Ubuntu. Try Ubuntu without any changes to your machine! Windows or whatever you use normally is unaffected after trying this and then rebooting.
The standard Ubuntu Cd can be used as a LiveCd as well as an installer. Live mode is the default option when booting from CD. Only some of the non-standard downloads (such as the «Alternate Cd») lack this functionality. Windows users might be familiar with the term ‘boot CD’ or ‘bootable CD’ or ‘Recovery/Restore Media’. A «LiveCD» is more than that because it gives the option of running a normal desktop environment with all the normal programs and some extras. A LiveCD usually finds your wired internet connection and Firefox should be able to surf the internet into here.
This guide has screen-shots of the 8.04 and 10.04 Desktop Edition of Ubuntu. However, Lubuntu, Xubuntu, Kubuntu and even unofficial Ubuntu-based distros as well as other versions all tend to have similar screens & menus.
Most distributions (versions or «distros» of Linux) have this LiveCd functionality on their installer CD, a few have a separate Cd to download. It is rare to find a distro that has no LiveCd session at all. Ubuntu tries to make their LiveCD the easiest to use. Although a LiveCD session is a good way to demo Ubuntu without making changes to a machine, a LiveCD will always be slower than a proper installation to the hard-drive. Cd-drives & Dvd-drives are physically slower than hard drives.
You can use a persistent image to keep data & settings safe after shut-down. This does go against many reasons for using a LiveCd session (rather than an installation) but it can be useful for multi-user machines, such as offices or in third world education projects.
Reasons for Using a LiveCD Session
LiveCD sessions are good to:
- give a ‘demo’ session on a machine before installing or upgrading
- checks hardware works as expected
check the look & feel of the distro
repair or preparation for awkward installations
repair/replace/install grub perhaps after (re)installing Windows
fix Windows problems on a machine that doesn’t have a dual-boot
anti-virus problems on a Windows system
resizing partitions to give Ubuntu more (or less) room
adding a new partition(s) to your hard-drive for other distros or for a new Windows
safely using a computer which seems to have poor security or lacks privacy. This is particularly good if you have a Usb stick or something to save your data and settings on (see ‘persistent image’)
Other Ways to Try Ubuntu
LiveCDs are designed for people that want to use Ubuntu on a computer for a few hours. If you want to carry a LiveCD around with you, a persistent image lets you customise your live session. If you want to use Ubuntu on a computer for a few weeks or months, Wubi lets you install Ubuntu inside Windows. If you want to use Linux on a computer permanently, dual-booting lets you install Window and Ubuntu (or which-ever distro) side-by-side on the same computer.
Because Wubi needs Windows and Ubuntu to co-operate, you have to deal with all the problems of both systems. For example, it’s not easy to completely uninstall Wubi. An experienced linux user or someone with considerable technical knowledge about Windows might find it better to try Wubi in some certain circumstances where dual-booting is infeasible or inadvisable. See the Wubi guide for more information about Wubi, particularly how to uninstall it cleanly.
Dual-booting can be daunting at first, but tends to work better once you’ve got it set up. This allows Window & Ubuntu to work without relying on the other for anything, except the boot-loader. As you get more comfortable with Ubuntu, you can just forget about your Windows partition. Reinstalling Windows is quite tricky, so it’s best to leave your Windows partition in place unless you’re absolutely sure you’ll never use Windows again.
How-To LiveCD Ubuntu
Preparing your LiveCD
You need to create, borrow, buy or request an Ubuntu CD or Usb-stick. Once you have an Ubuntu Cd or Usb it should work as an installer and as a !LiveCD or LiveUsb. There are some downloads, such as the Alternate Cd that cannot be used as !LiveCd/Usb.
To create a LiveCd
Download Ubuntu. For a live CD, avoid the «alternate CD» & the Server Edition because it has no desktop. For installing, using the alternate CD is a good idea, if installing using the standard CD does not work.
Make your own CD. Cheap «write once» CDs in packs of 10 or more are usually best. You could burn a new CD once every 6 months to get the latest version but all version are supported for 18 months and long time support releases for 3 years. You could also use the remaining CDs for trying out other distros Having a quick demo of other distros can help you understand Linux in general a LOT better a LOT faster, which helps you understand Ubuntu better.
To create a LiveUsb
The Usb stick needs to be 1Gb or more and there are 2 different pages giving advice. I prefer the first; Installation/FromUSBStick, Installation/FromImgFiles
To buy an Ubuntu Cd
The official Cannonical store, OnDisc, OSDisc or your local Ubuntu team might be able to help you find somewhere in your country from which to buy Ubuntu CDs. Also see GettingUbuntu for more information.
Using your LiveCD
Put the Ubuntu CD into the CD/DVD-drive and reboot the computer. You should see a menu with «Try Ubuntu without any change to your computer» at the top. If you don’t get this menu, read the booting From the CD guide for more information.
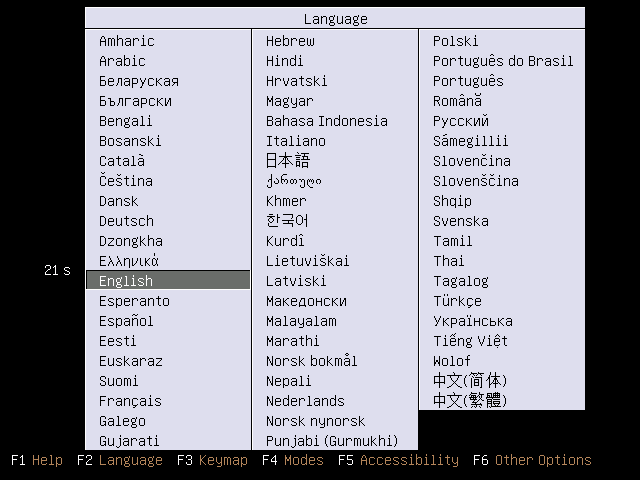
Figure 1: The first thing you will see when you boot from your Ubuntu CD
Press the up or down arrow on keyboard to get your language and then press enter
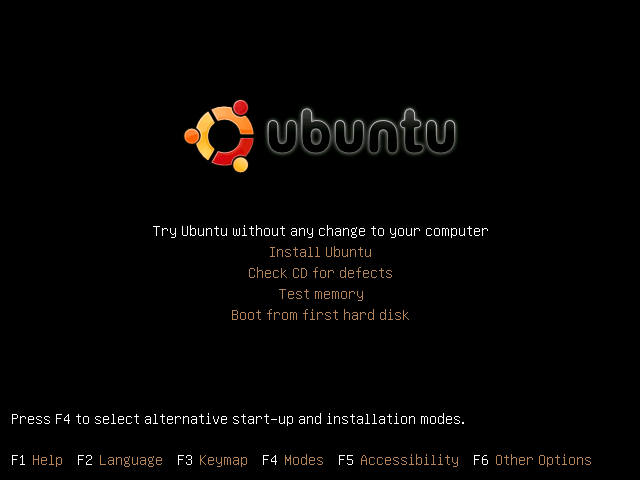
Figure 2: F6 will give you Boot Options & allows you to edit the boot-string
Choose «Try Ubuntu without any change to your computer». You should get a desktop which we call a «LiveCD session». If you don’t see a desktop, or need safe graphics mode, read the boot options for more information.
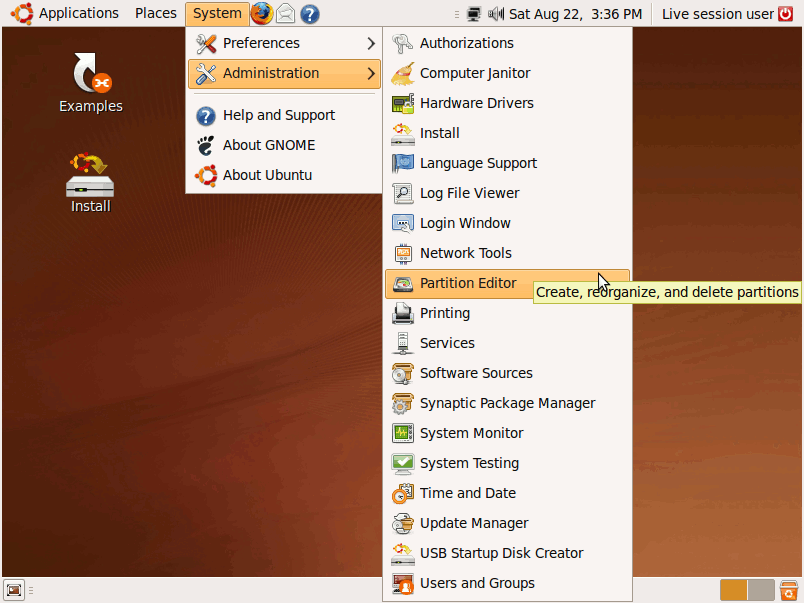
Figure 3: The LiveCD lets you manage partitions with GPartEd.
Also see the installer icon top-left
The Firefox icon on the top panel should let you surf the internet. Other normal programs are available in the menus.
After you have finished, shut the computer down and remove the CD. At this point anything you saved to the desktop or Documents folders and such will vanish — only things you saved into folders on the hard-drive will remain. This means that there won’t be any trace of your personal data (e-mails, passwords etc.) left on the machine, which can be quite useful if you don’t trust the Windows installation on the computer.
If you have troubles getting the working desktop but if it is still not behaving then try asking for help in Launchpad or use Signpost Help, or both.
Installing Programs or Other Packages
You can install programs to a LiveCD session in the normal way, although these will be forgotten as soon as you switch the machine off. For example, you might install antivirus or data-recovery tools to fix the system installed on the computer’s hard drive. Because space is limited on a LiveCD, you should limit the number of packages you install or consider using a persistent image.
Making a Customised LiveCD
If you want to make custom Ubuntu-based Live CD, you should read the LiveCD Customisation HowTo. Without even starting from an existing Ubuntu CD you can make a customised live system, see LiveCD Customisation From Scratch.
Troubles with a LiveCD
Logging in
Sometimes a LiveCD might ask you for a user-name or password. Just leave these blank and press enter (or allow it to time-out).

Figure 4: Just press enter to get past this, or let it time-out 
Security and Updating
While linux systems are more secure than Windows, LiveCD sessions are not meant for long-term use nor for sessions lasting several days. Because LiveCDs can’t easily be updated, they may well be vulnerable to security issues discovered in the months since their release. They also can’t protect you against scams such as phishing. If a criminal broke in to your live session, any changes he made to your session would be reset along with everything else when you reboot, although he could make permanent changes to the computer’s hard drive.
A persistent image can be updated as new security issues emerge, but also lets any damage done to your computer persist across sessions.
Setting a Password
You can set a password during a LiveCD session by opening a terminal, and typing in:
Text-Mode Installation
If your normal installation fails without giving an error message, or if you want to install on a very limited system, you can use the text-based installer instead.
Источник


