- Switching between Java Versions on Ubuntu linux
- How to change the default Java version on Ubuntu
- Bonus: Use Script to Switch Java Version If you frequently switch between different Java versions, it is a good idea to write a short script to automate the process. Here is the script I used for switching to OpenJDK 8 on my machine. Similarly, you can create scripts for other Java versions installed on your machine. The next step is to add these scripts as aliases to .bashrc file. Next, run the following command to load the changes of .bashrc file: Now if you want to switch to Java 8, just type the following command in your terminal: ✌️ Like this article? Follow me on Twitter and LinkedIn. You can also subscribe to RSS Feed. Источник Установка Java в Linux В этой статье речь пойдёт о проприетарной версии Java. Часто происходят ситуации, когда пользователь пытается открыть какую-либо программу на Java, а она либо вообще не запускается, либо пытается это сделать с помощью OpenJDK (Java Development Kit). Но вместо результата вы получаете кучу ошибок (как например с Minecraft). В данных ситуациях вам, скорее всего, поможет установка Java от Oracle. Я вам расскажу, как установить JRE (Java Runtime Environment) и JDK (Java Development Kit) 8 версии на такие дистрибутивы, как Ubuntu, CentOS и Arch, а также как выбрать нужную среду по умолчанию. Чем отличается JDK от JRE JRE — Java Runtime Environment — это среда выполнения Java. Предназначена для обычного использования. Позволяет запускать приложения, написанные на языке Java. JDK— Java Development Kit — стандартная версия платформы Java, предназначенная для разработки. Это специальный пакет разработчика, в который входят документация, различные утилиты, компилятор, библиотеки классов, а также сама JRE. Установка Java в Linux своими руками Скачать архив с необходимой вам версией вы можете с официального сайта. Далее вам надо перенести его в желаемую директорию и распаковать. Рекомендую /opt/java, далее она и будет использоваться. Сделайте это, используя следующие команды: sudo tar -xzf /opt/java/jre*.tar.gz Где «*» — версия Java. Загрузите архив со средствами разработчки с официального сайта компании Oracle. Также перенесите его в желаемую директорию и распакуйте: sudo tar -xzf /opt/java/jdk*.tar.gz Установка Java в Ubuntu JRE и JDK Для установки проприетарной Oracle Java вам необходимо добавить репозиторий, обновить индексы пакетов и установить Java. В Ubuntu, начиная с 18 релиза, это делается автоматически после добавления репозитория. Внимание! Будут установлены как JRE, так и JDK. Сначала добавим репозиторий и обновим списки пакетов: sudo add-apt-repository ppa:webupd8team/java sudo apt-get update В процессе установки необходимо будет принять лицензионное соглашение: sudo apt-get install oracle-java8-installer Установка Java в ArchLinux В официальных репозиториях есть только OpenJDK. Поэтому придётся воспользоваться пакетом из AUR(вы можете, конечно, руками установить Java от Oracle, но AUR проще). Установка производится всего одной командой: JDK так же можно установить, используя AUR. Просто выполните команду: Установка Java в CentOS Для RHEL, Fedora, Cent OS, OpenSUSE есть официальный RPM-пакет, который вы можете скачать с официального сайта. Чтобы установить пакет из терминала, воспользуйтесь этой командой: sudo rpm -i /путь/к/файлу/jre-*.rpm где «*» — версия Java. Или же примените любую графическую утилиту. Средства для разработчика вы можете скачать на сайте Oracle, ссылка на который есть в верху статьи. Для установки из терминала, используйте команду: Где «*» — версия Java. « » — указывает, что путь начинается. Выбор версии Java Ubuntu Для переключения на 8 версию Java используйте следующую команду: sudo update-java-alternatives -s java-8-oracle Чтобы автоматически установить переменные среды, воспользуйтесь командой: sudo apt-get install oracle-java8-set-default Или же вы можете установить альтернативы сами. Делается это с помощью следующих команд: sudo update-alternatives —install /usr/bin/java java / usr / lib / jvm / java-8-oracle/bin/java 1 sudo update-alternatives —install / usr / bin / javaс javaс / usr / lib / jvm / java-8-oracle / bin / javaс 1 sudo update-alternatives —install / usr / bin / javaws javaws / usr / lib / jvm /java-8-oracle / bin / javaws 1 Теперь осталось выбрать версии исполняемых файлов java, javaws и javac, которые будут использоваться по умолчанию: sudo update-alternatives —config java sudo update-alternatives —config javac sudo update-alternatives —config javaws ArchLinux Для начала просмотрите список установленных сред: Затем установите необходимую вам: archlinux-java set имя_среды archlinux-java set java-8-jre/jre CentOS Выбрать необходимую среду можно с помощью команд, данных ниже (так же, как и в Ubuntu). Вам нужно будет просто выбрать цифру, соответствующую номеру версии: sudo update-alternatives —config java sudo update-alternatives —config javac sudo update-alternatives —config javaws Настройка переменных окружения Чтобы настройки были доступны для всех пользователей, будем использовать файл /etc/profile. Откройте его для редактирования любым текстовым редактором с помощью команды sudo и добавьте в конец следующие строки: export JAVA_HOME=/opt/java/jdk*/ export JRE_HOME=/opt/java/jdk*/jre export PATH=$PATH:/opt/java/jdk*/bin:/opt/java/jdk*/jre/bin Вместо пути по умолчанию /opt/java укажите тот, который использовали; Если вы используете не JDK, а JRE, то в пути у вас так же будет не «jdk*», а «jre*»; «*» — версия Java, которая у вас установлена. Выводы В данной статье мы подробно разобрали процесс установки и настройки Java в различных дистрибутивах Linux. Если остались вопросы, спрашивайте в комментариях! Источник How to Install Java on Ubuntu Home » SysAdmin » How to Install Java on Ubuntu Java is one of the most popular programming languages. It is used for developing anything from lightweight mobile to desktop applications. This step-by-step guide will show you how simple it is to install Java on Ubuntu 18.04 or 20.04. Note: This guide provides instructions that work on Ubuntu 18.04, Ubuntu 20.04 and any other Ubuntu-based distribution (including Linux Mint, Kubuntu, and Elementary OS). If you are looking for other Java installation guides, please refer to: A user account with sudo privileges Access to the command-line/terminal window The apt (apt-get) command Java Versions There are four Java platforms available: Java Standard Edition (Java SE) Java Micro Editions (Java ME) Java Enterprise Edition (Java EE) JavaFX In this document, we look at different packages within the Java SE. The Ubuntu repository offers two (2), open-source Java packages, Java Development Kit (Open JDK) and Java Runtime Environment (Open JRE). You use JRE for running Java-based applications, while JDK is for developing and programming with Java. Also available is Oracle Java, another SE implementation, which has additional commercial features. You can find the official Oracle JDK through a third-party repository. However, bear in mind the license only allows non-commercial use of the software. Installing Java on Ubuntu You can install one or several Java packages. You can also decide which version you want on your system by installing a specific version number. The current default and LTS version is Java 11. Install OpenJDK 1. Open the terminal (Ctrl+Alt+T) and update the package repository to ensure you download the latest software version: 2. Then, you can confidently install the latest Java Development Kit with the following command: 3. Confirm the installation by typing y (yes) and press Enter. Install OpenJRE 11 1. Before you install the Java Runtime Environment, make sure you update the repository with: 2. Next, type in the following command to download and install Java RE: Type y (yes) and press Enter to confirm the installation. Install Oracle Java 11 To download the official Oracle JDK, you first need to download a third-party repository. We include instructions for installations from 2 (two) different package repositories. You can decide from which one you prefer to download. Option 1: Download Oracle Java from Webupd8 PPA 1. First, add the required package repository by typing: Hit Enter when prompted. 2. Make sure to update your system before initiating any installation: 3. Now, you can install Java 11, the latest LTS version: 4. Optionally, you can set this Java version as the default with the following command: Option 2: Download Oracle Java from Linux Uprising PPA 1. Before adding the new repository, install the required packages if you do not have them on your system yet: 2. Next, add the repository with the following command: 3. Update the package list before installing any new software with: 4. Then, download and install the latest version of Oracle Java (version number 11): Verify Java is Installed on Your System Now verify whether the software is part of your system. To check the version of Java running, use the command: The successful installation of Java on Ubuntu will output details, as in the image below. If there is no Java version, the system will say it is unable to find the software. Install Specific Version of Java If for some reason you do not wish to install the default or latest version of Java, you can specify the version number you prefer. Install Specific Version of OpenJDK You may decide to use Open JDK 8, instead of the default OpenJDK 11. To do so, open the terminal and type in the following command: Verify the version of java installed with the command: Install Specific Version of Oracle Java When you download the Oracle Java packages from a third-party repository, you have to type out the version number as part of the code. Therefore, if you want other versions of Java Oracle on your system, change that number accordingly. The command for installing Oracle JDK is the following (the symbol # representing the Java version): For instance, if you want to install Java 10, use the command: How to Set Default Java Version As you can have multiple versions of Java installed on your system, you can decide which one is the default one. First, run a command that shows all the installed versions on your computer: The image above shows that there are two alternatives on this system. These choices are represented by numbers 1 (Java 11) and 2 (Java 8), while the 0 refers to the current default version. As the output instructs, you can change the default version if you type its associated number (in this case, 1 or 2) and press Enter. How to Set JAVA_HOME Environment Variable The JAVA_HOME environment variable determines the location of your Java installation. The variable helps other applications access Java’s installation path easily. 1. To set up the JAVA_HOME variable, you first need to find where Java is installed. Use the following command to locate it: The Path section shows the locations, which are in this case: /usr/lib/jvm/java-11-openjdk-amd64/bin/java (where OpenJDK 11 is located) /usr/lib/jvm/java-8-openjdk-amd64/jre/bin/java (where OpenJDK 8 is located) 2. Once you see all the paths, copy one of your preferred Java version. 3. Then, open the file /etc/environment with any text editor. In this example, we use Nano: 4. At the end of the file, add a line which specifies the location of JAVA_HOME in the following manner: For example, if we copied the installation path for Java 11 in the previous step, the added line in the text code editor would be: How to Uninstall Java on Ubuntu In case you need to remove any of the Java packages installed, use the apt remove command. To remove Open JDK 11, run the command: To uninstall OpenJDK 8: Once you run the command, confirm the continuation of the process by pressing y (yes) and the packages will be removed. This guide has shown you how to install Java on Ubuntu 18.04. It also instructed you on how to change the default version and set the home environment variable. Now, you are ready to use the powerful Java platform! Источник
- Установка Java в Linux
- Чем отличается JDK от JRE
- Установка Java в Linux своими руками
- Установка Java в Ubuntu
- JRE и JDK
- Установка Java в ArchLinux
- Установка Java в CentOS
- Выбор версии Java
- Ubuntu
- ArchLinux
- CentOS
- Настройка переменных окружения
- Выводы
- How to Install Java on Ubuntu
- Java Versions
- Installing Java on Ubuntu
- Install OpenJDK
- Install OpenJRE 11
- Install Oracle Java 11
- Option 1: Download Oracle Java from Webupd8 PPA
- Option 2: Download Oracle Java from Linux Uprising PPA
- Verify Java is Installed on Your System
- Install Specific Version of Java
- Install Specific Version of OpenJDK
- Install Specific Version of Oracle Java
- How to Set Default Java Version
- How to Set JAVA_HOME Environment Variable
- How to Uninstall Java on Ubuntu
Switching between Java Versions on Ubuntu linux
If you’re using Ubuntu Linux on your daily basis work, you’ve probably Java installed on your machine. Personally I prefer using Wepupd8 PPA to manage JAVA installation, it makes my life a lot more easier especially for updates. The Wepupd8 team didn’t add any binary for Oracle JAVA installation and they made a script to download the Oracle JAVA from Oracle website and install it straight away. So whenever Oracle will release the update, I can simple upgrade via package manager.
Working with multiple Java versions in your machine is a normal thing, especially if you’re a Java developer, and because I’m a (very) lazy person, I’m always looking for a quicker/easier way to make the switch.
Today, I’ll share with you my tip on this subject. First, let’s run the following command:
$ sudo update-alternatives —config java
Running this command shows a list of installed Java JDKs and JREs allowing one to be selected as the default that is used when java needs to be executed.
But I’m using it just to get the Installation path of each Java version.
Then, for each version I created a script that contain the following lines (in the example below, I’m showing the one for java 8):
Note that I’m using u8.sh to make he switch to Java 8, and u9.sh for Java 9 and so on.
The final step is to add an alias in
/.bashrc file to source our script as follow:
and That’s all. Now for switching between Java versions, I only run u8, u7 or u9 😉
Источник
How to change the default Java version on Ubuntu
If you are a Java developer, it is normal to have multiple Java versions installed on your machine to support different build environments. When a Java program is compiled, the build environment sets the oldest JRE version the program can support. Now, if you run this program on a Linux machine where an unsupported Java version is installed, you will encounter an exception.
For example, if your program is compiled on Java 11, it can’t be run on a machine where Java 8 is installed. But the good thing is you can install multiple Java versions on your machine and quickly change the default JRE version.
In this tutorial, I’ll explain how to change the default Java version on a Linux machine. First of all, run the following command to check the current Java version:
As you can see above, the default Java version is currently set to OpenJDK JRE 1.8. Now, let’s run the following command to see all available Java versions:
Running the above command displays a list of installed Java JDKs and JREs allowing you to select the one as you want to set as default.
When prompted, select the Java version you would like to use. If the list does not include your desired Java version, you can always install it.
Now you can verify the default Java version as fellows:
That’s it. The default Java version is changed to OpenJDK 11.
Bonus: Use Script to Switch Java Version
If you frequently switch between different Java versions, it is a good idea to write a short script to automate the process. Here is the script I used for switching to OpenJDK 8 on my machine.
Similarly, you can create scripts for other Java versions installed on your machine. The next step is to add these scripts as aliases to .bashrc file.
Next, run the following command to load the changes of .bashrc file:
Now if you want to switch to Java 8, just type the following command in your terminal:
✌️ Like this article? Follow me on Twitter and LinkedIn. You can also subscribe to RSS Feed.
Источник
Установка Java в Linux
В этой статье речь пойдёт о проприетарной версии Java. Часто происходят ситуации, когда пользователь пытается открыть какую-либо программу на Java, а она либо вообще не запускается, либо пытается это сделать с помощью OpenJDK (Java Development Kit). Но вместо результата вы получаете кучу ошибок (как например с Minecraft). В данных ситуациях вам, скорее всего, поможет установка Java от Oracle.
Я вам расскажу, как установить JRE (Java Runtime Environment) и JDK (Java Development Kit) 8 версии на такие дистрибутивы, как Ubuntu, CentOS и Arch, а также как выбрать нужную среду по умолчанию.
Чем отличается JDK от JRE
- JRE — Java Runtime Environment — это среда выполнения Java. Предназначена для обычного использования. Позволяет запускать приложения, написанные на языке Java.
- JDK— Java Development Kit — стандартная версия платформы Java, предназначенная для разработки. Это специальный пакет разработчика, в который входят документация, различные утилиты, компилятор, библиотеки классов, а также сама JRE.
Установка Java в Linux своими руками
Скачать архив с необходимой вам версией вы можете с официального сайта. Далее вам надо перенести его в желаемую директорию и распаковать. Рекомендую /opt/java, далее она и будет использоваться. Сделайте это, используя следующие команды:
sudo tar -xzf /opt/java/jre*.tar.gz
Где «*» — версия Java.
Загрузите архив со средствами разработчки с официального сайта компании Oracle. Также перенесите его в желаемую директорию и распакуйте:
sudo tar -xzf /opt/java/jdk*.tar.gz

Установка Java в Ubuntu
JRE и JDK
Для установки проприетарной Oracle Java вам необходимо добавить репозиторий, обновить индексы пакетов и установить Java. В Ubuntu, начиная с 18 релиза, это делается автоматически после добавления репозитория.
Внимание! Будут установлены как JRE, так и JDK. Сначала добавим репозиторий и обновим списки пакетов:
sudo add-apt-repository ppa:webupd8team/java
sudo apt-get update
В процессе установки необходимо будет принять лицензионное соглашение:
sudo apt-get install oracle-java8-installer


Установка Java в ArchLinux
В официальных репозиториях есть только OpenJDK. Поэтому придётся воспользоваться пакетом из AUR(вы можете, конечно, руками установить Java от Oracle, но AUR проще). Установка производится всего одной командой:


JDK так же можно установить, используя AUR. Просто выполните команду:
Установка Java в CentOS
Для RHEL, Fedora, Cent OS, OpenSUSE есть официальный RPM-пакет, который вы можете скачать с официального сайта. Чтобы установить пакет из терминала, воспользуйтесь этой командой:
sudo rpm -i /путь/к/файлу/jre-*.rpm
где «*» — версия Java. Или же примените любую графическую утилиту.
Средства для разработчика вы можете скачать на сайте Oracle, ссылка на который есть в верху статьи. Для установки из терминала, используйте команду:
Где «*» — версия Java. «
» — указывает, что путь начинается.

Выбор версии Java
Ubuntu
Для переключения на 8 версию Java используйте следующую команду:
sudo update-java-alternatives -s java-8-oracle
Чтобы автоматически установить переменные среды, воспользуйтесь командой:
sudo apt-get install oracle-java8-set-default
Или же вы можете установить альтернативы сами. Делается это с помощью следующих команд:
sudo update-alternatives —install /usr/bin/java java / usr / lib / jvm / java-8-oracle/bin/java 1
sudo update-alternatives —install / usr / bin / javaс javaс / usr / lib / jvm / java-8-oracle / bin / javaс 1
sudo update-alternatives —install / usr / bin / javaws javaws / usr / lib / jvm /java-8-oracle / bin / javaws 1
Теперь осталось выбрать версии исполняемых файлов java, javaws и javac, которые будут использоваться по умолчанию:
sudo update-alternatives —config java
sudo update-alternatives —config javac
sudo update-alternatives —config javaws

ArchLinux
Для начала просмотрите список установленных сред:
Затем установите необходимую вам:
archlinux-java set имя_среды
archlinux-java set java-8-jre/jre

CentOS
Выбрать необходимую среду можно с помощью команд, данных ниже (так же, как и в Ubuntu). Вам нужно будет просто выбрать цифру, соответствующую номеру версии:
sudo update-alternatives —config java
sudo update-alternatives —config javac
sudo update-alternatives —config javaws

Настройка переменных окружения
Чтобы настройки были доступны для всех пользователей, будем использовать файл /etc/profile. Откройте его для редактирования любым текстовым редактором с помощью команды sudo и добавьте в конец следующие строки:
- export JAVA_HOME=/opt/java/jdk*/
- export JRE_HOME=/opt/java/jdk*/jre
- export PATH=$PATH:/opt/java/jdk*/bin:/opt/java/jdk*/jre/bin
- Вместо пути по умолчанию /opt/java укажите тот, который использовали;
- Если вы используете не JDK, а JRE, то в пути у вас так же будет не «jdk*», а «jre*»;
- «*» — версия Java, которая у вас установлена.

Выводы
В данной статье мы подробно разобрали процесс установки и настройки Java в различных дистрибутивах Linux. Если остались вопросы, спрашивайте в комментариях!
Источник
How to Install Java on Ubuntu
Home » SysAdmin » How to Install Java on Ubuntu
Java is one of the most popular programming languages. It is used for developing anything from lightweight mobile to desktop applications.
This step-by-step guide will show you how simple it is to install Java on Ubuntu 18.04 or 20.04.
Note: This guide provides instructions that work on Ubuntu 18.04, Ubuntu 20.04 and any other Ubuntu-based distribution (including Linux Mint, Kubuntu, and Elementary OS). If you are looking for other Java installation guides, please refer to:
- A user account with sudo privileges
- Access to the command-line/terminal window
- The apt (apt-get) command
Java Versions
There are four Java platforms available:
- Java Standard Edition (Java SE)
- Java Micro Editions (Java ME)
- Java Enterprise Edition (Java EE)
- JavaFX
In this document, we look at different packages within the Java SE.
The Ubuntu repository offers two (2), open-source Java packages, Java Development Kit (Open JDK) and Java Runtime Environment (Open JRE). You use JRE for running Java-based applications, while JDK is for developing and programming with Java.
Also available is Oracle Java, another SE implementation, which has additional commercial features. You can find the official Oracle JDK through a third-party repository. However, bear in mind the license only allows non-commercial use of the software.
Installing Java on Ubuntu
You can install one or several Java packages. You can also decide which version you want on your system by installing a specific version number. The current default and LTS version is Java 11.
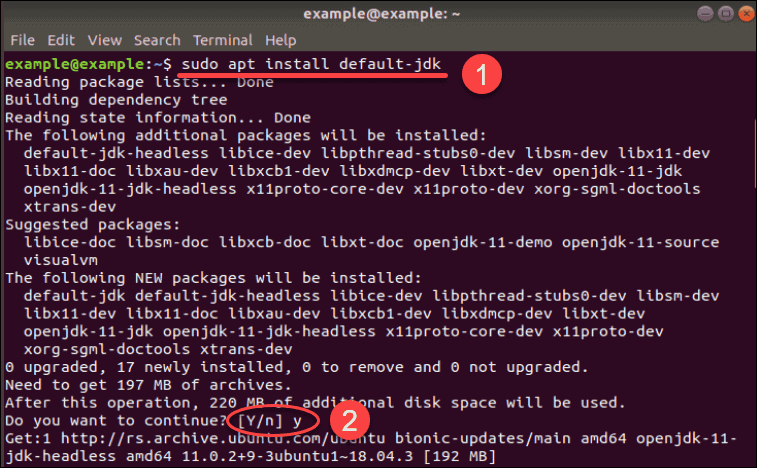
Install OpenJDK
1. Open the terminal (Ctrl+Alt+T) and update the package repository to ensure you download the latest software version:
2. Then, you can confidently install the latest Java Development Kit with the following command:
3. Confirm the installation by typing y (yes) and press Enter.
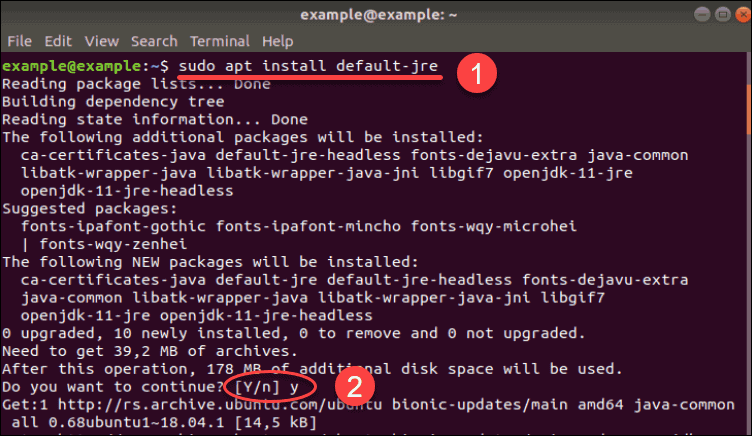
Install OpenJRE 11
1. Before you install the Java Runtime Environment, make sure you update the repository with:
2. Next, type in the following command to download and install Java RE:
Type y (yes) and press Enter to confirm the installation.
Install Oracle Java 11
To download the official Oracle JDK, you first need to download a third-party repository.
We include instructions for installations from 2 (two) different package repositories. You can decide from which one you prefer to download.
Option 1: Download Oracle Java from Webupd8 PPA
1. First, add the required package repository by typing:
Hit Enter when prompted.
2. Make sure to update your system before initiating any installation:
3. Now, you can install Java 11, the latest LTS version:
4. Optionally, you can set this Java version as the default with the following command:
Option 2: Download Oracle Java from Linux Uprising PPA
1. Before adding the new repository, install the required packages if you do not have them on your system yet:
2. Next, add the repository with the following command:
3. Update the package list before installing any new software with:
4. Then, download and install the latest version of Oracle Java (version number 11):
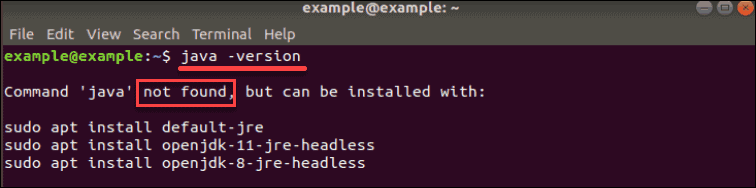
Verify Java is Installed on Your System
Now verify whether the software is part of your system.
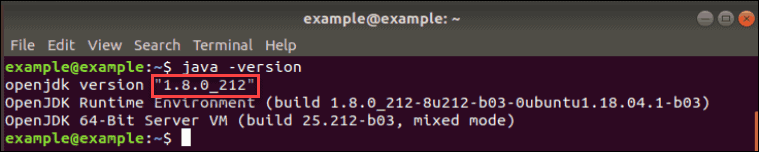
To check the version of Java running, use the command:
The successful installation of Java on Ubuntu will output details, as in the image below.

If there is no Java version, the system will say it is unable to find the software.
Install Specific Version of Java
If for some reason you do not wish to install the default or latest version of Java, you can specify the version number you prefer.
Install Specific Version of OpenJDK
You may decide to use Open JDK 8, instead of the default OpenJDK 11.
To do so, open the terminal and type in the following command:
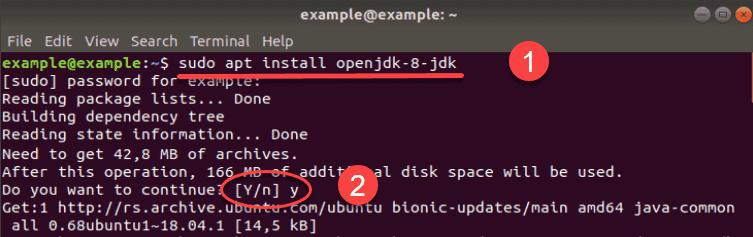
Verify the version of java installed with the command:
Install Specific Version of Oracle Java
When you download the Oracle Java packages from a third-party repository, you have to type out the version number as part of the code.
Therefore, if you want other versions of Java Oracle on your system, change that number accordingly.
The command for installing Oracle JDK is the following (the symbol # representing the Java version):
For instance, if you want to install Java 10, use the command:

How to Set Default Java Version
As you can have multiple versions of Java installed on your system, you can decide which one is the default one.
First, run a command that shows all the installed versions on your computer:
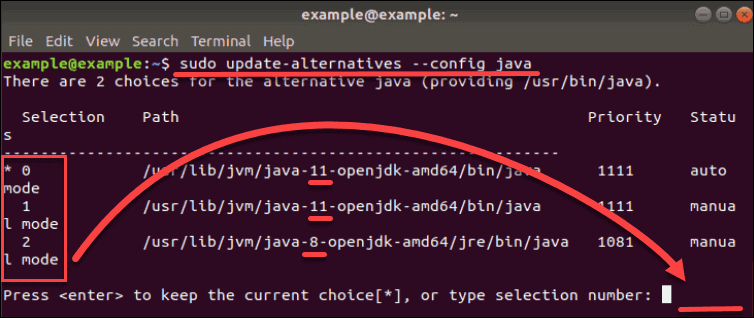
The image above shows that there are two alternatives on this system. These choices are represented by numbers 1 (Java 11) and 2 (Java 8), while the 0 refers to the current default version.
As the output instructs, you can change the default version if you type its associated number (in this case, 1 or 2) and press Enter.
How to Set JAVA_HOME Environment Variable
The JAVA_HOME environment variable determines the location of your Java installation. The variable helps other applications access Java’s installation path easily.
1. To set up the JAVA_HOME variable, you first need to find where Java is installed. Use the following command to locate it:
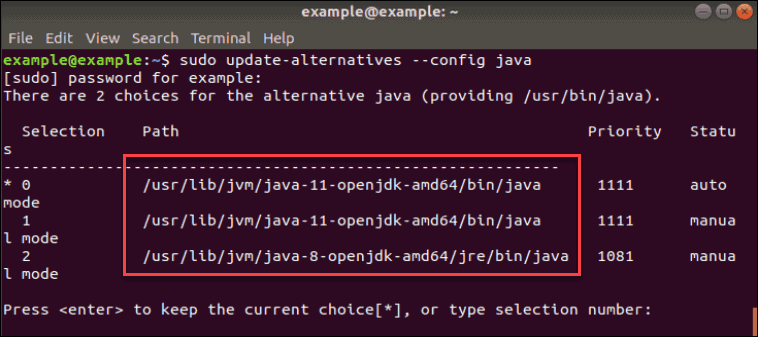
The Path section shows the locations, which are in this case:
- /usr/lib/jvm/java-11-openjdk-amd64/bin/java (where OpenJDK 11 is located)
- /usr/lib/jvm/java-8-openjdk-amd64/jre/bin/java (where OpenJDK 8 is located)
2. Once you see all the paths, copy one of your preferred Java version.
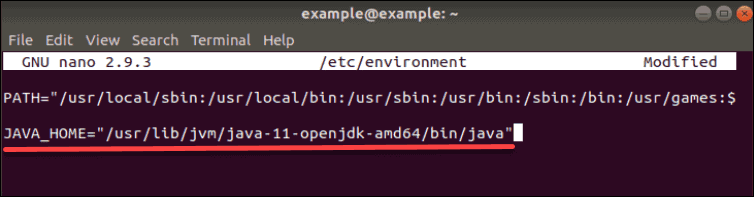
3. Then, open the file /etc/environment with any text editor. In this example, we use Nano:
4. At the end of the file, add a line which specifies the location of JAVA_HOME in the following manner:
For example, if we copied the installation path for Java 11 in the previous step, the added line in the text code editor would be:
How to Uninstall Java on Ubuntu
In case you need to remove any of the Java packages installed, use the apt remove command.
To remove Open JDK 11, run the command:
To uninstall OpenJDK 8:
Once you run the command, confirm the continuation of the process by pressing y (yes) and the packages will be removed.
This guide has shown you how to install Java on Ubuntu 18.04. It also instructed you on how to change the default version and set the home environment variable.
Now, you are ready to use the powerful Java platform!
Источник


