- Синхронизация времени по NTP в Linux
- Устанавливаем в системе Linux время, дату и часовой пояс из командной строки или из Gnome | Используем ntp
- Set Time, Date Timezone in Linux from Command Line or Gnome | Use ntp
- Синхронизация времени с NTP в Linux
- How to Synchronize Time with NTP in Linux
- Installing Chrony in Linux Server
- Checking Chrony Synchronization
- Configuring Chrony Time Sources
- If You Appreciate What We Do Here On TecMint, You Should Consider:
Синхронизация времени по NTP в Linux
Оригинал: How to Synchronize Time with NTP in Linux
Автор: Matei Cezar
Дата публикации: 20 апреля 2018 года
Перевод: А. Кривошей
Дата перевода: декабрь 2018 г.
Network Time Protocol (NTP) — это протокол, используемый для автоматической синхронизации системных часов компьютера по сети. Машина может выставлять системные часы по Coordinated Universal Time (UTC), а не по местному времени.
Наиболее распространенный метод синхронизации системного времени по сети на десктопах или серверах Linux — выполнение команды ntpdate, которая может установить системное время с сервера времени NTP. В этом случае на компьютере, на котором введена команда ntpdate, должен быть остановлен демон ntpd.
В большинстве систем Linux команда ntpdate не устанавливается по умолчанию. Чтобы установить ее, выполните приведенную ниже команду.
Пример команды ntpdate:

Чтобы просто запросить время сервера и не устанавливать часы, используя непривилегированный порт для отправки пакетов, чтобы обойти брандмауэры, выполните команду ntpdate со следующими флагами:
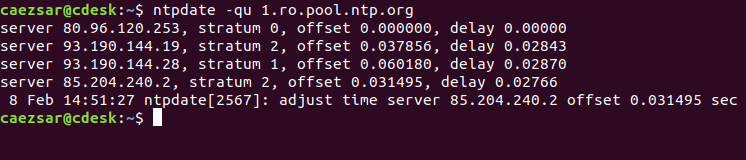
Всегда старайтесь запрашивать и синхронизировать время с ближайшими NTP-серверами, доступными для вашей зоны. Список пулов серверов NTP можно найти по следующему адресу:
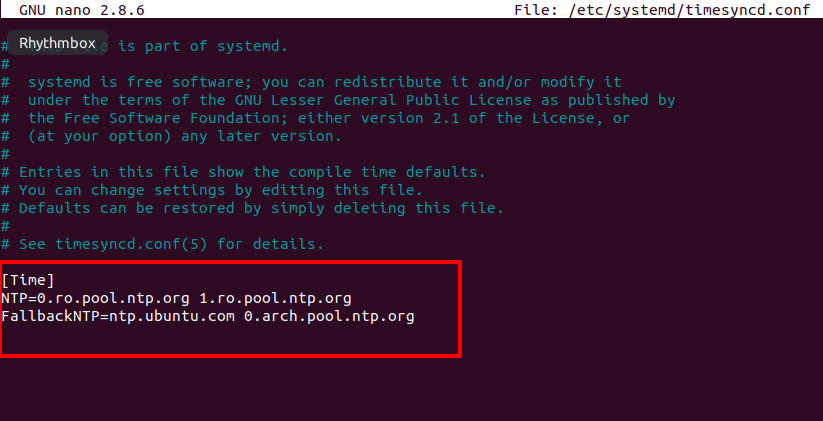
В новых дистрибутивах Linux, которые используют Systemd, вы также можете синхронизировать время через файл timesyncd.conf. Просто откройте файл для редактирования.
И добавьте или раскомментируйте следующие строки после оператора [Time], как показано ниже:
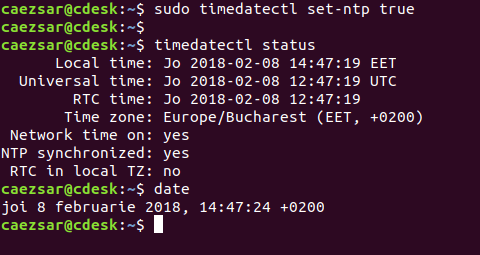
После редактирования файла введите команду timedatectl, чтобы активировать сборку клиента NTP в systemd.

После этого введите команду date для отображения системных часов.
Источник
Устанавливаем в системе Linux время, дату и часовой пояс из командной строки или из Gnome | Используем ntp
В системе Linux очень важно иметь правильное время и дату, поскольку от этого зависит многое. Причем неважно, используете ли вы систему Linux на своем персональном компьютере или у вас Linux-сервер. Серверные и системные часы должны указывать правильное время.
Аппаратные часы — это те часы, которые работают на вашем компьютере даже тогда, как питание компьютера отключено. Это возможно благодаря наличию в современных компьютерах литиевой батареи или батареи другого типа в более старых компьютерах.
Мы можем увидеть различие между аппаратными и системными часами
Вы увидите что-то вроде следующего:
Теперь проверьте системные часы
Вы увидите что-то вроде следующего:
Давайте установим аппаратные часы по местному времени:
Если вы хотите установить их на использование времени по Гринвичу (UTC):
Установка часового пояса
Чтобы в ваших системных часах установить часовой пояс, выполните следующее:
Правильно укажите ваш часовой пояс.
Автоматическая регулировка часов
Для того, чтобы ваша система могла автоматический регулировать время, вам нужно установить программу ntp . Получите ее из репозитария. После того, как она будет установлена, вы можете настроить ее следующим образом:
Отредактируйте файл /etc/ntpd.conf . Он будет выглядеть следующим образом:
Удостоверьтесь, что вы запустили демон, и сделайте так, чтобы он автоматически запускался при загрузке системы.
Для Arch Linux это: /etc/rc.d/ntpd start ; для Debian и производных систем: /etc/init.d/ntpd start
Обновление из командной строки времени по значению, получаемому с сервера времени
Вы можете обновлять время вручную без использования демона ntpdate
Вы получите что-то вроде следующего:
Бонус: Установка времени и даты в Gnome
Если вы используете Gnome, щелкните правой кнопкой мыши по изображению часов и выберите пункт настройки adjust, или в меню выберите пункт System > Administration > Time and Date (Система > Администрирование > Время и дата). Вам, возможно, будет предложено ввести пароль.
Источник
Set Time, Date Timezone in Linux from Command Line or Gnome | Use ntp
Written by Guillermo Garron
Date: 2012-04-19 15:55:00 00:00
To have the correct time and date in Linux is very important, a lot of things depends on it. It does not matter if you are using Linux to power your personal computer or you have a Linux server. The server and system clock needs to be on time.
Set date from the command line
Set time from the command line
Set time and date from the command line
Linux check date from command line
Will show you something like this:
Set hardware clock
The hardware clock is the clock that runs in you PC hardware even if you disconnect it from the main power supply. This is because it has a lithium battery in the modern computers and another type of battery in the old ones.
We’ll see differences between hardware clock and system clock
Will output something like this:
Now check the system clock
Will output something like this:
Let’s set the hardware clock to local time:
If you want to set it to UTC time use:
Set the timezone
To set the timezone of your system clock do the following:
Choose the right timezone for you.
Automatically adjust your computer clock
To have your system to automatically adjust time we need to install ntp . Get it from your repository. Once installed you can configure it this way:
Edit the file /etc/ntpd.conf . It will look like this:
Be sure to start the daemon, and to make it start automatically when the system boots.
On Arch Linux is: /etc/rc.d/ntpd start on Debian and derivatives /etc/init.d/ntpd start
Update from the command line against a time server
You can update the clock manually, without the need of the daemon with ntpdate
You will get something like this:
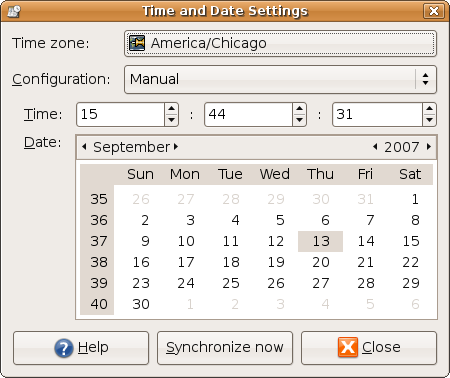
Bonus: Set the time and Date on Gnome
If you are using Gnome right click on the clock and select adjust, or go to: System > Administration > Time and Date (You may be asked for root password)
You will see a window similar to this one:
If you enjoyed the article, please share it
Источник
Синхронизация времени с NTP в Linux
Оригинал: How to Synchronize Time with NTP in Linux
Автор: Matei Cezar
Дата публикации: 20 апреля 2019 года
Перевод: А. Кривошей
Дата перевода: январь 2019 г.
Network Time Protocol (NTP) — это протокол, используемый для автоматической синхронизации системных часов компьютера по сети. Машина может устанавливать системные часы по всемирному координированному времени (UTC), а не по местному времени.
Наиболее распространенный метод синхронизации системного времени по сети на десктопах или серверах Linux — выполнение команды ntpdate, которая может установить системное время с сервера времени NTP. В этом случае а компьютере, на котором введена команда ntpdate, должен быть установлен демон ntpd.
В большинстве систем Linux утилита ntpdate не устанавливается по умолчанию. Чтобы установить ее, выполните приведенную ниже команду.
Пример команды ntpdate:

Чтобы просто запросить сервер и не устанавливать часы, используя непривилегированный порт для отправки пакетов, чтобы обойти брандмауэры, выполните команду ntpdate со следующими флагами.

Всегда старайтесь запрашивать и синхронизировать время с ближайшими NTP-серверами, доступными для вашей зоны. Список пулов серверов NTP можно найти по следующему адресу:
В новых дистрибутивах Linux, которые поставляются с Systemd, вы также можете синхронизировать время через файл timesyncd.conf. Просто откройте файл для редактирования.
И добавьте или раскомментируйте следующие строки после оператора [Time], как показано ниже:

После редактирования файла введите команду timedatectl, чтобы активировать сборку клиента NTP в systemd.
После этого введите команду date для отображения системных часов.
Источник
How to Synchronize Time with NTP in Linux
The Network Time Protocol (NTP) is a protocol used to synchronize computer system clock automatically over a networks. The machine can have the system clock use Coordinated Universal Time (UTC) rather than local time.
Maintaining accurate time on Linux systems especially servers is a important task for many reasons. For example, in a networked environment, accurate timekeeping is required for accurate timestamps in packets and system logs for root-cause analysis, determining when problems occurred, and finding correlations.
Chrony is now the default NTP implementation package on the latest versions of Linux operating systems such as CentOS, RHEL, Fedora and Ubuntu/Debian among others and comes pre-installed by default. The package consists of chronyd, a daemon that runs in userspace, and chronyc a command-line program for monitoring and controlling chronyd.
Chrony is a versatile NTP implementation and performs well in a wide range of conditions (check out the comparison of chrony suite to other NTP implementations). It can be used to synchronize the system clock with NTP servers (act as a client), with a reference clock (e.g a GPS receiver), or with a manual time input. It can also be employed as an NTPv4 (RFC 5905) server or peer to provide a time service to other computers in the network.
In this article, you will learn how to synchronize server time with NTP in Linux using chrony.
Installing Chrony in Linux Server
In most Linux systems, the chrony command is not installed by default. To install it, execute the below command.
Once the installation is complete, start the chrony service and enable it to automatically start at system boot, then check if it is up and running.
![]() Check Chrony Status
Check Chrony Status
To cross-check if chrony is now up and running fine and to see the number of servers and peers that are connected to it, run the following chronyc command.
![]() Check Chrony Activity
Check Chrony Activity
Checking Chrony Synchronization
To display information (list of servers available, status, and offsets from the local clock and the source) about the current time sources that chronyd is accessing, run the following command with the -v flag shows the description for each column.
![]() Check Chronyd Time Sources
Check Chronyd Time Sources
Concerning the previous command, to display other useful information for each of the sources currently being examined by chronyd (such as the drift rate and offset estimation process), use the sourcestats command.
![]() Check Chronyd Source Stats
Check Chronyd Source Stats
To check chrony tracking, run the following command.
In the output of this command, the reference ID specifies the name (or IP address) if available, of the server to which the computer is currently synchronized, out of all the available servers.
![]() Display Chrony Tracking
Display Chrony Tracking
Configuring Chrony Time Sources
The main chrony configuration file is located at /etc/chrony.conf (CentOS/RHEL/Fedora) or /etc/chrony/chrony.conf (Ubuntu/Debian).
When installing a Linux OS in the cloud, your system should have some default servers or a pool of servers added during the installation process. To add or change the default servers, open the configuratioon file for editing:
You can either add several servers using the server directive as shown.
![]() Add NTP Servers
Add NTP Servers
or in most cases, it’s best to use ntppool.org to find an NTP server. This allows the system to try to find the closest available servers for you. To add a pool, use the pool directive:
![]() Add a Pool of NTP Servers
Add a Pool of NTP Servers
There are many other options you can configure in the file. After making changes, restart the chrony service.
To show information about the current time sources that chronyd is querying, run the following command once more.
![]() View Chronyd Time Sources
View Chronyd Time Sources
To check chrony tracking status, run the following command.
![]() Check Chrony Synchronizing Status
Check Chrony Synchronizing Status
To display the current time on your system, check whether system clock is synchronized and whether NTP is indeed active, run the timedatectl command:
![]() Check Current Server Time
Check Current Server Time
That brings us to the end of this guide. If you have any questions, reach us via the comment section below. For more information, check out: using the chrony suite to configure NTP from the RHEL 8 documentation or using chrony to configure NTP from the Ubuntu official blog.
If You Appreciate What We Do Here On TecMint, You Should Consider:
TecMint is the fastest growing and most trusted community site for any kind of Linux Articles, Guides and Books on the web. Millions of people visit TecMint! to search or browse the thousands of published articles available FREELY to all.
If you like what you are reading, please consider buying us a coffee ( or 2 ) as a token of appreciation.

We are thankful for your never ending support.
Источник


