- Локализация Ubuntu Server 18.04 LTS
- Текущие настройки языка
- Список доступных локалей
- Добавить новую локаль
- Подробная информация о локалях
- Локаль по-умолчанию
- Быстрая локализация
- Удалить лишние локали
- Переводы для системных программ
- Локализация для текущей сессии
- Файлы конфигурации шрифта и клавиатуры
- Настройка шрифта и клавиатуры
- Locale
- Contents
- Generating locales
- Setting the locale
- Setting the system locale
- Overriding system locale per user session
- Make locale changes immediate
- Other uses
- Variables
- LANG: default locale
- LANGUAGE: fallback locales
- LC_TIME: date and time format
- LC_COLLATE: collation
- LC_ALL: troubleshooting
- Troubleshooting
- My terminal does not support UTF-8
- Gnome-terminal or rxvt-unicode
- My system is still using wrong language
- Настройка русской локали в Linux
- Подготовка к настройке
- Настройка локали в CentOS, Fedora
- Настройка локали в Debian, Ubuntu
- linux-notes.org
- 2 thoughts on “ Настройка locate (локали) в Unix/Linux ”
- Добавить комментарий Отменить ответ
- How to Change or Set System Locales in Linux
- How to View System Locale in Linux
- How to Set System Locale in Linux
- If You Appreciate What We Do Here On TecMint, You Should Consider:
Локализация Ubuntu Server 18.04 LTS
Локаль (locale или локализация) в Linux определяет, какой язык и какой набор символов (кодировку), пользователь видит в терминале. Посмотрим, как проверить текущие настройки языка и кодировки, как получить список всех доступных локалей, как сменить язык и кодировку для текущей сессии или установить их постоянно.
Для тех, кому лень читать всю статью до конца — чаще всего для локализации консоли достаточно повторно сконфигурировать пакет locales :
Сначала будут созданы нужные локали (их выбрать на первом экране), потом установлена локаль по умолчанию (ее выбрать на втором экране).
Текущие настройки языка
Посмотрим информацию о текущем языковом окружении:
Список доступных локалей
Теперь посмотрим список всех установленных языков и кодировок:
Есть только системная локаль C.UTF-8 , которая присутствует всегда. А нам надо добавить еще две локали — en_US.UTF-8 и ru_RU.UTF-8 .
Добавить новую локаль
Смотрим список всех поддерживаемых (доступных для установки) локалей:
Устанавливаем нужные локали — en_US.UTF-8 и ru_RU.UTF-8 :
Второй способ установить локали — расскомментровать нужные строки в файле /etc/locale.gen
И просто выполнить команду locale-gen без указания локалей:
Подробная информация о локалях
Более подробную информацию об установленных в системе локалях можно посмотреть так:
Часть локалей размещена в архиве /usr/lib/locale/locale-archive , а часть — в директориях внутри /usr/lib/locale/ .
Локаль по-умолчанию
Хорошо, нужные локали у нас теперь есть, осталось только задать локаль по умолчанию:
Эта команда запишет в файл /etc/default/locale строку:
После этого надо будет перезайти в систему. И проверяем информацию о языковом окружении:
Теперь все правильно, так что запишем эту информацию в файл /etc/default/locale :
Быстрая локализация
До сих пор мы все делали ручками, но если лень — можно просто повторно сконфигурировать пакет locales . Сначала будут созданы нужные локали (их нужно выбрать на первом экране), потом установлена локаль по умолчанию (ее нужно выбрать на втором экране).
Удалить лишние локали
После установки (генерации) локали, она помещается в архив /usr/lib/locale/locale-archive . Файл архива — это файл, отображаемый в память, который содержит все локали системы; он используется всеми локализованными программами. Посмотреть список локалей в архиве можно с помощью команды:
Удалить заданную локаль из файла архива:
Обратите внимание на название локали — ru_UA.utf8 , а не ru_UA.UTF-8 . Если неправильно указать локаль — она не будет удалена из архива:
В случае, если утилита locale-gen была вызвана с опцией —no-archive , надо удалить соответствующую директорию в /usr/lib/locale :
Переводы для системных программ
Локализация для основных системных программ, чтобы получать сообщения на русском языке:
Локализация для текущей сессии
Достаточно временно установить переменную окружения LANG в текущей сессии терминала:
Или даже так — передать переменную LANG конкретной программе:
Файлы конфигурации шрифта и клавиатуры
Настройки можно найти в файлах конфигурации /etc/default/console-setup и /etc/default/keyboard :
Это системные настройки, пользователь может создать свои в файлах
Настройка шрифта и клавиатуры
Чтобы сформировать файлы конфигурации /etc/default/console-setup и /etc/default/keyboard можно использовать команды:

После того, как файлы конфигурации будут сформированы, нужно выполнить команду setupcon без аргументов или перезагрузить систему.
Источник
Locale
Locales are used by glibc and other locale-aware programs or libraries for rendering text, correctly displaying regional monetary values, time and date formats, alphabetic idiosyncrasies, and other locale-specific standards.
Contents
Generating locales
Locale names are typically of the form language[_territory][.codeset][@modifier] , where language is an ISO 639 language code, territory is an ISO 3166 country code, and codeset is a character set or encoding identifier like ISO-8859-1 or UTF-8. See setlocale(3) .
For a list of enabled locales, run:
Before a locale can be enabled on the system, it must be generated. This can be achieved by uncommenting applicable entries in /etc/locale.gen , and running locale-gen. Equivalently, commenting entries disables their respective locales. While making changes, consider any localisations required by other users on the system, as well as specific #Variables.
For example, uncomment en_US.UTF-8 UTF-8 for American-English:
Save the file, and generate the locale:
Setting the locale
To display the currently set locale and its related environmental settings, type:
The locale to be used, chosen among the previously generated ones, is set in locale.conf files. Each of these files must contain a new-line separated list of environment variable assignments, having the same format as output by locale.
To list available locales which have been previously generated, run:
Setting the system locale
To set the system locale, write the LANG variable to /etc/locale.conf , where en_US.UTF-8 belongs to the first column of an uncommented entry in /etc/locale.gen :
Overriding system locale per user session
The system-wide locale can be overridden in each user session by creating or editing $XDG_CONFIG_HOME/locale.conf (usually
The precedence of these locale.conf files is defined in /etc/profile.d/locale.sh .
/.config/locale.conf automatically generated.
Make locale changes immediate
Once system and user locale.conf files have been created or edited, their new values will take effect for new sessions at login. To have the current environment use the new settings unset LANG and source /etc/profile.d/locale.sh :
Other uses
Locale variables can also be defined with the standard methods as explained in Environment variables.
For example, in order to test or debug a particular application during development, it could be launched with something like:
Similarly, to set the locale for all processes run from the current shell (for example, during system installation):
Variables
locale.conf files support the following environment variables.
Full meaning of the above LC_* variables can be found on manpage locale(7) , whereas details of their definition are described on locale(5) .
LANG: default locale
The locale set for this variable will be used for all the LC_* variables that are not explicitly set.
LANGUAGE: fallback locales
Programs which use gettext for translations respect the LANGUAGE option in addition to the usual variables. This allows users to specify a list of locales that will be used in that order. If a translation for the preferred locale is unavailable, another from a similar locale will be used instead of the default. For example, an Australian user might want to fall back to British rather than US spelling:
LC_TIME: date and time format
If LC_TIME is set to en_US.UTF-8 , for example, the date format will be «MM/DD/YYYY». If wanting to use the the ISO 8601 date format of «YYYY-MM-DD» use:
glibc 2.29 fixed a bug, en_US.UTF-8 started showing in 12-hour format, as was intended. If wanting to use 24-hour format, use LC_TIME=en_GB.UTF-8 .
LC_COLLATE: collation
This variable governs the collation rules used for sorting and regular expressions.
Setting the value to C can for example make the ls command sort dotfiles first, followed by uppercase and lowercase filenames:
To get around potential issues, Arch used to set LC_COLLATE=C in /etc/profile , but this method is now deprecated.
LC_ALL: troubleshooting
The locale set for this variable will always override LANG and all the other LC_* variables, whether they are set or not.
LC_ALL is the only LC_* variable which cannot be set in locale.conf files: it is meant to be used only for testing or troubleshooting purposes, for example in /etc/profile .
Troubleshooting
My terminal does not support UTF-8
The following lists some (not all) terminals that support UTF-8:
Gnome-terminal or rxvt-unicode
You need to launch these applications from a UTF-8 locale or they will drop UTF-8 support. Enable the en_US.UTF-8 locale (or your local UTF-8 alternative) per the instructions above and set it as the default locale, then reboot.
My system is still using wrong language
It is possible that the environment variables are redefined in other files than locale.conf , for example
If you are using a desktop environment, such as GNOME, its language settings may be overriding the settings in locale.conf .
KDE Plasma also allows to change the UI’s language through the system settings. If the desktop environment is still using the default language after the modification, deleting the file at
/.config/plasma-locale-settings.sh ) should resolve the issue.
If you are using a display manager in combination with accountsservice , follow the instructions in Display manager#Set language for user session.
LightDM will automatically use accountsservice to set a user’s locale if it is installed. Otherwise, LightDM stores the user session configuration in
/.dmrc . It is possible that an unwanted locale setting is retrieved from there as well.
Источник
Настройка русской локали в Linux
Чтобы изменить установленную по умолчанию локализацию в системе на русскую, необходимо выполнить несколько не сложных шагов.
Подготовка к настройке
- Подключаемся к VPS по SSH с правами root.
- Проверяем, доступна ли русская локаль в системе и её корректное название:
- В результате, при наличии локали, будет получен примерно следующий вывод:
- В нашем случае, интересует вариант ru_RU.utf8. Его мы и будем использовать далее. Поэтому скопируйте это значение в блокнот для дальнейшей вставки.
Настройка локали в CentOS, Fedora
- Создадим файл i18n, в котором затем сохраним параметры новой локали:
- В открывшемся редакторе вносим следующую информацию:
- Сохраняем изменения сочетанием клавиш CTRL+O и затем Enter.
- На этом всё, локаль изменена и теперь необходимо переподключиться в консоль, чтобы увидеть изменения. Если вы использовали VNC или другое удаленное подключение к рабочему столу, то рекомендуется и в нём произвести переподключение для применения изменений.
Настройка локали в Debian, Ubuntu
Если в шаге подготовки команда locale -a | grep ru дала пустой результат, значит русская локаль отсутствует в системе и её можно установить следующими способами:
Способ 1:
- Перенастраиваем пакет locales командой:
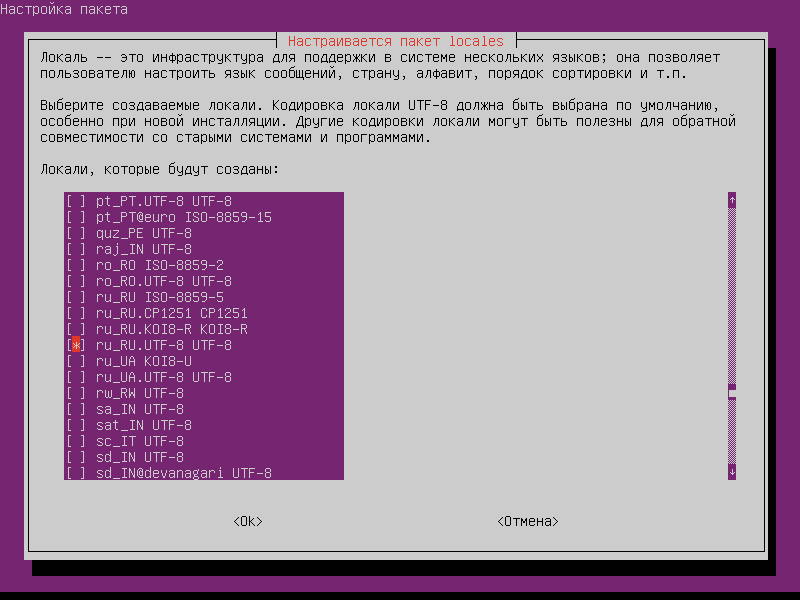
- В появившейся форме ищем локаль ru_RU.UTF-8 и отмечаем её нажатием пробелом, в результате перед этой локалью появится звёздочка, как показано на изображении ниже. Затем нажимаем Enter и переходим к следующему шагу.
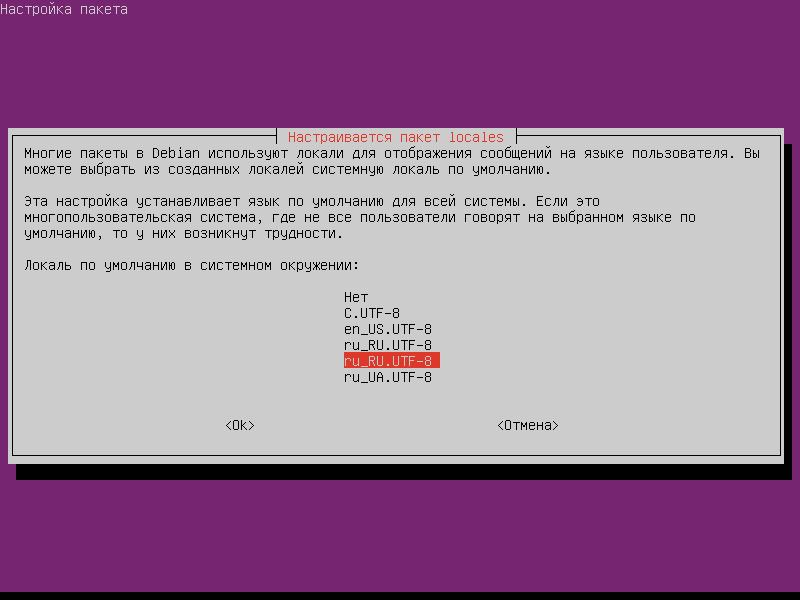
- Следующий шаг – выбор локали по умолчанию. Выбераем русскую локаль из списка и нажмаем Enter.
- В результате будет завершена перенастройка локали и теперь необходимо только выполнить повторное подключение к консоли и к удаленному рабочему столу (если таковое используется).
Способ 2:
- Устанавливаем языковой пакет:
- Открываем текстовым редактором файл /etc/default/locale:
- Заменяем его содержимое на:
- Сохраняем изменения сочетанием клавиш CTRL+O и затем Enter.
- Выходим из консоли, а также закрываем соединение с удаленным рабочим столом (если такое соединение было) и подключаемся к этим сервисам повторно.
- На этом настройка завершена.
Источник
linux-notes.org

Я получил сообщение об ошибке следующего содержания при подключении к любому удаленному Unix/Linux серверу терминал:
Сейчас, я расскажу в своей статье «Настройка locate (локали) в Unix/Linux» как можно данную ошибку исправить.
Смотрим какое переменное окружение установлено:
Можно отгрепать нужное:
Данная команда покажет на экран нужную локаль. Например, для кодировки UTF-8 нужна следующая локаль — ru_RU.utf8. При выводе данной команды если имеется данная локаль, нужно сейчас создать:
И добавляем в файл:
Для utf-8 используйте:
Сохраняем открытый файл и перезаходим в консоль, должен появиться русский шрифт в локали. Но бывает так, что при выводе команды:
Способ 1.
Ничего не показало ( нет именно русской локали), то мы сейчас это исправим:
И так, команда что выше, берет из директории /usr/share/i18n/locales/ файл с русской локалью с названием — ru_RU, а так же, из директории /usr/share/i18n/charmaps файлик с символьной картой для юникода с названием — UTF-8.gz. После чего, на основании двух этих файлов — генерирует необходимую локаль с именем — ru_RU.UTF-8. Собственно, локаль была сгенерирована, сейчас нужно выполнить все действия что я приводил выше.
Более расширенный вариант:
Способ 2.
Можно предотвратить передачу LC_* переменных в самой утилите (OpenSSH клиенте) на Unix/Linux машине.
Откройте /etc/ssh/ssh_config или /etc/ssh_config:
Удаляем или закоментируйте строку:
Сохраняйте и закройте данный файл. Настройка locate (локали) в Unix/Linux завершена.
2 thoughts on “ Настройка locate (локали) в Unix/Linux ”
Есть ли такая же статья по том как передать локали (напр. ru_RU) в питоновский докерфайл?
Просто в Dockerfile вставить:
ENV LANG=»ru_RU.UTF-8″
Так же, можно добавлять и другие переменные (LC_ALL, LC_CTYPE и так далее).
Добавить комментарий Отменить ответ
Этот сайт использует Akismet для борьбы со спамом. Узнайте, как обрабатываются ваши данные комментариев.
Источник
How to Change or Set System Locales in Linux
A locale is a set of environmental variables that defines the language, country, and character encoding settings (or any other special variant preferences) for your applications and shell session on a Linux system. These environmental variables are used by system libraries and locale-aware applications on the system.
Locale affects things such as the time/date format, the first day of the week, numbers, currency and many other values formatted in accordance with the language or region/country you set on a Linux system.
In this article, we will show how to view your currently installed system locale and how to set system’s locale in Linux.
How to View System Locale in Linux
To view information about the current installed locale, use the locale or localectl utility.
You can view more information about an environmental variable, for example LC_TIME, which stores the time and date format.
To display a list of all available locales use the following command.
How to Set System Locale in Linux
If you want to change or set system local, use the update-locale program. The LANG variable allows you to set the locale for the entire system.
The following command sets LANG to en_IN.UTF-8 and removes definitions for LANGUAGE.
To configure a specific locale parameter, edit the appropriate variable. For instance.
You can find global locale settings in the following files:
- /etc/default/locale – on Ubuntu/Debian
- /etc/locale.conf – on CentOS/RHEL
These files can also be edited manually using any of your favorite command line editors such as Vim or Nano, to configure your system locale.
To set a global locale for single user, you can simply open
/.bash_profile file and add the following lines.
For more information, see the locale, update-locale and localectl man pages.
That’s all! In this short article, we have explained how to view and set system local in Linux. If you have any questions, use the feedback form below to reach us.
If You Appreciate What We Do Here On TecMint, You Should Consider:
TecMint is the fastest growing and most trusted community site for any kind of Linux Articles, Guides and Books on the web. Millions of people visit TecMint! to search or browse the thousands of published articles available FREELY to all.
If you like what you are reading, please consider buying us a coffee ( or 2 ) as a token of appreciation.

We are thankful for your never ending support.
Источник


