- How to check CPU temperature on Ubuntu Linux
- Procedure for monitoring CPU and HDD temperatures on Ubuntu
- Check CPU temperature in Ubuntu Linux
- Install lm-sensors in Ubuntu Linux
- Display CPU temperature in the command line
- How can I show the CPU temperature in the GNOME panel
- How to install hddtemp in Ubuntu Linux
- How to see hard disk temperature in Ubuntu
- Use disks & storage GUI tool to view hard disk temp
- How to monitor Nvme ssd temperature in Ubuntu
- What to do when a laptop gets way too hot
- Conclusion
- How To Check CPU Temperature in Ubuntu Linux
- Check CPU temperature in Linux command line
- Check CPU temparature with Psensor GUI tool
- Install Psensor on Ubuntu 18.04 and 16.04
- Display temperature in the panel
- Start Psensor at each startup
- How to Check CPU Temperature on Linux
- Check CPU Temperature Using Lm-Sensors
- Check CPU Temperature Using Psensor
- Install Psensor
- Using Psensor
- Check Temperature Without Third-Party Utilities
How to check CPU temperature on Ubuntu Linux
H ow do I check CPU temperature in Ubuntu Linux using a command line and GUI tools on my Thinkpad laptop or Desktop computer?
One of the most common complaints is the overheating laptop, especially older models. Laptop components are tightly put together to each other. So there is very little room for air movement in thinner laptops. If your laptop overheats, it can cause some damage to your body as well as the hardware parts. Therefore monitoring hardware temperature is essential. In this tutorial, you will learn how to check CPU temperature in Ubuntu Linux.
| Tutorial details | |
|---|---|
| Difficulty level | Easy |
| Root privileges | Yes |
| Requirements | Ubuntu Linux |
| Est. reading time | 4 minutes |
Procedure for monitoring CPU and HDD temperatures on Ubuntu
- Open the terminal application.
- Install the lm-sensors and hddtemp packages in Ubuntu using the sudo apt install hddtemp lm-sensors .
- Run hddtemp command to see SSD and hard drive temperature in Ubuntu.
- Execute sensors command to find out CPU temperature in Ubuntu Linux.
Let us view processor temperature including SSD/HDD in details for Ubuntu desktop or server.
Check CPU temperature in Ubuntu Linux
The sensors command is used in Linux to show the current readings of all sensor chips including CPU temp. The hddtemp command will show you the temperature for SSD and HDD. You need to install and configure the lm-sensors package as well as hddtemp. You can search it using the following syntax:
apt-cache search lm-sensors
apt-cache search hddtemp
To install these packages on Ubuntu, run the following apt command or apt-get command in a terminal:
sudo apt update
sudo apt upgrade
Install lm-sensors in Ubuntu Linux
- Sensors embedded in CPUs and other super I/O chips
- Hardware monitoring chips accessed through I/O ports and SMBus/I2C bus on your system
Type the following command:
sudo sensors-detect
Display CPU temperature in the command line
How can I show the CPU temperature in the GNOME panel
Install Freon and Sensors extension for Ubuntu Linux desktop:
How to install hddtemp in Ubuntu Linux
Run the following apt command:
sudo apt install hddtemp
How to see hard disk temperature in Ubuntu
Simply type:
hddtemp
sudo hddtemp SATA:/dev/sda
Sample outputs:
Use disks & storage GUI tool to view hard disk temp
Hard disks have a built-in health-check tool called SMART (Self-Monitoring, Analysis, and Reporting Technology), which continually checks the disk for potential problems. SMART also warns you if the disk is about to fail, helping you avoid loss of important data. It also displays hard disk temperature. Run:
gnome-disks
How to monitor Nvme ssd temperature in Ubuntu
First install nvme-cli, run:
sudo apt install nvme-cli
Now use the nvme command as follows to get list of all NVMe devices and namespaces on machine:
sudo nvme list
Sample outputs:
sudo nvme smart-log /dev/nvme0
One can filter output using the grep command:
sudo nvme smart-log /dev/nvme0 | grep temperature
- No ads and tracking
- In-depth guides for developers and sysadmins at Opensourceflare✨
- Join my Patreon to support independent content creators and start reading latest guides:
- How to set up Redis sentinel cluster on Ubuntu or Debian Linux
- How To Set Up SSH Keys With YubiKey as two-factor authentication (U2F/FIDO2)
- How to set up Mariadb Galera cluster on Ubuntu or Debian Linux
- A podman tutorial for beginners – part I (run Linux containers without Docker and in daemonless mode)
- How to protect Linux against rogue USB devices using USBGuard
Join Patreon ➔
What to do when a laptop gets way too hot
- Open your laptop and remove (blow out) all the dust from fans and hardware.
- Buy a good laptop cooler to place your laptop on.
- Make sure your Thinkpad laptop positioned on a flat and hard surface.
- Shutdown unwanted Linux apps that use lots of CPU, ram, hard drive, and stress out your system.
- Above all use power saving mode on your laptop.
Conclusion
In conclusion, keep your laptop fan clean and dust free to reduce the temperature. In some extreme cases, you may need to replace a heat sink to keep a hot component such as a processor cool. Similarly, use the quality thermal paste to fill in the gaps and allow for better transfer of heat from the heat spreader to the heatsink. I hope to find out CPU temperature in Ubuntu Linux help you to keep your laptop healthy and use it for a longer time.
🐧 Get the latest tutorials on Linux, Open Source & DevOps via
Источник
How To Check CPU Temperature in Ubuntu Linux
Last updated April 20, 2020 By Abhishek Prakash 57 Comments
This quick tutorial shows you how to check the CPU temperature on Ubuntu and other Linux distributions with a help of a tool called Psensor.

Overheating of laptops is a common issue one faces these days. Monitoring hardware temperature may help you diagnose why your laptop is getting overheated. In this article, we’ll learn how to check the CPU temperature on Ubuntu.
Check CPU temperature in Linux command line
You can check the CPU temperature using a command line utility called sensors. Combine it with the watch command to keep on monitoring the CPU temperature in the terminal like this:
If your distribution doesn’t have sensors command installed already, you can use your distributions’ package manager to install either sensors or lm-sensors package.
You can see the CPU temperatures refreshed for each core every two seconds:
That was easy, wasn’t it? Let’s see how to do it graphically.
Check CPU temparature with Psensor GUI tool
We’re going to use a GUI tool, Psensor, that allows you to monitor hardware temperature on Linux. With Psensor you can:
- monitor the temperature of the motherboard and CPU sensors
- monitor the temperature of the NVidia GPUs
- monitor the temperature of the hard disk drives
- monitor the rotation speed of the fans
- monitor CPU usage
The latest version of Psensor also provides an applet indicator for Ubuntu and thus it makes the monitoring of hardware temperature even easier on Ubuntu. You can choose to display the temperature right in the top panel itself. It can even send a desktop notification when the temperature exceeds the limit.
Install Psensor on Ubuntu 18.04 and 16.04
Before you install Psensor, you need to install and configure lm-sensors, a command-line utility for hardware monitoring. If you want to measure hard disk temperature, you need to install hddtemp as well. To install these tools, run the following command in a terminal:
Then start the detection of your hardware sensors:
To make sure that it works, run the command below:
It will give you an output like:
acpitz-virtual-0
Adapter: Virtual device
temp1: +43.0°C (crit = +98.0°C)
coretemp-isa-0000
Adapter: ISA adapter
Physical id 0: +44.0°C (high = +100.0°C, crit = +100.0°C)
Core 0: +41.0°C (high = +100.0°C, crit = +100.0°C)
Core 1: +40.0°C (high = +100.0°C, crit = +100.0°C)
If everything seems alright, proceed with the installation of Psensor by using the command below:
Once installed, run the application by looking for it in the Unity Dash. On the first run, you should configure which stats you want to collect with Psensor.
Display temperature in the panel
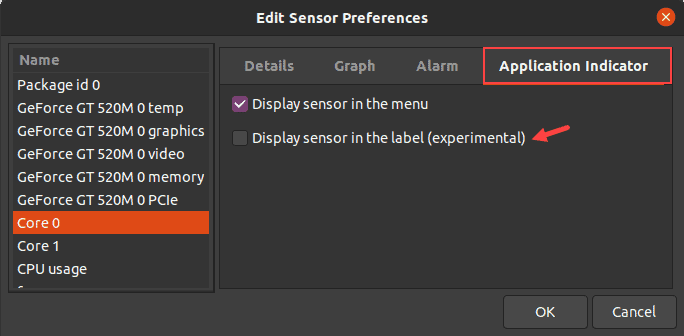
If you want to show the temperature in the top panel, go to Sensor Preferences:

Then under the Application Indicator menu, select the component for which you want to display the temperature and then check the Display sensor in the label option.

Start Psensor at each startup
Go to Preferences->Startup and then check Launch on session startup to start Psensor at each boot.

That’s it. Everything you need for monitoring and checking your CPU temperature is here. You can keep an eye on it and it may help you find out which process is overheating your computer.
However, do note that it’s often the hardware that causes overheating. If you use a desktop computer, you should regularly clean it. You can refer to this article about reducing CPU temperature.
I hope you find this article useful. Please take a moment to share the article on social media, Hacker News and other such websites. Thank you.
Like what you read? Please share it with others.
Источник
How to Check CPU Temperature on Linux
Home » SysAdmin » How to Check CPU Temperature on Linux
Like any electrical component, CPUs generate heat when being used. Some resource-demanding programs cause the CPU to increase the clock speed, which results in higher temperatures. Dust buildup also causes the CPU to overheat.
High temperatures shorten the lifespan of sensitive components, so keeping track of CPU temperatures is crucial. This way, you prevent performance throttling or component damage.
In this tutorial, you will learn how to use different tools and in-built utilities to check CPU temperature on Linux machines.

- A machine running Linux
- An account with sudo/root privileges
Check CPU Temperature Using Lm-Sensors
Lm-sensors is a command-line utility for hardware monitoring. Use the tool to check the temperature of the CPU and other components. Follow these steps to install and configure Lm-sensors:
1. Open the terminal and install these packages using a package manager for your distribution. In Ubuntu, use the following command:
Wait for the lm-sensors and hddtemp to finish downloading and installing.
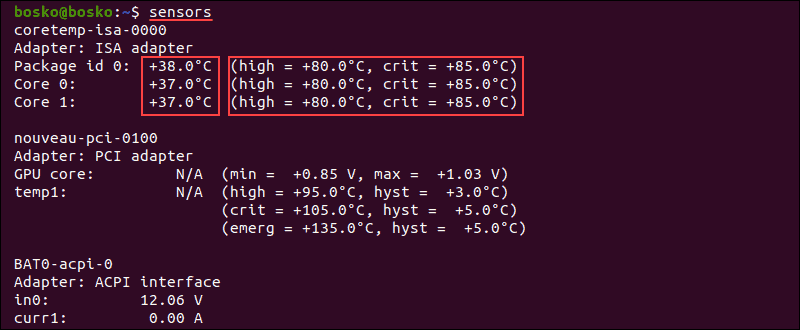
2. Execute the sensors command to see the CPU temperature. The output shows the current temperature readings of all sensors in the machine. The results include the temperature of each core and maximum thresholds.
3. To check SSD and hard drive temperatures, execute the following command:

The output shows the temperature of the selected disk.
4. To see which system components you can monitor, run sudo sensors-detect .
Answer YES to multiple scanning requests until the system scan is complete.
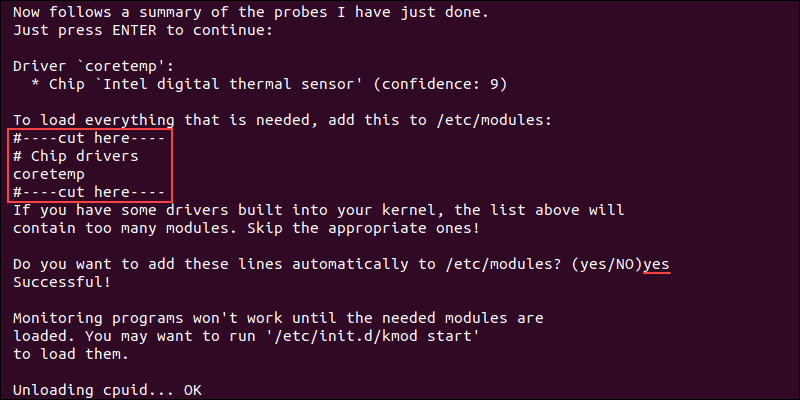
When the scan completes, the output shows the summary.
5. To ensure that system monitoring works, load the needed modules using the following command:

6. To run the sensors command repeatedly and get real-time data in the terminal, execute the following command:
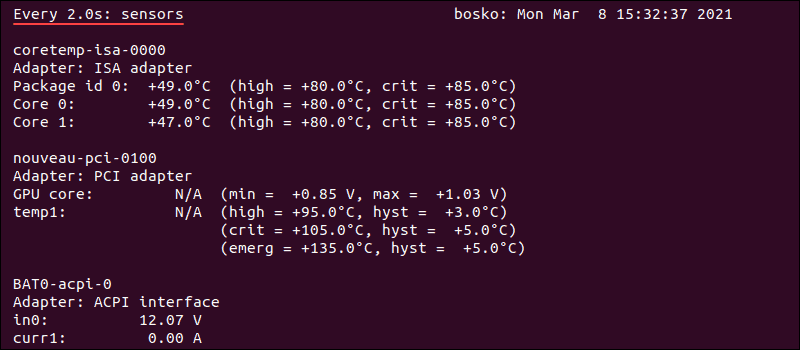
The output refreshes every two seconds and displays the current CPU temperature reading.
Note: To check CPU usage on Linux, read our tutorial on How to check CPU usage.
Check CPU Temperature Using Psensor
Psensor is a GUI app that allows you to monitor the temperature of various system components. This utility also allows you to monitor CPU usage and fan speed.
Psensor includes an applet indicator for Ubuntu, allowing you to display the temperature in the top panel to notify you when the temperatures get too high.
Install Psensor
Before installing Psensor, you need to install and configure Lm-sensors.
1. Run this command to install the necessary packages:
2. Next, scan for sensors in your machine:
Answer YES to any scan requests until the scan is completed.
3. To make sure the packages are installed, execute the sensors command.
4. Update the package repository with sudo apt update .
5. Install Psensor using the following command:
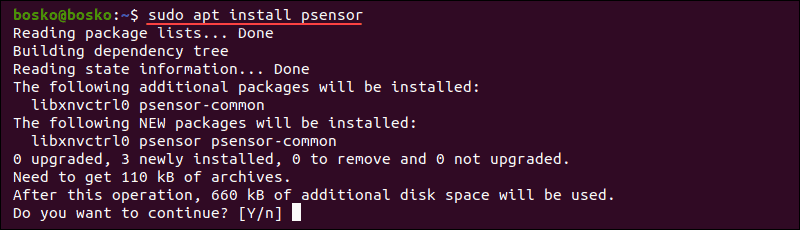
Answer YES and wait for the installation to finish.
Using Psensor
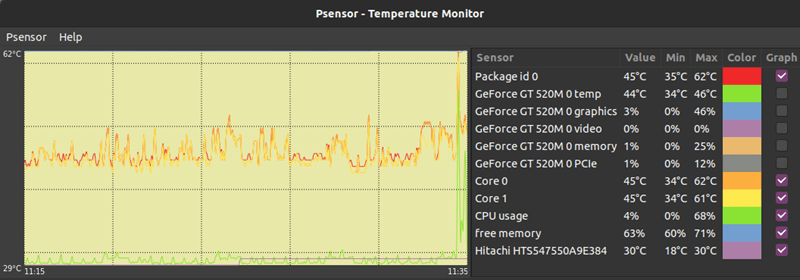
Search for Psensor in the app menu and open the utility. The app displays a graph of the selected values and shows the CPU temperature, CPU and memory usage, free RAM, GPU temperature, and HDD temperature.
To configure Psensor and set which stats you want to see, follow these steps:
1. Click Psensor in the menu bar, followed by Preferences.
2. Check off the boxes for the options you want – whether Psensor launches on system startup, the update interval, graph colors, etc.

3. To show CPU or HDD temperatures in the top panel, go to Sensor Preferences under the Application Indicator. Enable the Display sensor in the label option.
Check Temperature Without Third-Party Utilities
There is a way to use the in-built utilities to check the CPU temperature if you don’t want to use third-party apps.
1. To check the CPU temperature without installing a third-party app, use the following command:

The output shows the CPU temperature in the five-digit format. Here, 49000 means 49C.
2. If you get several thermal zones and different temperatures, execute the following command to see what a single thermal zone represents:
For example, run cat /sys/class/thermal/thermal_zone2/type to see the type of thermal zone 2.
The CPU temperature is in the zone labeled x86_pkg_temp.
3. To see what all the thermal zones are referring to, use:

The output shows the last stored temperature for that thermal zone in degrees Celsius. In this example, there is only one thermal zone, labeled x86_pkg_temp, which represents the CPU temperature.
You now know how to check CPU temperature on Linux using various utilities. The guide also showed how to configure the tools to display other information, such as GPU and HDD temperature.
Источник


