- UNIX / Linux Find File Owner Name
- How do I find out owner / group name for a file?
- ls -l file mode (permissions)
- Linux show file owner
- ls command
- Permission details
- The first character: file type
- Permissions abbreviations
- The permissions characters
- The first number
- Owner and group
- The rest
- Share this information:
- Linux / Unix Find All The Files Owned By a Particular User / Group
- Linux / Unix Find All The Files Owned By a Particular User / Group
- Find file owned by a group
- Find all *.mp4 files by group vivek
- Find file owned by user
- How to find files by users vivek and wendy
- Chown Command: Change Owner of File in Linux
- Linux Chown Command Syntax
- How to Check Ownership of a File in Linux
- How to Change the Owner of a File
- Change the Owner of a File With UID
- Change Ownership of Multiple Linux Files
- How to Change the Group of a File
- Change the Group of a File Using GID
- Change Owner and the Group
- Change Group to a Users Login Group
- Transfer Ownership and Group Settings from One File to Another
- Check Owner and Group Before Making Changes
- Check Owner Only
- Check Group Only
- How to Recursively Change File Ownership
- Chown Command and Symbolic Links
- Display Chown Command Process Details
- Suppress Chown Command Errors
UNIX / Linux Find File Owner Name
Q. How do I find out the name of file / directory owner under UNIX / Linux operating systems?
A. You can use ls -l command (list information about the FILEs) to find our the file / directory owner and group names.
The -l option is known as long format which displays Unix / Linux / BSD file types, permissions, number of hard links, owner, group, size, date, and filename. In some environments and UNIX versions / Linux distributions, providing the option –color (for GNU ls) or -G (FreeBSD ls) causes ls to highlight different types of files with different colors.
(Fig. 01: Linux file colors)
(Fig. 02: Understanding Linux / UNIX file colors code [ image credit wikipedia] )
How do I find out owner / group name for a file?
Type the ls -l command at a shell prompt:
$ ls -l filename
Sample output:
- No ads and tracking
- In-depth guides for developers and sysadmins at Opensourceflare✨
- Join my Patreon to support independent content creators and start reading latest guides:
- How to set up Redis sentinel cluster on Ubuntu or Debian Linux
- How To Set Up SSH Keys With YubiKey as two-factor authentication (U2F/FIDO2)
- How to set up Mariadb Galera cluster on Ubuntu or Debian Linux
- A podman tutorial for beginners – part I (run Linux containers without Docker and in daemonless mode)
- How to protect Linux against rogue USB devices using USBGuard
Join Patreon ➔
- -rw-r–r– : file mode
- 1 – number of links
- vivek – Owner name (if user name is not a known user, the numeric user id displayed)
- admin – Group name (if group name is not a known group, the numeric group id displayed)
- 2558 – number of bytes in the file (file size)
- Jan 8 07:41 – abbreviated month, day-of-month file was
last modified, hour file last modified, minute file last modified - filename – File name / pathname
ls -l file mode (permissions)
Quoting from the unix ls command man page – the file mode printed under the -l option consists of the entry type and the permissions. The entry type character describes the type of file, as follows:
| – | Regular file. |
| b | Block special file. |
| c | Character special file. |
| d | Directory. |
| l | Symbolic link. |
| p | FIFO. |
| s | Socket. |
| w | Whiteout. |
The next three fields are three characters each: owner permissions, group permissions, and other permissions. Each field has three character positions:
- If r, the file is readable; if -, it is not readable.
- If w, the file is writable; if -, it is not writable.
- The first of the following that applies:
- S : If in the owner permissions, the file is not executable and set-user-ID mode is set. If in the group permissions, the file is not executable and set-group-ID mode is set.
- s : If in the owner permissions, the file is executable and set-user-ID mode is set. If in the group permissions, the file is executable and set group-ID mode is set.
- x : The file is executable or the directory is searchable.
- – : The file is neither readable, writable, executable, nor set-user-ID nor set-group-ID mode, nor sticky.
- T : The sticky bit is set (mode 1000), but not execute or search permission.
- t : The sticky bit is set (mode 1000), and is search able or executable.
See ls command man page for more information:
$ man ls
🐧 Get the latest tutorials on Linux, Open Source & DevOps via
Источник
Linux show file owner
Last updated on: 2019-03-07
Authored by: Jered Heeschen
This article explains how to use the ls command to check Linux® file permissions. Being able to check the permissions on a file is useful, especially for troubleshooting. You can ensure that a user can read a particular file, for example, or examine a directory structure to ensure that users can follow the hierarchy to the files that they need.
For a more in depth discussion on Linux file permissions, see Linux file permission concepts.
ls command
Use the ls command (the first letter is a lowercase L) to see what files are in a directory. When run by itself, ls returns a list of the current working directory. You can also specify a directory to list. The following example shows a list of the first few files in the /etc directory on a Gentoo system.
The -h option changes the way file sizes are displayed. When you use the -h option, files sizes are displayed in the human-readable format of kilobytes, megabytes, and so on, rather than in raw bytes. Other linux tools such as df also support this flag. The command df -h shows current disk usage in a easier to read format.
To display hidden files (files with names that start with a period), use the -a option. For example, if you use only ls to look at the root home directory on a clean Linux installation, no files are returned:
However, if you add the -a option, the ls command returns a list of files:
Files that start with a period are often system files and application settings files, and you usually don’t want them included in directory lists. But it’s important to know that they’re there and how to see them. The .bashrc file is especially useful to know about because it contains user environment settings that you can change.
If you combine the -a option with the -l option (see the next section) into -la , you get all the details of the hidden files:
Consider the single period and double period in both directory lists:
The single period (.) refers to the directory itself. This is convenient if you want it to run a command and reference your current directory (for example, when you want to copy a file there).
The double period (..) refers to the parent directory. If you type cd .. the directory changes to the one above the one you’re in, in the file system hierarchy. For example, if your current directory is /root , typing cd .. would take you to / , the very top of the hierarchy.
To get more information about the files in a directory, use the -l option with ls, as shown in the following example.
The file names are on the far right side of each line, and the file details precede the names. The necessary details to check file permissions are (1) the series of letters and dashes on the far left of each line, and (2) the two columns that have root in them (in the preceding example). The rest of this article explains how to interpret and use these details.
Permission details
This section explains the series of letters and dashes that define the file permissions.
The first character: file type
In the preceding examples, the first character in each list was either a dash (-) or the letter d .
A dash (-) indicates that the file is a regular file.
The letter d indicates that the file is a directory, which is basically a special kind of file.
A special file type that you might see is a symlink, sometimes called a soft link. It begins with a lowercase L , as shown in the following example:
A symlink is a pointer to another location in the file system.
Permissions abbreviations
Permissions for files are represented by the following letters.
- r refers to the read permission.
- w refers to the write permission.
- x refers to the execute permission.
The permissions characters
Consider the following example:
The first trio of letters after the file type in a file list ( rwx ) shows the permissions for the user , or file owner.
The next trio of characters (also rwx ) shows the permissions for the group category.
The last trio of characters ( r-x ) shows the permissions for the final category, other . In this example, users who are neither the file owner nor in the group have read and execute permissions but not write, as indicated by the dash (-) in the middle position.
Notice the specific order to the permissions in a trio: read, write, execute. A dash in place of a letter for a permission means that category doesn’t have that permission.
The first number
The number listed after the permissions indicates the link count of a file or the number of contained directory entries, for a directory. This number is not relevant for permissions.
Owner and group
After the number of links, two names are listed. In the preceding example, the names are root and mail .
The first name indicates the owner of the file. The user permissions apply to the owner of the file, so in this case, the user ‘root’ has read, write, and execute permissions for this directory.
The second name is the file’s group. The group permissions apply to any user in the same group as the file, so in this case, those permissions apply to anyone in the mail group.
The rest
The remainder of the file details are the size of the file, the date and time that the file was created or last modified, and the file name.
Share this information:
©2020 Rackspace US, Inc.
Except where otherwise noted, content on this site is licensed under a Creative Commons Attribution-NonCommercial-NoDerivs 3.0 Unported License
Источник
Linux / Unix Find All The Files Owned By a Particular User / Group
Linux / Unix Find All The Files Owned By a Particular User / Group
Let us see how to use the find command to locate all files/folders owned by one or many users on Linux or Unix-like system.
Find file owned by a group
| Tutorial details | |
|---|---|
| Difficulty level | Easy |
| Root privileges | Yes |
| Requirements | Linux or Unix |
| Est. reading time | 2m |
Use the following syntax to find files owned by users(s) in Linux/Unix:
find directory-location -group < group-name >-name < file-name >
Where,
- directory-location : Locate the file in this directory path.
- -group
: Find the file belongs to group-name. - -name
: The file name or a search pattern
In this example, locate or find all files belongs to a group called “ftpusers” in the /home directory:
# find /home -group ftpusers
To find all *.c file belongs to a group called “ftpusers” in /data/project directory, run:
# find /data/project -group ftpusers -name «*.c»
OR do case insensitive search:
# find /data/project -group ftpusers -iname «*.c»
Find all *.mp4 files by group vivek
Find file owned by user
The syntax is:
find directory-location -user < username >-name < file-name >
Where,
- directory-location : Locate files or directories in this directory location.
- -user < user-name >: Find the file belongs to user.
- -name
: File name or pattern.
In this example, locate or find all file belongs to a user called “vivek” in /var directory:
# find /var -user vivek
To find all *.pl (perl files) file belongs to a user called “vivek” in /var/www directory, enter:
# find /var/www -user vivek -name «*.pl»
- No ads and tracking
- In-depth guides for developers and sysadmins at Opensourceflare✨
- Join my Patreon to support independent content creators and start reading latest guides:
- How to set up Redis sentinel cluster on Ubuntu or Debian Linux
- How To Set Up SSH Keys With YubiKey as two-factor authentication (U2F/FIDO2)
- How to set up Mariadb Galera cluster on Ubuntu or Debian Linux
- A podman tutorial for beginners – part I (run Linux containers without Docker and in daemonless mode)
- How to protect Linux against rogue USB devices using USBGuard
Join Patreon ➔
How to find files by users vivek and wendy
### match files only ##
# find / -type f -user vivek -o -user wendy
### match dirs only ##
# find / -type d -user vivek -o -user wendy
Conclusion
You just learned how to find all of the files created by a particular user/group and display them to the screen. For more info see find command man page.
🐧 Get the latest tutorials on Linux, Open Source & DevOps via
Источник
Chown Command: Change Owner of File in Linux
Home » SysAdmin » Chown Command: Change Owner of File in Linux
The chown command changes user ownership of a file, directory, or link in Linux. Every file is associated with an owning user or group. It is critical to configure file and folder permissions properly.
In this tutorial, learn how to use the Linux chown command with examples provided.

- Linux or UNIX-like system
- Access to a terminal/command line
- A user with sudo privileges to change the ownership. Remember to run the commands with sudo to execute them properly.
Linux Chown Command Syntax
The basic chown command syntax consists of a few segments. The help file shows the following format:
- [OPTIONS] – the command can be used with or without additional options.
- [USER] – the username or the numeric user ID of the new owner of a file.
- [:] – use the colon when changing a group of a file.
- [GROUP] – changing the group ownership of a file is optional.
- FILE – the target file.
Superuser permissions are necessary to execute the chown command.
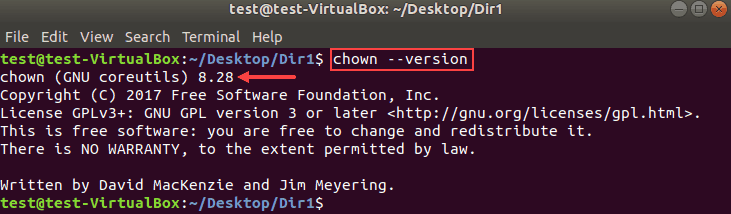
In this guide, we tested the command examples with the chown version 8.28 in Ubuntu 18.04.2 LTS.
To check the chown version on your machine, enter:
The output will look similar to this:
How to Check Ownership of a File in Linux
First, you need to know the original file owner or group before making ownership changes using the chown command.
To check the group or ownership of Linux files and directories in the current location, run the following command:
An example output of the ls command looks like this:

How to Change the Owner of a File
Changing the owner of a file with chown requires you to specify the new owner and the file. The format of the command is:
The following command changes the ownership of a file sample from root to the user test:
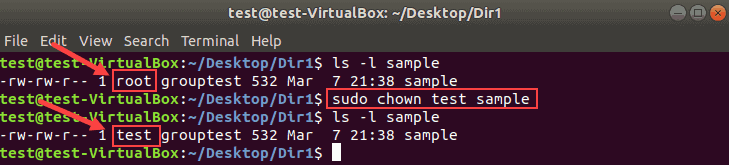
Use the same format to change the ownership for both files and directories.
Change the Owner of a File With UID
Instead of a username, you can specify a user ID to change the ownership of a file.
Make sure there is no user with the same name as the numeric UID. If there is, the chown command gives priority to the username, not the UID.
Note: To check a user’s ID, run id -u USERNAME from the terminal.
Change Ownership of Multiple Linux Files
List the target file names after the new user to change the ownership for multiple files. Use single spaces between the file names.
In the following example, root will be the new owner of files sample2 and sample3.
Combine file names and directory names to change their ownership with one command. For example:
Do not forget that the commands are case sensitive.
How to Change the Group of a File
With chown, you can change a group for a file or directory without changing the owning user. The result is the same as using the chgrp command.
Run the chown command using the colon and a group name:
The following example changes the group of the file sample3 from grouptest to group3.
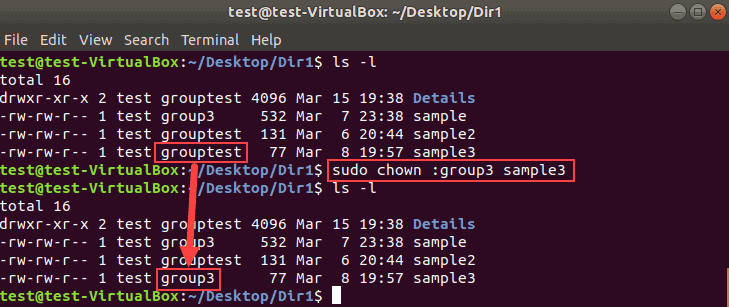
List multiple names of files or directories to make bulk changes.
Change the Group of a File Using GID
Similar to UID, use a group ID (GID) instead of a group name to change the group of a file.
Change Owner and the Group
To assign a new owner of a file and change its group at the same time, run the chown command in this format:
Therefore, to set linuxuser as the new owner and group2 as the new group of the file sample2:
Remember that there are no spaces before or after the colon.
Change Group to a Users Login Group
The chown command assigns the owner’s login group to the file when no group is specified.
To do so, define a new user followed by a colon, space, and the target file:
The following example changes the group ownership to the login group of linuxuser:
Transfer Ownership and Group Settings from One File to Another
Rather than changing the ownership to a specific user, you can use the owner and a group of a reference file.
Add the —reference option to the chown command to copy the settings from one file to another:
Remember to type in the names of the files correctly to avoid the error message:
![]()
Check Owner and Group Before Making Changes
The chown command —from option lets you verify the current owner and group and then apply changes.
The chown syntax for checking both the user and group looks like this:
The example below shows we first verified the ownership and the group of the file sample3:
Then chown changed the owner to linuxuser and the group to group3.
Check Owner Only
The option —from can be used to validate only the current user of a file.
Check Group Only
Similar to the previous section, you can validate only the group of a file using the option —from .
Here is an example where we verified the current group before changing it:
Remember to use the colon for both group names to avoid error messages.
How to Recursively Change File Ownership
The chown command allows changing the ownership of all files and subdirectories within a specified directory. Add the -R option to the command to do so:
In the following example, we will recursively change the owner and the group for all files and directories in Dir1.
Chown Command and Symbolic Links
To change the owner of a symbolic link, use the -h option. Otherwise, the ownership of the linked file will be changed.
The following image shows how symbolic links behave when -h is omitted.
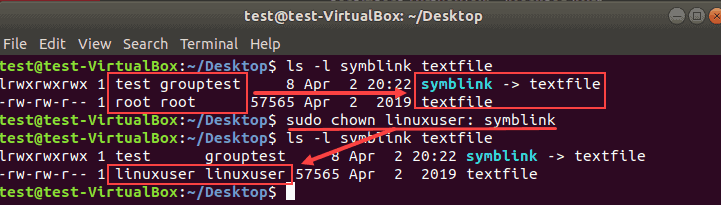
The owner and group of the symbolic link remain intact. Instead, the owner and the group of the file textfile changed.
To push the changes to the link, run the chown command with the -h flag:
In the following example, we changed the owner and group of a symbolic link.

Display Chown Command Process Details
By default, the terminal does not display the chown process information. To see what happens under the hood, use one of the two command line flags:
- The option –v produces the process details even when the ownership stays the same.
- The option –c displays the output information only when an owner or group of the target file changes.
For example, if we specify the current owner as a new owner of the file:
The terminal produces the following output:

Switch from -v to -c and there will be no messages in this case. This happens because there are no owner or group changes.
The information is particularly useful with the recursive chown command:

In this example, the output lists all objects affected after running the command.
Suppress Chown Command Errors
To avoid seeing potential error messages when running the chown command, use the -f option:
The example below shows the error message for a non-existent file or directory:

Adding the -f flag suppresses most error messages. However, if you specify an invalid username, the error message appears:

Now you know how to use chown command in Linux to change a file’s user and/or group ownership.
Take extra caution when changing the group or ownership of a file or directories.
Источник


