- 16 команд для проверки аппаратной части компьютера в Linux
- Информация о комплектации компьютера
- 1. lscpu
- 2. lshw – список аппаратных устройств
- 3. hwinfo – информация об аппаратуре компьютера
- 4. lspci – список устройств PCI
- 5. lsscsi — список устройств scsi
- 6. lsusb – подробный список шин и устройств usb
- 7. Inxi
- 8. lsblk — список блочных устройств
- 9. df – дисковое пространство файловых систем
- 10. Pydf – команда df, написанная на языке Python
- 11. fdisk
- 12. mount
- 13. free – проверка оперативной памяти
- 14. dmidecode
- 15. Файлы /proc
- 16. hdparm
- Заключение
- How to Find Out What Motherboard You Have in Linux or Ubuntu
- Method 1: Finding Out what Motherboard you Have with the Terminal
- Method 2: Graphically Find Your Motherboard Using hardinfo
- 16 Commands to Check Hardware Information on Linux
- Hardware information
- 1. lscpu
- 2. lshw — List Hardware
- 3. hwinfo — Hardware Information
- 4. lspci — List PCI
- 5. lsscsi — List scsi devices
- 6. lsusb — List usb buses and device details
- 7. Inxi
- 8. lsblk — List block devices
- 9. df — disk space of file systems
- 10. Pydf — Python df
- 11. fdisk
- 12. mount
- 13. free — Check RAM
- 14. dmidecode
- 15. /proc files
- 16. hdparm
- Summary
- 48 thoughts on “ 16 Commands to Check Hardware Information on Linux ”
16 команд для проверки аппаратной части компьютера в Linux
Информация о комплектации компьютера
Точно также, как для всего прочего, в вашей системе Linux есть много команд для получения информацию об аппаратной части вашего компьютера. Некоторые команды сообщают информацию только о конкретных компонентах оборудования, например, процессоре или памяти, а другие — выдают информацию сразу о нескольких устройствах.
В данной статье кратко рассказывается о нескольких наиболее часто используемых командах, предназначенных для получения информации и особенностях настройки различных периферийных устройств и компонентах компьютера. Среди рассматриваемых — команды lscpu, hwinfo, lshw, dmidecode, lspci и другие.
1. lscpu
Команда lscpu выдает информацию о процессоре и его составляющих. В ней нет каких-либо дополнительных параметров или функциональных возможностей.
2. lshw – список аппаратных устройств
Утилита общего назначения, которая сообщает подробную и краткую информацию о нескольких различных аппаратных устройствах, таких как процессор, память, диск, контроллеры usb, сетевые адаптеры и т.д. Команда lscpu извлекает информацию из различных файлов /proc.
Если вы хотите больше узнать о команде lshw, то обратите внимание на пост Получаем интфомацию в Linux об аппаратных частях компьютера с помощью команды lshw .
3. hwinfo – информация об аппаратуре компьютера
Утилита hwinfo является еще одной универсальной утилитой зондирования аппаратуры, которая может сообщить подробную и краткую информацию о многих различных аппаратных компонентах, причем может сообщить больше, чем утилита lshw.
4. lspci – список устройств PCI
Команда lspci выдает список всех шин PCI, а также подробную информация об устройствах, которые к ним подключены. Под эту категорию подпадают следующие устройства — адаптер vga, графическая карта, сетевой адаптер, порты usb, контроллеры sata и т.д.
Отфильтруйте информацию о конкретном устройстве с помощью команды grep.
5. lsscsi — список устройств scsi
Выдается список устройств scsi/sata, например, жестких дисков и оптических приводов.
6. lsusb – подробный список шин и устройств usb
Эта команда показывает информацию о контроллерах usb и подробные сведения о подключенных к ним устройствах. По умолчанию выдается краткая информация. Для того, чтобы о каждом порте usb получить подробную информацию, используйте параметр «-v».
В системе, информация о которой приведена выше, один порт usb используется для подключения мыши.
7. Inxi
Inxi является мега скриптом bash, состоящим из 10000 строк кода, с помощью которого из разных источников и команд системы будет получена подробная информация об аппаратном обеспечении и будет создан отчет в виде, позволяющим его читать пользователям, которые не являются техническими специалистами.

8. lsblk — список блочных устройств
Перечисляется информация о всех блочных устройствах, которыми являются разделы жестких дисков и других устройств хранения данных, например, оптических приводов и флэш-накопителей
9. df – дисковое пространство файловых систем
Отчеты о различных разделах, об их точках монтирования и о том, сколько в каждом разделе есть свободного места.
10. Pydf – команда df, написанная на языке Python
Улучшенный вариант команды df , написанной на языке python, который выдает информацию в цвете, что выглядит лучше, чем информация, выдаваемая командой df
11. fdisk
Fdisk является утилитой, предназначенной для изменения разделов жестких дисков, и ей также можно пользоваться для получения информации о списке имеющихся разделов.
12. mount
Команда mount используется для монтирования/демонтирования, а также для просмотра смонтированных файловых систем.
Опять же, используйте команду grep для отфильтровывания информации только о тех файловых системах, которые вам интересны
13. free – проверка оперативной памяти
С помощью команды free проверьте объем используемой, свободной и общий объема оперативной памяти, имеющейся в системе.
14. dmidecode
Команда dmidecode отличается от всех других команд. Она извлекает информацию об оборудовании, читая для этого данные из структур данных SMBOIS (которые также называются таблицами DMI).
Подробности смотрите на странице man.
15. Файлы /proc
Во многих виртуальных файлах каталога /proc содержится информация об аппаратном обеспечении и о конфигурациях. Ниже приведены некоторые из них.
Информация о процессоре/памяти
Информация о Linux/ядре
16. hdparm
Команда hdparm получает информацию об устройствах sata, например, жестких дисков.
Заключение
В каждой из команд используется чуть-чуть иной способ извлечения информации, и вам для, чтобы получить определенную информацию об оборудовании, возможно, потребуется попробовать более одной команды. Но все они есть в большинстве дистрибутивов Linux и их легко можно установить из репозиториев, используемых по умолчанию.
Для тех, кто не хочет запоминать и вводить команды, на рабочем столе есть графические инструментальные средства. Hardinfo и I-nex — некоторые из популярных инструментальных средств, с помощью которых можно получить подробную информацию о большом количестве различных аппаратных компонентов.
Источник
How to Find Out What Motherboard You Have in Linux or Ubuntu
Just like with RAM cards and any USB, PCI or PCI Express devices that you might have attached to your system, Linux provides you with tools to find the make and model of the motherboard you have installed. This is particularly useful because while it can be difficult to get at the other devices to have a look at them, the motherboard is in even a worse spot when it comes to inspection.
Desktop workstations lock their motherboards in a case, and small netbooks or tablets might have a motherboard that’s impossible to access. You can perform an inspection with the command line or by mousing around in a graphical program. Both methods give you essentially the same information.
Method 1: Finding Out what Motherboard you Have with the Terminal
You’ll need to start a terminal window up by holding down Ctrl+Alt+T or by clicking on the Applications Menu, pointing to System Tools and then clicking on Terminal. Ubuntu users who still have the Unity Dash can search for the word Terminal at it and then select the option that comes up.
In any case, you should now be at a normal bash command prompt. From here, type sudo dmidecode | grep -A3 ‘^System Information’ and then push the enter key. You’ll need to type your administrative password if you’re working at a fresh prompt, since a normal user account can’t go poking around with the motherboard.

Polling the board should take nearly no time at all. On the low-powered i386 netbook we tested this command on, it took less than half a second. If there’s any sort of delay, then you might want to make sure that you entered it correctly. You can always swipe the text from this article with your mouse and then copy it. Click on the Edit menu in your terminal then select paste. Holding down Shift+Ctrl+V also works to paste copied text in a terminal.
As long as it ran correctly, then you’re completely done with no further playing around. Generally, motherboards themselves don’t actually have version numbers, as versions are reserved for software. The version number that gets displayed here is referencing the firmware we had installed in the BIOS. If you run this on a more modern UEFI system, then you might see a bit of additional information.
If you’re interested in reading more about your machine’s logic systems, then you have another option to run from the terminal if you’d like. Nevertheless, for most people the above technique was more than enough. It doesn’t require any additional playing around, though, so you can feel free to run it from the same terminal screen that you’re already at.
Try typing sudo dmidecode -t baseboard at the terminal and push enter to receive a mess of information about the baseboard that you’re using in your computer. While this will give you more information than the previous command would have, it will still be in a human-readable format, which makes it useful for troubleshooting.
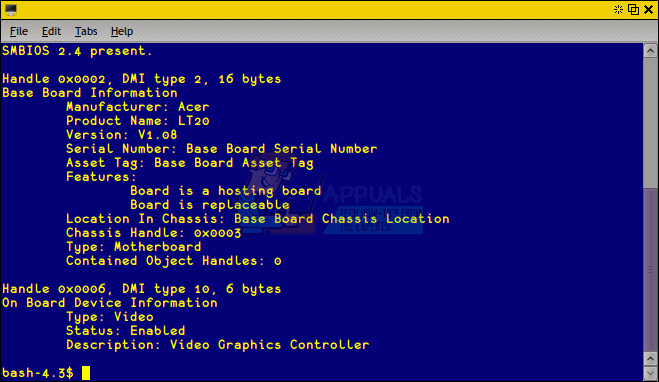
This command will additionally tell you whether or not the logic board that you’re working with is replaceable and where it is in the chassis. Since it uses grep, it still sorts it out quite nice however. Once again, the version number it returns is more than likely related to firmware. You might notice that the manufacturer name differs from the above command, which is the result of the vendor and manufacturer of a piece of hardware not always being completely the same company.
Method 2: Graphically Find Your Motherboard Using hardinfo
If you’re using LXDE or some GNOME implementations, then you have a tool called hardinfo installed. This does the same job, albeit graphically. Most users will want to use the command line app above, but the old Unix rule about there being more than one way to accomplish a task applies here. If you’re using a desktop environment that includes it, then click on the Application menu, point to System Tools and then click on System Profiler and Benchmark. This should go for most compatible re-spins of popular Linux distributions. For instance, Ubuntu got re-spun as Lubuntu with the LXDE desktop environment and there are versions of Debian and Fedora that come with this tool.
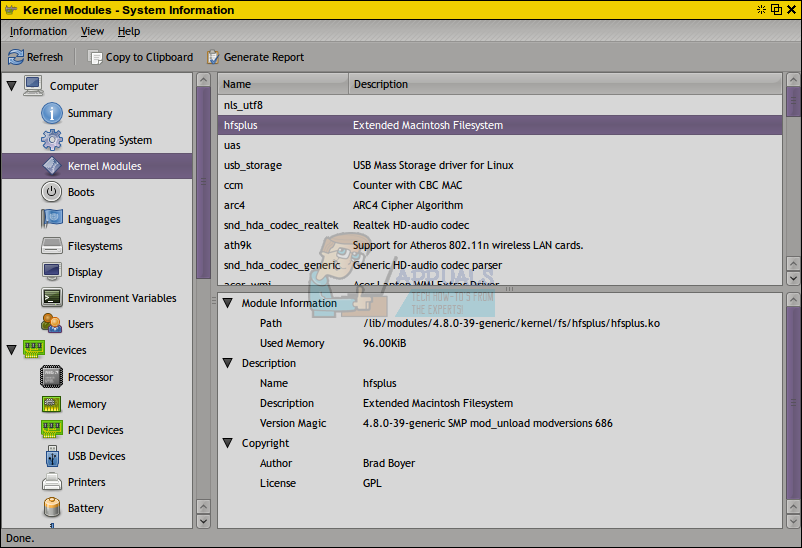
When it first starts, hardinfo may greet you with a blank screen or focus on Kernel Modules or something else that’s not relevant to the information that you’re trying to find right now.
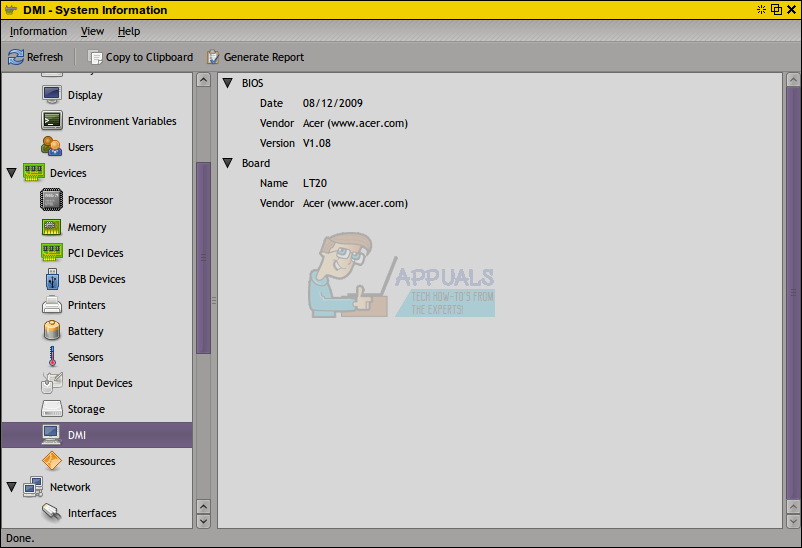
Scroll down to where it reads Devices on the left-hand side of the window and then click on DMI to find the same information that you would have in the command line app.
Even though it might take a couple extra seconds, this method usually won’t require you to use any administrative access, so it’s useful in situations where sudo doesn’t work. If you don’t have this program but you would like a copy, then you can head back over to the terminal window from the first method. Type sudo apt-get install hardinfo and push enter You’ll be asked to push the y key in order to approve the install. This gives you the option of running hardinfo on another type of desktop environment that might not come with it, such as the popular lightweight Xfce4 environment or something more full-featured like KDE Plasma.
If it doesn’t add an application shortcut to your menu, then you can just type hardinfo to run it from the terminal.
Once again, you might have noticed that the name of the manufacturer doesn’t stay the same. The reason for this is related to digital hardware vending practices. That being said, as long as you know one of the names and a model number you should be able to look documentation or replacement parts up online. In fact, if you do a quick search you might find that there are many different system boards packaged under different names that feature the same design as yours.
Источник
16 Commands to Check Hardware Information on Linux
Hardware information
Like for every thing, there are plenty of commands to check information about the hardware of your linux system.
Some commands report only specific hardware components like cpu or memory while the rest cover multiple hardware units.
This post takes a quick look at some of the most commonly used commands to check information and configuration details about various hardware peripherals and devices.
The list includes lscpu, hwinfo, lshw, dmidecode, lspci etc.
1. lscpu
The lscpu command reports information about the cpu and processing units. It does not have any further options or functionality.
2. lshw — List Hardware
A general purpose utility, that reports detailed and brief information about multiple different hardware units such as cpu, memory, disk, usb controllers, network adapters etc. Lshw extracts the information from different /proc files.
Check out the following post to learn more about lshw
3. hwinfo — Hardware Information
Hwinfo is another general purpose hardware probing utility that can report detailed and brief information about multiple different hardware components, and more than what lshw can report.
4. lspci — List PCI
The lspci command lists out all the pci buses and details about the devices connected to them.
The vga adapter, graphics card, network adapter, usb ports, sata controllers, etc all fall under this category.
Filter out specific device information with grep.
5. lsscsi — List scsi devices
Lists out the scsi/sata devices like hard drives and optical drives.
6. lsusb — List usb buses and device details
This command shows the USB controllers and details about devices connected to them. By default brief information is printed. Use the verbose option «-v» to print detailed information about each usb port
On the above system, 1 usb port is being used by the mouse.
7. Inxi
Inxi is a 10K line mega bash script that fetches hardware details from multiple different sources and commands on the system, and generates a beautiful looking report that non technical users can read easily.

8. lsblk — List block devices
List out information all block devices, which are the hard drive partitions and other storage devices like optical drives and flash drives
9. df — disk space of file systems
Reports various partitions, their mount points and the used and available space on each.
10. Pydf — Python df
An improved df version written in python, that displays colored output that looks better than df
11. fdisk
Fdisk is a utility to modify partitions on hard drives, and can be used to list out the partition information as well.
12. mount
The mount is used to mount/unmount and view mounted file systems.
Again, use grep to filter out only those file systems that you want to see
13. free — Check RAM
Check the amount of used, free and total amount of RAM on system with the free command.
14. dmidecode
The dmidecode command is different from all other commands. It extracts hardware information by reading data from the SMBOIS data structures (also called DMI tables).
Check out the man page for more details.
15. /proc files
Many of the virtual files in the /proc directory contain information about hardware and configurations. Here are some of them
16. hdparm
The hdparm command gets information about sata devices like hard disks.
Summary
Each of the command has a slightly different method of extracting information, and you may need to try more than one of them, while looking for specific hardware details. However they are available across most linux distros, and can be easily installed from the default repositories.
On the desktop there are gui tools, for those who do not want to memorise and type commands. Hardinfo, I-nex are some of the popular ones that provide detailed information about multiple different hardware components.
A Tech Enthusiast, Blogger, Linux Fan and a Software Developer. Writes about Computer hardware, Linux and Open Source software and coding in Python, Php and Javascript. He can be reached at [email protected] .
48 thoughts on “ 16 Commands to Check Hardware Information on Linux ”
How i can check memory in CPU. Example OPT, Efuse
Thanks for this. I’m just getting going on a VPS and this helped me discover they’d not given me the extra 1Gb I ordered. Very well explained.
Super happy with
inxi -Fx
more accurate than some of the other utilities.. for instance hwinfo was inaccurate for my Lenovo
Thanks for the great post!
Thank you! Your descriptions were useful and well explained!
Источник


